Contribute
Register

jaymonkey

Moderator
Joined
Aug 27, 2011
Messages
4,072
Motherboard
GB Z490 Vision D
CPU
i9-10850K OC @ 5.2 GHz
Graphics
RX6800-XT+UHD630
Mac
  1. MacBook Air
  2. MacBook Pro
  3. Mac Pro
Mobile Phone
  1. iOS
200px_imessage_logo.png


Guide: How to Fix iMessage Version 2.1
OSX & AppleID Configuration

Version 1.0 - Public Release: 30th September 2013
Version 2.0 - Public Release: 25th February 2015
Version 2.1 - Reformatted for new site framework: May 2017 More Info

iMessage Status: GREEN (iMessage is working with self-generated MLB & ROM Values as per-guide)

Check Apple's On-Line Services Status now.

P1LGRIM has created a cut down version of this guide which deals with just the basics to get iMessage working so some users maybe better of trying that guide first. If you still have problems getting iMessage woking then return to this guide for a more detailed break down and debugging hints :-


Welcome ...

My original guide started life as just a few paragraphs on getting iChat running on OS X Lion, back then things were simple and easy. However, as Apple's messaging app and its on-line eco-system has matured over the years, getting this unique messaging system to work correctly on non-Apple hardware has become more and more complex and i've done my best to keep the guide up to date.

In Jan 2015 the guide became totally un-manageable, news, tips, notes, fixes and procedures were all combined in to one massive post .... it wasn't intentional, I just never imagined that it would become such a popular subject and grow so big .... with well over 1 million views the time was right to put some some structure to it all.

I hope you like the improvements, by breaking the guide up into different chapters and re-ordering some of the procedures, new-comers to the guide should be able to find the information they need quicker, use the Index below to quickly navigate to specific sections in the guide, you will find a link at the end of each chapter to return back to the main index.

new-chapter-line-break.png

Guide Index

Chapter
Description
Last Modified

Chapter: 1 Overview & How to use this Guide 18-05-2017
Chapter: 2.1 Pre-requisites (RAID & Fusion Drives) 18-05-2017
Chapter: 2.2 iMessage Tips 18-05-2017
Chapter: 2.3 iMessage Error Codes 18-05-2017
Chapter: 3.1 Apple-ID Verification 19-05-2017
Chapter: 3.2 Network Interfaces (BSD Names) 19-05-2017
Chapter: 3.3 Reset iMessage Configuration files 19-05-2017
Chapter: 3.4 WAN IP Device Quota 19-05-2017
Chapter: 4.1 OS X Serial Number (S/N) 07-10-2019
Chapter: 4.2 OS X SMBIOS & System Type 19-05-2017
Chapter: 4.3 OS X Boot-Loader 19-05-2017
Chapter: 5 SmUUID (SystemID) and the SId Bug 20-05-2017
Chapter: 6.1 NVRAM 22-05-2017
Chapter: 6.2 Reset FileNVRAM 22-05-2017
Chapter: 7.1 MLB & ROM ID Values 23-05-2017
Chapter: 7.2 Using Cloned ID's 23-05-2017
Chapter: 8 Contacting Apple Support 10-05-2020

Credits:

This guide is all my own work and is the result many hours of experimentation, research and writing, however I would not have been able to join all the dots together and create the guide without the help and support of the OS X Hackintosh community on this and other forums ... I have tried to list credit to those that have contributed directly to the guide at appropriate points in the text but there are far too many names to list and thank individually so my thanks goes out to everyone in the OS X community who helped or had input to the guides content.

I hope this guide helps you fix your iMessage problems and more importantly that you gain a better understanding of how Apple's on-line eco and messaging systems work and the importance of configuring OS X and it's System ID's Correctly.

Cheers
Jay


Downloads (attached below)
 

Attachments

  • modules.zip
    39.7 KB · Views: 26,801
  • imessage_debug.zip
    4.5 KB · Views: 37,551
  • NVFileRAM (V1.1.2 & 1.1.3).zip
    79.6 KB · Views: 17,336
  • iMessageDebugv2.zip
    5.9 KB · Views: 80,950
Last edited:

How to Fix iMessage

News & Updates


May-2017: I have reformatted the entire guide so that it now works with the major update to the website's framework that was implemented by TonyMac and the gang last year. Sorry that its taken so long ... its something that i've been meaning to do for a while now but finding the time to do it has been difficult.

Unfortunately since the new framework does not allow the use of icon's for text anchors within tables, some of the guides navigation shortcuts have had to be removed.

For newcomers to the guide please be aware that this guide was written quite a few years ago as such it contains methods for working with legacy boot-loaders which have all but been replaced with Clover. Much of the information in the guide is still very relevant to clover but you may have to filter any legacy boot loader references in some places where not i have not written Clover specific instructions.

If there is demand i'll try and find time to update those sections of the guide in the future.

Cheers
Jay

End of News - Return to Index
 
Last edited:

How to Fix iMessage

Chapter: 1 - Overview & How use this Guide

iMessage - Apple's cross-device, instant messaging system built into OS X (and IOS) is quite possibly the most finicky software element to get working correctly when OS X is running on non-Apple hardware.
iMessage-Error.png
There are many different factors that can effect iMessage and stop it from working, the majority of these can be fixed by ensuring your OS X System (& Apple ID) are set up and configured correctly. The object of this guide is to take you through diagnosing which of the many possible issues are stopping iMessage from working on your system and explain what you need to do to fix it.

It is best to think of this guide as a 'Tool Box' rather than a step by step guide, although i have tried to put the guide into a logical order, solving iMessage can be a real nightmare but armed with the knowledge contained in this guide you should be able to resolve most iMessage issues, I apologise for the length of the guide, however as you will find .... there is a lot to cover.

I would suggest that you read through the entire guide first and digest each of the chapters before making any changes to your system. I have tried to explain the reasons behind each issue and the appropriate solution. I believe that its important to learn and understand how things work, anybody can upload a file and tell you what to do with it but nobody learns from that, some steps of the guide are critical, others are optional - this is made clear at each step of the guide.

Before you start I recommend that you make sure you've got an up-to-date TM or CCC backup, there is nothing in this guide that should cause any problems, all the steps are relatively straight forward and easy to apply, just take your time and be sure to follow the instructions carefully ... read all the notes.

I am not responsible for any damage or loss of data you may incur by using the information in this guide.

Additional information & Tips

Although rare, some issues such as the ROM value always returning zero's have been resolved by a number of users by updating their BIOS. Whilst updating the BIOS has never resolved any iMessage issues for myself it does seem to have helped a few people on this thread/forum so it's worth considering if your continuously having problems and the guide does not seem to be working for you.

Warning: You should only update the BIOS if your sure about what your doing .... if you are using a DSDT with your boot-loader then updating the BIOS may break your DSDT's system compatibility. Ideally after updating the BIOS you should extract a new native DSDT and re-patch.

Sometimes it is necessary to try some of the procedures in the guide more than once, iMessage is very very fussy, so much so that sometimes the order of the things you do can effect the out-come, the order given is the guide is a logical one for a system that has just had OS X installed with no prior knowledge of iMessage fixes.

If you continue to have issues, try searching through the posts in this thread - its possible that someone has already found a solution to your issue, one suggestion that keeps coming up is to use a genuine Mac to re-initialise the effected AppleID, although I can not personally confirm this suggestion, it does seem to have helped others but like so many tips out there it could also be coincidence as this also works when using another Hackingtosh to re-initialise an AppleID.

Finally I'll end this chapter by reminding you that Apple are constantly evolving and updating their on-line eco and message systems with new features and security measures, as such do not be surprised if we see new and even stranger issues with iMessage in the future. If you think you've encountered a new iMessage issue please post to this thread with as much info as you can, including screen shots of any alerts and/or console log snippets and i'll try to help.

Thanks for reading & Good Luck.
Cheers
Jay
End of Chapter 1 - Return to Index
 
Last edited:
  • Like
Reactions: aol

How to Fix iMessage

Chapter: 2.1 - Pre-requisites for RAID & Fusion drives

If your using Chameleon or Chimera as your boot loader and you boot OS X from a software RAID or Fusion drive then there is an added complication, systems booting via Clover are not effected so you can skip this section.

To negate this complication you must clone your RAID volume to a standalone HDD using Carbon Copy Cloner or similar utility, install Chimera or Chameleon boot-loader and modify the chameleon plist in /Extra so that you can boot OS X from this non RAID clone (be sure to remove Kernel Cache=Yes and the RAID uuid from the boot flags). Once booted from the clone HDD, apply the necessary steps from the guide to get iMessage working.

When your happy that everything is working ok, take a deep breath and delete your existing RAID set, it's also worth erasing the two RAID member drives just so you know that everything is fresh and makes for a good opportunity to update your boot loader, then re-create your RAID so a new RAID uuid is generated,

Now clone the standalone HDD back to the new RAID set, make the RAID bootable by installing the boot loader via the command line method to each of the RAID helper partitions and copy the entire /Extra folder to the two RAID helper partitions, be sure to edit the chameleon plist so that it boots using the new RAID uuid and Kernel Cache=Yes.

It sounds a pain and it is, it's time consuming and carries a certain amount of risk but all OS X software RAID users should be familiar with this method as its how most of us get our RAID's woking in the first place, so if you think of it along those lines it wont seem quite so daunting, just be sure to cover yourself with multiple backups if possible.

Warning: If you don't understand the above then please stop now, do some research and make yourself familiar with the way a OS X RAID is created and made bootable on a Hackingtosh system, you can use this guide as a starting point.

August 2014: Anyone running a Raid or Fusion drive should seriously think about changing to Clover for their boot loader as it resolves all of the above problems. On my GA-Z77X-UD5H which uses two 128GB SATA-III SSD's for the OS X startup drive, I found an old 16GB mSATA SSD which I fitted to the motherboards mSATA port (SATA05). I installed Clover on to that and set it as the UEFI Boot drive. Once Clover was configured I am was to boot OS X up from the Raid without having to use helper partitions .. etc. I've added many tips to the guide to cover each issue for Clover Users.

Background Info: If you boot OS X from a software RAID then it causes a major headache for FileNVRAM ... since a software RAID volume can only be read & written to once the kernel is up and running, the boot-loader and /Extra folder must reside on the RAID helper partition(s) which are accessible to the hardware outside of OS X, however these helper partitions are unmounted once OS X has finished booting, thus FileNVRAM is unable to access the /Extra folder which means that the contents of nvram.uuid.plist can not be updated which can eventually cause the FileNVRAM service to hang.

You can use the RAID clone method detailed above to get iMessage working initially but if you ever get logged out of iMessage for any reason then you will need to repeat the clone procedure again so that the NVRAM cache, nvram.uuid.plist and the iMessage plists can be updated with new keys and data.

End of Chapter 2.1 - Return to Index

new-chapter-line-break.png

Chapter: 2.2 - Useful iMessage Tips

Tip-1: Clover Migration Preparation


If you are migrating from a legacy boot-loader to Clover, please reuse all your existing ID's from your Mavericks install (assuming iMessage was working OK)

This includes all of the following :-
  • SMUUID (SystemId)
  • OSX S/N
  • MLB
  • ROM
You can get these from your old build using iMessage Debug V2.

Failure to do this will result in a new device being logged with Apple and you will not be able to access iMessage, please make sure that you put the SystemID UUID in the SMUUID field on the SMBIOS page, do not put it in the Custom UUID field on the System Parameters page but do ensue that 'Inject System ID' is checked.

Before trying iMessage run iMessage Debug and ensure that all your ID's match your previous Mavericks build including the Hardware (platform) UUID, if all ok try iMessage and it should work. If ANY ID's are not the same or are changing on each boot then resolve the issues before trying iMessage or Contacting Apple to Unlock AppleID/Device.

Do not confuse the SmUUID (systemId) with the Hardware (Platform) UUID on your old build, you should only need to add the SmUUID to Clover's config.plist, then OS X should automatically generate the same Hardware UUID as before.

Tip-2: Contact Apple with Customer Code Alert


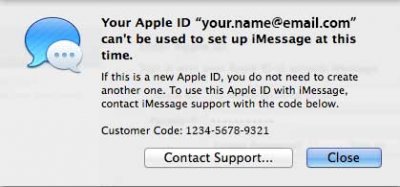
If you get a iMessage alert asking you to contact Apple with a customer code there is nothing you can do locally to resolve the issue, the customer code must be applied to your AppleID to unlock iMessage on your device, this can only be done by Apple (this will not effect any mobile devices ability to send/receive messages such as iPhone, iPad .. etc)

appleid-cant-be-used.jpg

The above message is explained in further detail in Chapter 8 of this guide.​

If this is the first time you have seen this message then I suggest that you check ALL your ID's to ensure they are the correct syntax and are persistent on each boot. Many installs allow the ROM & MLB values to change on each boot or have a miss-matched System Type and/or S/N. If this happens then you will continue you get this message.

This guide covers the necessary checks and provides some possible solutions, I recommend that you read the entire guide at least once as you will learn a lot about debugging iMessage, as a very minimum if you are getting the above alert then I suggest working through the following check list:-
  • Check if you have the SId bug, if so fix it - Chapter 4.1
  • Check your S/N is correct for the System Type you are using - Chapter 5
  • Check for persistent MLB & ROM values - Chapter 7.1
  • Reset FileNVRAM and iMessage Configuration - Chapter 3.3
Once your ready to contact Apple use the method described in Chapter 8 of the guide which should get you through to correct support department without them asking you too many questions.

!! Only contact Apple if you get the above message with a Customer Code !!

If you are getting generic login or authentication alerts then use the guide to resolve the rest of your issues, at some point you should start getting the above alert in which case iMessage is now communicating with Apples systems and you must contact Apple to remove the device/AppleID lockout and/or your white-listed MLB & ROM values.

If you are getting Error 31 and have called Apple Multiple times with a customer code and they remove the block but you still continue to get Error 31 the chances are the Apple validation servers simply just don't like your values. Error 31 (See the Error codes below) means there has been an error in validating your MLB or ROM id on the Apple servers resulting in no security token being sent back to your machine which causes OSX to disable the iMessage service.

If you attempt to connect to Apples iM servers more than a few times with the same invalid ROM/MLB then the id's will be automatically blacklisted, Apple help desk wont be able to help and unless they are top tier almost all help desk representatives will not have access to the black list databases ... so they will not be able to tell you that some or all of your ID's are black listed or teh reason why.

The only fix .. as i've told countless people .. countless times is to completely change the identity of your system .. You need to do the following :-

1. Logout from ALL Apple iCloud services.
2. From windows (or anther mac) log into iCloud web site and remove the offending device (in settings)
3. Disable network (unplug ethernet or turn off wifi)
4. Reset all IM configuration plists
5. Reset Network Configuration & Check BSD names
6. Create the following new id's for your hack .. (you can use clover's generator these days)
  • New SMUUID (which will automatically cause OSX to generate a new platform UUID)
  • New Serial Number (make sure it's correct for the SMBIOS your using and valid but unregistered)
  • New ROM and MLB (do not use MAC address for ROM .. Apple blocks some MAC address prefix's automatically)
Do not enable network in OSX until you check the following

7. Check and recheck the new id's are correct and as close to what they would be for a real mac (use the guide)
8. Do not assume that clovers generated id's are correct .. sometimes it gets things wrong
9. Ensure your iCloud account is verified

Once your 100% happy with the new identity enable the network, cross your fingers and give it a go.

If you've done everything right then there is no reason why it should not work ... but if you do get an error turn off the network ASAP and check all id's again .. don't not keep trying ... if you do it will get blocked (again)

As a last resort try creating a new user account (admin) on you hack, associate your icloud account and try it again ... this can sometimes get things working ..

Tip-3: Check the status of Apples iCloud Services

Sometimes iMessage problems are caused by issues with Apples iCloud servers, you can check the status of all Apples on-line services at anytime using this support page:-

http://www.apple.com/support/systemstatus/

Another source of checking on-line service outages is via Down Detector :-

For USA use this link:-
http://downdetector.com/status/imessage

For UK use this link:
http://downdetector.co.uk/status/imessage

(for other countries use either of the two links and click on the appropriate country flag on the right)

Tip-4: Problems with Macpro 6,X (Trash-Can-Mac-Pro) - Theory

I've always avoided using mac pro 6,X SMBIOS ... for all my desktop builds i use a iMac SMBIOS which use desktop CPU's rather than enterprise .... Intel Xeon CPU's contain Vpro architecture which has an additional layer of security embedded in the CPU itself (kind of like SMUUID but specific to the CPU rather than the motherboard). its possible that Apple use some of that embedded security in their validation on the Trash-Can mac's ... it's just a theory at the moment but a sound one ... I don't think there is any real reason to use 6.X so try a iMac SMBIOS ... I've set up countless hacks using iMac SMBIOS on all sorts of PC hardware and never had an issue with iMessage/FT.

If you really must use Macpro 6,X SMVIOS you could try posting in one of the build threads and ask if anyone using Macpro 6,X has had any luck with IM .. but unless your using a Xeon CPU .. it might be a dead end ....

End of Chapter 2.2 - Return to Index

new-chapter-line-break.png

Chapter: 2.3 - iMessage Error Codes

If you are receiving a generic sign-in or authentication error message such as the one below :-
iMessage-Error.png
Then you may be able to gain a better understanding of what is wrong by checking your OS X system log for iMessage related errors, simply open the 'Console' app and use the search/filter facility to check for 'iMessage' related events.

Check the filtered results ... there are far too many variants of iMessage related log entries to list individually but most will contain an error code .... the following list details what each error code means and the end result (usually Disabling service) this information may help you in debugging your iMessage issue and give an indication of which area you need to address .

List of Error Codes

Error No.
Type
Description
Result
0 [Warning] Failed unknown error Disabling service
1 [Warning] Failed no error Disabling service
2 [Warning] Failed registration cancelled Disabling service
3 [Warning] Failed not supported Disabling service
4 [Warning] Failed denied by user Disabling service
5 [Warning] Failed delivered too many sms Disabling service
6 [Warning] Failed too many sms delivery failures Disabling service
7 [Warning] Failed garbage signature Disabling service
8 [Warning] Failed garbage phone number Disabling service
9 [Warning] Failed server not found Disabling service
10 [Warning] Failed server not available Disabling service
11 [Warning] Failed server error Disabling service
12 [Warning] Failed new signature required Disabling service
13 [Warning] Failed bad signature Disabling service
14 [Warning] Failed bad push token Disabling service
15 [Warning] Failed no device id Disabling service
16 [Warning] Failed no push token Disabling service
17 [Warning] Failed empty result code Disabling service
18 [Warning] Failed invalid login Disabling service
19 [Warning] Failed invalid password Disabling service
20 [Warning] Failed login failed Disabling service
21 [Warning] Failed account update needed Disabling service
22 [Warning] Failed new password needed Disabling service
23 [Warning] Failed permanently blocked Disabling service
24 [Warning] Failed temporarily blocked Disabling service
25 [Warning] Failed unconfirmed alias Disabling service
26 [Warning] Failed alias legacy or not active Disabling service
27 [Warning] Failed alias not available Disabling service
28 [Warning] Failed alias in use Disabling service
29 [Warning] Failed not authorised Disabling service
30 [Warning] Failed bad invitation context Disabling service
31 [Warning] Failed abs in the error (MLB/ROM) Disabling service
32 [Warning] Failed rate limit error Disabling service
33 [Warning] Failed server registration unsupported Disabling service
34 [Warning] Failed no alias set Disabling service

Many thanks to Pike R. Alpha for providing the above list of error codes and descriptions.

End of Chapter 2.3 - Return to Index
 
Last edited:

How to Fix iMessage

Chapter: 3.1 - Apple ID Verification

All of Apples iCloud services including iMessage rely heavily on a correctly set up and registered AppleID, there are three different types of AppleID :-
  • Basic
  • Pro
  • Developer
It doesn't matter what type of account you have or if your AppleID is registered as @me.com, @mac.com, @icloud.com or a non-Apple email address, if your going to use it with iMessage it must be verified.

You can check the 'Verified' status of your AppleID by logging into Apple's on-line Account manager :-

Apple-id-verify.jpg

In order for your AppleID to have a 'Verified' status you must have an authenticated payment method registered against your account which will confirm/validate your name and address, the main reason behind this is to stop people from creating false AppleID's and using them to send spam and cause general chaos in the iCloud .... the easiest payment method is to register a valid Credit Card.

The most secure way to register a payment method against your AppleID is through iTunes or the App Store, do not use a web address in a browser, there have been several reports of fake AppleID phishing sites, most of these scams work via fake emails that contain a rouge link to a fake AppleID log-in page, the email usually asks you to confirm or update your AppleID, don't be fooled even if the address looks like it might reside on legit server.

Note: Some users have reported success at using their PayPal Account as a means of AppleID Verification. I personally can not confirm this but there are quite a few positive posts on this thread that indicate that it works.

For veteran OS X users its possible that you have an old AppleID (@mac.com ..etc) which you haven't used for a while, but if it has a credit card registered against it that is still current then you could try using it to test iMessage.

If your AppleID already has a Verified status but you are still experiencing issues with iMessage login or authentication, you could try changing your AppleID password, this is one of the oldest tricks in the book for resolving iMessage login issues. It has also been reported that sometimes updating your account details (address ..etc) or purchasing something from the AppStore or iTunes (even a free item) can also revive iMessage functionality.

Do not be tempted to remove your credit card info once your account is verified, iMessage will stop working at some point if you do.

You should also be aware that once the credit card expires on your AppleID, you are given a grace period which seems to be around 30 days to register a new one. If you do not register a new, valid credit card within the grace period, iMessage will stop working.

Update: Feb 2015 - Apple have now enabled Two Factor Authentication for iMessage, at the time of writing it is not a requirement to have 2FA on your iMessage account but some users have reported that they were unable to use iMessage until they enabled 2FA .... its possible that by enabling 2FA resets some flags against your AppleID in the iMessage database - any feedback on this tip would be appreciated.

Chapter 3.1 Summary: Your Apple ID must have a Verified status for iMessage and Face-Time to work
End of Chapter 3.1 - Return to Index

new-chapter-line-break.png

Chapter: 3.2 - Network Interfaces (BSD Names)

Open 'System Information' [About this MAC -> More Info -> System Report] and click on 'Ethernet Cards' , you should see a list of installed NIC's on your system, for each NIC you will see a list of parameters such as Type, Bus, VendorID, DeviceID ... etc

Look at the parameter called 'BSD name' for each of your network interfaces, they should be called 'en0', 'en1' ... etc
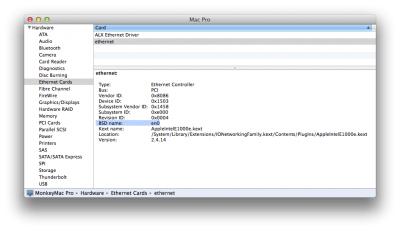
NICs-BSD-names.png
BSD names should always start with 'en0' and be numbered sequentially for the number of NIC's in your system, any additional NIC's such as USB or WiFi devices should have BCD names that follow the on-board or PCI devices.

Example:

A Gigabyte GA-Z77-UD5H motherboard's has two built-in LAN ports (Intel and Atherios). In this example the user can access the internet and email on both ports but can not use any Apple on-line services such as iMessage, iCloud, App Store and iTunes (on either port).

On investigating the BSD names I found that the Intel port was named 'en2' and the Atherios port was 'en1', there was no 'en0' .... how this occurred during OS X install i'm not sure ? but I've seen this happen more than once on different systems.

If you find that you have no 'en0' or have 'gaps' in the BSD Name number sequence or things just don't seem correct with your network hardware/software then the first thing you could try is re-setting the Network configuration ...

Re-setting OSX's Network and System configuration.

Using Finder navigate to the root of the system drive and then to :-

Code:
/Library/Preferences/

Note: You may need to use show all files or press <SHIFT><CMD>. to see these folders/files

First make a backup copy of the folder :-

SystemConfiguration


Save it somewhere in your user folder such as Documents/Sys-Backup just in case something goes wrong.
Once you have a backup delete the original SystemConfiguration folder in /Library/Preferences/

Empty the trash and reboot.

OS X should re-discover all your Network Interfaces and rebuild the network configuration files, hopefully now with the correct BSD names. If the BSD names are still not correct and you have additional add-on PCI or USB NIC's then try removing them and delete the SystemConfiguration folder again, reboot and let OS X assign the 'built-in' NIC's first, then re-install your add-on NIC's one by one.

This method has good chance of working .... if not then a re-install usually does the job.

You'll know if this particular issue is resolved once you can use some iCloud service such as the App Store and Software updates however iMessage may still not work....

Note: Its also a good habit to delete the SystemConfiguration folder if you have changed your SMBIOS type or any of the key system ID's such as MLB, ROM, S/N in your clover config.plsit file as MacOS keep copies of previous configuration 'sets' in these files which will show up as extra devices in Sys-Prefs->iCloud->Account Details->Devices which you will be unable to remove until you rebuild the Configuration Files.

It's always worth checking your BSD names first-thing after a OS X install, or after you've added or removed any NIC's. If all your Network Interface's have good BSD names then it time to check if they are flagged as 'Built-In' - for this task I recommend using DPCIManager 1.5, which you can download from here:-

http://sourceforge.net/projects/dpcimanager/files/

Once installed run it and make sure your on the 'Status' tab, at the top of the page will be a list of all your network interfaces along with their BSD names, as explained above, the BSD names should start at 'en0' and be numbered sequentially with no 'gaps', additionally the 'Builtin' check box next to each interface must be checked in-order for iMessage to work on that interface.

DPCIManager Status.png
If the 'built-in' check box is not checked you should make sure you have the following key and string in your boot.chameleon.org.plist (if using Chimera or Chameleon):-

Code:
<key>EthernetBuiltIn</key>
    <string>Yes</string>
If you do have this key and string in your plist but the 'Built-in' check box is not ticked then click on the 'eye' icon for the appropriate interface (at the right hand side of each entry), you should be given an 'EFI string' that you can add to your boot.chameleon.org.plist in /Extra, this string is required by OS X for correct iMessage operation, for most users the Boot-Loader will identify the correct EFI string and automatically inject it, however in some rare instances this does not work in which case you should manually inject the NIC(s) EFI string(s) identified by DPCIManager.
Ethernet EFI String.png
Clover users can manually add the EFI String by editing their config.plist or use Clover Configurator and add the EFI string on the devices page.

If it does not work straight away, you may have to try one or two of the other steps in the guide such as deleting all previous iMessage setup data (See Chapter 3.3 below), reset AppleID password, delete nvram.uuid.plist in /extra ... etc.

All of my hackingtosh builds have 'en0' and 'en1' for the on-board ethernet NIC's, if you have Ethernet and WiFi like my trusty Sony Vaio-SE2 laptop hackingtosh, the Ethernet port should be assigned to 'en0' and the WiFi should be 'en1' (see above DPCIManager 'Status' screen grab).

If your working on a new build or clean install then I recommend you get everything working via a wired network interface first then add/enable the WiFi interface. If you jump straight to the WiFi interface you may experience odd BSD NIC naming.

INFO: There is a bit more information on the issue with BSD names and a possible way to avoid the problem in the future here.

Chapter 3.2 Summary: NIC BSD names should be 'en0', 'en1' ... etc and numbered sequentially with no gaps.
End of Chapter 3.2 - Return to Index

new-chapter-line-break.png

Chapter: 3.3 - Reset iMessage Configuration files

If you are starting with a clean OS X install then there is no need for you to perform any of the procedures in this chapter .... however if you have been trying to get iMessage to work for sometime and have been using different System ID's and/or Apple_ID's then the chances are that the iMessage configuration and cache files could contain invalid or non-useful data.

Another sign of corruption of the configuration files is if OS X asks you for your AppleID password multiple times each time you boot OS X .. this indicates that one or more of the background services are using a temporary configuration file as the system one is corrupted.

By deleting these files we can force iMessage to reset-itself and re-build the configuration files which will force iMessage to re-authenticate it-self with Apples iMessage servers. I always recommend performing this procedure after making any significant changes to OS X's System ID's such as the S/N, SmUUD (System_Id), System Type, MLB & ROM.

If your booting with Chameleon or Chimera then i also recommend that you reset your FileNVRAM.plist by following the procedure in Chapter 6.2 after performing the following.

Before commencing you should logout of all Apple iCloud services and disconnect from your network, then reboot this way OSX will not start the iCloud services and allow us to remove the config files.

In order to actually delete the files you will need the ‘Show all Files’ utility or similar for displaying hidden files and folders ... you can download 'Show all Files' form the community section of this site.

Start ‘Show all Files’ and select 'Show' ..... start-up Finder and navigate to:-

Code:
/StartupDrive/Users/~Username/Library/Caches
Delete all files and folders beginning with the following prefixes:-
  • com.apple.iCloudHelper
  • com.apple.Messages
  • com.apple.imfoundation.IMRemoteURLConnectionAgent
Now navigate to:-

Code:
/StartupDrive/Users/~Username/Library/Preferences
Delete all files and folders beginning with the following prefixes:-
  • com.apple.iChat.
  • com.apple.icloud.
  • com.apple.imagent.
  • com.apple.imessage.
  • com.apple.imservice.
  • com.apple.ids.service
And these two files :-
  • com.apple.madrid.plist
  • com.apple.imessage.bag.plist.
(Optional) delete the message folder:-

Code:
/StartupDrive/Users/~Username/Library/Messages
Note: The above folder is your local message store, you may want to make a backup of this folder before removing it .... most of your recent conversations (contacts & messages) should be recovered and re-synced from your iCloud account once iMessage is working correctly, this can sometimes take a while so be patient. It is not always a requirement to delete this folder to get iMessage working, try without removing it first if you want, if you continue to have issue try deleting it and empty the trash.

After performing any of the above deletions ensure you empty the trash before rebooting. You may find that it is impossible to delete all of the cached files via the OS X GUI due to services automatically restarting .... if you really want to persist and remove all trace of the files you can boot into OS X Single User mode :-
  • Legacy Boot-Loader users should boot OS X with the '-x' flag
  • Clover users can simply press the <Space> bar on the OS X boot entry and select Single User mode.
To Empty the trash from the command line enter the following commands:-

Code:
/sbin/fsck -fy
/sbin/mount -uw /
sudo rm -rf ˜/.Trash/
Performing the above procedures either individual or all together has been confirmed to help in resolving multiple iMessage issues, removal of these plists should not cause any additional side effects .... however as with all things Hackingtosh it's always worth ensuring you have a up-to-date backup before you start deleting anything.

Resetting the Security Service settings :-

Around the 8th or 9th of August 2014 a 'glitch' in Apples backend servers logged many iMessage users out and found they were unable to reactivate iMessage despite following all the tips in the guide, the following procedure fixed the issue for myself :-

With 'Show all Files' enabled navigate to:-

Code:
/StartupDrive/Users/~Username/Library/Preferences
Delete all files beginning with the following prefixes:-
  • com.apple.identityserviced
  • com.apple.ids.service
  • com.apple.security.
This procedure may help with future persistent iMessage sign-in/authentication issues related to the security service .... if you do this make sure you perform all of the above deletions too.

You'll probably find that you are unable to delete some of the files because they are being accessed by the associated services .... in this case, open Activity Monitor and try killing the following services :-
  • identityserviced
  • imagent
  • securityd
  • securityd_service
Try deleting the files again (you may have to do this a few times before it works) .... try and empty the trash before re-booting .... you may find it necessary to boot OS X in Single Use mode and delete the files and empty the trash using terminal commands (see above).

IMPORTANT: After performing any of the above file and/or folder deletions, be sure to Repair Permissions via Disk Utility, reboot and check iMessage functionality.

Reset iCloud KeyChain :-

If you are using the option to store your KeyChain data in your iCloud account and are continuing to have iMessage authentication issues then in some rare cases, it is possible that the keychain data in the cloud is out of sync with the locally stored keychain data.

Although i have never personally encountered this issue, a number of users have reported that resetting/removing keychain data from their iCloud account allowed them to get iMessage working. The most likely cause of this is if you have had a number 'ghost' devices associated with your AppleID caused by multiple changes of MLB and/or ROM.

Personally i don't like the idea of storing all my passwords on Apples servers and i'm not a fan of the 'tracking' features of iCloud so i disable them on all my hacks in System Prefs (System Prefs --> iCloud) which could be why i've never encountered the problem.

iCloud Options.png
More information about this can be found by reading this Apple FAQ, the procedure for resetting/removing iCloud Keychain data on OSX and IOS devices can be found at the bottom of that page.

Reseting IOS 8 Network Configuration :-

If you are using iMessage in-conjunction with a IOS 8 mobile device(s) then after performing a Network and iMessage reset on OS X as detailed above, you may also need to reset the network configuration on your IOS 8 device(s) .... this is due to a known bug in IOS 8, IOS 7 does not seem to suffer this issue.
  • Log out of iMessage and Face-Time on all IOS and OS X Device(s).
  • Turn off WiFi on your IOS Device(s).
  • On IOS Device go into Settings -> General -> Reset -> Reset Network Settings.
  • The IOS Device will turn it-self off and back on again.
  • Once IOS Device reboots, it may ask for your Wi-Fi and/or Apple ID Password.
  • Start iMessage on your IOS device(s) and turn it on, wait for verification.
  • Once verified turn on iMessage on your OS X Devices.
  • You should receive 'This Phone is in use with <Computer Name> notification.
  • You should get a verification code to complete the coupling of IOS device(s) with OS X.
To see if the reset has been successful, send yourself a test message ... it should appear on all your OS X & IOS Devices, thank's to @esafeddie for this IOS 8 tip.

End of Chapter 3.3 - Return to Index

new-chapter-line-break.png

Chapter: 3.4 - WAN IP Device Quota

Symptom: You are getting the contact Apple alert with a Customer Code every time you start iMessage, the customer code is the same each time you boot and your are 100% certain that all your critical ID's are correct and persistent. You've already contacted Apple (maybe multiple times) who tell that iMessage should work, but it still gives the same customer code.

appleid-cant-be-used.jpg
NOTE: The wording of the alert may be different to the above

Cause: It's possible that the Apple on-line servers have logged too many different Apple devices and/or IP addresses against your routers WAN IP address. I know this sounds a bit of an odd thing for Apple to do but its does seem to be the case in some situations.

I repair a lot of Mac systems so i have quite a high flow of Apple machines and devices going through my network, Apple introduced this IP quota check quite a few years a-go and according to the Apple Tech I spoke to was the original reason for the Contact Apple with customer code message.

The point here is that if you have had non-persistent NVRAM values on your hackingtosh at some point in the past, then its possible that the S/N, MLB, ROM ... etc will get logged as a 'Ghost Devices' just like if it was a real device. You can sometimes (but not always) see these 'Ghost Devices' in the 'My Devices' section of Apples on-line iCloud system by clicking on 'Settings'.

After a certain number of individual devices (or miss-matched ID's) have been registered or associated with your WAN IP then Apple systems can in some situations consider that IP address as a possible cyber threat (think hackers and spammers doing lots of naughty stuff) and flag the device/account with a block so that no more devices can access Apples messaging systems from that Internet IP Address.

If your ISP provides you with a WAN IP via DHCP from a pool of addresses (most do) then you'll most likely never see this issue as its quite likely your router will have changed it's WAN IP at some point over the last three months, be it after a power cut, reboot, firmware update .. etc.

Once your router's WAN IP has been changed, the WAN IP Quota will also be reset ...

However if like me you have a static IP for your router or you know for a fact that your routers DHCP IP address has been the same for a very long time, then it's possible that your being blocked by Apples systems for having a high volume of devices associated to your WAN IP.

Solution: There are three ways I know the problem can be dealt with:-

1. If your router gets its WAN IP via DHCP (automatically assigned IP address) then the best thing to do is to force an DHCP refresh by simply turning off your router for as long as you can.

Before you start make a note of what your current WAN IP is by visiting :-

http://www.whatsmyip.org/

Now turn off your router, preferably overnight, the longer the better as there will be more chance that your ISP's DHCP server will reallocate your old WAN IP to someone else.

When you turn everything back on you should visit the link again and see if your routers WAN IP has changed, if it has then I suggest resetting the iMessage configuration files as detailed in the previous chapter then reboot and try iMessage again, hopefully it will now work.

2. If your ISP assigns your router with a Static WAN IP then you could try contacting your ISP and ask them to 'rotate' you to new WAN IP, it a normal thing to request (you could tell them that you've been under a hacker attack or something like that) your ISP Should be able to do it within 24 hours if you have the WAN IP registered with a DDHC service then you may have to manually update via the appropriate web UI.

3. Contact Apple Support and give them the customer code but explain that you think its a WAN IP problem ... not many Apple Tech's i've spoken too know about this issue so you may need to ask to speak to a iMessage expert and tell them you think you got a WAN IP Quota issue.

I first detailed this issue a long time ago at the end of the original guide (now Chapter 8 - 'What causes this Message') but i didn't do a very good job of describing the problem or describing the solution very well and since then the contact Apple message with a customer code has primarily become associated with iMessage authentication issues (bad MLB/ROM ... etc).

I should point out that despite this issue sounding a little-far-fetched, i learned of it first hand from a Apple tech guy .... make of it what you want but in my case he reset my WAN IP Quota and it solved my iMessage issues, additionally i can confirm that the method of forcing a WAN IP change by powering off your router for as long as possible has worked for a number of users on the forum.

End of Chapter 3.4 - Return to Index
 
Last edited:

How to Fix iMessage

Chapter: 4.1 - OS X Serial Number

It is important that you have a unique OSX Serial Number (S/N). Under no circumstances should you use someone else's OSX S/N it isn't necessary and doing so can cause a miss-match with your System Type and lead to security and authentication issues.

Important: Try to keep the number of times you change the OSX S/N to an absolute minimum as Apple will detect the change against your devices UUID, if done too many times Apple may block your device's UUID against your AppleID (See Chapter-5 of the guide for more details on this, you can override your SystemId (UUID) by means of the SId Bug fix). While resolving some iMessage issues like BCD names and fixing ID's I recommend going off line that way you avoid Apple's servers detecting any changes which could be flagged as a miss-matches.

Note: Changing your OSX S/N can cause certain user profile settings being reset such as BT Mouse settings and Launchpad layout, additionally some registered applications that use the S/N as part of its licensing system may also be affected and may need to be re-registered.

Anatomy of OSX S/N

The OSX S/N on MAC's manufactured after 2010 is normally 12 Digits long and can be broken up thus:

AA B CC DDD EEEE

AA = Manufacturing Country/Facility - 2 digit - alpha numeric
B = Generation Usually 2 - early MAC's such as Mac Pro 3,1 do not have this digit so S/N is 11 digits long
CC = Year and Week of manufacture as code - 2 digit - alpha-numeric
DDD = Unique Number - 3 digit - alpha-numeric
EEE = Suffix = Specific Model & Year/Type - 4 digit - alpha-numeric

The Prefix (AA) specifies the production facility were the MAC was made, getting this information is proving difficult but here is a list of confirmed country codes known so far ...

QP : USA
G8 : USA
CK : Ireland
C0 : Taiwan (Quanta Computers)
YM : China
W8 : China
RM : Re-manufactured Model

Most OSX S/N generators such as Chameleon Wizard and Clover's 'Magic Wand' will set the prefix to either 'CK' or 'CO' as these locations manufacture and repair many types os Apple Devices where as some of the other plants only produce 1 or 2 models.

The Suffix (DDDD) consists of four digits depending on the model type and year it was made - pikeralpha maintains lists that you can use to check your OSX S/N suffix is correct for the model type your trying to emulate. It should be noted that it's not a complete list and only covers Apple hardware made in the last six years.

OSX S/N Suffix - F000-FZZZ
OSX S/N Suffix - G000-GZZZ
OSX S/N Suffix - H000-HZZZ

Also note that for most Mac's there are multiple entries for each year and model type, these are generally for the different configurations available for each model/year such as CPU/GPU/Memory ...etc follow the link against each suffix to confirm the exact specification. Some OSX features are only available on certain models/year so this may be an important factor in getting all of OSX features working correctly.

You should try to ensure that your S/N prefix and suffix is correct for the model type your using. I generally only use iMac 13,1 or 14,2 depending Intel Chipset and CPU type. As of late Oct 2014 - I have a theory that its possible that Apple are now checking the manufacturing country code (S/N Prefix) against the model type identifier ....

Example: MacPro 6,1 with a S/N starting with C0 or CK would be invalid as the new Mac Pro is only manufactured in Austin TX, USA so could never have a S/N prefix of C0 (Taiwan) or CK (Cork - Ireland) ... this is purely a theory at the moment but could explain what why some users are having trouble especially those using MacPro 6,1... I am investigating this trail of thought further and will update the guide soon.

I suspect many users are manually editing the SMBIOS.plist or Clover's config.plist and changing the System Type without realising the importance of the prefix or suffix in the S/N thus causing a S/N - System-Type miss-match.

Make sure your S/N is correctly formatted

Open the following URL in a browser :-

http://www.everymac.com/ultimate-mac-lookup/

Copy and Paste your Serial Number into the box and click Lookup
Complete the Captcha to prove that you are not a web-bot.

If you get the message "No Results where found" then the S/N is not formatted correctly or is invalid and thus should not be used and you should generate another one.

If you get a summary page detailing the Mac Model type and specifics that matches the SMBIOS that your using then the S/N is correctly formatted :-

 everymac-ok.png

Check that the S/N is not already registered with Apple

You can do this by using Apple's Check Service Coverage website which can be accessed at the following URL:-

https://checkcoverage.apple.com/

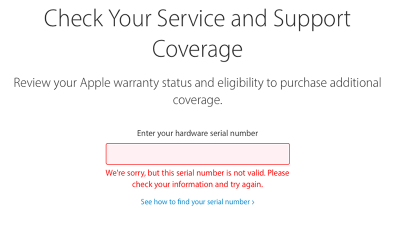
Simply copy and paste your OSX S/N into the form and enter the Captcha code then click on continue, if your S/N passes the validation checks and the S/N is not already registered to a genuine Apple Mac system then site will return with the following message:-

"We're sorry, but this serial number is not valid. Please check your information and try again"


SN-OK.png

This is good and is the only message you really want to see ..... it means your OSX S/N does not match an existing Mac's S/N but it does pass all of Apples S/N validation checks, this is also useful when calling Apple support as the S/N will appear valid but will not show up on their systems .. in-most cases making them think the issue is with their registration database and not your OSX S/N.

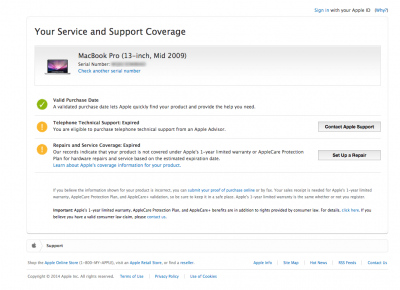
If the site returns with a summary of the device and a page detailing the current warranty status then it means that the S/N is already registered and assigned to anther machine:-

Selfsolve-ok.png
This is bad, using someone else's OSX S/N is not a good idea, if you own the MAC and I don't use it with any of Apple's on-line services then I guess its not so bad but I still don't recommended it.

Its very easy for Apple's systems to detect that more than one machine is using the same S/N and/or other critical ID's such as ROM, MLB .. etc at the same time which may cause security authentication issues and you may be locked out using iMessage on all of your other devices or worse your AppleID could be deactivated.

There have been a number of post's on this thread from users who it would seem have black-listed their own real Mac OSX S/N by cloning it across multiple hackingtosh machines. I can't personally confirm this but i have no reason to doubt those reports .... it would make sense given the heightened security Apple seems to apply to iMessage compared to all of its other online-services.

If you get any other message then the S/N is either black-listed or failing the OSX S/N validation checks, do not use it - generate new S/N and try again, remember to test it first on Everymac as detailed above.

Chapter 4.1 Summary: You must have a unique, non-registered but valid OSX Serial Number. First check that the S/N is correctly formatted by checking it on EveryMac and then check that the S/N is unregistered by using Apples Check Coverage website.

End of Chapter 4.1 - Return to Index

new-chapter-line-break.png

Chapter: 4.2 - OS X SMBIOS (System Type)

Its important that you match the SMBIOS 'System Type' to the PC hardware you have in your hackingtosh for maximum system stability and performance.

If your not sure which System Type to use, download and install MAC Tracker ... compare the hardware of the various Apple Model types with the CPU and Motherboard chipset generation you are using, don't worry too much about the internal video type as you can override this using Boot-Loader options. Whats important is to try and match the CPU and Chipset as close as possible. OS X has internal optimisations for Ivy & Haswell CPU based systems will only be activated if using the correct System Type .

Although many OS X Hardware build guides recommend using Mac Pro 3,1 because its considered 'safe' it can cause issues with iMessage because it has a 11 digit S/N - which in-turn can effect the MLB value.

OS X uses the System Type ID along with the PID's & VID's of your hardware in order to optimise some of the more advanced Apple only kernel features. EG you have a Haswell Z87 PC Based system but are using a Mac Pro 3,1 system definition which is pre Sandy Bridge Architecture ... Mac Pro 3,1 was discontinued in 2009 making its hardware specification over 5 years old - in PC technology terms this is light years - so in this instance many of OS X's power saving features of the Haswell Architecture will not be activated.

One thing to note is that if you plan on using a Nvidia video card then select a Mac type that came with nvidia graphics as standard (eg: iMac) or at least had the ability to support one (eg: old Mac pro) ...

Updating the SMBIOS & OS X S/N - Chimera or Chameleon method

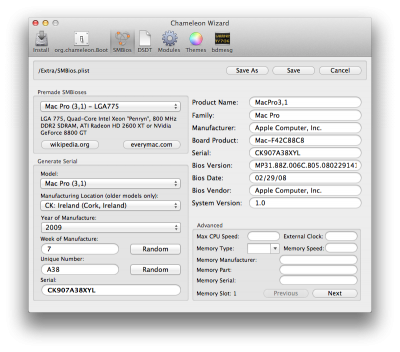
Open Chameleon Wizard and click on the 'SMBios' icon then 'Open' and navigate to the /Extra folder in the root of your startup disk and select your SMBIOS.plist.

Note: RAID users will have to mount the two RAID helper partition(s) to access the /Extra folders - see here.

Once your SMBIOS is loaded in the editor, selecting a pre-made SMBIOS will automatically fill-in all the details and ensure that the suffix of the S/N is correct for the system type you have selected (see Chapter 4.1 above).

CW-SN.png
Once your happy with the System Type, click a few times on the two <Random> buttons to generate a new batch number and week of manufacture then click on 'Save', if you boot from a OSX RAID then use the 'Save As' button to save the updated SMBIOS.plist to the two raid helper partition(s) - see here.

Updating the SMBIOS & OSX S/N - Clover Method

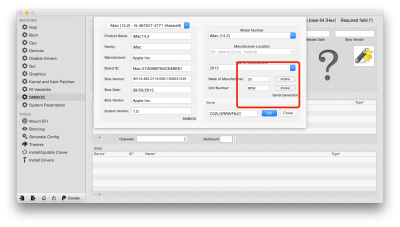
If using Clover, mount the EFI Partition and run Clover Configurator, load you config.plist and select the SMBIOS page. You can use Clovers 'Magic-Wand' to select a pre-made SMBIOS which works very similar to Chameleon Wizards 'magic wand' ,you can update and replace any of the values if necessary.

clover-shake.png clover-sn.png
Important: Never ever accept the default S/N generated by Clover's 'Magic Wand' ... (same applies to CW) they are all blacklisted, always use the two 'shake' buttons (click on them multiple times) to randomise the manufacturing batch and week numbers.

Alternatively you can run Chameleon Wizard as detailed above and copy the values in to the respective fields in Clover Configurator.

Note: This is also the page where you can manually inject a unique SmUUID (SystemId) see chapter-5.

As mentioned elsewhere in the guide try to keep the number of incremental changes to your SMBIOS ID's to a minimum and always try to keep the system your configuring off-line until your happy with all the changes.

Once you have a working set of OS X ID's keep them safe and always try use them on the same machine to avoid iMessage being disabled again, remember that these ID's would never change on a real Mac as they are baked into the system board.

If too many of your ID's are miss-matched then those ID's could also become black-listed in which case it is best to create a whole new identity for your system by generating a new SmUUID ID (Chapter 5), OS X Serial Number and new MLB & ROM values if necessary (Chapter 7).

Chapter 4.2 Summary: Match System Type in your SMBIOS as close as possible to your hardware.

End of Chapter 4.2 - Return to Index

new-chapter-line-break.png

Chapter: 4.3 - OS X Boot-Loader info

Boot-Loader version

If your using Chimera (or Chameleon) as your boot-loader then ensure that the core version is 2.2 or later, if not then download and install the latest version of Chimera from the downloads section of this website or use Chameleon Wizard to update the Chameleon Boot-Loader before going any further.

OSX RAID users will need to manually install Chimera (or Chameleon) by extracting the '/usr/standalone/ i386' folder from the boot-loader install package (I use Pacifist) and then use terminal commands to install the boot-loader files on to your RAID helper partitions - see this guide if your not familiar with the procedure.

As explained in Chapter 7, if your running OS X 10.10.X Yosemite and want to use iMessage then you need to be using Clover as your boot-loader, for all other previous versions of OS X you can use Chimera or Chameleon.

Time to switch to Clover

As of mid 2014 I recommend everyone take a look at using Clover as their boot-loader, it's been written from the ground up to work with newer hardware and addresses many of the problems that cause iMessage to fail when using Chimera or Chameleon. I know a lot of you may think it's more complex than the older boot-loaders that your used to but in reality it's not that much different and gives you far more control and solves so many problems especially for Raid and Fusion drive users (no more cloning to fix iMessage).

I think much of the confusion is more to do with understanding how EFI booting works rather than Clover itself, if your not sure then it's worth searching for and reading a guides that explain how EFI booting works before jumping straight into Clover. It's actually a much simpler method of booting OS's once you understand the method.

If you find that you have hardware that does not work with Clover try getting in-touch with the developers, they are keen and Clover has nightly builds. I personally think Clover is the future for all of us, you just need to devote some time to it, I promise once you make the switch you'll never go back.

Chapter 4.3 Summary: Ensure your Boot-Loader is up-to-date

End of Chapter 4.3 - Return to Index
 
Last edited:

How to Fix iMessage

Chapter: 5 - SmUUID (System-ID

All PC Motherboards BIOS's should return a 128Bit unique identifier known as the 'SystemId' or SmUUID, you can think of 'SystemId' (SM-UUID) like a motherboard's equivalent of a Ethernet MAC address, in both cases it always needs to be unique, that's the point. It's there to allow any OS (Linux, Windows, OS X ..etc) to generate a unique system identity, something which is becoming ever more important in these times of hyper-connectivity.

OS X uses your BIOS's 'SmUUID' or 'SystemId' as part of a crypto key to generate the OS X platform (hardware) UUID of your system. If your BIOS fails to initialise 'SystemId' correctly with a unique identity then OS X could end up with a non-unique platform UUID meaning that your system's identity could match someone else's ...

Many of these generic/duplicate Hardware UUID's are now black listed on Apple's servers either as masks or specific UUID's.

The SId Bug

On some PC Motherboard's, the BIOS does not initialise 'SystemId' (know in OS X as SmUUID) correctly with a Universally Unique IDentifier . It would seem that in these cases 'SystemId' is set to a default (non-unique) UUID such as "00020003-0004-0005-0006-000700080009" or something very similar, I have read reports of some ASRock motherboards BIOS returning all zero's for the SystemId ?

You can easy check if your BIOS has the SId bug by running IORegistryExplorer or IOJones and inspecting the following IORegistry tree value :-

ioreg-platfom-id.png
<IODeviceTree : efi / platform / system-id>

If your unfamiliar with the OS X Registry and the tools used to examine it then please see post #1012 for a bit more more info.

If your BIOS has the SId Bug then the 16 byte value of the key name 'system-id' will contain an invalid number sequence like all zeros's or some other invalid UUID. It should consist of 16 Bytes (16 x 2 digits - 0-9,a-f)

On Some motherboards only one or two set's of numbers may be unique in the SM-UUID for example on Gigabyte H/Z 77/87 N-Wifi motherboards the SM-UUID is AAAAAAAA-BBBB-CCCC-DDDD-EEEEEEEEEEEE but only DDDD and the first 2 digits of EEEEEE.... are different. This used to be enough to allow iMessage to work, however since August 2014 Apple hasexpanded the UUID black lists masks to include these sorts of UUID's too. I suspect in these cases the BIOS is only returning a 32 or 64 Bit number for the SM-UUID rather than a full 128bit UUID.

Ideally all 16 bytes that make up the SM-UUID should be different thus making it a completely unique 128bit UUID, if any part of your SM-UUID looks like its following a number sequence then you should suspect that your BIOS is not returning a full 128bit unique SM-UUID

Some Examples of a bad SystemId (SmUUID):
  • AAAAAAAA-BBBB-0001-0002-0003-00040005
  • AAAA0003-0004-0005-0006-BBBB-00070008
  • 00000000-0000-0000-AAAA-BBBB-CCCC0000
  • 00080009-AAAA-0001-BBBB-0002-0000CCCC
In these examples letters (A,B,C) are random hex vales but the numbers (0001,0002 ..etc) are default or fixed (non unique) number sequences.

If your Using Chimera or Chameleon then another clue to determine if your BIOS has the SId Bug is to check the 'UUID' in the nvram.UUID.plist filename located in the /Extra folder, this file is crucial for iMessage to work correctly on a hackingtosh (See Chapter 6.1 for detailed information) and is generated by the boot module FileNVRAM when it initialises the plist to store the NVRAM keys and data in, one of the first things FileNVRAM does is request the value of 'SystemId' from the boot-loader, if your BIOS is suffering from the SId Bug then the chances are the UUID value in the filename of nvram.UUID.plist will also be invalid.

The following motherboards have been confirmed to suffer from the SId Bug
  • Gigabyte GA-Z77X-UD5-TH
  • Gigabyte GA-Z77X-UD5H
  • Gigabyte GA-Z87X-UD4H
  • Gigabyte GA-H77N-WiFi
  • Gigabyte GA-Z77N-WiFi
  • Gigabyte GA-H87N-WiFi
  • Gigabyte GA-Z87N-WiFi
  • Gigabyte P67A-UD3-B3
  • Gigabyte GA-X58A-UD3R
  • Gigabyte GA-X58A-UD5
  • Gigabyte GA-X58A-OC
  • AsRock Z77 Extreme 6
  • AsRock H77 Pro4-M
I will endeavour to keep this list updated to help others, if your motherboard suffers from the SId Bug and is not on the list please post feedback.

The SId Bug's impact on OS X & iMessage

OS X's Platform_UUID (Hardware_UUID) forms part of a complex crypto key sequence used by Apple's on-line eco system. When you register an Apple device (or hackingtosh) with your AppleID for the first time with a iCloud service such as iMessage various security checks are run both locally and remotely. If your UUID fails to pass Apples security checks then you will get a login or activation error when starting certain iCloud services such a Facetime or iMessage.

By manually injecting a truly unique and correctly formatted value for 'SystemId' (SmUUID) into the boot-loader, we can override the BIOS SId Bug and allow OS X to generate a new and unique platform (hardware) UUID which passes Apple's UUID checks allowing us access to iCloud services.

Manual injection of SmUUId

In addition resolving the SId bug you can also use this method to override the BIOS generated SM-UUID (system-id) even if your motherboard is returning a valid SystemId (SmUUID) which is an effective way of changing the hardware identity ... this method should ideally be used in-conjunction with a new OS X S/N, ROM & MLB value so as to dis-associate the new UUID with any known and logged ID's.

As always make sure you've got at least one up-to-date backup of your OS X system before making any changes. There is nothing here that should cause you any problems, the fix is relatively straight forward and easy to apply, just take you time and follow the instructions carefully. I am not responsible for any damage or loss of data you may incur by using this guide.

Additional: For those of you using Chimera or Chameleon in conjunction with FileNVRAM .... please be aware that you may have problems trying to resolve the SId bug if your already having issues with MLB & ROM being persistent. Due to different versions of FileNVRAM and Chameleon/Chimera being incompatible with each other you may find it difficult to resolve both problems, please see the suggestions in Chapter 6.1 for some guidance on Boot-Loader/FileNVRAM versions.

If you do find yourself in this situation then my personal recommendation is to switch to Clover as your boot-loader, it is capable of resolving all of the SMBIOS and NVRAM issues associated with legacy boot-loaders, especially those relating to iMessage.

For applying manual edits to SMBIOS.plist, org.chameleon.Boot.plist or Clovers config.plist I recommend using TextWrangler by Bare Bones Software. Sometimes these files have a 'read only' flag and/or can have a 'locked' status, TextWrangler will detect both of these conditions and ask you for your OS X Admin password to continue if necessary.

As an alternative to TextWrangler a number of users have reported the editor in Champlist also works well, you can even use TextEdit but you may have to copy the file to the desktop first then make the edits and then copy it back to the correct file location.

To continue select the correct path based on your boot-loader and version.
  • If you are using a version of Chimera earlier than V3.0 start the guide at Path A
  • If you are using Chimera V3.0 or later then please start the guide at Path B
  • If you are using a version of Chameleon earlier than r2284 then start with Path A
  • If you are using Chameleon r2284 or later then please start the guide at Path B
  • If you are using Clover then start the guide at Path C
Path A
  1. Open SMBIOS.plist in /Extra using TextWrangler or other editor and check if the following exists:-
    Code:
    <key>SMsystemuuid</key>
    <string>********-****-****-****-************</string>
    If this key and string value are present then please remove both items and save the file, it can interfere with the injection of your new UUID in the next step.
  2. Open org.chameleon.Boot.plist in /Extra and add the following code if its not already there:
    Code:
    <key>SystemId</key>
    <string>********-****-****-****-************</string>
    Make sure that the key name you set in your plist is called "SystemId" not "SystemID" or some other permutation.
    Jump to Step 3 below.
Path B
  1. Open org.chameleon.Boot.plist in /Extra using TextWrangler or other editor and check if the following exists:-
    Code:
    <key>SystemId</key>
    <string>********-****-****-****-************</string>
    If this key and string value are present then please remove both items and save the file, it can interfere with the injection of your new UUID in the next step.
  2. Open yor SMBIOS.plist in /Extra add the following code if necessary:
    Code:
    <key>SMsystemuuid</key>
    <string>********-****-****-****-************</string>
    Jump to step 3 below.
Path C
  1. Ensure you have the latest version of Clover Configurator.
  2. Run Clover Configurator and select the 'SMBIOS' page on the left hand plane
    (All Paths)
  3. Open a Terminal window and execute the command
    Code:
    uuidgen
    This will generate a new random UUID. Do not use an existing UUID from your OSX system such as hardware UUID in System Profiler, if you do your 'SystemId' will not be totally unique. Its worth running uuidgen four or five times, before using the value. The more times you execute the command will result in a more unique UUID.
  4. Block and copy the UUID you just generated in terminal, if you are using Clover then paste it into Clover Configurator as the value for 'SmUUID' on the SMBIOS page, save chages (CMD-S) and exit:-Clover-SMUUID.png
  5. If you are using Chameleon or Chimera then paste it in place of all the '*****-*****' in the code you entered in step 2 and save the file.
  6. Chameleon or Chimera users should ensure they have the correct version of 'FileNVRAM.dynlib' installed in the 'modules' folder of the /Extra folder - See Chapter 6.1
  7. if your Using FileNVRAM then reset it's plist - See Chapter 6.2
  8. Reboot and load OS X with the -f boot flag (without caches)
Next time OS X starts you may be asked to re-authenticate your system password, you should not loose any data or applications but it has been reported by some that it can reset a few of your user profile preference settings like Launchpad layout, mouse ... etc.

This fix should work for most users, however if the mechanism between the Boot-Loader and FileNVRAM is not working correctly you may still have old/invalid values for your MLB & ROM Values (Clover is not effected). After applying the SId bug fix i recommend you check your MLB & ROM nvram values and fix if required - - See Chapter 7.1

Post SId Bug Fix Checks
  1. As long as the 16 byte key for 'system-id' in the IORegistry (IODeviceTree : efi / platform / system-id) matches the new unique UUID that you entered at step 3 above then the Sid Bug fix is working.
  2. If your using FileNVRAM with a legacy boot-loader then check the 'UUID' in the filename of 'nvram.uuid.plist' in the /Extra folder, it should match the new UUID your injecting. If it's not matching then something is still not right, re-check your install of FileNVRAM, make sure you delete any old nvram.uuid.plist file(s) - (see below) and repair file permissions via Disk utility ..... re-check each step and try again until it matches.
Maybe I'm paranoid but I try to avoid connecting to any of Apples on-line services until both the above checks are true. Each time you try with a different UUID and/or S/N you could be registering yet another UUID or S/N miss-match against your AppleID so keep off-line until everything looks OK.

After successfully applying the SId Bug fix, you should recheck everything using iMessage Debug.

Once iMessage is working, I recommend you avoid changing the UUID's and S/N again, try to use the same injected SmUUID (SystemId) and S/N through-out the life of the hackingtosh. Only change them if you want to register it as a new device against your AppleID, just don't do it too often ....

iMessage UUID Summary

On a working OS X system the following should all be true.
  • The platform UUID (via terminal command: "ioreg -lw0 | grep PlatformUUID") and hardware UUID (via System Profiler -> Hardware Overview) should always be the same.
  • The IOReg key "system-id" (IORegistry: IODeviceTree : efi / platform / system-id) should always be 16 bytes and should always be different to the OS X Platform & Hardware UUID regardless if manually injected or supplied by the BIOS.
  • If using FileNVRAM then the UUID in the nvram.UUID.plist filename located in the /Extra folder should be the same UUID as the key system-id (IORegistry: IODeviceTree : efi / platform / system-id)
Still not working ?

After applying the SId Bug fix some of you may still find you can not use iMessage ....

If you get a generic sign-in or activation alert when starting iMessage, then in most cases simply changing the password of your AppleID (an old iMessage fix) is enough to get things working again, if it still does not work I would suggest working through the guide again ... as long as the SId Bug is fixed you should be able to get iMessage working again.
If you get a message asking you to contact Apple with a customer code then keep calm and don't worry, this is normal ... follow the advice given in Chapter 8

End of Chapter 5 - Return to Index
 
Last edited:

How to Fix iMessage

Chapter: 6.1 - NVRAM

On all genuine Apple Mac's, OS X stores some critical system keys and values in Non Volatile RAM (NVRAM) rather than writing them to a config file or plist on your startup drive, these keys play an important role in OS X security and authentication. The format and implementation of Apple's NVRAM is subtly different to that found on more recent PC Hardware

iMessage uses some of the key values stored in NVRAM during login and authentication to Apples iMessage servers. If certain keys are not saved in NVRAM then the next time the system is powered off or re-booted iMessage may suffer from login and/or activation problems.

There has been much work done in the OS X boot-loader community to try and resolve this issue and the latest versions of Chameleon and Chimera include code that try's to maintain these critical values in OS X's NVRAM cache. However for reasons outside the scope of this guide it does not work reliably for everyone.

Fixing the NVRAM isssue

Clover Users:

If your booting OS X via Clover then you don't have to do anything, Clover includes a comprehensive emulation of OS X's NVRAM features and generates a NVRAM cache file at boot time, since OS X reads NVRAM values from the cache rather than the slow Non-Volatile RAM hardware it negates most of the problems associated NVRAM on non-Apple hardware.

Chameleon and Chimera Users:

In 2013 the Hackingtosh group xZenue released a boot-loader plug-in module called 'FileNVRAM' that simulates Apple's Non-Volatile RAM hardware through software emulation, it simply store's all the NVRAM keys and values in a plist called nvram.xxxxxxxx-xxxx-xxxx-xxxx-xxxxxxxx.plist located in the /Extra folder of your OS X startup drive.

The nvram plist is automatically generated by the FileNVRAM module if it does not already exist and allows OS X to maintain NVRAM keys and values through power cycles and reboots. Depending on your system type, additional OS X settings may also be written to the simulated NVRAM such as screen brightness & volume levels.

You can check the content of OS X's NVRAM by starting a terminal window and executing the command:-
Code:
nvram -x -p
The resulting output should list the current contents of the NVRAM, please note that many of the key values are encrypted or displayed as base64 values.

Installing the FileNVRAM module for Legacy Boot-Loaders

For older systems running OS X Mountain Lion or Mavericks and booting via Chimera or Chameleon (base version 2.6 or less) download the file ‘modules.zip’ and extract it, the contents are a folder called 'modules' that has a single file in it named 'FileNVRam.dylib', copy the ‘modules’ folder and paste it in the ‘/Extra’ folder in the root of your startup drive

Important: FileNVRAM must exist in /Extra/modules in the root of your OS X Start-Up Drive, if you boot from a USB key or from another drive then you need to address this before continuing. Normally this will involve using the stand-alone installer for your chosen boot-loader and installing it on you OS X drive - RAID and Fusion drive users may have to use the terminal method to install the boot-loader - see the Pre-Requisites section of the guide for advice and information regarding RAID systems.

Remember you only need to install FileNVRAM if your using Chameleon or Chimera, if your using Clover as your boot loader then you can skip the rest of this Chapter.

For Systems that already have a 'modules' folder in /Extra then download the zip archive that contains both versions of FileNVRAM (V1.1.2 & 1.1.3) and use the appropriate version - see notes below ...

Update: JAN 2015 - Yosemite Versions of FileNVRAM now available

A new version of FileNVRAM (1.1.4) has been released with support for OS X 10.10.x - Yosemite, please note that there are different versions for Chameleon and Chimera see the News Archive for information on these versions.

FileNVRAM 1.1.4 Links:
Important notes about installing NVFileRAM:-

1. Multibeast now creates the 'modules' folder in /Extra and will install other '.dylib' files inside it, if you already have a 'modules' folder then just copy the appropriate version of FileNVRAM to the existing folder.

2. If you have relocated the boot-loader and /Extra folder to the EFI partition then the chances are that FileNVRAM may not work for long, it is similar to the issue that effects RAID users in that once OS X is booted the EFI partition is unmounted so OS X no longer has access to the nvram.uuid.plist. To resolve this issue move the /Extra folder to the root of your startup drive and reinstall Chameleon or Chimera to the default location on the same drive, and erase the contents of the EFI partition (you will have to mount it first). This will not work for RAID or Fusion Drive systems. Alternatively you could use EFI Mounter which is available in the Community Downloads section of the site, This utility ensures that the EFI partition is mounted once OS X is booted which should allow FileNVRAM to function normally.

3. In addition to having a unique OS X S/N you must also have a unique OS X platform UUID, this is anther unique system identity and is normally generated by OS X via a key passed from the BIOS called 'SystemID'.

In April 2014, Apple implemented new checks on their severs to make sure all iMessage packets are authenticated, these new checks ultimately led to the discovery of the "SId Bug" in the BIOS of some motherboard's which can cause a hackingtosh to have an invalid or duplicated platform UUID because 'SystemId' is not initialised correctly.

Since FileNVRAM uses the value of 'SystemId' when creating it's plist it is important to make sure your BIOS does not suffer from the 'SId Bug' so now is a good time to jump to Chapter 5 and check to see if your BIOS is effected by it and apply the fix if necessary.

4. The version of FileNVRam.dynib included in the 'modules' attachment of this guide is V1.1.2 this version is recommend for all Chimera Versions up-to 2.2.1. If you are using Chimera Version 3.0 or later then TonyMacx86 recommends that you use version 1.1.3 of FileNVRAM which you can download directly from this link, download and unzip the archive, you only need the file called 'FileNVRAM.dylib' copy and paste it in the /Extra/modules folder, delete the old version first if already there - alternatively download the attached archive which contains both versions of FileNVRAM and replace your existing version with the correct one.

A small number of users have encountered issues with Chimera Version 3+ and have either stuck with FileNVRAM V1.1.2 or backed out Chimera to version 2.2.1 and FileNVRAM V1.1.2 this seems to effect some users running OS X 10.8 x (Mountain Lion).

Please note that if you have recently updated to Chimera V3.0 or later and are injecting 'SystemId' in order to negate the SId bug then you must use the SMBIOS injection method, please see Chapter-5 for more info if you have not already done this.

Chapter 6.1 Summary:
If booting OS X via Chimera or Chameleon you must emulate persistent NVRAM by installing the correct version of FileNVRAM.dylib in /Extra/modules or switch to booting OS X via Clover.

End of Chapter 6.1 - Return to Index

new-chapter-line-break.png

Chapter: 6.2 - Reset NVRAM (Chimera or Chameleon ONLY)

Sometimes the key data stored within FileNVRAM's plist can get out of sync, for instance if you change your OS X S/N the MLB value in NVRAM may now not match the new one. There are multiple reasons for resetting FileNVRAM plist.

I recommend resetting the NVRAM plist when ever you change anything to do with the system identities (UUID, S/N, System Type .. etc) or after reseting the iMessage configuration files (See Chapter 3.3)

Because FileNVRAM's job is to keep the nvram.uuid.plist in /Extra updated at all-times - on some systems the file can be re-created after erasing it during a OSX shutdown in which case it may not pick up changes to certain SMBIOS parameters. So we need to temporally disable FileNVRAM - this fail-safe method will ensure that you always get an entirely new and correct uuid.nvram.plist.
  1. Disconnect from Internet
  2. Copy FileNVRAM.dylib from /Extra/modules to your Desktop
  3. Remove FileNVRAM.dylib from the /Extra/modules
  4. Reboot
  5. Remove all nvram.uuid.plist's in /Extra and empty the Trash
  6. Reboot
  7. Ensure that there are no nvram.uuid.plist's in /Extra.
  8. Make any necessary changes to your SMBIOS settings.
  9. Copy FileNVRAM.dylib from your Desktop back to /Extra/modules
  10. Open a terminal window and execute the following command:-
    Code:
    sudo nvram boot-args=""
    This console command clears the value of the 'boot-args' key stored in the OSX NVRAM cache which can sometimes interfere with creating a new 'nvram.uuid.plist' if set.
  11. Reboot.
  12. Check that a new nvram.uuid.plist has been recreated in /Extra
  13. Check uuid in filename matches (IORegistry: IODeviceTree : efi / platform / system-id)
  14. Check MLB & ROM values using iMessage Debug
  15. You may have to re-inject your MLB & ROM value if so inject them using the appropriate terminal commands and reboot, check again
  16. If all looks well reconnect to the Internet
End of Chapter 6.2 - Return to Index
 
Last edited:

How to Fix iMessage

Chapter: 7.1 - MLB & ROM ID Values

There are two critical key values stored in NVRAM that iMessage uses during authenticating iMessage, these are the MLB (Mac Logic Board) and ROM data values.

You can view the raw NVRAM values using the terminal command 'NVRAM -x -p' which will display all the current keys and values stored in NVRAM including MLB & ROM. Many of the values will seem like random alpha-numeric strings, this is actually the data value encoded in base64, you can use an on-line base64 converter to convert the <data> values to hexadecimal values, i use this one:-

http://www.motobit.com/util/base64-decoder-encoder.asp

Which can convert in both directions should you need to ...

A much easer way to check these values is to use the attached utility 'iMessage Debug' which should work for all boot-loaders including Clover on OS X Mountain Lion, Mavericks and Yosemite.

To use iMessage Debug .... download the attachment from the Files section of the guide and extract, there is no install required, simply double click (or right-click -> Open) in Finder to execute the script. It should open a terminal windows and dump all of the critical iMessage values from NVRAM including MLB, ROM, Hardware (Platform) UUID, S/N .. etc in a hexadecimal readable form.
Imessage-Debug-V2.png
Depending on the version of iMessage debug you use (or if you used the NVRAM command) then the MLB and ROM values may be prefixed by a UUID and will look something like this:-

4D1EDE05-38C7-4A6A-9CC6-4BCCA8B38C14:ROM <xxxxxx...>
4D1EDE05-38C7-4A6A-9CC6-4BCCA8B38C14:MLB xxxxxxx...


Note: Version 1.0 of iMessage Debug surrounds the The ROM value with '<' and '>' and will also insert a space between the 8th and 9th digit, this is a formatting issue and you should ignore these when referencing the ROM Value, just use the 12 Hexadecimal numbers.

If the values (xxx..) following these prefixes are incorrect, such as all zeros, null or blank then iMessage will have registration issues. Note that the UUID prefix should not and must not be the same as SM-UUID or Hardware (Platform) UUID - in most cases it will be the same UUID as the above examples which is ok.

The MLB Value Should be 13 digits in length if you have an 11 digit OS X S/N or 17 digits long if you have 12 digit OS X S/N. It is made up of a series of alpha-numeric characters much like the OS X Serial Number (see Chapter 4.1). 13 digit MLB's are associated with Pre 2011/12 hardware and its syntax/format is largely understood where as more recent Apple hardware use the 17 digit MLB format which is still not fully understood - yet.

NOTE: If you want to learn more about the formatting and the correct make-up of the MLB value I recommend reading @holyfield's 'Pattern of MLB' article over at Insanely Mac. Using this article it is possible to piece together a valid and correctly formatted 13 or17 digit MLB however it will require that you read the entire thread not just the article and will require you to search on-line suppliers of Apple system boards in order to find the correct 'EEE' code if you do not already know it. As of Feb 2015 most users should be able to use the simpler method of generating a working MLB as detailed below .....

The ROM value Should be 6 Bytes long (12 hexadecimal digits)

In addition to having valid values for MLB and ROM it is vital that these values are also persistent between shutdowns and reboots, if these NVRAM values are not maintained either by Clover or FileNVRAM then the boot-loader will generate new random values on each boot.

In this case iMessage may work for a while, but Apples servers will eventually detect the change in these ID's values the next time the security token needs authenticating. If this happens too often then it will cause a IP/Device lockout to be placed on your AppleID. This is a part of Apples backend security checks to stop hackers from cloning OS X system identities.

Checking for persistent nvram values is easy, simply run iMessage Debug and make a note of the MLB and ROM values or take a screen dump of the iMessage Debug window .... Version 2.0 of iMessage Debug has the facility to dump the output to a text file (see News 14th Oct 2014)

Once you've got a note of your initial ID values, shutdown and power back up, boot OS X and re-run iMessage Debug, if the emulation of NVRAM is working correctly then the MLB and ROM values will be the same as they were on the previous boot..

If you have invalid MLB and/or ROM values (all zeros, blank, null, invalid syntax) and/or the values are changing on each boot-up then you must address this issue before iMessage will work, whist working on these types of iMessage issues I recommend keeping disconnected from all of Apple iCloud services (logout from iMessage, iCloud .. etc) do not try to login until your happy that everything is correct - if you can disconnect the system from the internet.

NOTE: If your booting via Clover then skip this list and continue with 'Manual Injection of MLB & ROM Values' below.'

If using Chimera or Chameleon as your boot-loader then check these things first :-
  • If you are booting or trying to boot Yosemite then you must be using the latest versions of Chimera and FileNVRAM .... these new versions are still in development and compatibility with Chameleon requires a slightly different version of FileNVRAM.
  • There have been reports that UEFI BIOS support can cause problems on some systems when using a legacy boot-loader, if you have the option available and are not running Windows 8 in UEFI mode then disable all UEFI options in the BIOS and use legacy boot options (SATA-P0 .. etc)
  • Certain versions of Chimera and Chameleon can have issues with FileNVRAM if too many 'dylib' files are in the modules folder, try removing some or all of the other dylib files and see if that helps.
  • It has been reported that ACPICodec.dylib will cause problems with FileNVRAM, if it exists in your modules folder - remove it.
  • Ensure that all files in the 'modules' folder are .dylib files, if any other file types are in the modules folder remove them, it has been reported that some versions of the boot-loader may try to load any file as a module even if it does not have a .dylib suffix, which can abort the SMBIOS/NVRAM initialisation process.
  • Try updating your BIOS, whist not directly related to MLB and ROM issues it has been found to help some users. If your using a custom/patched DSDT you may need to rebuild it.
  • If you are running a version of OS X earlier than 10.9.x then consider updating to Mavericks or Yosemite. there have been a plenty of reports that some users were not able to get the MLB and ROM values persistent until they updated to at least Mavericks, this is not something I can not confirm as i've not personally experienced it.
Manual Injection of MLB & ROM values

WARNING: You may come across posts on this and other forums quoting the use of real Apple Mac MLB & ROM values (also OS X Serial Numbers). I strongly advise against using shared/leeched/stolen values. Apple is getting more wise to hackingtosh systems using cloned ID's and you will almost certainly encounter issues with iMessage authentication and and may loose the ability to associate other Apple devices with your AppleID ..... you may even be locked out of your account if the same MLB and/or ROM value is used too many times. By using someone else's MLB and ROM values you are effectively cloning/spoofing that persons system on Apples iMessage servers which can't be good for them or for you from a security point of view - see the warning at the end of this chapter for more information

With that said and out of the way, many users have had huge success activating iMessage by manually injecting unique and correctly formatted MLB and ROM values:-

For the MLB value use your OS X S/N + random alpha/numeric values to make the correct length based upon the length of your OS X S/N
  • If you have 11 digit S/N then your MLB should be 13 characters long
  • If you have 12 digit S/N then your MLB should be 17 characters long
Using MLB Generators: There are a number of different MLB generator utilities/tools floating about, at the time of writing none of the current generators produce a 100% accurate MLB. The 17 digit MLB generators are still lacking the understanding of two pairs of digits so will never produce a 100% certain result. The latest 13 digit MLB generators are getting close to generating a valid value - however if you do use a generator - do not use the value until you understand the patten/make-up of the MLB .... check the date and 'EEE' code by reading @holyfield's 'Pattern of MLB' article over at Insanely Mac.

Another method of generating a MLB value is to not specify one initially in your boot-loader config and let the boot-loader generate one for you, ensure that you disconnect from your network and boot OS X, run iMessage debug and check the MLB value, if its the correct length (13 or 17 digits depending upon system type) then copy the value and use it in-place of the above method.

The ROM value is a heated discussion on many OS X Hackingtosh forums, some people think on a real Mac it is the MAC address of the firewire port, others believe that iMessage will only work if it is a cloned value form a real Apple Mac. The truth is that it just has to be unique and 6 bytes long (12 Hexadecimal numbers), since a Network MAC address is 6 bytes and unique its a good value to use.

An easy way to get a MAC address is to open 'System Preferences', click on 'Network' and select a Ethernet port from the list of available network devices (any will do) , then click on the 'Advanced' button and select the 'Hardware' tab, make a note of the MAC address, it will be 6 bytes ( 6 x 2 Hexadecimal numbers) each separated by a colon, do not include the colons when injecting a MAC address as a ROM value - you just need the hex numbers.

Note: An alternate method of generating a ROM value is to use the last six bytes of the SmUUID (see here for more info)

MLB & ROM Injection Method for Chameleon & Chimera Users:

To inject new nvram values open terminal and use the following commands :-
Code:
sudo nvram 4D1EDE05-38C7-4A6A-9CC6-4BCCA8B38C14:MLB=xxxxxxxxxxx
sudo nvram 4D1EDE05-38C7-4A6A-9CC6-4BCCA8B38C14:ROM=xxxxxxxxx

In each case, replace 'xxxxx' with the appropriate value and be sure to always use the same prefix UUID as displayed via iMessage Debug (normally 4D1EDE05-38C7-4A6A-9CC6-4BCCA8B38C14)

When injecting the ROM value place a '%' in front of each byte

Example:-

Ethernet MAC address = 23:f4:e7:65:4a:44

To inject the above as a ROM value execute:
Code:
sudo nvram 4D1EDE05-38C7-4A6A-9CC6-4BCCA8B38C14:ROM=%23%f4%e7%65%4a%44

Important: FileNVRAM must be installed and working correctly in order for OS X to remember the new MLB and ROM values after a power down or reboot (Chimera & Chameleon only)

After changing the MLB and/or ROM values, run iMessage Debug again and check the change, then reboot the computer and run iMessage Debug again, ensure the the new values are persistent, if they are then try a few more reboots/power downs ..etc, if all still looks good then your done with configuring your MLB & ROM values.

However, if they keep changing then the most likely cause is a software incompatibility between the FileNVRAM module and your boot-loader, this is a very common issue and may not be straight forward to resolve.

Your only real option now is to try different versions of FileNVRAM and/or Chimera/Chameleon, If your using Chimera try switching to Chameleon.

I recommend using Chameleon Wizard version 4.4.1 or later to install different versions of Chameleon - on the 'Install page' use the drop down to select the Chameleon version you want to try and set the install method to 'Update' ensure you check the box 'Install more boot-loader files' then click on the 'Install' button. Thats - it. You can easily switch between different versions of Chameleon using this method, to switch back to Chimera run the appropriate standalone installer. Some of your boot.plist options may need adjustment to get optimum performance and full GPU support.
CW_Update_Boot.png
Many users have reported good success with OS X Mavericks using Chameleon r2283 and version 1.1.3 of FileNVRAM, if your BIOS has the SId bug don't forget different versions of Chimera and Chameleon require different methods for injecting SystemId (SM-UUID) see Chapter-5.

If after trying all of the above you find that your MLB & ROM values are still changing on each boot AND your motherboard's BIOS suffers from the SId bug (See Chapter-5) then your very likely to find yourself in a rather frustrating situation. Due to version incompatibilities with the SMBIOS memory tables between Chameleon (Chimera) and FileNVRAM you may find that you can not solve both the SId bug and Non-persistent NVRAM values at the same time.

If you don't know if your motherboard suffers from the Sid bug then stop and read Chapter-5 of the guide now, check to see your BIOS has the bug, if it's OK and is not suffering from the Sid bug then carry on trying different versions of Chameleon you have a fair chance of finding a combination that will work.

However, if your BIOS does have the SId bug and a BIOS update does not help, then I seriously suggest you consider switching to Clover as your boot-loader, you could save yourself a lot of time and frustration. If you've been thinking about taking a look at Clover then do it now. Whilst it is possible to resolve both the SId bug and non-persistent NVRAM values without using Clover I would say that you now have only a 12% or less chance of it working (depending mostly on hardware).

Don't be afraid to learn something new, Clover is really worth the effort and once you've got it working resolving SMBIOS/NVRAM Injection issues is straightforward and you'll kick your-self for not doing it sooner. I consider Clover the future for OS X hackingtosh systems, Personally I find it easer to install OS X using unibeast and then Install Clover (see Post #1272 for more info)

Method for CLOVER Users:

I always recommend manually injecting your MLB & ROM values using the RT (Run Time) Variables method as its easer to understand and should result in predictable results however you should be aware that Clover Configurator also has an automatic way of injecting and generating MLB & ROM values - see the update below, you can manually inject MLB & ROM using Clover Configurators new ID methodology using the alternate ROM method.

I recommend that you use Clover Configurator for maintaining Clover's config.plist, the latest version can always be download from here, whilst it's quite easy to to manually edit the config.plist using text wangler or any other text editor, some of Clover's plist formatting is very specific so I always use the configurator.
Screen Shot 2015-02-23 at 13.53.16.png
When working with Clover in EFI mode you will need to mount the normally hidden EFI Partition. Clover Configurator has an option to do this for you when you run it but i use a small OS X menu utility called Semulov which can be download for free from the developers web site here, die hard terminal users can mount it from the console using diskutil.

Run Clover Configurator and mount the EFI Partition if you've not already done so. Click on the 'Home' Icon and load the config.plist from your /EFI/Clover folder. If this is the first time you've run Configurator then you may need to use the import option to load the config.

Once loaded, click on 'RT Variables' on the left selection plane and enter your MLB and ROM values in the appropriate fields.

Clover_MLB_ROM_RTV.png
If your not using Clover Configurator (which I highly recommend for simplicity) you can open Clover's config.plist in TextWrangler or similar and find the the 'Rt Variables' section, add the following keys and values, if you don't have a Rt Variables section then add all of the following code:-
Code:
<key>RtVariables</key>
<dict>
    <key>MLB</key>
    <string>XXXXXXXXXX</string>
    <key>ROM</key>
    <data>YYYYYYYYYYY</data>
</dict>

Clover Update: October 2014:

As of Oct 2014 Clover & Clover Configurator developers have altered the automatic way of generating and injecting ID's for OS X ... On the RT Variables page is a ID Generator/Calculator which will attempt to extract your systems SmUUID (System-ID) along with other key values and generate/calculate a full set of OS X ID's for your system. If you know that your BIOS suffers from the SId bug then i don't recommend that you use it.

Personally I never use Clover Configurators ID Calculator as it can produce unpredictable results and i prefer to generate the ID values myself, however some users have used the ID Calculator successfully and it can only get better as more is understood about the make up of the various system ID's.

The Official Clover Wiki attempts to explain the new ID generation/injection method but it is not very clear as the information is spread over several sections of the guide - this is my understanding of it:-

ROM: This will be the last 6 bytes of the 'SmUUID' value. If you have not generated your own SmUUID (using 'uuidgen' in Terminal) and entered it in the the SmUUID field (on the SMBIOS page) then Clover will try to use your BIOS's SystemId. I personally think it's always best to override the BIOS (even if it does not suffer from the SId bug)

MLB: Will be read from the 'Board Serial Number' (BSN) field on the SMBIOS page (the new generator will create a value for BSN). On a clean Clover install this is defaulted to Clovers own pre-set static value which is of-course black-listed on Apples systems. You therefore must replace this with your existing MLB value (on an existing install) or use your OSX S/N + Random Alpha / Numeric digits to make it up to the required length if not using the generator.
Clover-MLB-ROM-New.png


Manual Injection - Alternate ROM Method

You can manually inject MLB & ROM values using this alternate method which is based on Clover Configurator's ID generator, many users have reported good success when using this method.

1. Ensure that your S/N and SMBIOS are correct for your hardware and the Apple System Type your going to emulate - see Chapter 4.1 and Chapter 4.2 for more info.

2. Create your SmUUID using the 'uuidgen' terminal method detailed in Chapter 5 and copy/paste it into the 'SmUUID' field on the 'SMBIOS' page.

3. Copy the last six bytes (last 12 hex digits) of the 'SmUUID' and use as the 'ROM' value on the 'RT Variables' Page.

4. Generate your MLB as detailed above using your OS X S/N with extra digits and enter in the 'MLB' field on RT Variables Page - leave 'Board Serial Number' (BSN) blank on 'SMBIOS' page.

Since Apple relaxed the enhanced MLB verification in mid-February 2015, many users using this alternate ROM method have reported that there was no need to contact Apple to white-list MLB & ROM, if you try this method and it works for you please post feedback.

This alternative 'ROM' method should in principle work for those using FileNVRAM with a legacy boot loader such as Chimera but i have not tested it.

iMessage Debug not Working: There are quite a few versions of iMessage Debug floating around on GitHub. Since it is a terminal framework utility the version's attached to this guide may not work on older versions of OS X (pre Mountain lion), if it does not work for you try finding an alternate version or downloading a source file and compile it on your own system or you can use Darwin Dumper as an alternative.

Credits: iMessage Debug was originally created by @ElNono based on the iMessage login research done by @tflux back in September 2013 a big thank you goes out to those guys.

End of Chapter 7.1 - Return to Index

new-chapter-line-break.png

Chapter: 7.2 - Cloning OSX ID's

Warning - Using Leached ID's (Stolen Identity)

There are several posts in this thread related to using leached 'Real Mac' ID's. Whilst this method was known to work and several forum members were using this method, unless you own the Mac who's ID's you are going to clone, and you know for sure it is either broken or will be never/ever be used with iMessage again then I strongly recommend that everyone else avoid this method.

If you use the 'Stolen Identity' method for your MLB and/or ROM then your iMessage data is essentially using the same authentication token as the machine who's ID's you've cloned/stolen. Even if you change the ID's after registering with iCloud, the iMessage authentication token remains in place until you logout.

Since it's relatively easy to intercept IP packets (especially on non-secure wifi) it opens a security hole that could potently be used to receive someone else's iMessage packets.

My main concern is that if too many people use leached ID's then Apple will be forced to change the whole iMessage protocol which could be a real problem for us hackingtosh users, potentially locking us all out of the service for good which would be a real shame.

I understand why some of you are getting frustrated and resorting to this method, but i think it can only end badly for everyone if it becomes a common practice.

As already mentioned, for some of you this will mean ditching the familiarity of Chameleon/Chimera and moving over to Clover which may seem daunting especially for novices but it really is not and once you have got your head around it you'll wonder why you didn't do it sooner. It really is the future for hackingtosh systems.

Update-1: November 2014 - Apple introduced enhanced verification checking of MLB values during iMessage authentication, this seems to have been a direct response to the increased use of cloned MLB & ROM values to negate having to call Apple with a customer code.

Update-2: Feb 2015 - It would appear that Apple have now relaxed the level of MLB verification allowing the use of basic generated MLB's as detailed in this chapter, however cloned values will still cause issues.

Summary: Please don't resort to using hackers methods, it will give this community a bad name and could make things very difficult for all of us in the future. My personal feeling is that Apple are actually ok with people using OS X on their PC's. After all the OS is now free .... surely it would be better for Apple if PC users dropped Windows in favour of OS X ? .... leading to increased awareness of Apple eco systems and features ... it could even be considered clever marketing by Apple .... it's advertising that money cant buy (literally for a lot of us) .... however if the hackingtosh community abuse Apple's tolerance by stealing real Mac ID's then we should not be surprised if they do something about it, especially when it concerns the on-line security of their customers.

End of Chapter 7.2 - Return to Index
 
Last edited:

How to Fix iMessage

Chapter: 8 - Contacting Apple Support

Activation of Customer Code

If you are receiving a iMessage alert informing you that you need to contact Apple Customer support with a customer code then iMessage is now communicating with Apples iMessage servers correctly, however it is possible that too many device ID's have been logged against your AppleID or that your MLB & ROM need to be registered on Apples database .... both these situations will result in the following iMessage alert:-

appleid-cant-be-used.jpg
Background Info: As already detailed in the guide, Apple log and store various ID's from your OS X device's such as MLB, ROM and Hardware UUID each time you attempt to log into/authenticate with iMessage's servers .... these ID's must be valid and are verified against black lists, masks and security checks ... you will only see the above message once your ID's pass these checks.

Once logged into iMessage your system will receive a security token which will allow iMessage to continue to work without having to login and authenticate on each boot, the token has an expiry date/time ... when the token expires the iMessage agent service will attempt to automatically authenticate again with the iMessage servers ... if some of your ID's (MLB/ROM) have been changing then the service will be unable to authenticate because the ID's are different to those that were registered the first time your system connected to the iMessage servers.

By now you should have been through the entire guide and checked all your ID's to ensure they are the correct syntax and are persistent, if your getting the above alert and your still unsure about your ID's then an easy way to confirm that everything is persistent is to reboot / power off and restart two or three times and make a note of the Customer Code each time you try to login.

The Customer Code is generated by a crypto algorithm using several of your systems ID's and your AppleID. If the Customer Code is not the same each time you run iMessage then one (or more) of your ID's is still not persistent and you need to check everything again.

What Causes this Message ?

The most common cause of this message is that your MLB and/or ROM value are not registered on Apple iMessage system, this can happen to genuine Mac's after a system board has been repaired or replaced.

I found out about another cause of this message after a long chat with a particularly helpful Apple Support representative, he explained that Apple log the number of Apple iMessage capable devices against a single WAN IP (not your local LAN IP's but your routers Internet IP). So this will include any and all hackingtosh systems with changing personalities or ID's (eg ROM value changing on each boot). All of these miss-matches count as 'IP' marks against your account.

If you've been running OS X with non-persistent ID's for some time then it's quite likely that your AppleID will have been flagged as having too many OS X devices or ID miss-matches associated with it thus leading to the above Customer Code message.

Note: OS X USB installers such as Unibeast override many things during boot-up including nvram values which can cause the MLB & ROM to fail (confirmed by iMessage Debug). If the system is able to connect to Apples systems it will still attempt to identify it-self thus potentially logging anther bad device against your WAN IP.

Unless you are using a fully configured Clover based system, when re-installing or updating OS X such as applying a Combo-Update I recommend completely isolating the system from the internet. Only reconnect to the internet once the install/update is complete and iMessage Debug returns the same values you had before - see Chapter 7 of the guide for further info on using iMessage Debug.

There is not much you can do locally to stop this, it's automatic and is part of Apples back-end customer security service, they are basically looking for and logging WAN IP address that have a 'high-volume' of Apple Devices associated with them. If like me you have multiple hacks on your local LAN then try allocating them static IP address via your router's DHCP service .... anything you can do to limit changes may help.

It is important to understand that each device on your network will generate it's own unique customer code, so if you've got multiple hacks, first ensure that they all have valid and persistent ID's and that they always generate the same customer code each time you try to log into iMessage. If they generate different codes each time then one (or more) of your ID's is changing and you need to check everything again. If they are all consistent then make a note of all the Customer Codes, it's far easer to deal with all of them in one hit rather than calling Apple multiple times.

Update Feb 2015: Since initially writing this chapter Apple have changed the look and layout of some of the support pages on their web site, so you may find subtle differences between what you see and what is in the guide, however the following advice is still valid and should be followed as close as possible.

If you own a Apple iPhone or iPad then I recommend that you enable 2 step authentication on your AppleID, again this may help to affirm your identity with Apple and in some cases the support department may ask you to use your 2 step authentication to generate a temporary support code.

Important: Make sure your OS X S/N is valid but unregistered ..... see Chapter 4.1.

Do not be afraid to contact Apple just because you are using a hackingtosh, but only do it once you get the alert with a customer code and a request to contact Apple support. In almost all cases Apple customer support will help you with the lockout.

In the case of a iMessage lockout Apple are supporting the software (OS X) and your AppleID and not the hardware so you do not need a warranty or Apple support contact.

The easiest and best way to contact Apple is to use the Live chat feature via the the Apple Support Website :-

Procedure :-

1
. Goto to the Apple Support Portal :-


2. Select your country/location :-

Get-Support-Country.png
3. On the next page scroll down until you see "Get Support" and click on the link :-

Get-Support-Select.png
4. On the Next page select "Apple ID" :-

Get-Support-Apple-ID.png
5. On the next page select "Other Apple ID Topics" :-

Get-Support-Other.png
6. On the next page select "The topic is not listed" :-

Get-Support-Not-Listed.png
7. Finally enter a description of your issue in the message box :-

Gert-Support-Message.png
Just write that you can not use iMessage and that you are getting a message to contact Apple support message and quote the customer code ... you should get a response within a few minuets ... but some users have reported it taking up to an hour before they got a response.

What if they ask you for your serial number ?

The only reason they may push for a OS X S/N is to log the support ticket against it as that is standard procedure, try and take control of the conversation and steer it back to the iMessage customer code issue and away from the OS X S/N ... be assertive and confident.

If they continue to push for a OS X S/N you have a number of options, you could say you are away from home and not in front of the Mac so you may have written down the S/N incorrectly or that you've lent it to your parents or a relative. You could say it was bought from a friend or as a used system via eBay or Crags list.

If you own a real Apple Mac then you could try giving them OS X S/N from that, if its registered to you then even better and you should avoid any further discussion about the OS X S/N not being registered.

Tip: Be sure that you know what your System Type and year of manufacture is as they may ask you to confirm it.
Example: iMac 14,2 = 27" iMac Late 2013, you can use Mac Tracker to confirm this if you are not sure.
MacTracker.png
If you don't own a real Mac try giving them the S/N generated by Clover, of course you know its not registered so it's not going to be on their system, never, ever give them a leached OS X S/N that is not yours .... doing so could be classed as fraud.

They may ask you to confirm the S/N two or three times while they tried to find it on their system, in my case I was told to hang on while they tried a 'different older system' eventually they apologised for taking so long and that there must be an issue with their system.

As stated above, the only reason they want a OS X Serial Number is because Apples help-desk system asks the Apple support representative for the OS X S/N to log the issue against, in my case I was asked if I was ok with them logging the call against my AppleID, I told them thats fine and we moved on to discussing the iMessage issue.

At this point you may be asked to login into your AppleID account via the AppleID support web page and generate a temporary support pin, this is straight forward and easy to do, as long as your have a validated AppleID and at least one registered legit Apple device. If you've set up 2FA then let the operator know what you are doing, it all helps to add credibility to your support ticket.

Eventually the operator will ask you to confirm your AppleID and the Customer Code from the iMessage alert at which point it will be entered into their system and the operator should say that it accepted the code and to try logging into iMessage - if you have followed the guide correctly then you should now be up and running.

As noted above, if you have multiple devices give the operator all the customer codes, one at a time and try iMessage as each device is unlocked. I did all five of my systems in one hit.

Many users have posted very positive feedback after contacting Apple to remove the lock-out, in almost all cases they are friendly and helpful and most don't really care about the fact your using a Hackingtosh. If you want to read some positive feedback from users who have already done this take a look at posts #1043 onwards ...

If you find yourself having trouble with the operator be patent and try not to give up, keep pressing the Customer Code and use my tips above, if you do falter or have been particularly unlucky with the Apple support operator you got through and you have to end the session without resolution then give it a day or so and try again, hopefully you'll get through to a different Apple support representative who will be able to help, you can even tell them that the previous attempt wasn't successful just be calm and confident.

As noted through-out the guide once iMessage is working, try to keep all your critical ID's, OS X S/N, SM-UUID, System Type, MLB, ROM .. etc the same throughout the life of the system. The easy way to do this is to keep a backup of your /Extra folder or backup your config.plist if using Clover.

End of Chapter 8 - Return to Index
 
Last edited:
Back
Top