
- Joined
- Mar 31, 2011
- Messages
- 772
- Motherboard
- Gigabyte GA-Z97-D3H (F7)
- CPU
- i7-4790S
- Graphics
- HD 4600
- Mobile Phone
Robbish's 8yr old ATX IvyBridge Hackintosh GA-Z77-DS3H - i5-3570K - HD 4000 [OpenCore]
(Final Guide Revision 6.3)
(Final Guide Revision 6.3)
Components
Gigabyte Z77-DS3H (Revision 1.0) motherboard
Discontinued
Intel i5-3570K (Ivy Bridge) 3.8 GHz 4-Core Processor CPU
Discontinued
Noctua NH-U12S Air Cooler
Amazon US
Amazon UK - Not listed
Corsair Vengeance CMZ16GX3M4A1600C9 - 16 GB (4 x 4 GB) DDR3-1600 Mhz RAM Memory
Amazon US - Kit not listed on
Amazon UK
Broadcom BCM94360CD Wifi/Bluetooth PCIe Combo Card kit
eBay
Dell X3959 PCIe Intel Dual Port Ethernet NIC
eBay
Seagate Barracuda 2TB HDD
Amazon US
Amazon UK
Sandisk SSD Plus 240GB SSD
Amazon US
Amazon UK
Crucial BX300 CT240BX300SSD1 240GB SSD
Discontinued
Sandisk Extreme 120GB SSD
Discontinued
Pioneer BD-ROM BDC-207D
Discontinued
Corsair CP-9020054-UK RM650 80 Plus Gold 650W ATX/EPS Fully-Modular Power Supply Unit
Discontinued
Bitfenix Neos ATX Case
Discontinued
Peripherals
Apple Aluminium Wired Numeric Keyboard (1st Gen)
Discontinued
Apple Wireless Magic Trackpad (1st Gen with user replacement batteries)
Discontinued
Apple Wireless Mouse (1st Gen with user replacement batteries)
Discontinued
Logitech C920 HD Pro Webcam (1st Gen)
Discontinued
Comments
This Hackintosh has been my macOS daily driver for 8+ years. It’s used for general web browsing, media consumption, office apps, family tech support and tinkering with macOS and Windows apps. I switched to using OpenCore in Nov 2019 following the release of macOS Catalina because Clover at that time was not playing well with FileVault2 and I was having boot problems like never before.
I also retired my Pjalm DSDT that had served me well under Clover for HDMI audio, USB power, DSDT re-names and Graphics. OpenCore uses only SSDTs so this led me to create all new patches: i.e, an updated SSDT for proper Power Management, an Intel Graphics HD4000 Plist patch with working HDMI Audio and a custom USB Port Limit Patch kext.
My setup is triple boot with macOS Big Sur as my default OS, macOS Mojave for legacy apps/a boot back-up and erm Windows 10 because.. I can't escape Windows !
Installation Notes
My bootloader was created in macOS using the Dortania OpenCore Guide. Dortania covers every aspect of an OpenCore Hackintosh with extremely well written step by step guides that are clearly laid out in great detail. Please familiarise yourself with Dortania's guide in order to appreciate my build. If you don't have access to a machine with macOS installed, then you can create a macOS Recovery USB in Windows or in Linux here.
Below is a list of all the tools (including hyperlinks) that I used in macOS to setup everything;
- Disk Utility
- EFI Agent
- Hackintool
- Propertree
- Xcode
- MaciASL
- GenSMBIOS
- SSDTTime (I used the Windows version to create my SSDT-EC because I wanted to try it out !)
** Making the GA-Z77-DS3H compatible with macOS Big Sur **
IvyBridge SMBIOS is not supported in macOS Big Sur so I had to create and validate a new iMac14,4 SMBIOS serial in order to download macOS Big Sur from the App Store. For this, I signed out of my Apple ID and used GenSMBIOS with the Dortania Haswell PlatformInfo guide here
For those with a Graphics Card, I recommend iMac15,1 as it supports dGPU
iMac14,4 SMBIOS works perfectly on my IvyBridge Hack with no side effects so far. I had read that Apple plan to drop support for HD 4000 iGPUs in Big Sur so maybe a future incremental update of macOS Big Sur could eventually break support for this Hack. Let's hope not !
BIOS & Settings
To access UEFI Setup, press and hold Delete while the system is booting up
- I’m using F11a BIOS. To extract the file Z77DS3H.11a in macOS, open the downloaded BIOS file mb_bios_ga-z77-ds3h_f11a.exe with The Unarchiver app.
- Copy the extracted Z77DS3H.11a file onto a FAT32 formatted USB flash drive.
- When in the UEFI BIOS, pressing F8 takes you to the Q-Flash utility where you can flash the BIOS.
- After BIOS has been flashed, Enter Advanced Settings (if in the 3D BIOS) and then Press F7 to apply Optimized Defaults.
- We're now ready to apply our OpenCore recommended BIOS settings;
- MIT-Advanced Frequency Settings > Advanced CPU Core Features > Internal CPU PLL Overvoltage > Disabled
- BIOS Features > Fast Boot > Disabled
- BIOS Features > Secure Boot state > Disabled
- BIOS Features > CSM Support > Never
- Peripherals > Super IO Configuration > Serial Port A > Disabled
- MIT-Advance Memory Settings > Extreme Memory Profile(X.M.P.) > Profile 1
- BIOS Features > OS Type > Windows 8
- BIOS Features > Intel Virtualisation Technology > Enabled
- BIOS Features > Execute Disable Bit > Enabled
- Peripherals > SATA Mode Selection > AHCI > Enabled
- Peripherals > XHCI Pre-Boot Driver > Enabled
- Peripherals > xHCI Mode > Enabled
- Peripherals > EHCI Hand-off > Enabled
- Peripherals > XHCI Hand-off > Enabled
- Peripherals > Internal Graphics Memory Size > 64M
- Peripherals > DVMT Total Memory Size > MAX
- Power Management > High Precision Event Timer > Enabled
- With the exception of my MIT-Advanced settings, all the other BIOS settings listed are copied from the Dortania OpenCore Guide for an IvyBridge Desktop.
- All other Z77-DS3H BIOS settings not mentioned above, you should tweak to your preference.
- Internal CPU PLL Overvoltage > Disabled prevents losing USB devices (e.g, keyboard/mouse) after Wake from Sleep. Useful if you're not using a custom USB port Map).
- Serial Port A > Disabled prevents Black Screen after Wake from Sleep when using Intel HD4000 iGfx with OpenCore.
- Intel Virtualisation Technology > Enabled is the same as enabling VT-x on other BIOSes.
- CFG Lock (MSR 0xE2 write protection), OpenCore requires CFG Lock to be Off. Luckily for us, the Z77-DS3H has this hidden BIOS setting set to Off by default.
Making the macOS Installation USB
Ever since Clover, I have always made a macOS Install USB stick using Apple’s createinstallmedia method;
- Insert a 16GB USB stick (or larger) into your PC
- Launch Disk Utility > View tab > Show All Devices
- Select your USB stick e.g, Kinston DataTraveler > Erase
- Name: USB > Format: Mac OS Extended (Journaled) > Scheme: GUID Partition Map
- click Erase and macOS will now format your USB stick
- Done > close Disk Utility
- Download macOS Big Sur from the Mac App Store
- When download complete, Quit the Install macOS pop-up (the file is now in your Apps folder so leave it there)
- Launch Terminal
- Copy and paste the following into Terminal bash but don’t press enter just yet ;
Code:sudo /Applications/Install\ macOS\ Big\ Sur.app/Contents/Resources/createinstallmedia --volume /Volumes/MyVolume - Rename MyVolume to USB and when you’re ready, press Enter
- Enter your password when prompted
- Select Y once you're ready to erase the Volume i.e, USB (the usb stick, not your other drives - you’ve been warned ! )
- The build process takes about 20 minutes but YMMV
- Done > close Terminal.
Configuring my OpenCore EFI
Here I followed the Dortania OpenCore Install Guide for the Desktop IvyBridge. In this section, I'm gathering all the files for building OpenCore onto X64 > EFI > OC
My OpenCore EFI
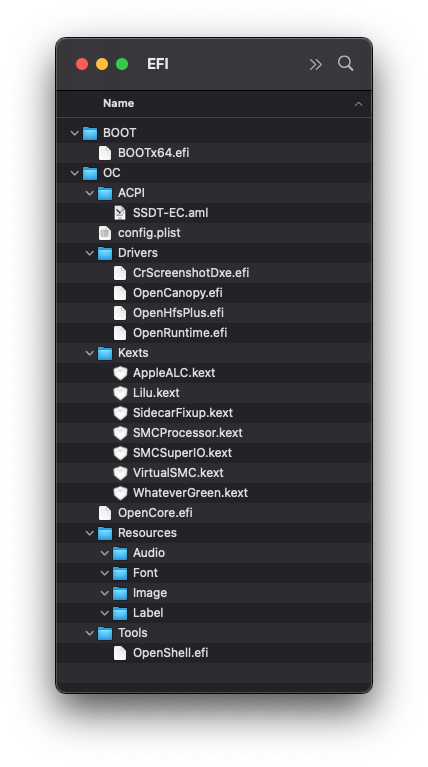
- SSDT-EC.aml - Embedded Controller /our fake EC.
- SSDT-PM.aml - Power Management and Intel Speed Step (this will be created later in Post Install)
- AppleALC.kext - Audio Codecs.
- AtherosE2200Ethernet.kext - Download this Atheros Ethernet Kext if you are using the Z77-DS3H onboard Ethernet.
- Lilu.kext - Patch Engine, this must sit at the top of the kext hierarchy in the OpenCore kext order.
- SMCProcessor.kext - CPU temperature monitoring.
- SMCSuperIO.kext - Fan speed monitoring.
- FeatureUnlock.kext - Enables Sidecar support for our unsupported SMBIOS.
- USBPorts.kext - My custom USB Port Limit Patch, (this will be created later in Post Install)
- VirtualSMC.kext - SMC emulator, macOS can't boot without it.
- WhateverGreen.kext - Graphics Patching.
- CrScreenshotDxe.efi - Enables taking Screenshots in OpenCanopy Boot Menu and Boot Text Picker
- OpenHfsPlus.efi - OpenCore will not see your macOS USB Installer, Recovery Partitions, Boot Images without this.
- OpenCanopy.efi - Provides a framework for the optional OpenCore GUI interface and it's Audio Accessibility Interface.
- OpenRuntime.efi - Replaces AptioFix.
- OpenLinuxBoot.efi - To boot Linux instead of using the Grub bootloader
- ext4_x64.efi - Provides support for OpenCore to read the 64 bit Linux file format ext4
- OpenShell.efi - Provides access to the UEFI Shell to perform command line tasks on UEFI BIOS, OpenCore, EFI and macOS. Access hidden BIOS settings, locate full drive/device paths etc. Very powerful but a potential security risk if left as a general user option on the OpenCore Picker Menu without password access.
My config.plist Setup
Here I followed the Dortania Desktop IvyBridge Settings to configure my config.plist. My Plist Editor of choice for this is ProperTree.
ProperTree has some handy features like OC Snapshot for injecting, declaring and arranging your SSDTs, Drivers and Kexts into the correct config.plist order. Plist comments removal and Bloat removal to tidy up my config.plist. The Find and Replace feature is the most useful to me when I'm updating from one OC version to the Latest version. Those features are found in ProperTree File menu ;
- OC Snapshop (cmd+R) - I use this whenever I've made additional changes e.g, adding/removing Kexts, SSDTs or Drivers.
- OC Clean Snapshop (cmd+shift+R) - used just once to initialise my config.plist (formerly Sample.plist) following a fresh build of OpenCore.
- Toggle Find/Replace Pane (cmd+F) - adds a Find and a Replace pane which is useful for locating any specific key parameter.
- Strip Comments (cmd+M)
- Strip Disabled Enteries (cmd+E) - Backup your final working config.plist before messing with this !
Caution: when applying all of your Quirks settings from the Dortania Desktop IvyBridge Settings page, please do not use the settings data from their Plist Editor screenshots. They are just 'examples' and can be out of date (a Rookie Mistake for me in the early days !)
Audio
Here are the Plist settings that I used to patch my Realtek ALC887. Note, I'm using Layout ID 11 (data value <0B000000> in Xcode). After testing all 17 layout IDs, this one gave me the best match for my onboard Sound options. Btw - You can override your current Layout ID in your boot-args like so
alcid=xxx (where x is your number choice e.g, alcid=12).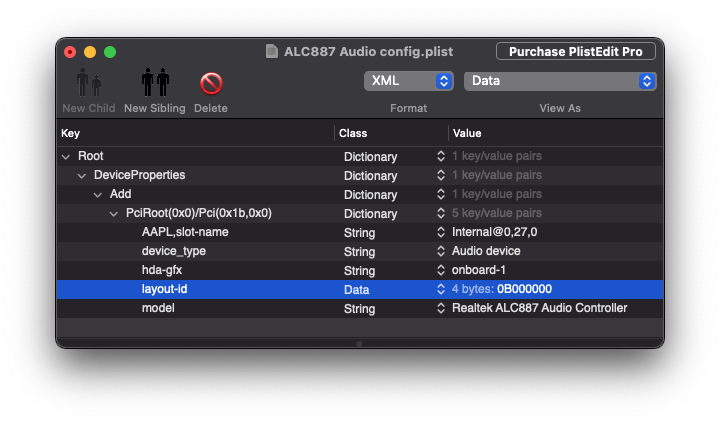
Here are the Plist settings that I used to patch my Intel HD Graphics 4000. Note, I'm using framebuffer 0x0166000B (data value <0B006601> in Xcode). This framebuffer is for type: Desktop and connectors: 3 so resembles my motherboard/CPU combo. (see the Acidanthera Whatevergreen website for more detail on this).

Video (Graphics Card Users)
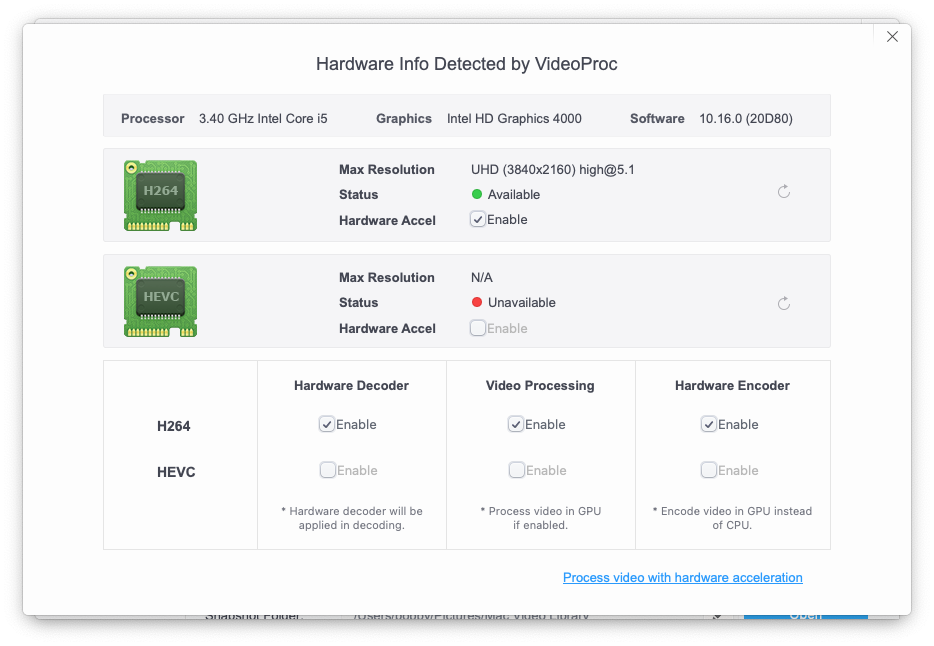
I don't have an External Graphics Card (dGPU) however for those that do, you can take advantage of Intel Quick Sync by keeping the HD4000 active in Headless Mode. To do this, just change the AAPL,ig-platform-id Data value from <0B006601> to <07006201>
 For cosmetic reasons, rename model String to Intel HD Graphics (Headless) and that will appear in your System Information > Hardware > PCI > Card info.
Note 1: If you have a AMD RX5000 series graphics card then you will have to add
As I mentioned earlier, I recommend iMac15,1 (a dGPU based SMBIOS) for those with a graphics card over iMac 14,4 (an integrated graphics based SMBIOS) although both should work either way.
Note 2: that you will also need to change your BIOS settings to accommodate your External Graphics card (dGPU). Those BIOS settings are not covered in my guide so I will link EdHawk's advice on dGPU BIOS Settings for a GA-Z77 motherboard.
credits: @pit512 and @Edhawk
I don't have an External Graphics Card (dGPU) however for those that do, you can take advantage of Intel Quick Sync by keeping the HD4000 active in Headless Mode. To do this, just change the AAPL,ig-platform-id Data value from <0B006601> to <07006201>
Note 1: If you have a AMD RX5000 series graphics card then you will have to add
agdpmod=pikera to your boot-argsAs I mentioned earlier, I recommend iMac15,1 (a dGPU based SMBIOS) for those with a graphics card over iMac 14,4 (an integrated graphics based SMBIOS) although both should work either way.
Note 2: that you will also need to change your BIOS settings to accommodate your External Graphics card (dGPU). Those BIOS settings are not covered in my guide so I will link EdHawk's advice on dGPU BIOS Settings for a GA-Z77 motherboard.
credits: @pit512 and @Edhawk
Validate your config.plist
You can check your completed config.plist on the OpenCore Sanity Checker website..
- Open the ocvalidate folder. It is located inside the Utilities folder from the latest OpenCore Release download.
- Open your EFI > OC folder showing your config.plist
- Launch the Terminal and drag the ocvalidate command into the Terminal window.
- Drag your config.plist into the Terminal window.
- Now press Enter.
- If ocvalidate displays any errors e.g,
../EFI/OC/config.plist in 3 ms. Found 7 issues requiring attention.it will list which parameters have the problem. In that case, re-check your config.plist settings, compare them with the sample.plist to see if you can spot any mis-matching in the formatting or any missing Quirks introduced from the latest OC release update. - Ideally, you will have no issues e.g,
../EFI/OC/config.plist in 5 ms. No issues found. - If No Errors, mount your USB stick's EFI partition, copy your OpenCore EFI build to there and you're good to go..
Tip: don't forget to enable Verbose mode -v on your config.plist so that you can see what's gone wrong if your PC stalls during macOS boot. I recommend
-v keepsyms=1 debug=0x100 as this boot-args combo should halt a restart loop.Clover Users.. Time to clean house !
For users with macOS already installed and making the jump from Clover to OpenCore, Dortania have detailed some macOS clean-up for you to do. This would be the time to do it ! (see Clover Conversion)
Install macOS
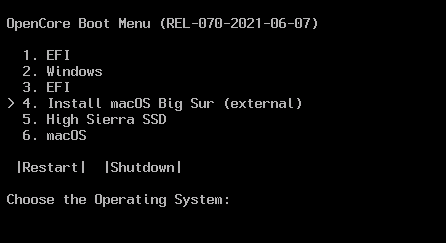
- Reboot into BIOS Boot Override i.e, press and hold the F12 key while the system is booting up.
- Locate your macOS Install USB stick from the drive list
Note: if you see two instances of your USB stick then you must select the version with the UEFI prefix (the other option creates a legacy drive which is no good for us !) - You have now successfully booted into OpenCore:
- Arrow up or down to option #. Install macOS Big Sur (External) and press Enter to start installer.
- When the macOS installer reaches the setup page, install and setup macOS Big Sur.
TIP: Do Not sign into your Apple ID (iServices) until you have created and validated a compatible macOS Big Sur SMBIOS and your Network devices are configured in the correct order e.g, Lan = en0, Wifi = en1, Bluetooth = en2
- Mount your macOS EFI System Partition (ESP)
- Mount your OpenCore USB stick EFI Partition
- Copy your OpenCore EFI from USB to your macOS ESP


Fix TRIM
macOS Big Sur broke Third Party TRIM so launch Terminal and run the Trimforce command which will force a Reboot:
Code:
sudo trimforce enablePower Management
Here, I used the PikeRAlpha method with the Dortania guide to create my power management SSDT-PM patch. I've combined the info below to illustrate all my steps;
- Launch your config.plist in ProperTree and for now Enable the ACPI DropTables;
- ACPI > Delete > Delete CpuPm (set All = True and set Enabled = True)
- ACPI > Delete > Delete Cpu0Is (set All = True and set Enabled = True)
- Save & Reboot
- Lets download Pike R. Alpha's ssdtPRGen v21.5 Beta
Note the scripts below are taken from PikeRAlpha's GitHub page here and will download to our Home directory (~)
Launch Terminal and Run the following scripts line by line;
Code:curl -o ~/ssdtPRGen.sh https://raw.githubusercontent.com/Piker-Alpha/ssdtPRGen.sh/Beta/ssdtPRGen.sh
- We now have to change the permissions of the file (adding +x) to make it run
Code:chmod +x ~/ssdtPRGen.sh - We can now generate our Power Management SSDT by running;
OR, Overclockers can override their stock CPU frequency to match their overclock like I did for my 4.2GHz Overclock here;Code:~/ssdtPRGen.sh -m iMac13,2 -b Mac-FC02E91DDD3FA6A4
Code:~/ssdtPRGen.sh -m iMac13,2 -b Mac-FC02E91DDD3FA6A4 -f 4200 - Do you want to continue (y/n)?
y
this outputs: Compilation complete. 0 Errors, 0 Warnings, 0 Remarks, 0 Optimizations
- Do you want to open ssdt.dsl (y/n)?
n
- To locate your newly generated Power Management SSDT, launch Finder and in the Menu bar select Go > Go to folder...
- Type ~/Library/ssdtPRGen then click Go
- Copy your ssdt.aml to your Desktop and rename it as SSDT-PM.aml
- Mount your EFI and move your SSDT-PM.aml to EFI > OC > ACPI
- Launch your config.plist in ProperTree and select cmd+R (OC snapshot), this will inject and enable SSDT-PM.aml into your config.plist.
- Don't forget to Disable ACPI DropTables now that they are no longer needed;
- ACPI > Delete > Delete CpuPm (set Enabled = False)
- ACPI > Delete > Delete Cpu0Is (set Enabled = False)
- Save & Reboot.
For some realtime hardware monitoring, I recommend that you install Intel Power Gadget here and HWMonitorSMC2 here
I ran some tests with the AppleIntelInfo.kext and over time, I achieved successful results below;

As you can see below, my Overclock is recognised but for reasons unknown, my P-States cap out at 38 instead of ramping up through to 42 but hey.. that's an issue for another day !

Tweak Energy Saver
- Uncheck Wake for network access (your network is probably active on 24/7 due to your smart devices. Your Hackintosh doesn't need to be)
- Uncheck Enable Power Nap (otherwise your Hack will wake later in the night, sleep again and repeat)
- Check or Uncheck the other functions in Energy Saver to your preference.
OpenCore GUI
OpenCore gives you a Text Picker by default but no GUI out of the gate. Thankfully, they have an optional download containing a feature rich Resources folder that includes a collection of OpenCore GUI themes; Chardonnay, Syrah and the Big Sur inspired GoldenGate theme icon set. They're OK but I prefer using Minimal Theme created by a third party dev called tekteq ;

(requires OpenCore version 0.7.0 or later + the latest Resources folder from OcBinaryData)
- Download OcBinaryData from the Acithandera GitHub.
- Locate the Resources > Image > Acidanthera folder. We're going to add our own folder to it.
- Create a folder called tekteq and create a sub folder inside that called Minimal
- Locate the Resources > Image > Acidanthera > GoldenGate > folder and open it.
- Copy all the .icns images files from the GoldenGate folder and paste them into the Minimal folder that you created earlier.
- Next, download opencanopy-minimal-theme-main.zip from the tekteq GitHub
- Locate it's own Resources > Image folder containing all the minimal theme .icns image files and Select All.
- Copy all of the minimal theme .icns image files into the Minimal folder you made earlier.
- Note: Copying will stall because all the .icns file names will be of the same so check box the Yes to All option and all the relevant .icns files will be replaced with the much cooler tekteq versions, keeping a few original .icns files intact to maintain compatibility with OpenCanopy.
- With this prep complete, mount your macOS EFI System Partition.
- Copy the modified Resources folder from OcBinaryData
- Paste/Replace the existing empty Resources folder located in EFI > OC > Resources
- Launch the config.plist in the Plist Editor and make the following settings;
- Misc > Boot > Hide Auxiliary : True
- Misc > Boot > PickerMode : External
- Misc > Boot > PickerAttributes : 17
- Misc > Boot > PickerVariant : Acidanthera\tekteq\Minimal
- UEFI > Drivers > OpenCanopy.efi
- Save & Reboot to view your themed GUI or feel free to change PickerVariant to display a different theme.
- Navigate the GUI using the Arrow keys, press Enter to select or press the Spacebar to reveal hidden options like Recovery, Reset NVRAM and OpenShell (in my case) thanks to the Hide Auxiliary quirk. Tab to select Restart or Shutdown

Never Mind The Picker Bollocks.. I wanna boot straight to macOS !
if you prefer to bypass the Picker screen altogether and boot straight from BIOS to macOS (like switching on a real Mac) then set your config.plist like this:- Misc > Boot > ShowPicker : False
Custom USB Port Limit Patch
Although USB ports will function perfectly fine on this motherboard without enabling a Port Limit Patch Quirk, I had on occasion, experienced the odd USB device disconnection from my case Front Panel USB Ports. I fixed the issue by creating my own USB Port Limit Patch kext in the fantastic Hackintool.

- Grab a USB2 stick, a USB3 stick and if you have one, a Bluetooth Keyboard and a BT Mouse.
- Download the latest Sniki USBInjectAll.kext v0.7.6 (don’t use v0.7.5, I did try it initially but had no success with it !)
- Mount your macOS drive EFI
- Move USBInjectAll.kext to your OC Kext folder
- Launch Propertree Plist Editor > File > Open > config.plist
- File > OC Snapshot (this injects the kext in the hierarchy and enables it)
- Go to Kernel > Quirks > XhciPortLimit > True
- Save & Exit
- Unplug all of your USB devices except your USB Keyboard and USB Mouse otherwise remove them too if you are using a Bluetooth keyboard and BT mouse.
- Reboot your PC and log back into macOS
- Launch Hackintool and select the USB icon from the top pane. We are ready to test our ports.
fig. 1 - Default.
- Insert your USB 2 stick into All USB ports one by one, noting on each go, the USB Port Name listed on the Hackintool interface e.g, HP3, HSP1, etc. Hackintool will mark port discovery in green as you go.
TIP: you can fill out the comments field in Hackintool like I did if you prefer (Right Click the comments field to use it). - Insert your USB 3 stick into the USB3 ports ONLY and again noting on each go, the USB Port Name from Hackintool.
Fig. 2 - USB Ports Discovered.
- That’s all the ports tested, let’s remove all of the Unknown ports first. Highlight the Unknowns and hit the “ - “ symbol in Hackintool to delete. TIP: if you hold down the cmd key and click each Unknown with the mouse then you can remove them in one go.
- Next, count how many Discovered Ports that you have left and then delete a few more until you are left with 15 USB Ports. Do not delete IOUSBHostDevice because it will disconnect Bluetooth USB Host Controller.
- To generate your custom USBPorts.kext, click the Export symbol in Hackintool and “Voila !” you'll have 4 files on your desktop. You can bin the others as you only want the kext.
- To use the kext, mount your macOS drive and delete USBInjectAll.kext v0.7.3 from your OC kext folder, replacing it with your custom USBPorts.kext
- Launch Propertree > File > Open > config.plist
- File > OC Snapshot (this Injects USBPorts.kext in the kext hierarchy and Enables it)
- Go to Kernel > Quirks > XhciPortLimit > False
- Save > Exit > Reboot
- Log back into macOS, launch Hackintool and select the USB tab icon.
fig. 3 - Custom USB port Limit Patch Working.

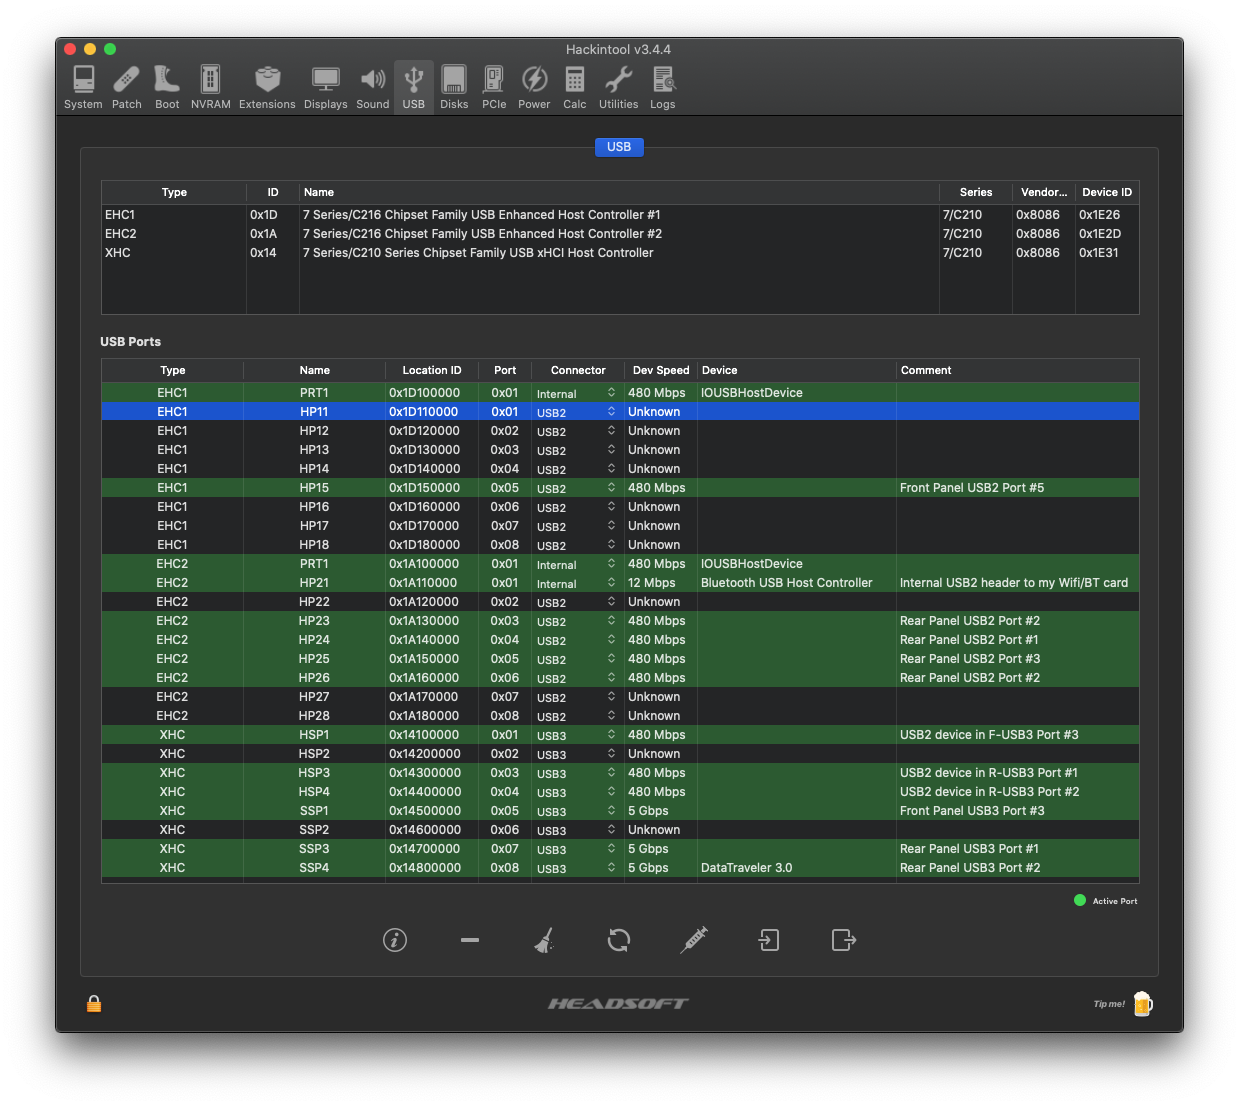


If the Hackintool USB screen reverts to displaying the default e.g, like the image in Fig.1 then hit the Refresh symbol and it should display your 15 USB configured Ports only. If that fails then reboot and Reset NVRAM. Boot back into macOS and the USBPorts.kext should take.

Multbooting OSes
I recommend having multiple OSes on their own separate drive. This keeps things simple, safe and manageable. My macOS Drive is the first drive in the BIOS boot priority order so that it's EFI (containing OpenCore) manages all the bootable drives. I only have my OS and Apps on the boot drive. My User folder is actually on a 2TB Hard Drive. I have not detailed how I did that in this guide because I used the outdated Lnx2mac method which I no longer recommend.
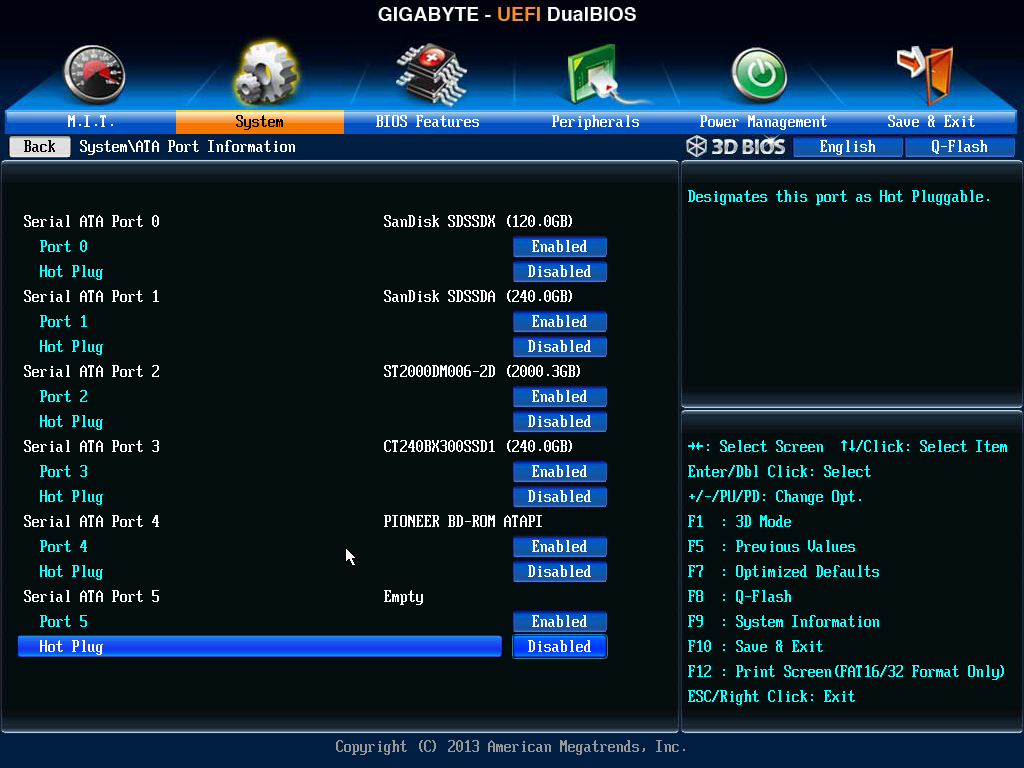
When installing a different OS, I recommend disconnecting all the other OS Drives to avoid accidents or corruption. If you don't fancy opening up your case and disconnecting drives (disturbing your proud cable management) then Enter the BIOS and Disable all the other Drives e.g, System > ATA Port Information > Port No# > Disabled (You can Re-enabled them later !)
Installing Windows via USB
If you see two instances of your Windows 10 USB stick in the BIOS then you must select the version with the UEFI prefix. This ensures that you install Windows in GPT (UEFI mode) and not Legacy MBR.
OpenCore Settings for Windows 10
I noticed when viewing msinfo in Windows 10 that my PC was listed as System Manufacturer: Acidanthera instead of Gigabyte Co. Z77-DS3H etc,. This could potentially conflict with Windows Activation. Luckily Milliuco solved this issue in his Z390 Aorus Elite build (credits: @miliuco)
Launch the config.plist in the Plist Editor and make the following settings;
- Kernel > Quirks > CustomSMBIOSGuid : True
- PlatformInfo > UpdateSMBIOSMode : Custom
- Save, Exit and Reboot into Windows
- Type msinfo in Windows Search and it should now display all your PC information correctly.
Apple Peripherals in Windows 10
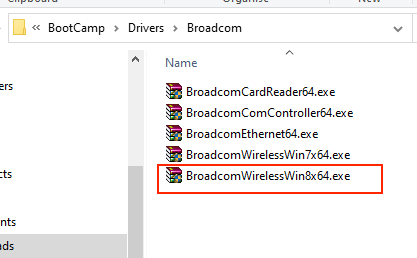
If you're using an Apple Magic Trackpad, Apple Broadcom Wifi/BT, etc, in Windows then download Apple's Boot Camp Support Software 5.1.5769. In Windows, extract the file from Boot Camp Support Software 5.1.5769 and locate the Drivers folder. The Apple folder and the Broadcom folder contains Windows drivers in executable form for those Apple peripherals.

Enabling Trackpad Gestures in Windows 10
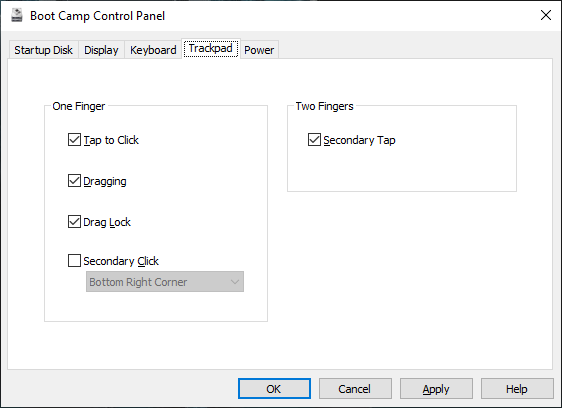
The Boot Camp Support Software 5.1.5769 also contains BootCamp Setup.exe located in the BootCamp folder. Installing this will give you a Boot Camp Control Panel (accessible from the Windows Task Bar) where you can enable a few Trackpad gestures.


Fix Incorrect Time in Windows after Dual Boot
Multibooting between different OSes tends to throw Windows Time out of sync with macOS or Linux. This can be fixed with a small Registry Edit in Windows. Fortunately, Hackintool will generate Windows UTC Registry files for you to execute in Windows. You get two files, one to apply the fix and the other to reverse the fix. The files will auto edit the registry for you. Of course, you only need to use one of the files.

Set Your Default OS
Want OpenCore to boot to your preferred OS each time until you interrupt the Picker time out for a different OS ? then set your preferred OS daily driver as the default in macOS Startup disk.

Remove Verbose mode -v from your boot-args and Disable AppleDebug at the start of boot:
- Misc > Debug > AppleDebug : False
- Misc > Boot > PollAppleHotKeys : True
What Works
- OpenCore v0.7.0 including Boot Menu screenshots
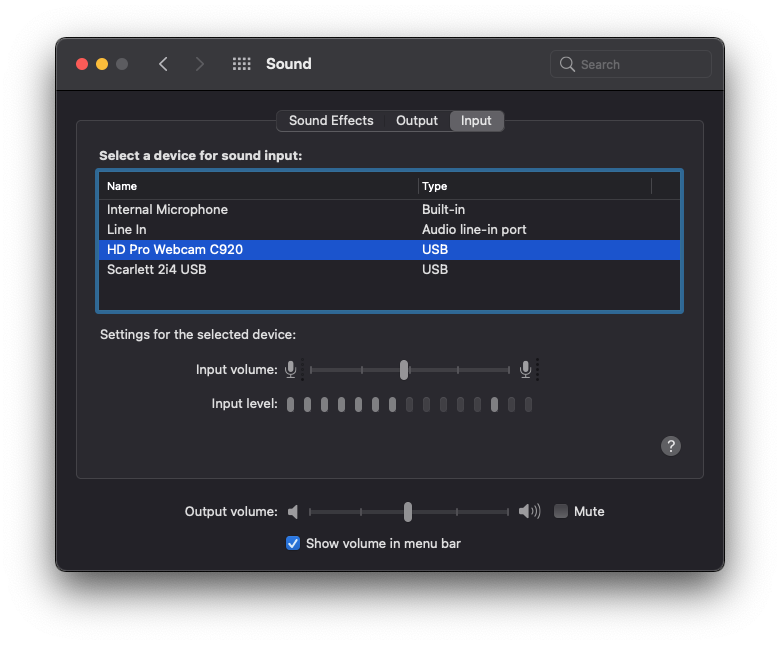
- Audio: Rear Out Port (Green), Front Panel Headphone and Line In jacks, HDMI Audio, Line In (Pink)
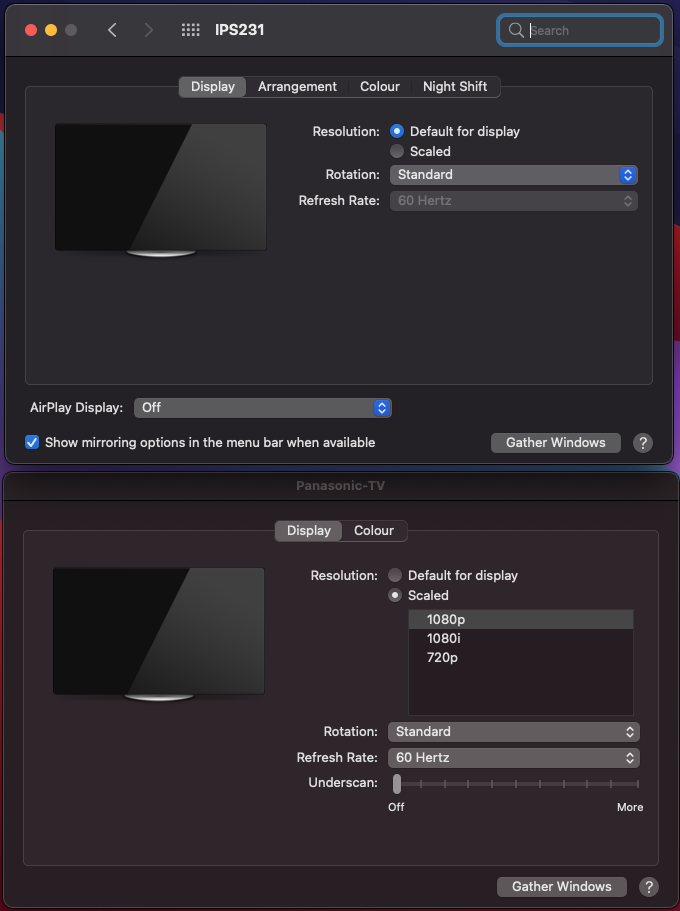
- Video: DVI-D and HDMI, Quartz Extreme (QE/CI) and Metal supported
- Ethernet: Dell X3959 PCIe Intel Dual Port NIC card works OOB (so I have Disabled my onboard Atheros Ethernet)
- Broadcom BCM94360CD Wifi/Bluetooth PCIe Combo Card kit both work OOB
- Sleep, Wake and Shutdown
- Native NVRAM
- FileVault2
- iServices: Messages, FaceTime, Apple Music 1, AppleTV app (Trailers Only).
- Handoff and Airdrop
- Sidecar is now available in System Preferences and works (Wired Only) on my incompatible 2017 iPad. It does not respond to iPad touch gestures though.
- Power Management / Intel SpeedStep
- Netflix and Amazon Prime only work in Google Chrome however BBC iPlayer works fine in Safari
- Triple Boot (macOS Mojave - macOS Big Sur - Windows 10 ) + macOS Recovery
- Software Updates install and reboot to the correct drive and macOS installer without further intervention from the user.
What Doesn’t Work
- AppleTV app plays to a Green Screen for all Paid For Content.
- VGA Out displays the OpenCore GUI but the VGA screen goes blank when loading macOS and in turn scrambles my HDMI connected screen.
- SSDT P-States: 39, 40, 41 and 42.
- Display sleep slider in Energy Saver doesn't sleep the Computer. My previous SMBIOS macmini6,2 had both Display sleep and Computer Sleep slider options. Sleep works but I have to use the Schedule Sleep function to time my PC to sleep.
- Corsair RM650 PSU Fan Shut-Off (when in low power usage) only works in Windows but not in Mac.
Credits
- vit9696 & The HermitCrabs Lab, CorpNewt, khronokernel/Dortania, GitHub, @headcaze, PikeR.Alpha, Rehabman, Apple, Tonymacx86, Stork, CaseySJ, r/Hackintosh, u/tekteq, blackosx, InsanelyMac, Lifehacker and all the Hackintosh Community out there.
- Honorable mentions; Linux, Microsoft, Chameleon Devs, MacMan, Clover Devs, Mackie100, Lnx2Mac, Pjalm and Toleda.
- YouTubers: Alexey Boronenkov (if only I could understand Russian.) and Peter Paul Chato.
Attachments
-
Z77-DS3H OpenCore EFI.zip8.4 MB · Views: 1,158
-
v0.6.8 OC EFI Z77-DS3H.zip8.4 MB · Views: 510
-
OC v0.6.9 EFI for Z77-DS3H v2.zip11.2 MB · Views: 408
-
OC v0.7.0 EFI for Z77-DS3H.zip12.2 MB · Views: 347
-
OC v0.7.1 EFI for Z77-DS3H.zip11.9 MB · Views: 311
-
OC v0.7.2 EFI for Z77-DS3H.zip12 MB · Views: 331
-
OC v0.7.3 EFI for Z77-DS3H.zip13.3 MB · Views: 339
-
Z77-DS3H OC v0.7.4 EFI.zip13.4 MB · Views: 342
-
Z77-DS3H OC v0.7.5 EFI.zip13.4 MB · Views: 364
-
Z77-DS3H OC v0.7.6 EFI.zip13.7 MB · Views: 1,316
Last edited:
")