- Joined
- Apr 28, 2011
- Messages
- 909
- Motherboard
- Asus Prime Z690M-Plus D4
- CPU
- i7-12700KF
- Graphics
- RX 6600
- Mac
- Mobile Phone
Giacomoleopardo's Prodigy MacMini 6,2 Gigabyte GA-Z77N-WiFi | Intel® Core™ i7-3770K Step by step guide
Components
INTEL Core i7 Ivy Bridge 3770K - 3,5 GHz
http://www.amazon.it/dp/B007X1JM30/?tag=tonymacx86com-21
http://www.newegg.com/Product/Product.aspx?Item=N82E16819116501
Gigabyte GA-Z77N-WIFI Motherboard
http://www.amazon.it/dp/B009GB87N6/?tag=tonymacx86com-21
http://www.newegg.com/Product/Product.aspx?Item=N82E16813128568
Corsair 16GB Vengeance Low Profile DDR3 1600MHz Black, CML16GX3M2A1600C10
http://www.amazon.it/dp/B008UY5MFG/?tag=tonymacx86com-21
http://www.newegg.com/Product/Product.aspx?Item=N82E16820233280
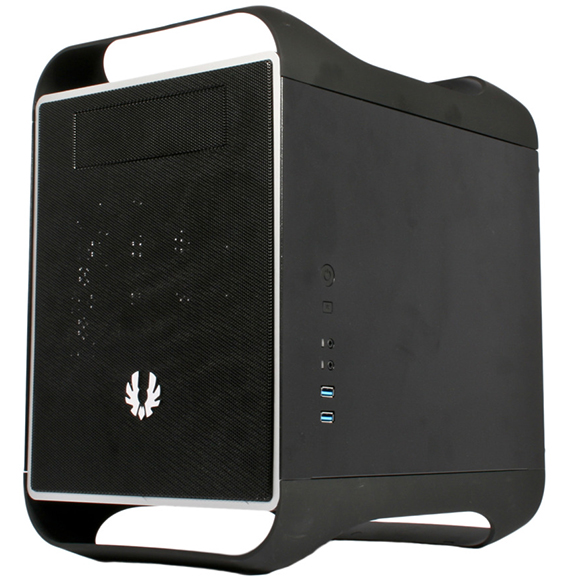
BitFenix Prodigy Case Mini-ITX - black
http://www.amazon.it/dp/B008BZVTX8/?tag=tonymacx86com-21
http://www.newegg.com/Product/Product.aspx?Item=N82E16811345016
GIGABYTE GeForce GTX 650 Ti - 1 GB GDDR5
http://www.amazon.it/dp/B00BFX5YMA/?tag=tonymacx86com-21
http://www.newegg.com/Product/Product.aspx?Item=N82E16814125447
Cooler Master GX650W 80 bronze PSU
http://www.amazon.it/dp/B0035QAKOM/?tag=tonymacx86com-21
http://www.newegg.com/Product/Product.aspx?Item=N82E16817171052
Crucial M4 CT128M4SSD2 2.5" 128GB SATA III MLC Internal Solid State Drive (SSD)
http://www.amazon.it/dp/B004W2JKZI/?tag=tonymacx86com-21
http://www.newegg.com/Product/Product.aspx?Item=N82E16820148442
Seagate Barracuda ST2000DM001 2TB 7200 RPM 64MB Cache SATA 6.0Gb/s 3.5" Internal Hard Drive
http://www.amazon.it/dp/B006CKCRMQ/?tag=tonymacx86com-21
http://www.newegg.com/Product/Product.aspx?Item=N82E16822148834
Noctua NH-U9B SE2 92mm SSO CPU Cooler
http://www.amazon.it/dp/B002SLJMQ2/?tag=tonymacx86com-21
http://www.newegg.com/Product/Product.aspx?Item=N82E16835608016
LG 24X DVD Burner
http://www.amazon.it/dp/B00A6S6VKE/?tag=tonymacx86com-21
http://www.newegg.com/Product/Product.aspx?Item=N82E16827136259
Belkin Mini Bluetooth Adapter F8T016
http://www.amazon.it/dp/B0055ZPQOK/?tag=tonymacx86com-21
http://www.newegg.com/Product/Product.aspx?Item=9SIA07R08U5947
Apple wired keyboard
http://www.amazon.it/dp/B005DQ0DFI/?tag=tonymacx86com-21
Apple Magic Mouse
http://www.amazon.it/dp/B002NX0M8C/?tag=tonymacx86com-21
http://www.newegg.com/Product/Product.aspx?Item=N82E16826101010
Atheros AR9280 AR5BHB92 half size mini PCI-E Wireless
http://www.ebay.it/itm/Atheros-AR9280-AR5BHB92-half-size-mini-PCI-E-Wireless-HP-495848-004-/360635770034?pt=DE_Computing_Notebook_Porterweiterungskarte&hash=item53f79124b2&_uhb=1#ht_3524wt_1414
Mountain Lion 10.8.3 Retail Mountain Lion 10.8.4 Retail
http://www.apple.com/osx/
Comments
DB, a dear friend of mine, asked me for a video editing machine with low budget (more or less) and here it is: a mini hack made to have fun with final cut, premiere, logic and stuff like that.
Here is a step by step guide for those who want to build their own edit machine.
First of all he chose the components. Of course I said my opinion, and as a matter of fact installation went flawless, without major issues. I didn't take pictures about it, but you can enjoy a little timelapse I posted at the end of this guide.
Some useful advices:
- Change wifi card, and put Atheros AR9280, it works OOB
- I used Belkin 2.1 bluetooth adapter, it works OOB and works in UEFI Bios and Chimera bootloader screen as well
- Learn how to extract and edit dsdt. This mobo doesn't need it, actually, but in order to optimize the system and have a more vanilla OS as possible DSDT is the key. So basically, everything works on this machine, except a little minor issue when, waking from sleep, usb devices appear disconnected (and instantly auto-reconnected).
That's it! Let's start with the guide. Have fun!
Installation
Tools:
- Download the latest non-beta UEFI Bios from Gigabyte web site (F2 version at the time of writing)
- UniBeast for Mountain Lion and MultiBeast for Mountain Lion (registration required)
- MaciASL Open Beta for editing .aml files
- MaciASL patches from MaciASL Patch Repository Thread
- KextBeast (registration required)
- Chameleon Wizard (registration required)
- Kext Wizard
- Show All Files (registration required)
- IORegistryExplorer attached by toleda in his post#1 (registration required)
- Trim Enabler by Groths
- A working Mac or Hackintosh machine (or use iBoot method to start from scratch, if you don't have a Mac)
- Internet connection
Step 1 - Update and setting UEFI Bios
- Power on the PC and press DEL key to gain Bios screen
- Check Bios version in the first screen (M.I.T), something like this
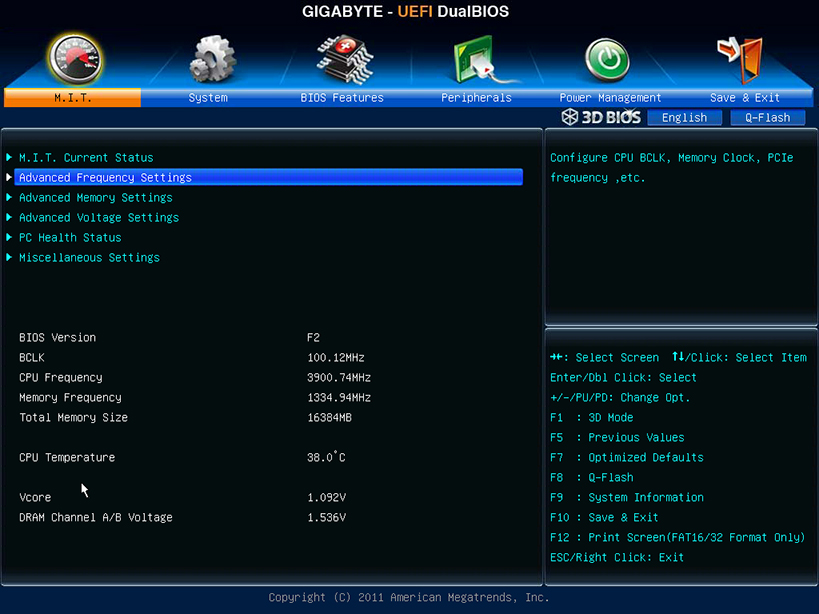
- If your bios is already the last one just skip this step, otherwise put your bios file (not the .exe file, the .bin or .rom file!) in a FAT formatted usb pen drive and update with Gigabyte Flash Update utility (check in bios or in mobo's manual wich is the key to press at boot to do that)
- Press F7 to load Optimized Default Settings
- Set parameters as in these pictures
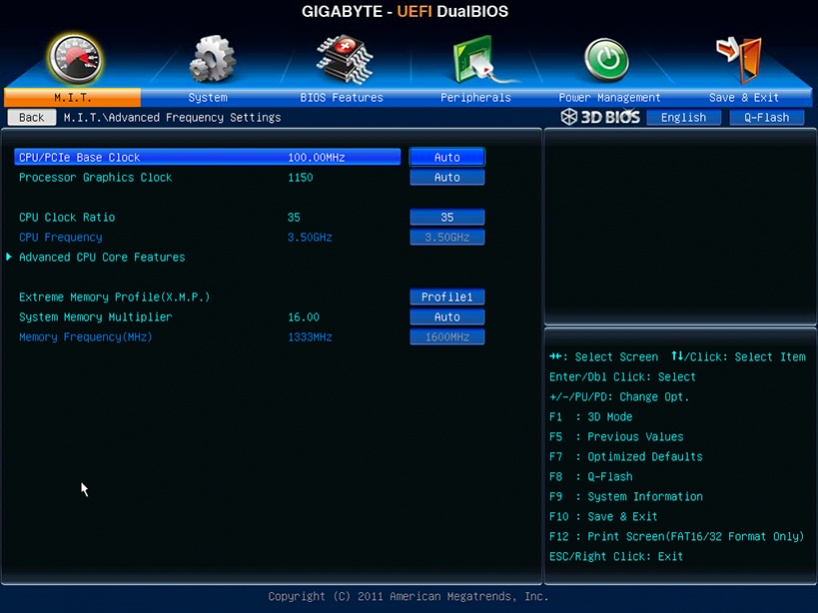
PAY ATTENTION! The following screenshot will show default Turbo Ratio values of i7 3770K. If you want to overclock change those values, and most important, keep the max Turbo Ratio value you set in mind (the first two are usually the highest), you'll need to set proper Power Management generating SSDT.aml (don't worry, we'll get there soon).
UPDATE #3: I've found that Internal CPU PLL Overvoltage can jeopardize wake from sleep function: If so, consider to set it as Disabled.

as exemple, here it is a little overclock (I'll leave that to 41 as max Turbo Ratio value, that means 4100 MHz as max CPU turbo frequency)
Side Note: still Internal CPU PLL Overvoltage should be set as Disabled to avoid wake from sleep issue (UPDATE #3)

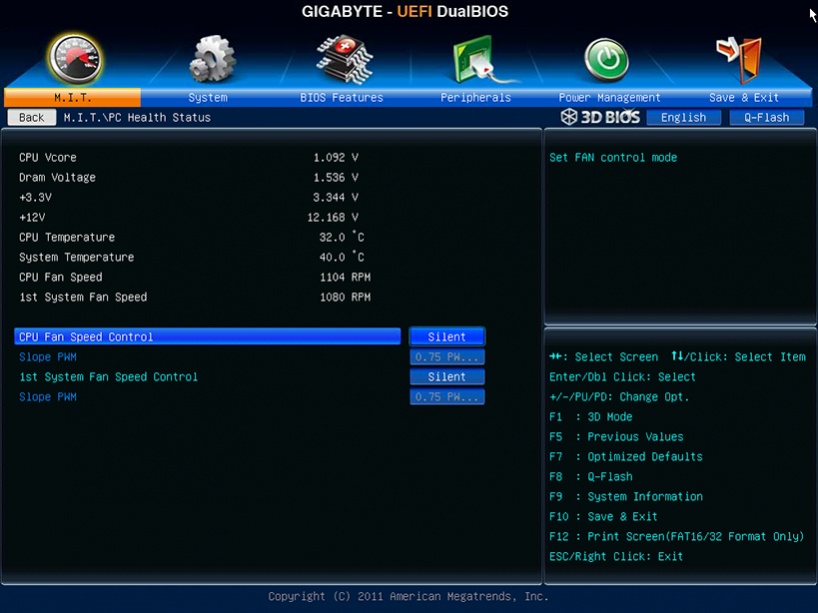
The next screen shows the fans settings: since the case I choose has a lot of room (and good air flow), I set the fans as "Silent". Choose at your convenience
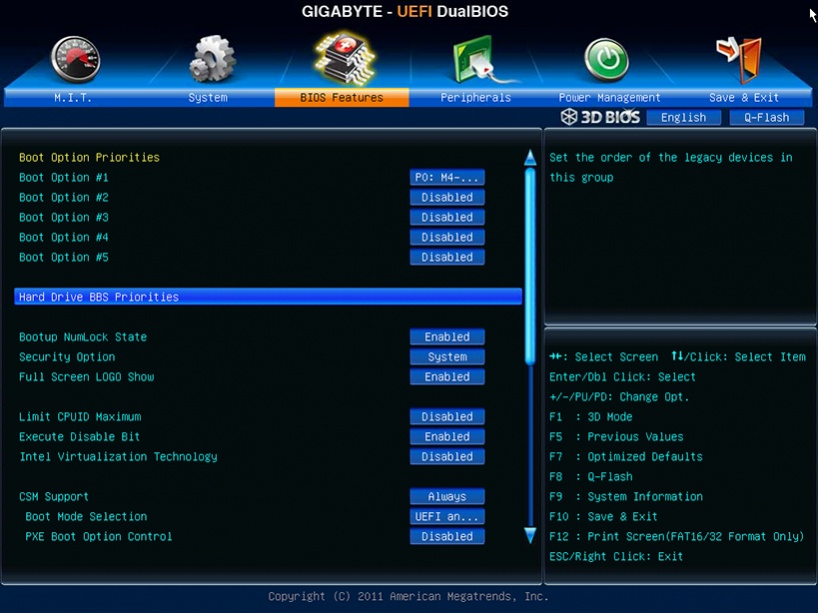

PAY ATTENTION! The next one will show you the right sets for discrete graphics. If you don't have a graphic card, set Init Display First as IGFX (PEG stands for discrete graphic). With discrete graphics don't set Internal Graphics as Enabled: it won't work.

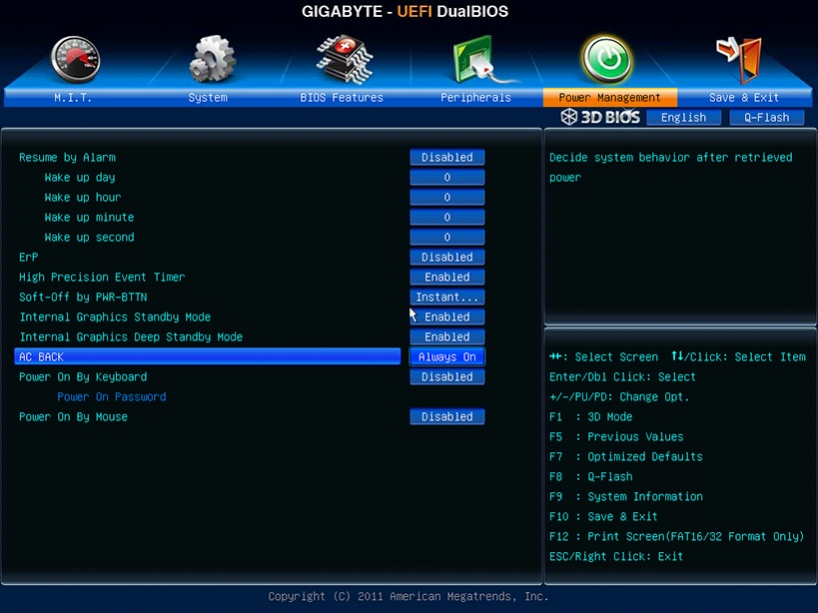
- Set boot orders at your convenience, then press F10 key to save settings.
You're ready to boot into usb UniBeast install flash drive.
- Check Bios version in the first screen (M.I.T), something like this
- If your bios is already the last one just skip this step, otherwise put your bios file (not the .exe file, the .bin or .rom file!) in a FAT formatted usb pen drive and update with Gigabyte Flash Update utility (check in bios or in mobo's manual wich is the key to press at boot to do that)
- Press F7 to load Optimized Default Settings
- Set parameters as in these pictures
PAY ATTENTION! The following screenshot will show default Turbo Ratio values of i7 3770K. If you want to overclock change those values, and most important, keep the max Turbo Ratio value you set in mind (the first two are usually the highest), you'll need to set proper Power Management generating SSDT.aml (don't worry, we'll get there soon).
UPDATE #3: I've found that Internal CPU PLL Overvoltage can jeopardize wake from sleep function: If so, consider to set it as Disabled.
as exemple, here it is a little overclock (I'll leave that to 41 as max Turbo Ratio value, that means 4100 MHz as max CPU turbo frequency)
Side Note: still Internal CPU PLL Overvoltage should be set as Disabled to avoid wake from sleep issue (UPDATE #3)
The next screen shows the fans settings: since the case I choose has a lot of room (and good air flow), I set the fans as "Silent". Choose at your convenience
PAY ATTENTION! The next one will show you the right sets for discrete graphics. If you don't have a graphic card, set Init Display First as IGFX (PEG stands for discrete graphic). With discrete graphics don't set Internal Graphics as Enabled: it won't work.
- Set boot orders at your convenience, then press F10 key to save settings.
You're ready to boot into usb UniBeast install flash drive.
Step 2 - Mountain Lion Installation
- install Mountain Lion with UniBeast method as explained in Tonymac's guide. Note: if you have trouble booting, you'll probably have to type -x before hitting enter, otherwise you won't reach installation screen. Take your time, install process will take 15-20 minutes.
- Reboot from Unibeast and at Chimera screen choose your new OSX installed partition (probably still typing -x)
- Assuming you have all of the tools mentioned above, now we have to take care of DSDT. This is one of the most important steps of the installation process, many people don't care about DSDT (even with Gigabyte boards) and probably they are satisfied in that way (I was!) as their system works, but to optimize the components, make a hackintosh as close as possible to a real Mac and more vanilla as possible, DSDT is the key to do that. My advice is: learn how to edit dsdt, spend some time (or headache!), and new perspectives will open to you as hackintosher. This guide is not really about a DSDT editing, but in this section I will explain what and why I did it, in order to make anyone able to compile his own DSDT, not just trying to use others' one. So:
UPDATE #1
Thanks to the massive work of forum moderator PJALM, and the support of forum moderator SJ_Underwater, now only two patches are necessary to make this board fully functional. Simply follow these steps (the red ones are not necessary anymore, but basically are the same job that PJALM patch does).
- Download MaciASL from here, unzip it and open it. It automatically will open a "clean" DSDT. It's important to know that these patches can be applied just one time, so if you want re-patch dsdt you'll have to start from a clean dsdt.aml again. So my advice is: save a backup copy of this file just in case you need to re-patch it. To do that just go to MaciASL menu bar click on File/Save as, choose the directory where you want to keep your backup clean dsdt, select Disassembled ASL file as File Format and name it "clean dsdt".
- in Menu bar open MaciASL\Preferences and select Sources in Preferences window
- set iASL as ACPI 5.0 as in the following picture
 - select sources icon, click on "+" to add Name and URL of the patches that you need: in my case they are
- Close completely MaciASL and re-open it: again a clean DSDT will appear as before, click on Patch command: now in the left side of the Patch window you should see all the patches we've just added like this
 - Under PJALM Gigabyte choose your motherboard's patch, click on Apply, then Close. Now click on Compile command: no Errors, Warnings nor Remarks should appear, but some Warnings may stay: they won't affect your installation; the mandatory thing is NOT TO HAVE ERRORS when compiling a DSDT! Go on
- Re-open patch windows and under PJALM Graphics select
The next red steps are not necessary anymore, but I leave them here 'cause they're still valuable infos
- Apply USB Multiplex from PJALM Intel7 patch, this method is based on Forum member Mieze's work
PAY ATTENTION! As mrengles stated, this method will work ONLY with these System Definition:
/END UPDATE #1
- Compile DSDT from MaciASL (0 Errors, 0 Warnings, 0 Remarks, XX Optimizations) and save it as DSDT.aml (add extension manually) on desktop (This time, choose ACPI Machine Language Binary File Format).
Your DSDT is finally ready to be used for installation
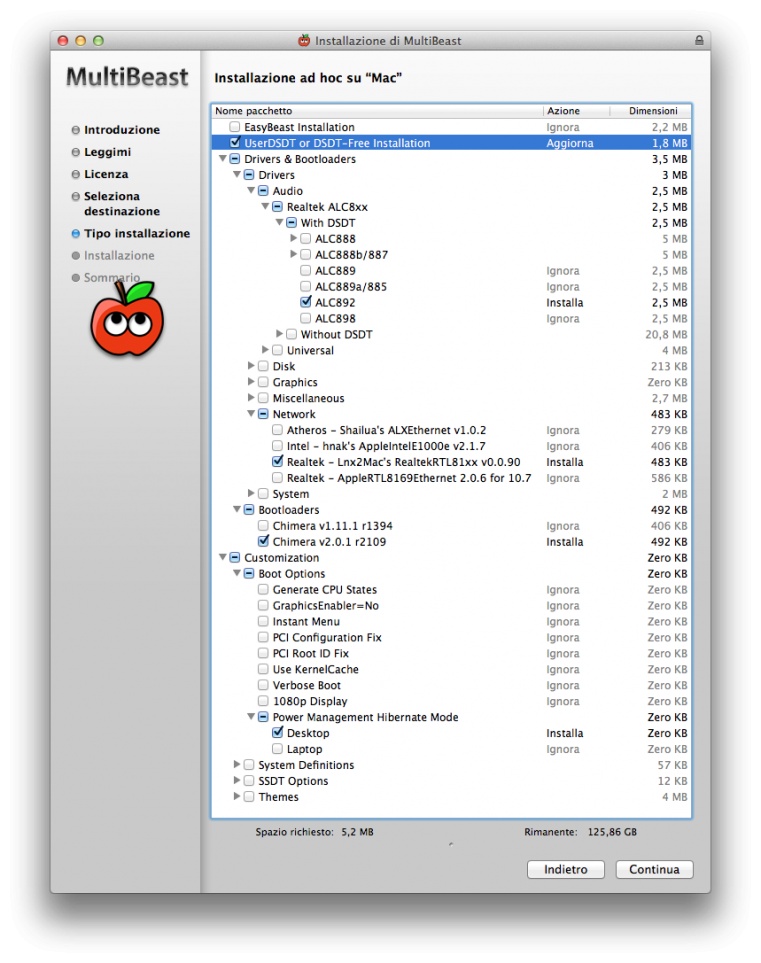
- Put your cool DSDT.aml on desktop and run latest MultiBeast. As for me, I ran this configuration
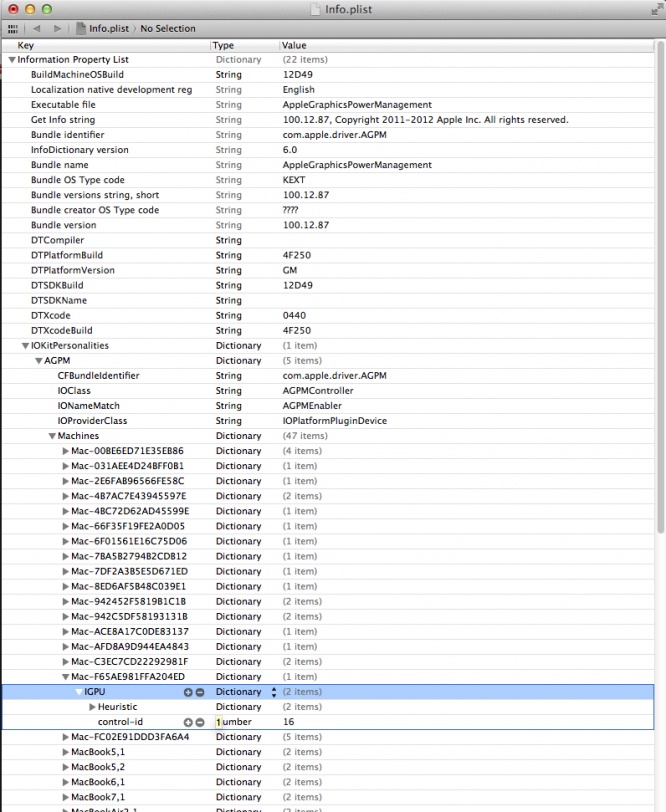
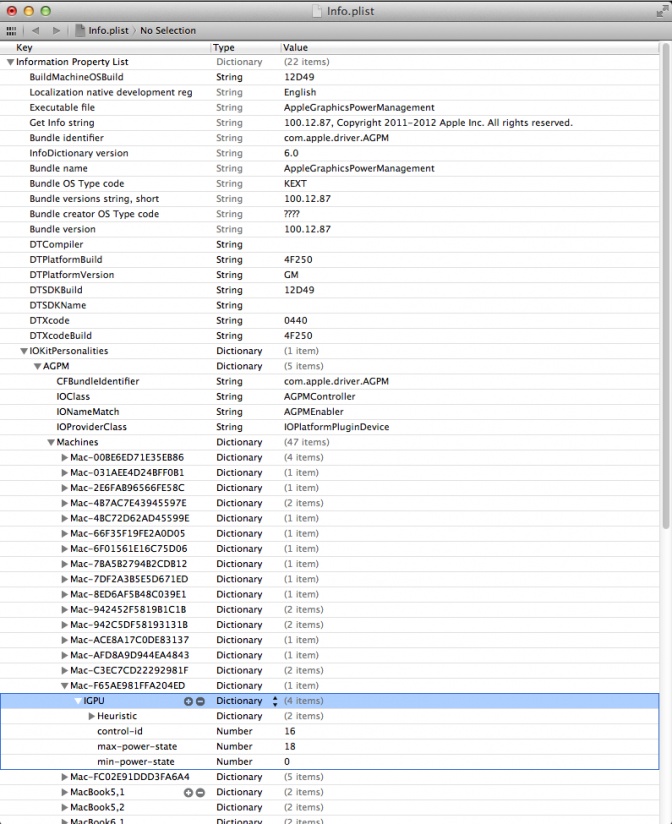
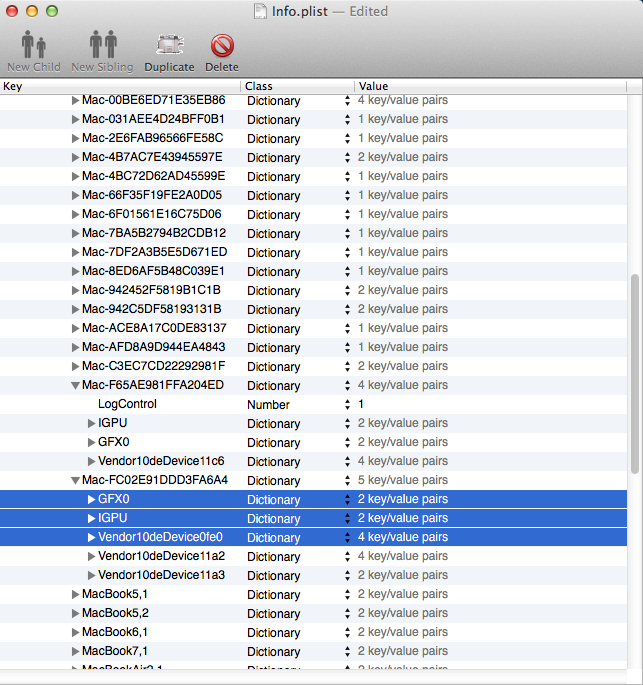
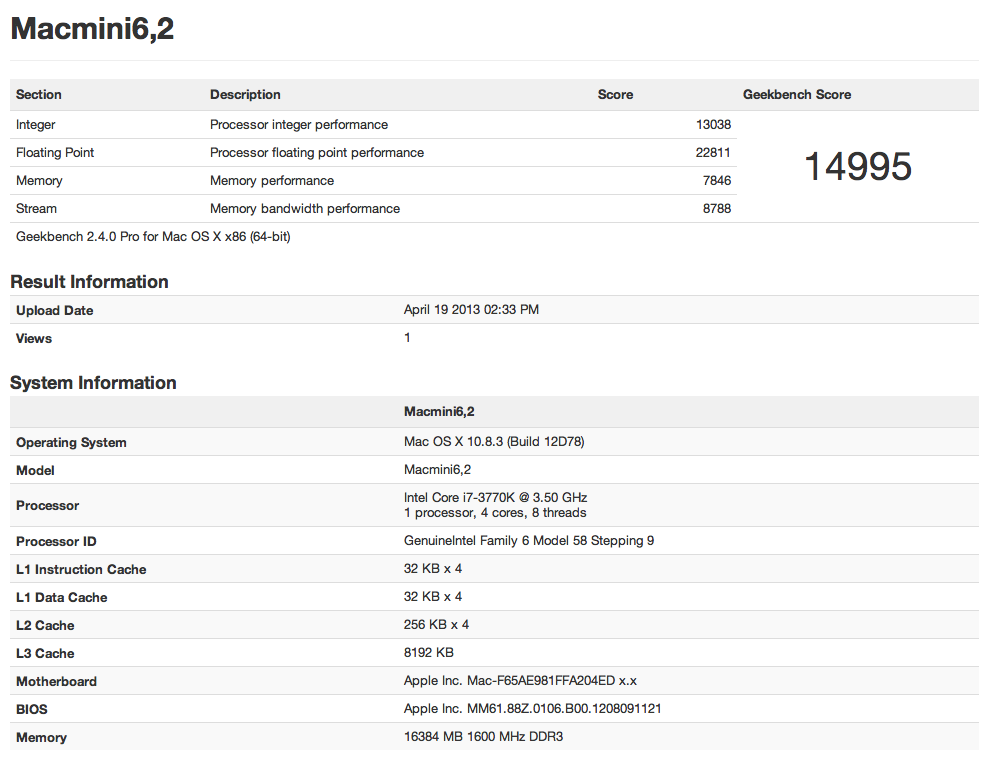
 - Run Chameleon Wizard to change System Definitions in smbios.plist: select SMBios from menu icons, select Edit command in the top right corner, select "Mac Mini (6,2) - Core i7 (Ivy Bridge)" in the first options in top left corner and Save. Don't worry if you don't have an i7 CPU, what really matters is the Ivy Bridge System Definition: it will be necessary to reach a good Power Management (of course if you have a Ivy Bridge CPU). System Definition MacMini 6,2 is the best choice at the moment to optimize Ivy Bridge Power Management
- Go to System\Extra and open org.chameleon.Boot.plist with Text Edit
- Add this
in order to make Chimera boot with proper resolution. Keep in mind that you have to use your display resolution, normally full hd monitors reach 1920x1080 (leave x32 as it is), do your research
- Stay in org.chameleon.Boot.plist and change darkwake value into 10 in order to make auto sleep working
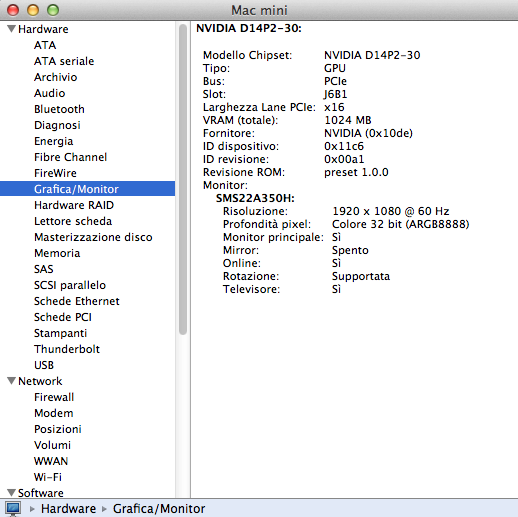
- Remember - if you have an nVidia card (like me) - to add
to org.chameleon.Boot.plist
- Install Trim Enabler (see Tools section above)
- Repair permission with Disk utility, rebuild cache with Kext Wizard and Reboot
Now the system will be able to boot without UniBeast flash drive. We need to optimize it taking care of Ivy Bridge Power Management.- Reboot from Unibeast and at Chimera screen choose your new OSX installed partition (probably still typing -x)
- Assuming you have all of the tools mentioned above, now we have to take care of DSDT. This is one of the most important steps of the installation process, many people don't care about DSDT (even with Gigabyte boards) and probably they are satisfied in that way (I was!) as their system works, but to optimize the components, make a hackintosh as close as possible to a real Mac and more vanilla as possible, DSDT is the key to do that. My advice is: learn how to edit dsdt, spend some time (or headache!), and new perspectives will open to you as hackintosher. This guide is not really about a DSDT editing, but in this section I will explain what and why I did it, in order to make anyone able to compile his own DSDT, not just trying to use others' one. So:
UPDATE #1
Thanks to the massive work of forum moderator PJALM, and the support of forum moderator SJ_Underwater, now only two patches are necessary to make this board fully functional. Simply follow these steps (the red ones are not necessary anymore, but basically are the same job that PJALM patch does).
- Download MaciASL from here, unzip it and open it. It automatically will open a "clean" DSDT. It's important to know that these patches can be applied just one time, so if you want re-patch dsdt you'll have to start from a clean dsdt.aml again. So my advice is: save a backup copy of this file just in case you need to re-patch it. To do that just go to MaciASL menu bar click on File/Save as, choose the directory where you want to keep your backup clean dsdt, select Disassembled ASL file as File Format and name it "clean dsdt".
- in Menu bar open MaciASL\Preferences and select Sources in Preferences window
- set iASL as ACPI 5.0 as in the following picture
- PJALM Gigabyte ---> http://maciasl.sourceforge.net/pjalm/gigabyte/
- PJALM Graphics ---> http://maciasl.sourceforge.net/pjalm/graphics/
- Close completely MaciASL and re-open it: again a clean DSDT will appear as before, click on Patch command: now in the left side of the Patch window you should see all the patches we've just added like this
- Re-open patch windows and under PJALM Graphics select
- Generic Discrete Graphics (AMD/nVidia) to enable HDMI Audio if you have a discrete graphic card or
- Intel HD4000 to enable HDMI Audio if you have ONLY Intel HD 4000 onboard graphic)
The next red steps are not necessary anymore, but I leave them here 'cause they're still valuable infos
- Apply USB Multiplex from PJALM Intel7 patch, this method is based on Forum member Mieze's work
PAY ATTENTION! As mrengles stated, this method will work ONLY with these System Definition:
- Macmini5,1 (Sandy Bridge)
- Macpro3,1 (Sandy Bridge)
- Any Ivy Bridge SysDef
/END UPDATE #1
- Compile DSDT from MaciASL (0 Errors, 0 Warnings, 0 Remarks, XX Optimizations) and save it as DSDT.aml (add extension manually) on desktop (This time, choose ACPI Machine Language Binary File Format).
Your DSDT is finally ready to be used for installation
- Put your cool DSDT.aml on desktop and run latest MultiBeast. As for me, I ran this configuration
- Go to System\Extra and open org.chameleon.Boot.plist with Text Edit
- Add this
Code:
<key>Graphics Mode</key>
<string>1920x1080x32</string>- Stay in org.chameleon.Boot.plist and change darkwake value into 10 in order to make auto sleep working
- Remember - if you have an nVidia card (like me) - to add
Code:
<key>GraphicsEnabler</key>
<string>No</string>- Install Trim Enabler (see Tools section above)
- Repair permission with Disk utility, rebuild cache with Kext Wizard and Reboot
Jump to the next post.
Last edited by a moderator:
") Summarizing: you'll need Turbo Ratio and TDP values.
Summarizing: you'll need Turbo Ratio and TDP values.