Contribute
Register

[SUCCESS] Gigabyte Designare Z390 (Thunderbolt 3) + i7-9700K + AMD RX 580

Volunteers!!!
Hello Inqnuam, so I tried HackinDROM EFI BETA 1.0.9 on a USB stick with EFI OC 0.6.4.
The update to 0.6.6 was, a priori, done quite correctly. The original EFI is saved under OLD_EFI.zip (great!)
Obviously I had to adjust the config.plist -> ACPI; Kernel ---> Kexts; UEFI Settings -> UEFI Drivers, and the contents of the corresponding folders of course, to adjust it to my own configuration.
Personally, in dark mode, the colors of the app do not bother me !! :)
Thank you it is very useful !!
 
Last edited:
Thanks @CaseySJ.
All my USB-C devices are external hard drives and none of them are recognized by the cable.
Hello, I am working on my second build build and having a difficult time getting past the USB install. Do you mind sharing your EFI folder. I've put in a ton of hours. Thanks.
 
Couple of follow-ups:
  • What is the make and model of the motherboard?
  • I am looking at the IOReg file (Antelope Yes) in which the Antelope device is connected, but Thunderbolt device tree is a bit incorrect.
    • So please post the Thunderbolt SSDT.
    • Also, with Antelope connected, post a screenshot of System Information --> Thunderbolt
Hi @CaseySJ ,

At the moment my friend Bubu :) is very busy, but he got to read the posts
and suggested me to better sum up the situation to avoid any misunderstanding,
otherwise it's a bit confusing.
So...

Bubu owes:
  • Asus Prime X299 A-II
  • High Sierra 10.13.6
  • Titan Ridge 2.0 (not flashed currently installed) + an apple thunderbolt adapter 2 to 3
  • Antelope Zen Tour (old model, NOT Synergy Core)
While I owe:
  • MacBook Pro mid 2012
  • Mojave
  • Built in Thunderbolt 1 + an apple thunderbolt adapter 1 to 3
  • Antelope Orion Studio Synergy Core
Since we are distant, to test the workstation, he used a different soundcard (ZenTour) from mine,
but which can share the same unified driver.
I provided him the Antelope's working IOReg file you read,
while the not working ones are from his FLASHED Thunderbolt.

Now I'm attaching:

  • the IOReg resulting from the NOT FLASHED Thunderbolt
  • the Asus Prime X299 A-II Bios
Since he made the test with an SSDT for flashed Thunderbolt,
we may only need one working fine on Asus Prime X299 A-II (or similar)
for a NOT FLASHED one.
Could you gently provide us it?


Of course we do stay available for whatever additional clue or in case
you notice any mistake in the process.

Thx
 

Attachments

  • Bubu files.zip
    1.2 MB · Views: 57
Last edited:
Hello, I am working on my second build build and having a difficult time getting past the usb install. you mind sharing your EFI folder. Ive put in a tune of hours. Thanks.
Well after many sleepless night, I changed my buggy EFI with the well crafted one of @CaseySJ. Everything is smooth ever since (well almost, my Vega 64 seems to be overused all the time, might take a look at that later).
 
ROTFL!! :)


I'm afraid these are not true Thunderbolt drives. They are compatible with Thunderbolt ports because every USB-C device is compatible with Thunderbolt ports. These are USB 3.0 drives with USB-C ports and therefore the USB-C cable works.

If the drive was a true Thunderbolt drive, you would see the Thunderbolt logo printed next to the USB-C port as you can see here:

View attachment 508023
I've got this OWC but it needed to restart this dock every time you reboot your computer.
 
CrScreenshotDxe.efi is awesome. Do not get rid of it, but try this instead:
  • At the OpenCore Picker GUI, press F10
  • You will momentarily see a green dot on the upper left corner of the screen
  • Congrats, a screenshot has been taken and saved in the EFI partition
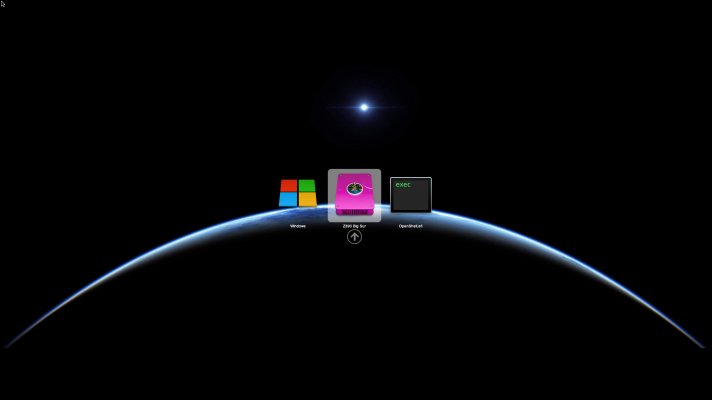
  • OpenCanopy in 0.6.6 even allows us to change the background image, which is just black by default, so this screenshot feature can even be used to show off custom backgrounds

Wow, that last one got me tickled. It works great! See attached image. I followed the following steps:
- Using your pre-made EFI on OpenCore 0.6.6 (or newer) where OpenCanopy is being used
- You need a file named 'Background.icns' and/or 'ModernBackground.icns' (depending on which icon pack you're using).
- You can convert a PNG file to icns file using a handy tool: https://github.com/chris1111/Icnspack-Builder https://github.com/chris1111/OpenCanopy-Generator
- Just make sure you use a big image (pixel wise).

OpenCanopy-Generator is the successor of Icnspack-Builder by the same dev.


- Place the Background.icns in the following folder: EFI/OC/Resources/Image
- Reboot and voila!
- Once in the bootscreen, use F10 to make the print screen, which you can then find in the EFI folder again.
 

Attachments

  • 06091827.png
    06091827.png
    196.3 KB · Views: 124
Last edited:
Wow, that last one got me tickled. It works great! See attached image. I followed the following steps:
- Using your pre-made EFI on 0.6.6 where OpenCanopy is being used
- You need a file named 'Background.icns' and/or 'ModernBackground.icns' (depending on which icon pack you're using).
- You can convert a PNG file to icns file using a handy tool: https://github.com/chris1111/Icnspack-Builder
- Just make sure you use a big image (pixel wise).

View attachment 508087


- Place the Background.icns in the following folder: EFI/OC/Resources/Image
- Reboot and voila!
- Once in the bootscreen, use F10 to make the print screen, which you can then find in the EFI folder again.
That’s just lovely! Who needs Clover now? :)

I’ll add this procedure shortly to Post 1.
 
When this problem was first encountered (it was with Catalina), the suspect was AMD RX 5000-series GPUs. But Vega GPUs were fine. The idea to disconnect Vega is purely speculative, but sometimes we have to apply the process of elimination. It's not necessary to physically remove the Vega; we can simply shutdown the system completely (including power switch on PSU) then remove the PCIe power cables from the Vega.

But before we do that, it will be necessary to transfer your serial numbers into config-Intel-iGPU.plist. This can be done through HackinDROM's CopyConfig feature. Simply backup or rename your current config.plist and use the new one downloaded from HackinDROM. Then shutdown the system, pull power cables from Vega, connect monitor to on-board HDMI port, and boot.

It would be best to copy the entire EFI folder to a USB Flash Disk and make changes to the EFI partition of that USB disk. This avoids any changes to the internal macOS SSD.
I spent the the whole evening trying to get the Intel GPU to work, and the best I could do is booting up into macOS reporting I have 7MB VRAM. Accordingly everything went very sluggish. So I didn't even care to start testing something on those circumstances.

I tried HackinDROM, I don't know if I understood the tool correctly, but:
I clicked on CopyConfig at the bottom
I uploaded my own config.plist which I use to boot my system with
I select Designare OC 065 with intelGPU then I download the new generated plist.

On a USB stick I copy my whole EFI folder into EFI partition, replace the config.plist with that from HackinDROM.
I shutdown PC, disconnect VEGA 64 from power, unplug all cables from it, connect HDMI to internal graphic, I see the POST messages and OC boots up, but it just boots up to black screen.

BIOS is set to IGFX enabled.

When I inspect the downloaded plist with ProperTree, it refers to several SSDT patches winch I don't have in my ACPI folder.

So I thought whatever, I use my old (original) plist, configure it myself with help of dortanias guide.
Changed to iMac19,1 SMBIOS
Added 07009B3E platform ID under DeviceProperties - with/without framebuffer-patch-enabled 01000000.
I got black screen every time.
Then I tried 00009B3E as platform-id, no luck.

Then I begun playing Sherlock Holmes by guessing which platform-id might be the right one, and converted from Big to Little Endian several framebuffers found here:

I came up with 0310913E (0x3E911003), which -funny enough- is not even to be found on that list. I think I mistyped something. But this is the one which finally booted up showing 7MB VRAM.

In the plist from HakinDROM I can see under DeviceProperties many, many framebuffer patches. I didn't try those, but I tried the boot-args from that plist. No luck.

I was to tired and frustrated so I gave up last evening.

Any other suggestions?

thanks
 
71 is the first integer after 70.
76 is the first integer after 75.

Other than that, me no capiche...
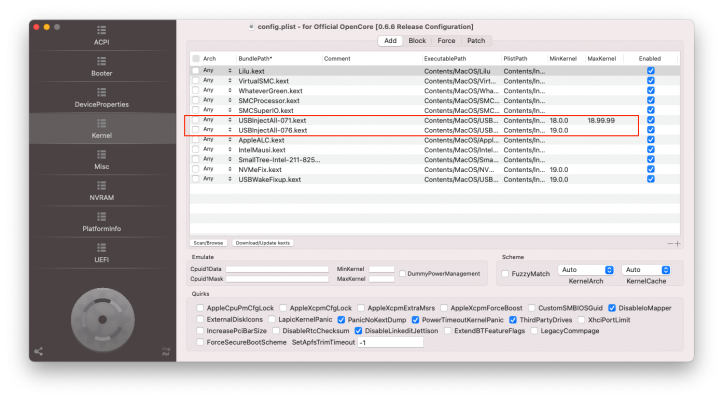
Sorry, there are two kext versions of the USBinjectAll.... -076.kext and -071.kext i just wondered which to use and why they were both in the 066 designaire OC zip files. I just grabbed the plain USBinjectALL.kext from my working machine and it worked ok.
 
Sorry, there are two kext versions of the USBinjectAll.... -076.kext and -071.kext i just wondered which to use and why they were both in the 066 designaire OC zip files. I just grabbed the plain USBinjectALL.kext from my working machine and it worked ok.
USBInjectAll-071 is being used only for Mojave (kernel 18.x.x), whereas USBInjectAll-076 is being used for Catalina and above (kernel 19.x.x is Catalina). This is because the former was compiled with a version of Xcode that is compatible with Mojave. The latter was compiled with newer libraries that don't work under Mojave. The newer version also supports iMac20,1 and iMac20,2 (older one does not).

Screen Shot 2021-02-06 at 4.58.02 AM.png
 
Back
Top