
CaseySJ
Moderator
- Joined
- Nov 11, 2018
- Messages
- 22,203
- Motherboard
- Asus ProArt Z690-Creator
- CPU
- i7-12700K
- Graphics
- RX 6800 XT
- Mac
- Classic Mac
- Mobile Phone
CaseySJ's Coffee Lake in Phanteks Evolv X ATX Case:
Gigabyte Designare Z390 - i7-9700K - UHD 630 - AMD RX 580
(Please do not quote this build guide in its entirely. Post a link instead.)
(See this post for how to refer to a Guide or Mini-Guide.)

URGENT: Please avoid Clover 5123 and newer for the time being.
Do not use BIOS F9j because of random freezes in Big Sur and problems with Thunderbolt.
10 Dec 2021: The new F9 'capsule' BIOS has not been tested and should be avoided at this time.
Successor to Z390 Designare is the Z490 Vision D with Intel 10th Gen Processors. Build Guide is located here
April 1, 2021: Should you consider Z590 and Rocket Lake? Please see this post by @dehjomz.
18 Mar 2022:
Monterey 12.3 users, please see this post to fix GPU issues.
Please see Quick Reference to Mini-Guides and Micro-Guides just past the component list below. This contains a set of the most important reference guides, and it is kept up to date.
If using or planning to use Samsung 950 Pro, 960 Evo/Pro, or 970 Evo/Pro NVMe SSDs it may be necessary to disable TRIM. Refer to this post by Vit9696.
NOTE 1: If you are using slightly different components, refer to the section Is this Guide Applicable to Other Configurations?
NOTE 2: Thunderbolt 1 devices will not work when directly connected to this motherboard, but they should work through a Thunderbolt 2 or Thunderbolt 3 dock with appropriate adapter cables. See Thunderbolt 3 Experiences for a list of compatible and incompatible Thunderbolt hardware.
NOTE 3: If you're a Final Cut Pro X or iMovie user, please see Going the Extra Mile.
NOTE 4: The XFX Radeon RX 580 graphics card is known to cause kernel panics during installation and uses non-reference port layout so HDMI and one DP port may not work. Use of this card is discouraged. Additionally, the Mad CatZ R.A.T. 9 gaming mouse may cause display problems after logging in. See here for details.
NOTE 5a:
NOTE 5b: 10-Nov-2019: Significant compatibility problems have been reported with the Intel 660p NVMe M.2 SSD. This drive should be avoided until a solution is found.
NOTE 5c: 09-Jun-2020: USB stability issues have been reported with the use of Inland Premium M.2 drives. If purchasing this device, be prepared to return or exchange it for a different make/model.
NOTE 5d: 03-Nov-2021: Updated list of NVMe SSDs to avoid.
NOTE 6: If you are running an earlier release of Mojave and simply wish to update to the latest release, please see the macOS 10.14.5 Update mini-guide. This applies to 10.14.6 as well.
NOTE 7a: Some Corsair power supplies (such as HX1000i, HX1200i, H80i, H120i, etc.) feature a USB connector that allows the operating system to monitor various power supply parameters. Unfortunately, this will prevent the system from entering sleep. If you wish to use this feature in Windows and keep the USB cable connected, the only solution for macOS is to disable the USB port to which it is attached (either HS11 or HS12). This can be done by modifying the USB SSDT.
NOTE 7b:
NOTE 7c:Thunderbolt monitors must also be avoided. They may not turn on in BIOS or in the boot loader. They may also not wake from sleep. Their on-board devices may not work either. Too many problems are being reported and there are no solutions. No support will be provided for issues with Thunderbolt monitors. However, please see this post by @nottooshabby that applies to Apple Thunderbolt Display, but might work as well on other Thunderbolt displays as well (keyword "might").
NOTE 8:For latest information about DRM content playback and shikigva values, please see this post by @jaymonkey
NOTE 9:To expand SATA ports with an add-in PCIe card, refer to SATA Port Limitations for a list of options. Do not use this card for reasons mentioned here.
Quick Reference
- Installation-Related
- macOS Sonoma Installation Mini-Guide
- Upgrade to Big Sur, Monterey or Ventura from an older version of macOS (Clover Users)
- Upgrade to macOS 11.x Big Sur from Catalina
- Quick-Guide for Fresh Installation of macOS 11.x Big Sur
- Mini-Guide for Fresh Installation of Catalina 10.15.1 to 10.15.3
- Mini-Guide for Fresh Installation of Catalina 10.15.4 and Newer
- Micro-Guide: Installing Catalina using OpenCore
- Micro-Guide for Upgrading from Mojave to Catalina 10.15.4 and Newer
- Replace Clover with OpenCore
- OpenCore Mini-Guide for macOS Catalina
- BIOS F9g beta with CFG-Lock DISABLED by default
- BIOS F9i official (CFG-Lock is Enabled by default, must be manually Disabled)
- BIOS F9i modified by Elias64Fr with MicroCode from July 2022 -- must be installed on top of BIOS F9i OFFICIAL Version (30 Jan 2023)
- BIOS F9i modified by Elias64Fr with MicroCode from F9j (fixes security issues) -- must be installed on top of BIOS F9i OFFICIAL Version
- BIOS F9i modified by Elias64Fr with MicroCode 0xEA -- must be installed on top of BIOS F9i OFFICIAL Version
- BIOS F9i modified by Elias64Fr with MicroCode 0xEC and Security Fixes (apply on top of F9i official version)
- Using HackinDROM to Transfer OpenCore PlatformInfo
- PRE-RELEASE: OpenCore 0.6.0 EFI for Z390 Designare
- NEW!! Guide to Using HackinDROM Application to Update OpenCore
- OpenCore 0.6.0/0.6.1 EFI for Z390 Designare
- OpenCore 0.6.2 EFI for Z390 Designare
- OpenCore 0.6.3.EFI for Z390 Designare
- OpenCore 0.6.4 EFI for Z390 Designare
- OpenCore 0.6.5 EFI for Z390 Designare
- OpenCore 0.6.6 EFI for Z390 Designare
- OpenCore 0.6.7 EFI for Z390 Designare
- OpenCore 0.6.8 EFI for Z390 Designare
- OpenCore 0.6.8 EFI for Z390 Designare with OpenIntelWireless Drivers
- OpenCore 0.6.9 EFI for Z390 Designare
- OpenCore 0.7.0 EFI for Z390 Designare
- OpenCore 0.7.1 EFI for Z390 Designare (supports Monterey as well)
- OpenCore 0.7.2 EFI for Z390 Designare
- OpenCore 0.7.3 EFI for Z390 Designare
- OpenCore 0.7.4 EFI for Z390 Designare
- OpenCore 0.7.5 EFI for Z390 Designare
- OpenCore 0.7.6 EFI for Z390 Designare
- OpenCore 0.7.7 EFI for Z390 Designare
- OpenCore 0.7.8 EFI for Z390 Designare
- OpenCore 0.8.0 Upgrade Procedure with new i211-V Ethernet driver for Monterey
- OpenCore 0.8.3 EFI for Z390 Designare
- OpenCore 0.9.1 EFI for Z390 Designare
- OpenCore 0.9.2 EFI for Z390 Designare
- Update to Latest OpenCore
- Adding Reset NVRAM and Toggle SIP to OpenCore 0.8.1 and Newer
- Intel WiFi and Bluetooth now working in Monterey and Ventura!
- New SmallTreeIntel driver for i211-V Ethernet port for Monterey
- Procedure for In-Place Upgrade of OpenCore from Earlier Version to New Version
- Upgrading from Already-Installed Catalina to Catalina 10.15.4 or Newer
- Upgrading from Clover 4xxx to Clover 5xxx
- Upgrading from Clover 5xxx to Clover 5120+
- The end of Hackintosh as we know it
- System Backup
- Customization
- How to enable Aquantia AQC-107 device ID 0x00B1
- Disabling GPUs in Slots 1 and 2 differently for different GPU types
- Enable AppleVTD with No Impact to WiFi and Ethernet
- Best Practices Guide for USB 2.0 Devices
- Decoding csr-active-config or SIP setting
- Enabling Boot Chime in OpenCore
- Boot Chime Playback through Optical Digital Output Port Credit @Lukey1979
- Easy Way to Enable On-Board HDMI Port with Hackintool
- Enable Native NVRAM in Clover
- General Guide to CFG-Unlock: Using UEFITool and ifrextract to View Firmware Settings
- Specific Guide to CFG-Unlock: Unlocking MSR 0xE2 on Gigabyte Designare Z390
- How to Customize Device Names and Properties
- True One-Key Wake from Sleep Without Changing DarkWake
- Disable Wake from USB (Wake only with Power Button)
- Changing CPU Name in "About this Mac" in Catalina
- Change Disk Label Shown in OpenCore Picker
- Troubleshooting
- Fix or Workaround for connecting USB 3.x devices to on-board Thunderbolt (Type C) ports
- Patch to fix WiFi and Ethernet in macOS 13.3 and newer
- Patch Theory post for above
- Universal Audio (UAD) Octo Satellite with UAD 10.1 firmware works best with BIOS F9g
- Black Magic Design (BMD) Drivers in Big Sur, Monterey, and newer
- Consolidated List of Sleep Aids for Gigabyte Z390 Designare
- How to Enable and Disable AppleVTD in OpenCore 0.7.2 and Higher
- If macOS Software Update Fails to Complete, Try This
- Fixing Handoff, Unlock w/Apple Watch, Continuity Camera
- VideoProc not compatible with AMD GPU. See also this post about bit rate, encoding quality, and HW vs SW encoding
- Fixing 'Unlock with Apple Watch'
- Performance-Related
- Experimental / Cutting Edge
- Guides Contributed by Members | Miscellaneous
- Enabling 4K resolution on LG 32UN880-B aka LG Ergo Monitor by @madmax559
- Procedure to Downgrade a Gigabyte Capsule BIOS -- thanks to @gandem
- Direct Link to Article on Reverting to Non-Capsule BIOS
- Configuring Blackmagic Design (BMD) Drivers in Big Sur, Monterey, and Newer by @SmackAttack
- AMD RX 580 Idle-Time Low Power Patch (SSDT) for Slots 1 and 2 (may need PCI path correction if using different motherboard)
- Z390 AORUS Master - New BIOS F11o with Intel 0xEA MicroCode - Install on top of official F11n/F11o -- WARNING: USB-C devices won't connect to TB ports
- Tip for UAD Audio Interface users running macOS Big Sur -- Install driver correctly
- How to Flash VBIOS of a Supported RDNA2 (RX 6000 Series) GPU onto a Non-Supported RNDA2 GPU by @byteminer
- Avoid Memory Notification Warnings the Right Way with Mac Pro 7,1 by @rj510
- Brief Look at OpenCanopy 0.6.8
- Enable tv and hardware video decoding in Big Sur
- Change Background Image in OpenCore Picker (OpenCanopy) by @joostiphone. Requires OpenCore 0.6.6 or newer.
- Samsung SSD Firmware Version Check and Update Procedure by @Inqnuam
- Mount root filesystem with read/write permissions in Big Sur (Make bootable backup first)
- Customize the Gigabyte BIOS Splash Screen Graphic by @Inqnuam
- Disabling all maintenance wake events during long periods of sleep by @hamzab
- Creating SSDT to Enable Thunderbolt Bus and Local Node for Alpine Ridge Controllers by @dgsga
- Aside-Guide: BIOS Update for Gigabyte Z170X-UD5 TH (for Thunderbolt)
- Asus X99 Deluxe II OpenCore EFI and Unlocked BIOS 1802
- Asus X99 Deluxe II BIOS Configuration Screenshots
- Asus X99 Deluxe II OpenCore EFI for Big Sur
- Flashing Thunderbolt Firmware to Enable Thunderbolt Bus and Local Node
- Why Enable Thunderbolt Bus and Local Node?
- How to Flash Thunderbolt Firmware
- Location of Thunderbolt Firmware Chip on Designare Z390
- Can TB3 Firmware be Flashed Just by Software? (Answer: Russian roulette)
- Mini-Guide for Flashing SPI ROM Chips using CH341A Programmer
- Mini-Guide for Flashing SPI ROM Chips using 3.3V CH341A Programmer
- Mini-Guide for Flashing SPI ROM Chips using Raspberry Pi 3B or 4
- Tips for Attaching SOIC8 Clip to Designare Z390 Winbond W25Q80DV
- Possible Improvement for In-Circuit Read/Write to SPI Flash ROM Chips
- Supplemental Procedure for Connecting External SPI Flasher to Designare Z390
- Linux procedure for reading active region of Thunderbolt firmware
- Thunderbolt Firmware Files
- Thunderbolt DROM Customization - After Flashing
- NEW!! Using HackinDROM to Create Thunderbolt SSDT with Custom DROM
- Thunderbolt DROM Micro-Guide for Gigabyte Designare Z390
- Thunderbolt DROM Micro-Guide for Gigabyte Z390 AORUS Xtreme
- Thunderbolt DROM Micro-Guide for Gigabyte Z490 Vision D
- Thunderbolt DROM Micro-Guide for Gigabyte B550 Vision D
- Thunderbolt DROM Micro-Guide for Gigabyte GC-Titan Ridge v1.0
- Thunderbolt DROM Micro-Guide for Gigabyte GC-Titan Ridge v2.0
- Thunderbolt DROM Micro-Guide for Gigabyte GC-Alpine Ridge
- Thunderbolt DROM Micro-Guide for Asus ThunderboltEX 3
- Thunderbolt DROM Micro-Guide for ASRock Z390/Z370 ITX/ac
- Thunderbolt DROM Micro-Guide for ThinkPad X1 Carbon 6th Gen
- Mini-Guide for Viewing, Editing and Verifying Thunderbolt DROM
with ThunderboltUtil - ThunderboltUtil by @joevt to View, Modify, and Verify ThunderboltDROM
- HackinDROM Web-Based DROM Generator by @Inqnuam
- Solution for Removing Duplicate Thunderbolt Port Entries
- User Experiences
- User Experience -- Apple Thunderbolt Display with GC-Titan Ridge by @nottooshaby
- User Experience -- @iRamon
- User Experience -- @jb007
- User Experience 1, Experience 2 -- @augustopaulo
- User Experience 1, Experience 2, Experience 3 -- @LeSeChe
- User Experience 1, Experience 2 -- @NCMacGuy
- User Experience -- @maschinenwart
- It all began here!
- NHI Device Properties
- Some Explanation of ThunderboltConfig
- Gigabyte Thunderbolt ROM Captured with SPI Chip Reader
- Thunderbolt ROM Extracted Info
- Thunderbolt Signs of Life
- SSDT Edits
- Thunderbolt Volunteers Needed
- TEST BENCH: Thunderbolt Interim Update
- XHC2 Port Verification in Windows
- Overall Summary of Tests
- 28-Jan-2020 Interim Status and Test Plan
- 30-Jan-2020 Interim Status
- 01-Feb-2020 Interim Status
- 03-Feb-2020 Short Summary of Status
- 10-Feb-2020 Interim Status - UPSB _PS0
- 13-Mar-2020 Designare Z390 Native TB3 Firmware Modified
- Culmination of the Search for Thunderbolt Bus and Local Node on Designare Z390
- Modified Titan Ridge Firmware File for Designare Z390 - Works Very Well
- Modified Titan Ridge Firmware File for Z390 AORUS Xtreme - Works Very Well
- Modified Firmware for GC-Titan Ridge - NVM 23 - Testing Needed
- Modified Firmware for GC-Titan Ridge - NVM 43 - Testing Needed
- Quick Comparative Analysis of Thunderbolt DROM and Thunderbolt Config
- Thunderbolt DROM Decoded
- Thunderbolt DROM Micro-Guide for Gigabyte Designare Z390
- Thunderbolt DROM Micro-Guide for Gigabyte Z390 AORUS Xtreme
- Thunderbolt DROM Micro-Guide for Gigabyte GC-Titan Ridge
- Thunderbolt DROM Micro-Guide for Gigabyte GC-Alpine Ridge
- Thunderbolt DROM Micro-Guide for Asus ThunderboltEX 3
- Thunderbolt DROM Micro-Guide for ASRock Z390/Z370 ITX/ac
- Thunderbolt Devices Made Compatible After Enabling Thunderbolt Bus
- Repository of Patched Thunderbolt Firmware Files
- Removing Boot Delay when Thunderbolt Controller is Enabled
These guides are for very specific applications and advanced users. Please use caution and discretion with these guides.
- Mini-Guide for Flashing SPI ROM Chips using CH341A Programmer
- Mini-Guide for Flashing SPI ROM Chips using Raspberry Pi 3B or 4
- Tips for Attaching SOIC8 Clip to Designare Z390 Winbond W25Q80DV
- Possible Improvement for In-Circuit Read/Write to SPI Flash ROM Chips
- Supplemental Procedure for Connecting External SPI Flasher to Designare Z390
- Can TB3 Firmware be Flashed Just by Software? (Answer: Russian roulette)
- First Modified BIOS - Proof of Concept
- pathcr and Other NHI Properties Auto Created
- Background Information About Experiment
- Experiment Update #1
- Interim Update #1A
- Interim Update #1B
- Interim Update #1C
- Interim Update #1D
- Experiment Update #2
- Interim Update #2A
- Interim Update #2B
- Experiment Update #3
- DRAM COMPATIBILITY CHART WHEN VT-d (AppleVTD) IS ENABLED
- What are the benefits of enabling AppleVTD?
- How to Modify Your DMAR Table to Fix Ethernet and WiFi with AppleVTD
- How to Create ACPI --> Delete Entry for Existing DMAR Table
- AppleVTD Fully Enabled with No Impact to WiFi and Ethernet
Contents
This guide is organized into the following sections. You may jump to any section by clicking on the link.
This guide is organized into the following sections. You may jump to any section by clicking on the link.
- Components: New
- Components: Already Owned
- Comments
- Going the Extra Mile
- Easy Bootable Backup
- Replacing OsxAptioFix2Drv-free2000 with FwRuntimeServices
- Home and OS Folders on Separate Drives
- External Disks Not Ejected During Sleep
- Different FakeSMC
- To TRIM or Not to TRIM
- Thunderbolt 3 Experiences
- Thermals
- Contributed Files and Tips
- Alternative USB Port Enumeration for Designare Z390
- Custom USB SSDT for Fractal Design R6 Case
- Gigabyte Z390 AORUS Extreme Owners
- USB SSDT for Gigabyte AORUS Extreme with BeQuiet Dark Base Pro 900 Rev 2
- Vega56 and Vega64 Fan and Crash Solution
- Sapphire PULSE Radeon RX Vega56 Fan Control
- Asus ROG Strix Vega 64 Fan and Power
- For Final Cut Pro X (FCPX) and iMovie Users
- Additional tip for users of Pro video/audio apps
- Troubleshooting Random Crashes
- Solving shutdown problem with Firewire card installed
- Bluetooth Signal Loss or Flaky Connection
- Enabling Brightness Control via F1 and F2 Keys
- Monitor and Control NZXT Kraken All-in-One Coolers
- Headkaze's MountEFI Menu Bar Tool
- Installing Linux - Dual/Multi Boot
- Tips for Installing Windows 10
- Fixing HEVC and H.264 Functionality with RX 580
- Enabling SATA Hot Plug
- SSDT for TP-Link Archer T9E AC1900 PCIe WiFi card
- Overclocking and Other Information
- If USB Ports Cannot Charge High Current Devices
- Tips for Universal Audio Devices UAD Apollo Thunderbolt Connection
- Apple Thunderbolt Display
- Development of Native Driver for Intel WiFi and Bluetooth
- Sidecar Patch for Unsupported Macs
- Significantly Boosting AMD Radeon GPU Performance
- Disable Wake from USB (Wake only with Power Button)
- Speed Up Wake from Sleep, esp. with Bluetooth Keyboard/Mouse
- Three Monitor Support with RX 5xx GPU
- Injecting Audio and Enabling On-Board HDMI
- Using the UHD 630 to Drive HDMI and DP Monitors
- Specifying Device Names and Types
- Specifying CPU Name in 'About this Mac'
- Fixing Sleep and Wake Issues
- Disabling a GPU in PCIe Slot 2
- SATA Port Limitations
- Modifying CFG Lock Parameter to Unlock 0xE2 MSR Register
- Enabling Native NVRAM
- Upgrading from Clover 4xxx to Clover 5xxx
- Is this Guide Applicable to Other Configurations?
- Firewire Cards
- Summary
- Edits/Updates
Components: New
Gigabyte Designare Z390 Motherboard with Built-In Thunderbolt 3 (Titan Ridge) Controller
https://www.amazon.com/dp/B07K8RJZRG/?tag=tonymacx86com-20
https://www.newegg.com/Product/Product.aspx?Item=N82E16813145110
Intel Core i7-9700K Coffee Lake Processor
https://www.amazon.com/dp/B07HHN6KBZ/?tag=tonymacx86com-20
https://www.newegg.com/Product/Product.aspx?Item=N82E16819117958
Phanteks Evolv X ATX Mid Tower Case (Anthracite Gray) with Tempered Glass Side Windows
https://www.amazon.com/dp/B07GY26TZJ/?tag=tonymacx86com-20
https://www.newegg.com/Product/Product.aspx?Item=N82E16811854077
G.Skill TridentZ 32GB RGB Memory (4 x 8GB) Dual Channel DDR4 3200 Mhz
https://www.amazon.com/dp/B01MSBS0UT/?tag=tonymacx86com-20
https://www.newegg.com/Product/Product.aspx?Item=N82E16820232753
ADATA SX8200 NVMe PCIe x4 v1.3 240GB SSD - Used for OS and Apps
https://www.amazon.com/dp/B07BLNFSQN/?tag=tonymacx86com-20
https://www.newegg.com/Product/Product.aspx?Item=9SIADF17442121t
Sunbow 1TB 2.5mm 3D NAND SATA SSD - For home directory
https://www.amazon.com/dp/B073QN8KL4/?tag=tonymacx86com-20
(Not available from NewEgg as of this writing.)
Recommended WiFi/BT Wireless Cards
https://www.newegg.com/Product/Product.aspx?Item=9SIADXZ7GS4848
https://www.newegg.com/fenvi-fv-hb1200-pci-express/p/0XM-00JK-00062?Description=fenvi%20WiFi&cm_re=fenvi_WiFi-_-9SIADXZ9CS9385-_-Product
The Fenvi FV-T919 and Fenvi FV-HB1200 provide both WiFi and Bluetooth, and work very well in a x1 slot with the SSDT-DESIGNARE-Z390-NO-CNVW.aml copied to the CLOVER/ACPI/patched folder on the EFI partition of the Mojave SSD. Instructions for copying the SSDT are provided in the spoiler labeled Final Steps in Post-Installation. (Gigabyte AORUS Xtreme owners must install these cards in one of the long slots.) The FV-T919 is the faster of the two cards and more expensive. The FV-HB1200 is slightly slower, but lower priced. Both will work out-of-the-box with no drivers needed.
Alternative WiFi/Bluetooth Module
If the Fenvi FV-T919 and Fenvi FV-HB1200 are not available, the following alternative can be used. This consists of a Broadcom modem and a PCIe x1 adapter. Both parts are needed. Again, the Fenvi FV-T919 and Fenvi FB-HB1200 are preferred. (Gigabyte AORUS Xtreme owners must install these cards in one of the long slots.)
- Broadcom WiFi and Bluetooth Module -- BCM94360CS2
- PCIe x1 adapter card for WiFi/BT module
https://www.amazon.com/dp/B00IKDETOW/?tag=tonymacx86com-20
https://www.newegg.com/Product/Product.aspx?Item=N82E16817438017
Raijintek Orcus 280mm All-in-One Liquid Cooler
(Not available from Amazon as of this writing.)
https://www.newegg.com/Product/Product.aspx?Item=9SIA66Z8253379
Antec Prizm 140mm Dual RGB Ring Case Fans - Quantity: 3
https://www.amazon.com/dp/B07FNKWCTB/?tag=tonymacx86com-20
(Not available from NewEgg as of this writing.)
Logitech C920 USB Webcam with Stereo Microphones for FaceTime and Siri
https://www.amazon.com/dp/B006JH8T3S/?tag=tonymacx86com-20
https://www.newegg.com/Product/Product.aspx?Item=9SIADA27A11474
Arctic MX-4 Thermal Paste
https://www.amazon.com/dp/B0795DP124/?tag=tonymacx86com-20
https://www.newegg.com/Product/Product.aspx?Item=9SIA4RE6W99285
SilverStone 2.4G Wireless Remote Power/Reset Switch
https://www.amazon.com/dp/B01MQUANS8/?tag=tonymacx86com-20
https://www.newegg.com/Product/Product.aspx?Item=9SIA62V5CD5492
This remote control is especially handy because the Phanteks Evolv X lacks a Reset switch. This item needs to connect to the internal F_USB header. So the following 2-way splitter is necessary for connecting Bluetooth and this remote control simultaneously.
9 Pin USB Splitter 1-to-2
https://www.amazon.com/dp/B076Q8685Y/?tag=tonymacx86com-20
https://www.newegg.com/Product/Product.aspx?Item=9SIAA7W8WD3857
If you need to connect more than 2 devices to the single F_USB header, you can purchase the 1-to-4 version of this splitter.
Components: Already Owned
ASUS Designo MX27UC 27" 4K IPS Monitor with DP, HDMI, USB Type-C, 3Wx2 SonicMaster Speakers
https://www.amazon.com/dp/B06XPJYVF2/?tag=tonymacx86com-20
https://www.newegg.com/Product/Product.aspx?Item=9SIA25V7GM8294
MSI Radeon RX 580 GAMING X with 8GB GDDR5 Memory
https://www.amazon.com/dp/B0781XS6QS/?tag=tonymacx86com-20
https://www.newegg.com/Product/Product.aspx?Item=9SIA85V6X56541
Logitech K780 Wireless USB Mac/Win/iOS Keyboard
https://www.amazon.com/dp/B01LZAK8MM/?tag=tonymacx86com-20
https://www.newegg.com/Product/Product.aspx?Item=9SIAB277XK0308
Logitech M510 Wireless USB Mouse - connected to same USB receiver as keyboard
https://www.amazon.com/dp/B003NR57BY/?tag=tonymacx86com-20
https://www.newegg.com/Product/Product.aspx?Item=9SIAET87935713
Samsung Bar Plus 32GB USB 3.0 Flash Disk for UniBeast
https://www.amazon.com/dp/B013CCTM2E/?tag=tonymacx86com-20
https://www.newegg.com/Product/Product.aspx?Item=9SIAG8T7E08478
Comments
This build guide is the culmination of the thread Ongoing Status of Designare Z390 with i7-9700K.
I've owned a MacPro 3,1 since January 2008 when it was first released. With PCIe slots, a WiFi/BT daughter card, and 4 internal drive bays the MacPro had plenty of flexibility and longevity. Over the years as technology progressed so did the MacPro. A USB 3.0 PCIe card brought 4 USB 3.0 ports to the system. A newer WiFi/BT card enabled AirDrop. A Sonnet Tempo Pro Plus SSD card introduced SATA 6 (versus SATA 3 on the MacPro) and allowed for installation of up to two SSDs onto the card itself. The standard issue Nvidia GT 8800 was replaced by a more capable AMD R9 380 that enabled Retina display on 4K monitors. Indeed the MacPro 3,1 was keeping up with the times.
But everything changed when Apple introduced Sierra and discontinued support for the venerable 2008 machine. Clever folks on the Internet found ways to circumvent this and I followed their procedures to upgrade the system all the way to High Sierra. But in so doing, none of my 4K video cards would work properly. Having become accustomed to 4K, it was hard to accept defeat and I refused to do so. But after spending a few weeks hacking through various 4K-capable cards, obstacles remained. And so enough was enough.
My attention turned to building a Hackintosh.
I wanted to design a system as capable, as flexible, and as upgradeable as the MacPro. And I wanted to embrace the RGB craze because, you know, everything's better with RGB. If Apple had introduced the promised "modular" MacPro -- at a decent price -- I might have purchased that instead. Not wanting to wait and not knowing what "modular" means to Apple, I concluded it was time to build the thing myself. Nevertheless, I expect to evaluate Apple's modular MacPro once it's released and decide whether or not it offers a compelling solution.
Installation Notes
This guide has been tested on MacOS 10.14.2, 10.14.3, 10.14.4, 10.14.5, and 10.14.6 (Mojave) and prefers the use of an AMD RX-series graphics card for ease of installation. The AMD RX discrete GPU will handle video output while the iGPU handles HEVC, H.264, Quick Look, Preview, etc. Both graphics processors will be used.
However, if a discrete PCIe GPU is not installed, then it's recommended to connect your display monitor via DisplayPort using a USB-C to DisplayPort cable. Either of the two Thunderbolt ports can be used to drive a DisplayPort monitor. If you must use HDMI with the internal GPU (iGPU), the installation procedure will still work, but during Post-Installation you must apply the framebuffer patch described in the section Using the UHD 630 to Drive HDMI and DP Monitors.
Before starting the installation, download the following to your Mac:
- MacOS 10.14.2, 10.14.3, 10.14.4, 10.4.5, or 10.14.6 installation file (about 6GB) from the Apple Mac App Store. Post-installation procedure defines the system as an iMac 19,1 for 10.14.5 and newer, but as Mac Mini 8,1 for 10.14.2 through 10.14.4. Neither of these system definitions is supported on 10.14.1 or earlier. If you need to install 10.14.1 or earlier, just leave your SMBIOS definition as iMac14,2 during the post-install procedure.
- UniBeast 9.2.0 or newer
- MultiBeast 11.2.1 or newer
- Clover Configurator 5.4.4.0 or newer
- EFI Mounter v3 (this may also be located inside the MultiBeast 11.x.y folder)
- IOregistryExplorer
- Hackintool 2.5.1 or newer
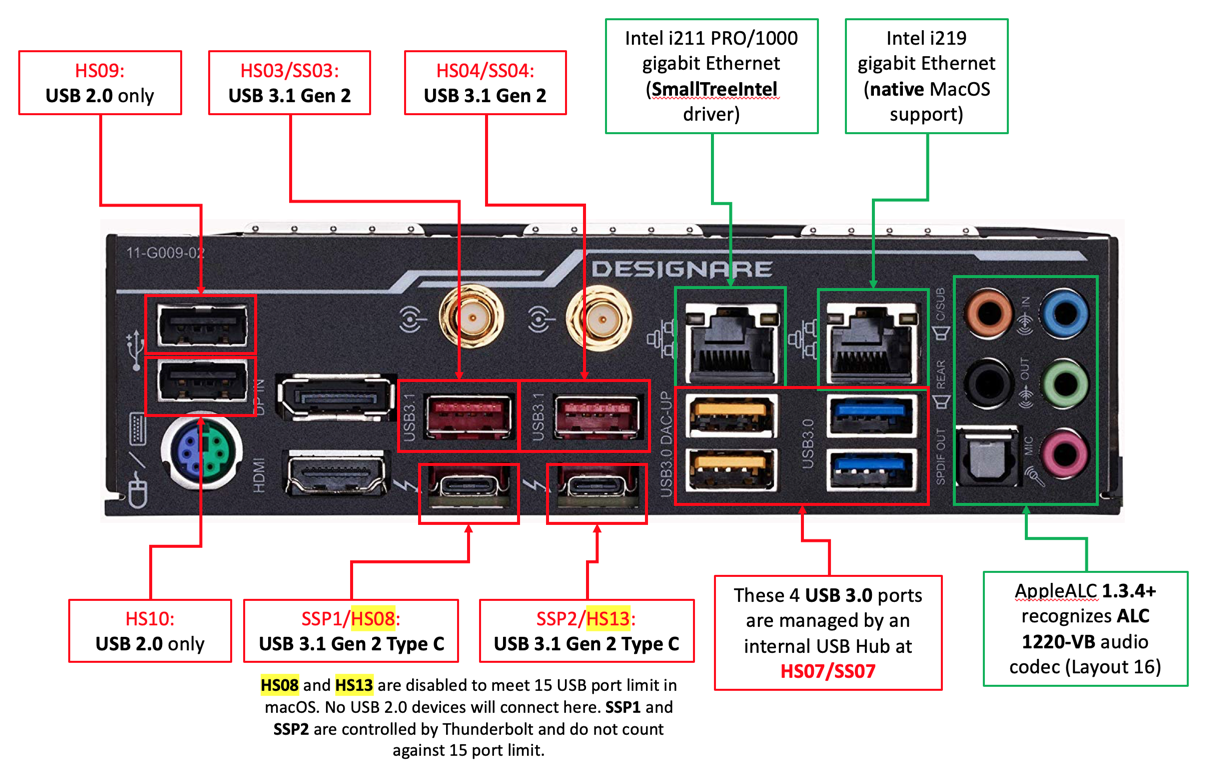
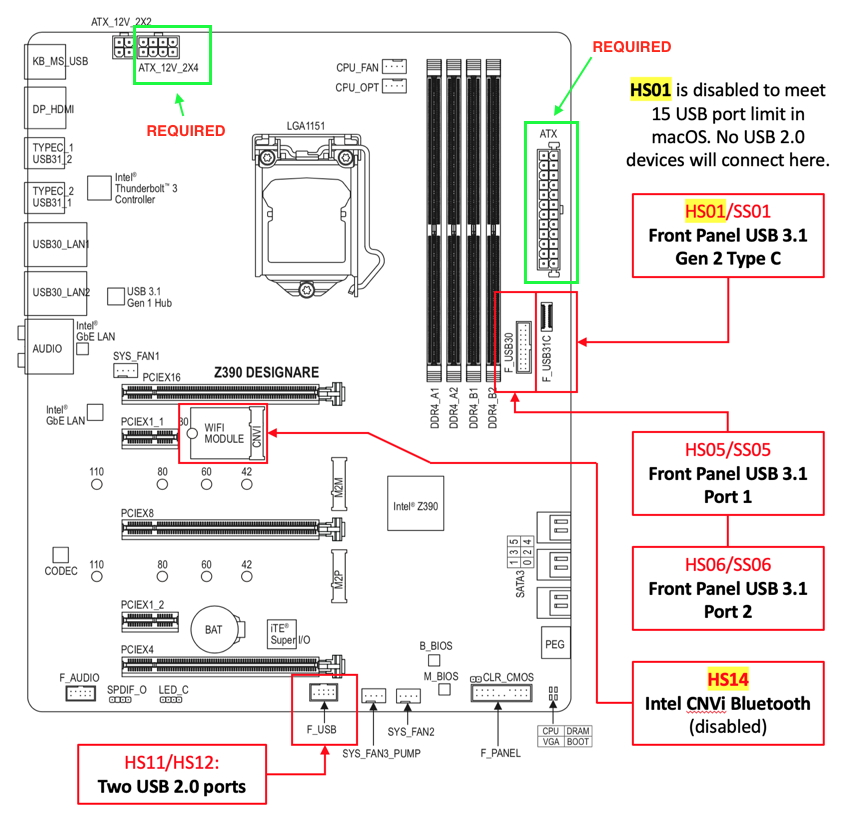
The Intel CNVi card connects Bluetooth to USB port HS14. And the PCIe adapter with piggybacked BCM94360CS2 module should be connected to the motherboard USB 2.0 header (F_USB) located next to the FAN_PUMP header. This header consists of USB 2 ports HS11 and HS12. A custom SSDT, applied in post-installation, therefore disables HS14 and enables both HS11 and HS12.
The motherboard has two on-board gigabit Ethernet ports, ideal for 802.3ad LACP link aggregation. One of the ports is supported by IntelMausiEthernet kext (installed with UniBeast and MultiBeast), but the other (Intel i211) requires a modified Smalltree kext, which is also included and applied in post-installation. Note that the Smalltree driver for the i211 Ethernet port does not support 802.3ad link aggregation at this time, but any macOS-compatible add-in or external Gigabit Ethernet port will work in combination with the Intel i219 port. For example, the Gigabit Ethernet port built into the OWC Thunderbolt 3 dock works perfectly in combination with the Intel i219.
The on-board Titan Ridge Thunderbolt 3 controller also requires an SSDT to enable hot plug capability. The SSDT is also included and applied in post-installation along with the required companion SSDT-DTPG.aml, which is also included.
During the build process a large number of "Couldn't allocate runtime area" or "Error allocating 0x11c45 pages at 0x000000000f302000 alloc type 2" were encountered. These problems were quite persistent, but were finally solved by using OsxAptioFix2Drv-free2000.efi in combination with slide=0. All other memory fix drivers are ineffective on this motherboard. The osxAptioFix2Drv-free2000 driver is included and applied in post-installation, but may also be applied when configuring the USB EFI partition immediately after running UniBeast.
Onboard audio is controlled by the Realtek ALC 1220-VB chip, which is only supported by AppleALC version 1.3.4 and later. MultiBeast 11.2.0 or newer will be used during Post-Installation to install a newer version of AppleALC.
In order to display the RX 580 properly in "System Information --> PCI" a custom SSDT for the RX 580 has also been included and is applied in post-installation. Two versions are available, one for RX580 in Slot 1 and the other for Slot 2.
A popular application used on real Macs is iStat Menus, which shows temperatures, voltages, fan speeds, CPU load, GPU load, and host of other system operating parameters. On a Hackintosh, however, a significantly reduced set of parameters is supported at this time. By installing FakeSMC and the associated sensor kexts as described later in the Guide, it is possible to monitor various component temperatures, CPU load and GPU load, but not voltages and fan speeds, with a licensed copy of iStat Menus or the free HWMonitor app.
Installation Overview
Before we start, let's get acquainted with the big picture. These steps will unfold as we go through the complete installation. If you're installing 10.14.4 or earlier, there will be THREE reboots as shown in red below. But if you're installing 10.14.5 and newer, there will be TWO reboots. All reboots except for the final one will be sudden and will appear to be fatal errors, but in fact they are normal.
- Create USB install disk using UniBeast on a Mac.
- Boot Hackintosh from USB by pressing F12 at BIOS screen and selecting USB disk.
- Clover menu appears.
- Choose Boot macOS Install from Install macOS Mojave.
- Mojave installer begins to load and run. Lots of text messages appear on screen. The log messages may pause for 15-25 seconds. After this the screen may go blank for another 15-25 seconds. All of this is normal.
- Mojave installer GUI appears and asks you to specify your Language. Run Disk Utility to format the target SSD or hard drive.
- Now Mojave installer starts Phase 1. It will show a progress bar of X Minutes Remaining.
- Mojaver installer will suddenly reboot your machine in order to begin Phase 2. Sometimes it cannot reboot the machine by itself, so in that case you will see an error message: EXC_CORPSE_NOTIFY. This is normal, and you should reboot the machine yourself if the machine locks up.
- When machine reboots, boot the USB disk again (F12 at BIOS screen).
- Clover will show a new disk icon called Boot macOS Install from Mojave. You should choose this if it's not already selected.
- This begins Phase 2 of the installation process. Mojave installer will usually say 15 Minutes Remaining or 30 Minutes Remaining. If you're installing 10.14.5 or later, the entire installation should take place at this time, after which you will see a graceful 10-second reboot timer. Then skip the next 4 steps. But if you're installing an earlier version, the next 4 steps will occur.
- Less than 1 minute later, the machine will suddenly reboot once again. You may or may not see an EXC_CORPSE_NOTIFY exception prior to reboot. This reboot is also normal.
- When the BIOS screen appears, press F12 and select the USB disk again.
- In the Clover screen, once again select Boot macOS Install from Mojave.
- Phase 2 will resume automatically. When this is done, you will see a graceful Restart message. Let the timer count down and reboot.
- When the BIOS screen appears, press F12 and select the USB disk again.
- At the Clover screen you will now see several new disk volumes. Choose Boot macOS from Mojave.
- A few moments later you will see the MacOS Welcome screen. Do not sign in to iCloud at this time.
- Post-Installation needs to be done as described in the Post-Installation section below.
- Reboot machine after Post-Installation. When BIOS screen appears, make sure your Mojave disk is booted (not the USB).
- At the Clover menu, choose Boot macOS from Mojave.
- Log into your new system and sign in to iCloud. Do not omit this step.
- After signing in to iCloud, run the Messages app and FaceTime app. You will find them in the dock, located adjacent to each other. Log in to each one if not already logged in.
- Now reboot the machine once again. Boot from the internal Mojave disk and choose Boot macOS from Mojave.
- You are now up and running! Congratulations!
- Make a backup of your system, preferably to an external SSD mounted to a USB 3.0 port. Backup the EFI folder on your Mojave EFI partition as well.
- If you wish to transfer your Applications and Home Directory from an older Mac, use Migration Assistant from the Utilities folder. Don't migrate anything without a full system backup. There is no undo with Migration Assistant!
Installation Procedure: Create USB Install Disk
Download MacOS 10.14.2 or newer from the App Store on a supported Mac and run UniBeast with a USB 2.0 or USB 3.0 flash disk between 16GB and 32GB. I used a Samsung Bar Plus 32GB USB 3.0 drive that has an impressive 200MB/s read speed, which cuts installation time in half. Use a good quality USB flash disk. It seems we all have some decrepit USB disks from yesteryear -- don't use them! Buy a new high quality USB 3.0 flash disk from a reputable manufacturer.
WARNING: If you have BIOS version F6 or newer, please be aware that the two black USB 2.0 ports (HS09/HS10) will not be functional until after Post-Installation. Plug your USB keyboard and mouse into one of the Blue, Red, or Yellow USB 3.x ports instead!
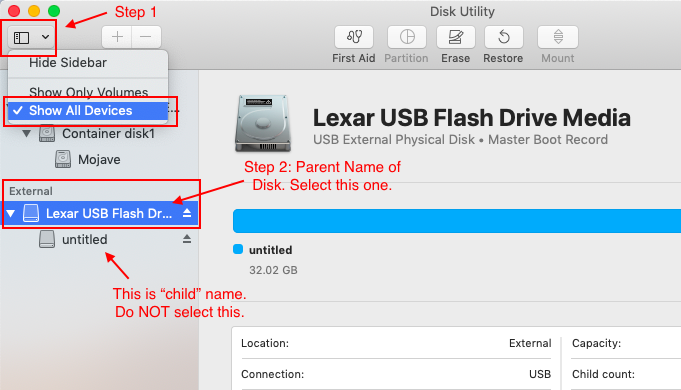
We start by formatting the USB install disk on an existing Mac. Insert the disk into the Mac and run Disk Utility. The carefully follow the steps in the two screenshots below. Every step here is critical -- do not deviate.
First, select Show All Devices. This will expand the list of drives and partitions on the left side. Your USB disk should be listed somewhere under the External section. Select the parent name of the disk. In the screenshot we can see that the USB disk already contains a partition labeled Untitled. We do not want to erase that partition. Instead, we want to erase the entire disk, so we select the parent name as shown.
Now we're ready to erase/format the disk. Select the options exactly as shown, namely:
- Name: Install macOS Mojave
- Format: MacOS Extended (Journaled)
- Scheme: GUID Partition Map
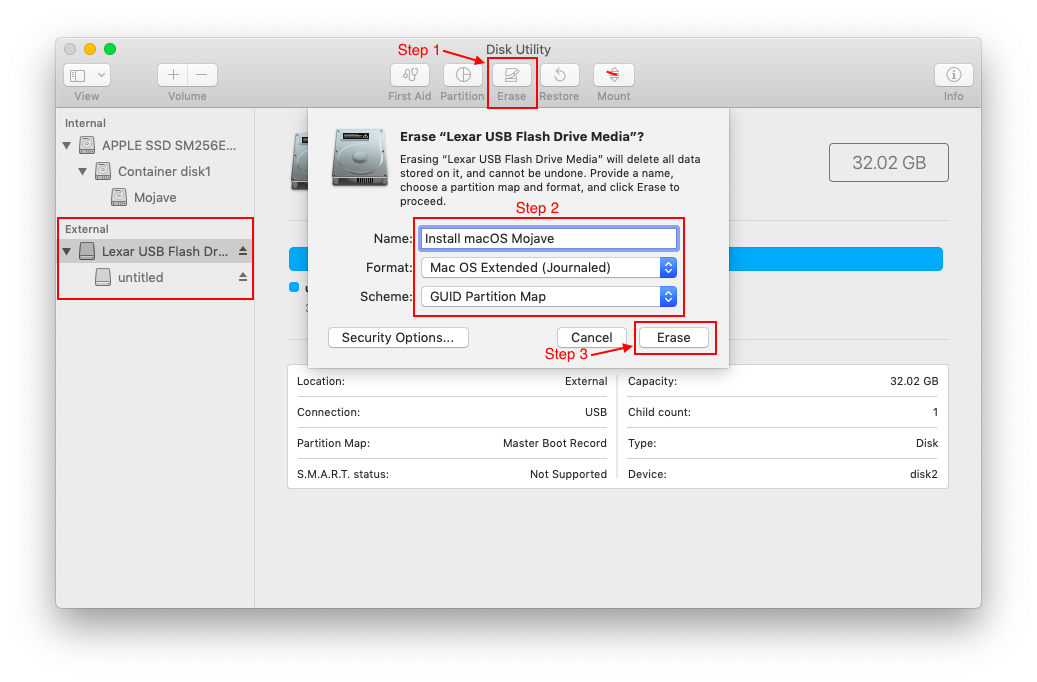
After the disk has been formatted, quit Disk Utility and run UniBeast according to the spoiler below.
An illustrated walk-through of UniBeast 9.1.0 is presented in the spoiler below (use newer version if available).
Click on Mojave to select it.

Select UEFI Boot Mode.
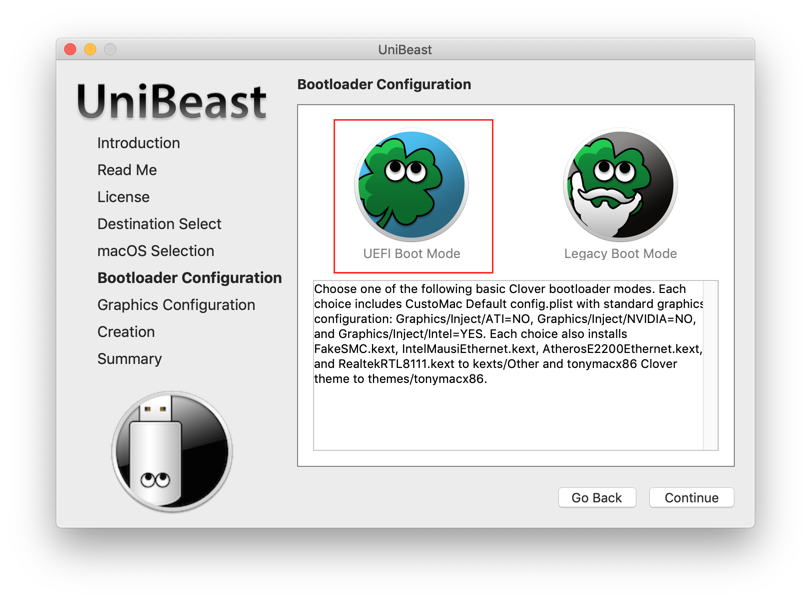
Do not inject either ATI or Nvidia.
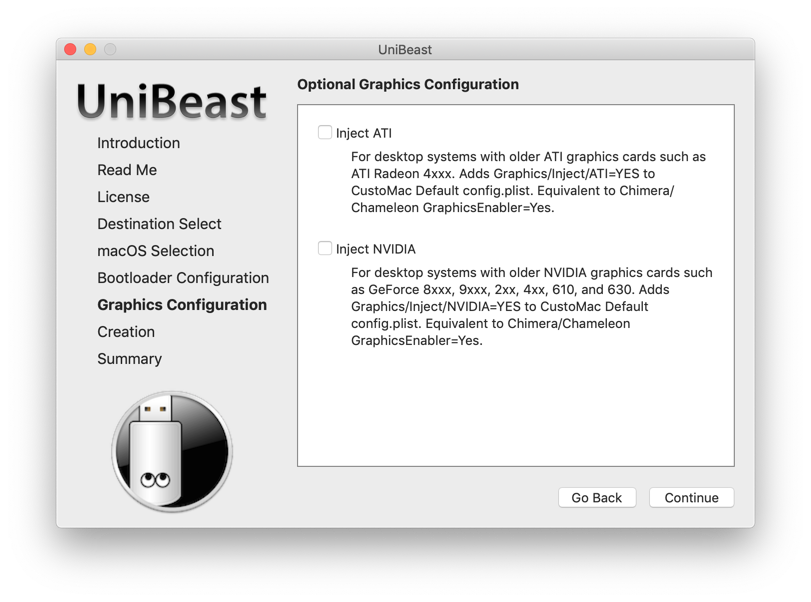
Your three selections should look like this:
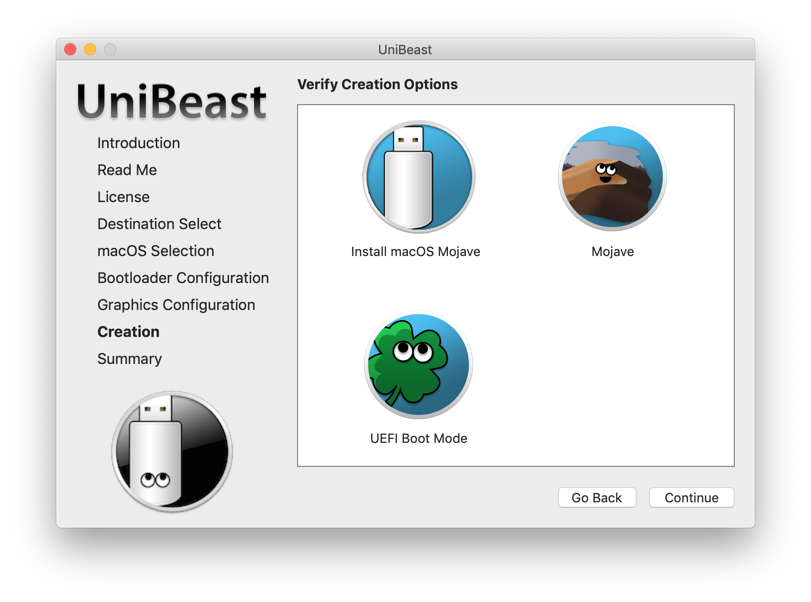
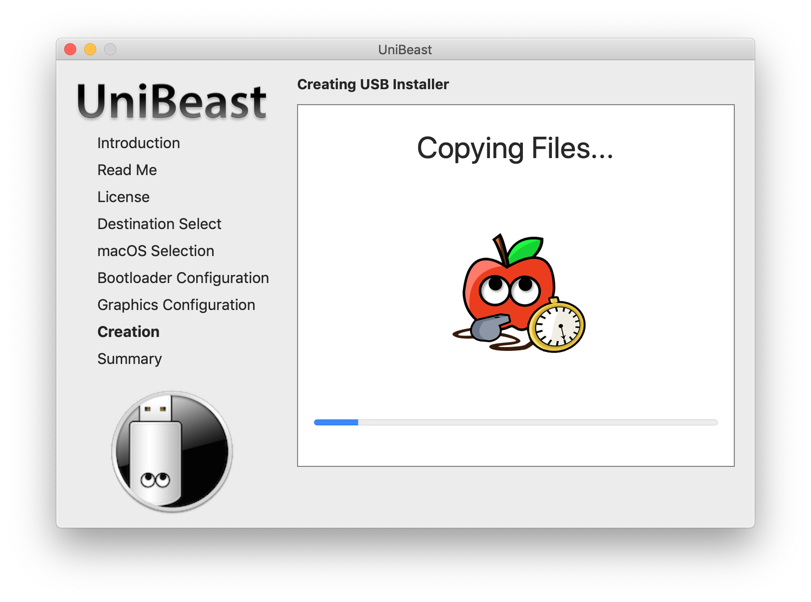
Take a break as UniBeast creates the USB installation media.
Select UEFI Boot Mode.
Do not inject either ATI or Nvidia.
Your three selections should look like this:
Take a break as UniBeast creates the USB installation media.
When UniBeast is done, you should see two USB disk icons on your Mac:
- Install MacOS Mojave
- EFI
Now download and copy the following additional files to the Install MacOS Mojave partition on the USB disk:
- MultiBeast 11.2.0 or newer
- Clover Configurator 5.4.4.0 or newer
- EFI Mounter v3
- Hackintool 2.5.1 or newer
- Post-Install Files.zip (attached to the bottom of this guide)
config.plist Modification
We need to make a few changes to config.plist while we're still on the Mac. Open the EFI partition in Finder and you'll see an EFI root directory that has a subdirectory named CLOVER. In the CLOVER directory is a file called config.plist. Right-click on this file (or CTRL-click) and choose the option to open with Clover Configurator.
An illustrated walk through of the modifications is presented in the spoiler below. The modifications described in the spoiler are mandatory.
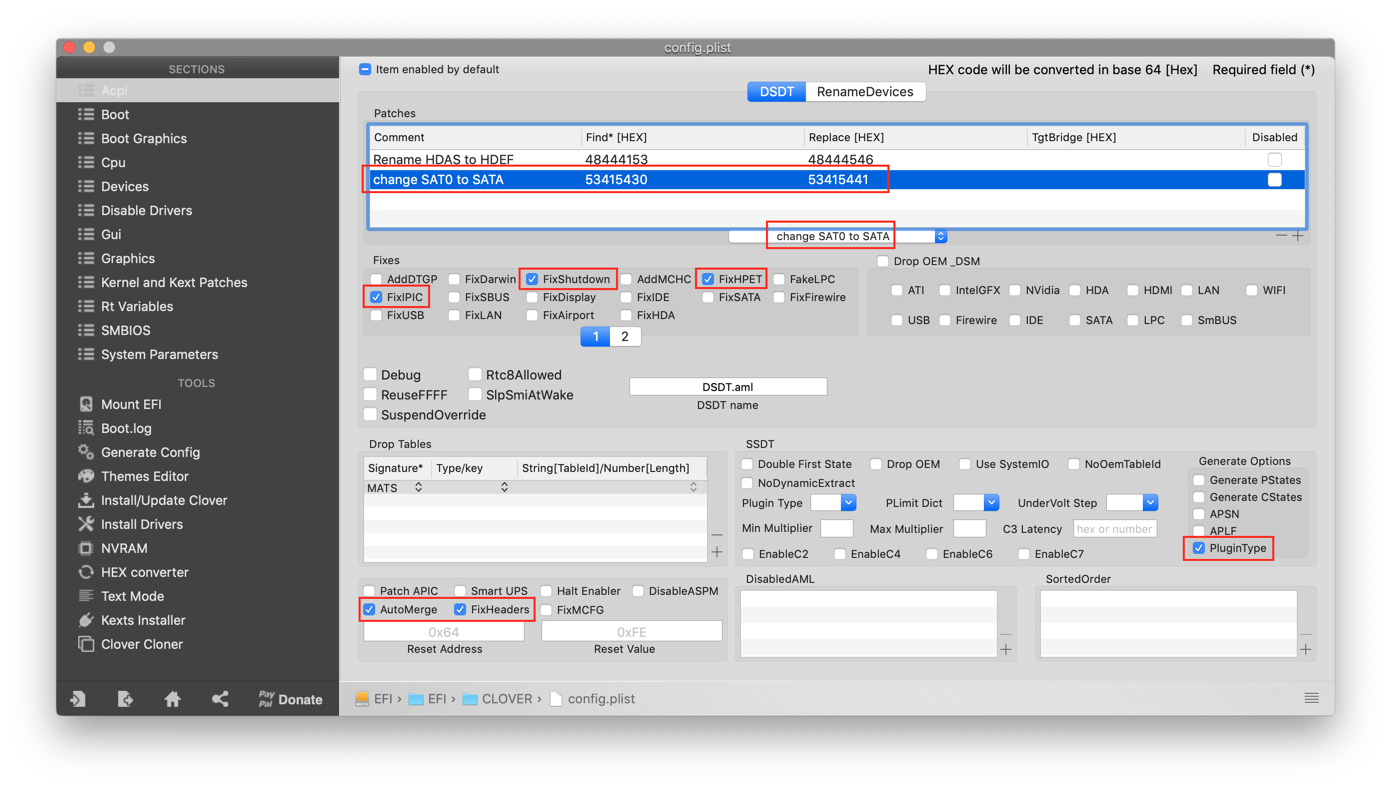
Let's start at the top with the ACPI section of Clover Configurator. Make all the changes shown in red. The SAT0-to-SATA patch is necessary for any SATA drive, including SATA M.2 SSDs. This patch is added by clicking the pop-up bar and selecting "Change SAT0 to SATA" as shown. FixHeaders provides an extra measure of security against kernel panics due to unprintable characters (as does MATS under Drop Tables). PluginType enables native CPU power management on Haswell and newer Intel CPUs. When clicking on FixIPIC be careful not to accidentally click on FixUSB because this will immediately lead to ACPI errors at boot.
WARNING: Some motherboards will fail to boot with PluginType enabled at this stage. To play it safe, you may elect to keep this turned off until post-installation stage.

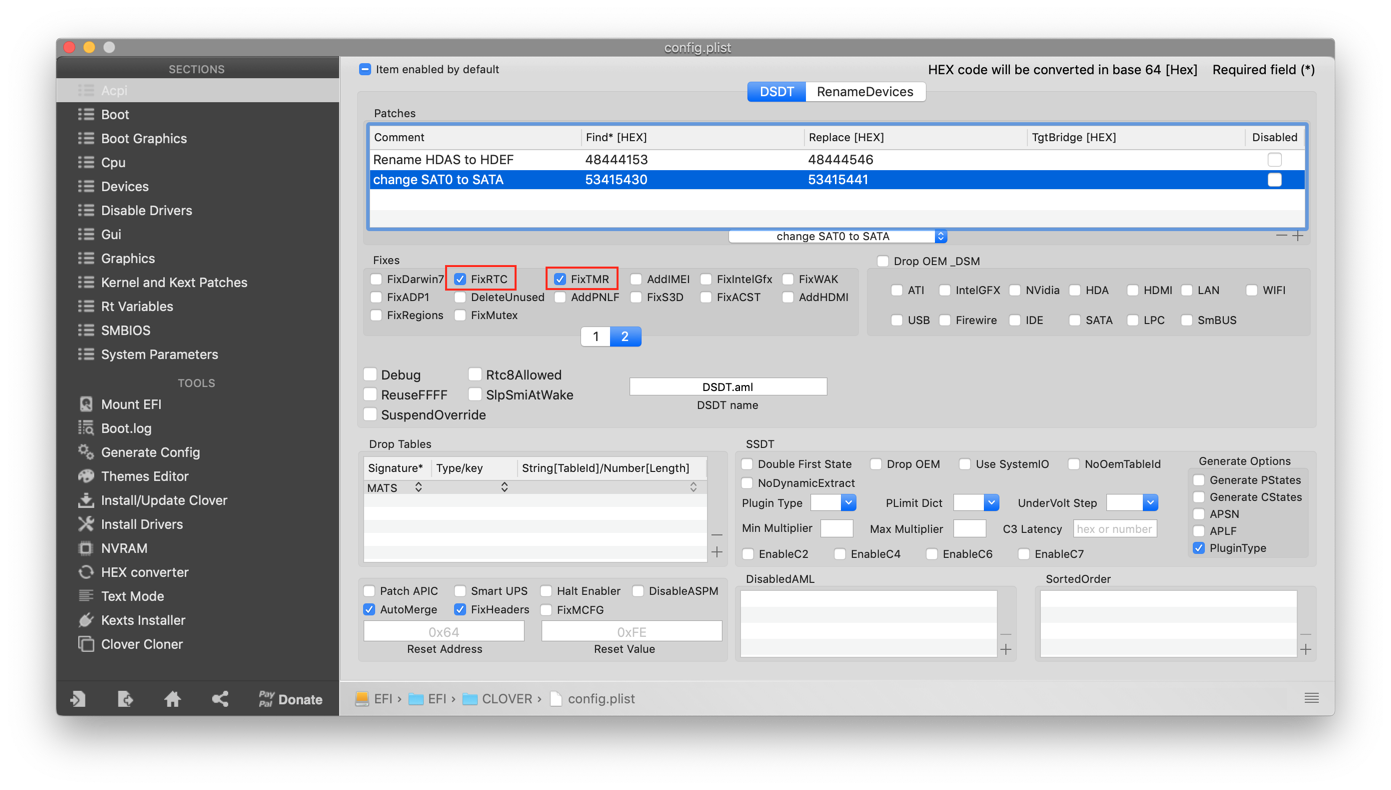
ACPI settings have a section 2 as shown below. Make these additional changes as well.

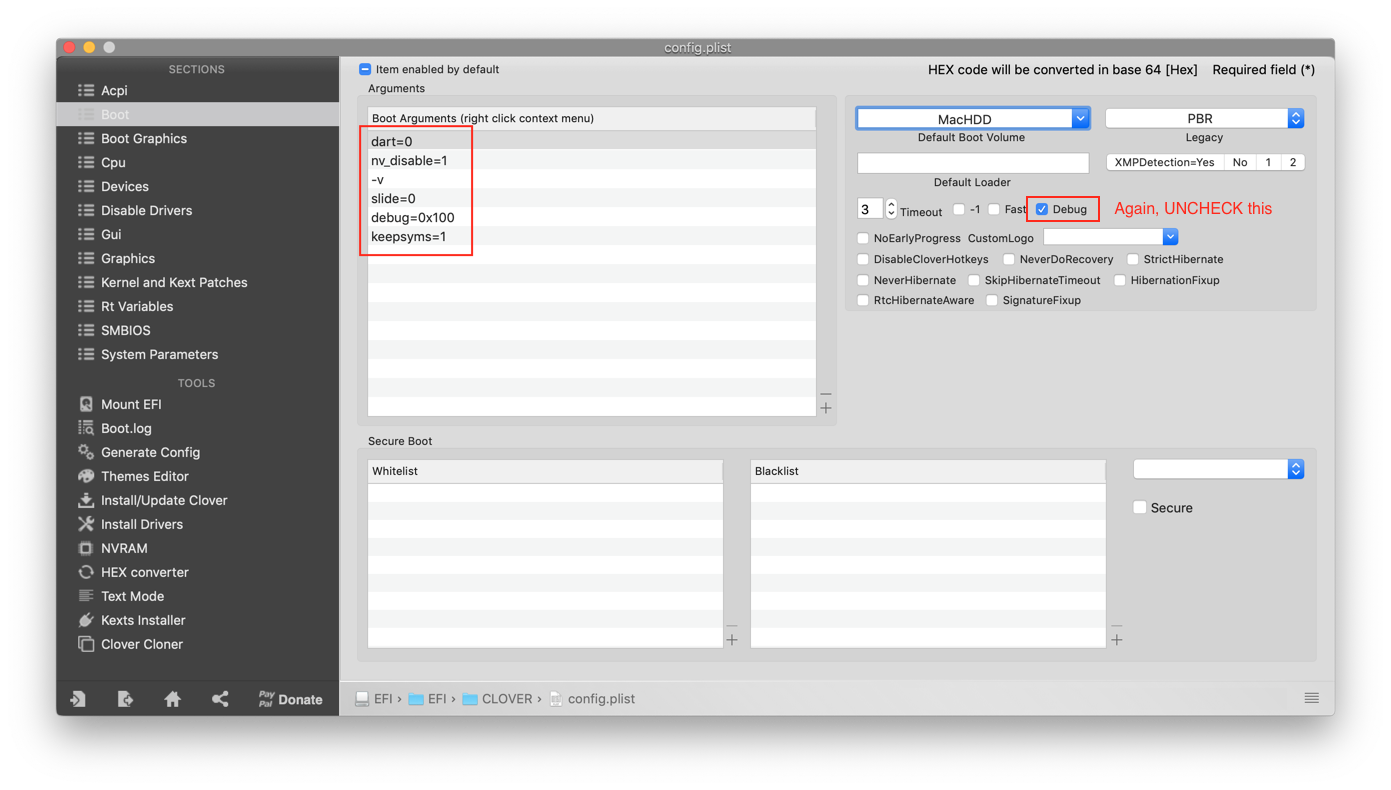
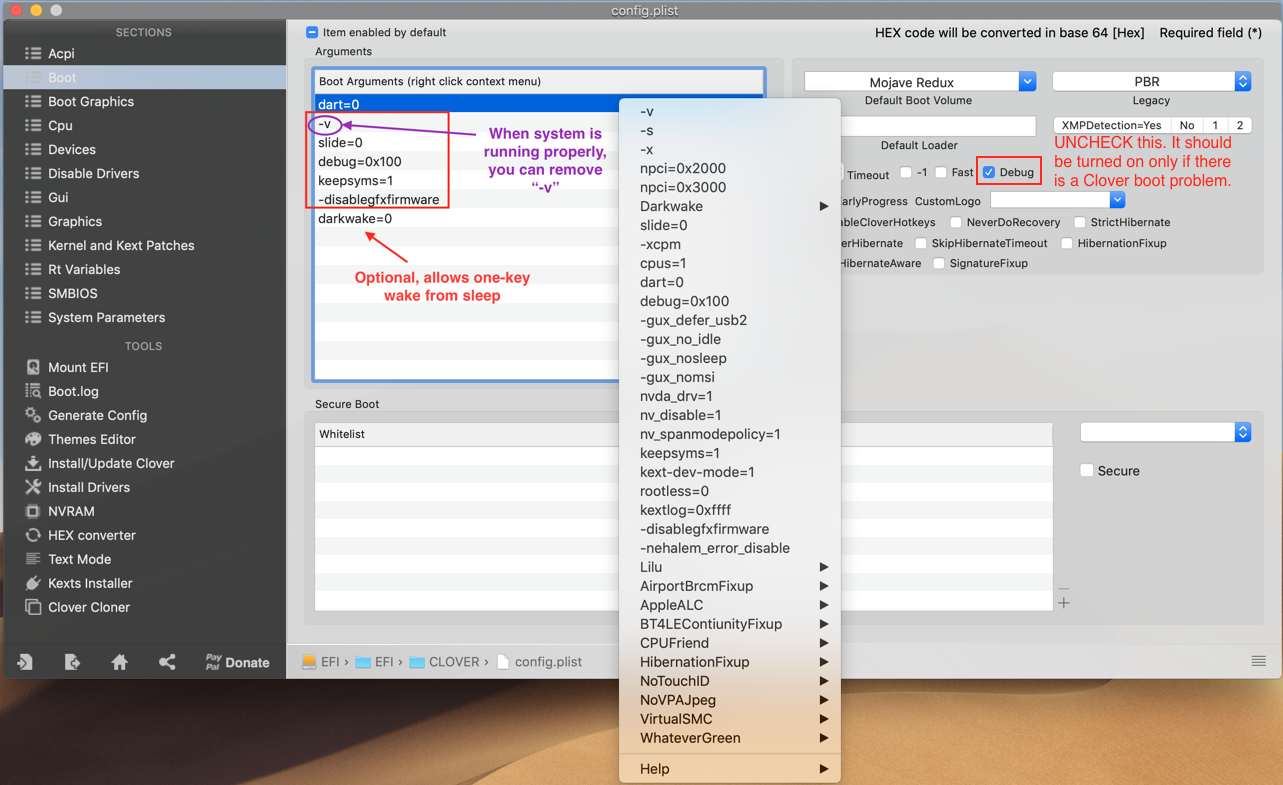
Now let's modify the Boot section as shown. Verbose allows us to peer into the inner workings of the boot sequence. Once everything is installed and functional, you may disable Verbose. "Slide=0" is essential for preventing memory allocation errors at boot time.
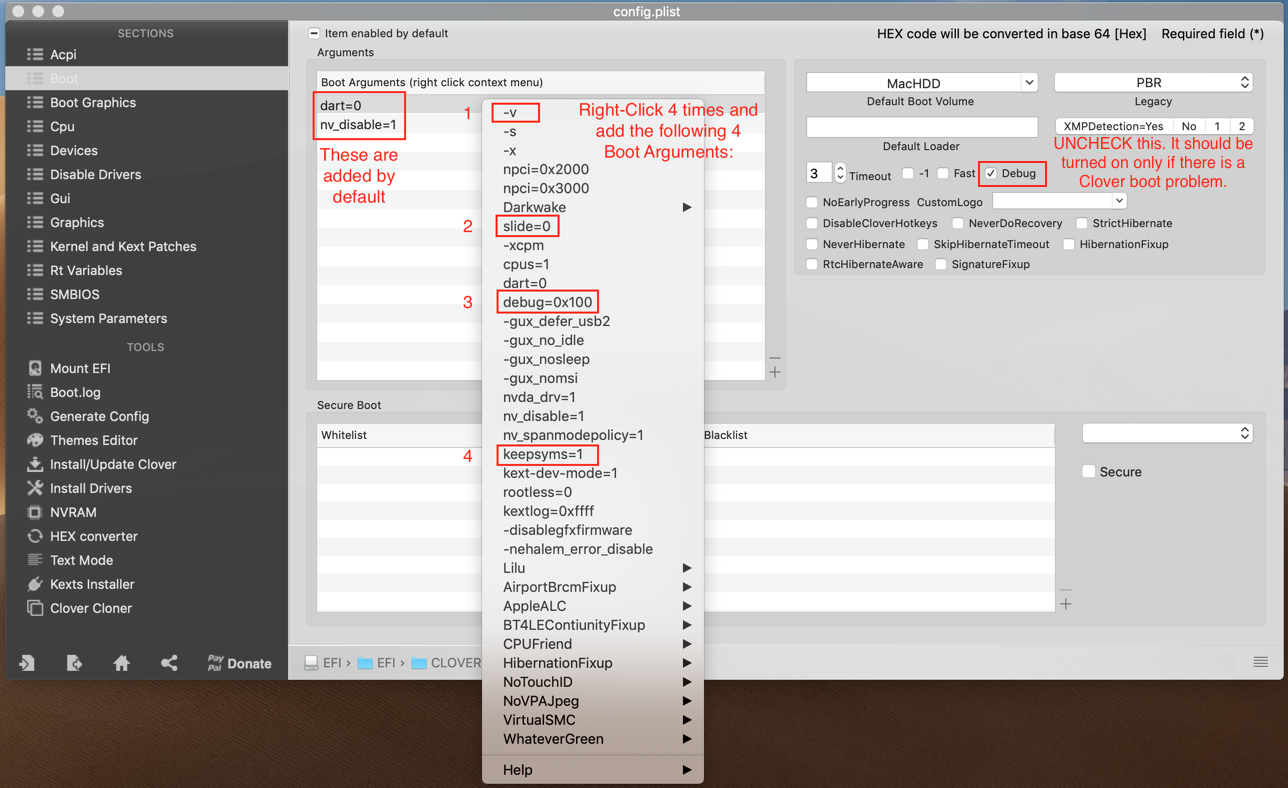
The resulting Boot Arguments should look like this:
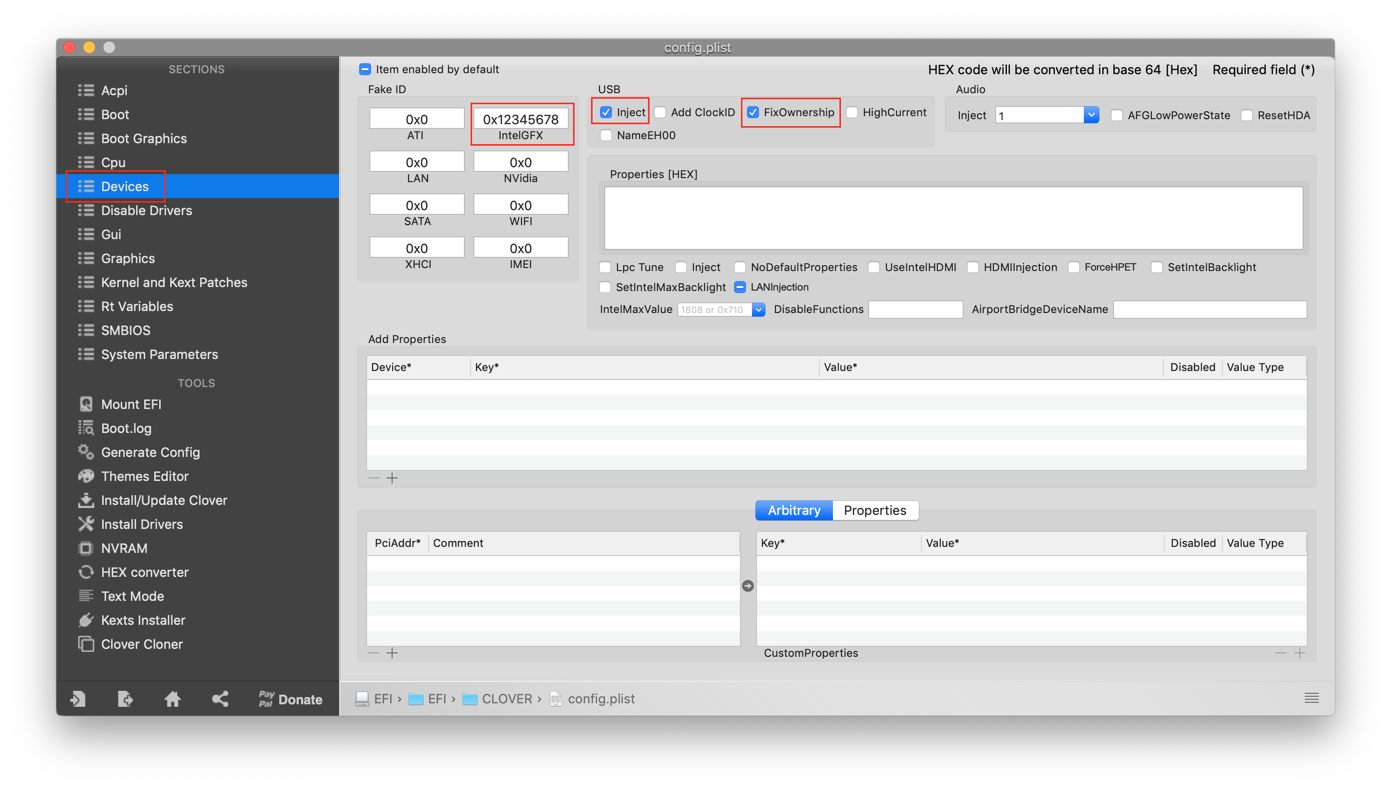
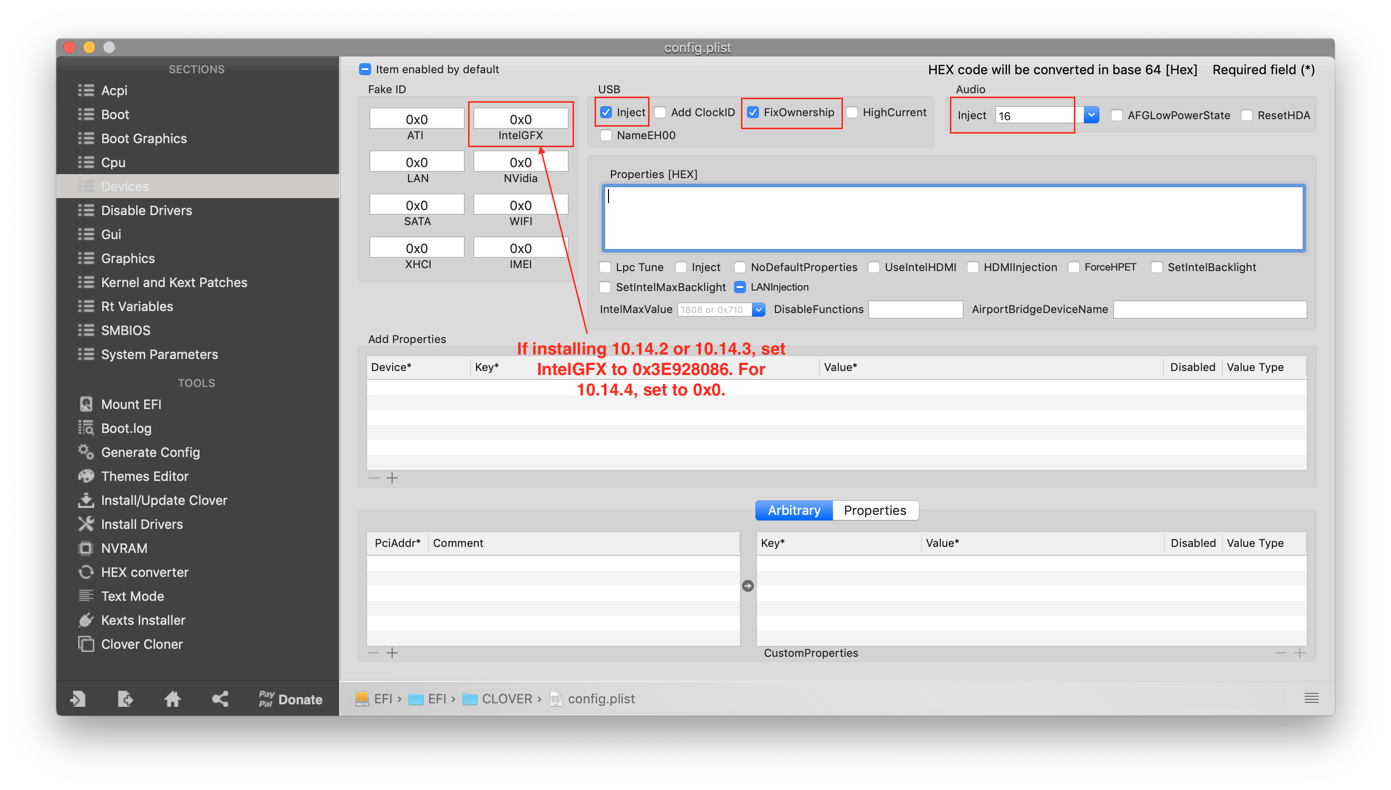
There are no changes in Boot Graphics or CPU. So let's move on to Devices and make the changes shown. We are intentionally setting IntelGFX to 0x12345678. This disables acceleration on iGPU, but allows the HDMI port to function. Don't worry -- we'll enable full iGPU acceleration in Post-Installation.
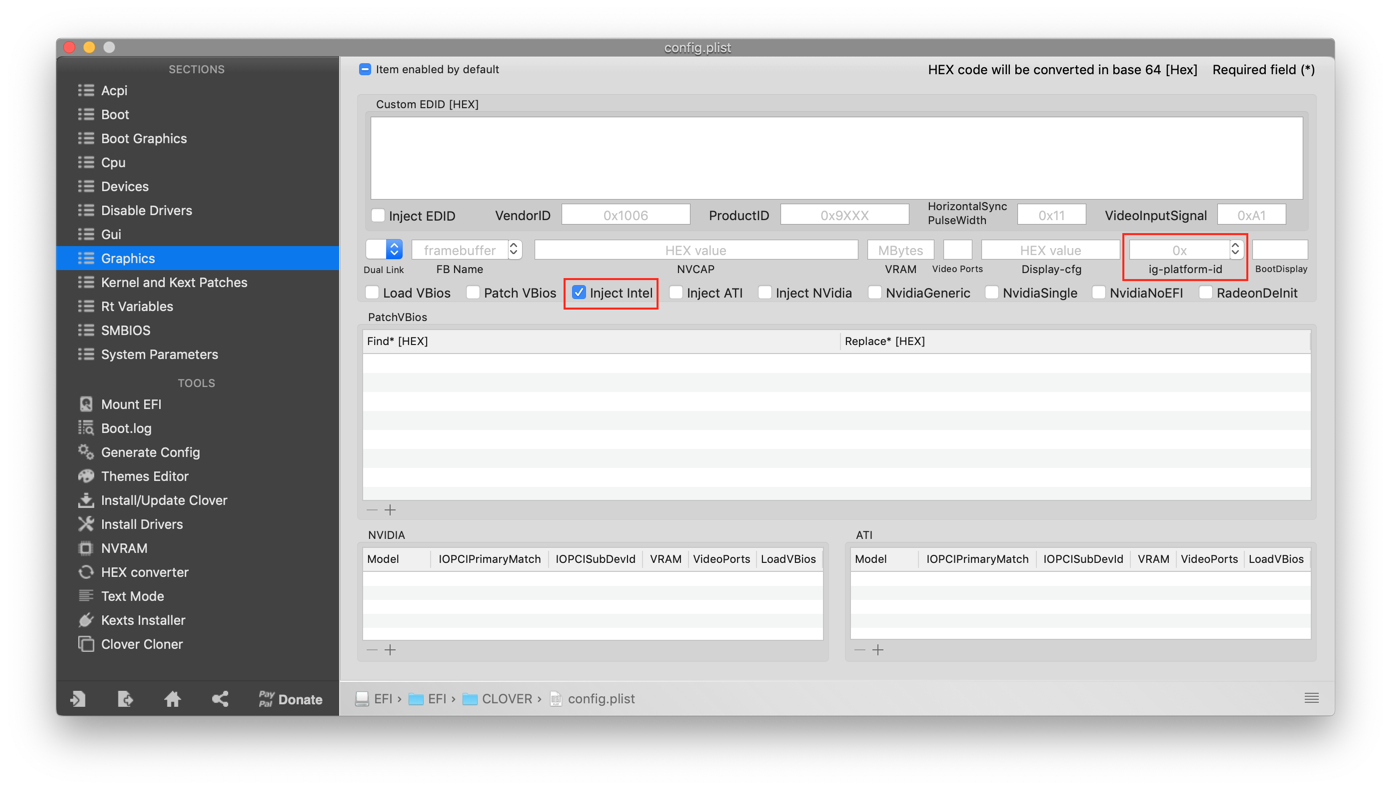
There are no changes to Disable Drivers or Gui. So let's move ahead to Graphics and make the changes shown. We are also intentionally blanking out ig-platform-id and enabling Inject Intel.
For 10.14.5 and newer:
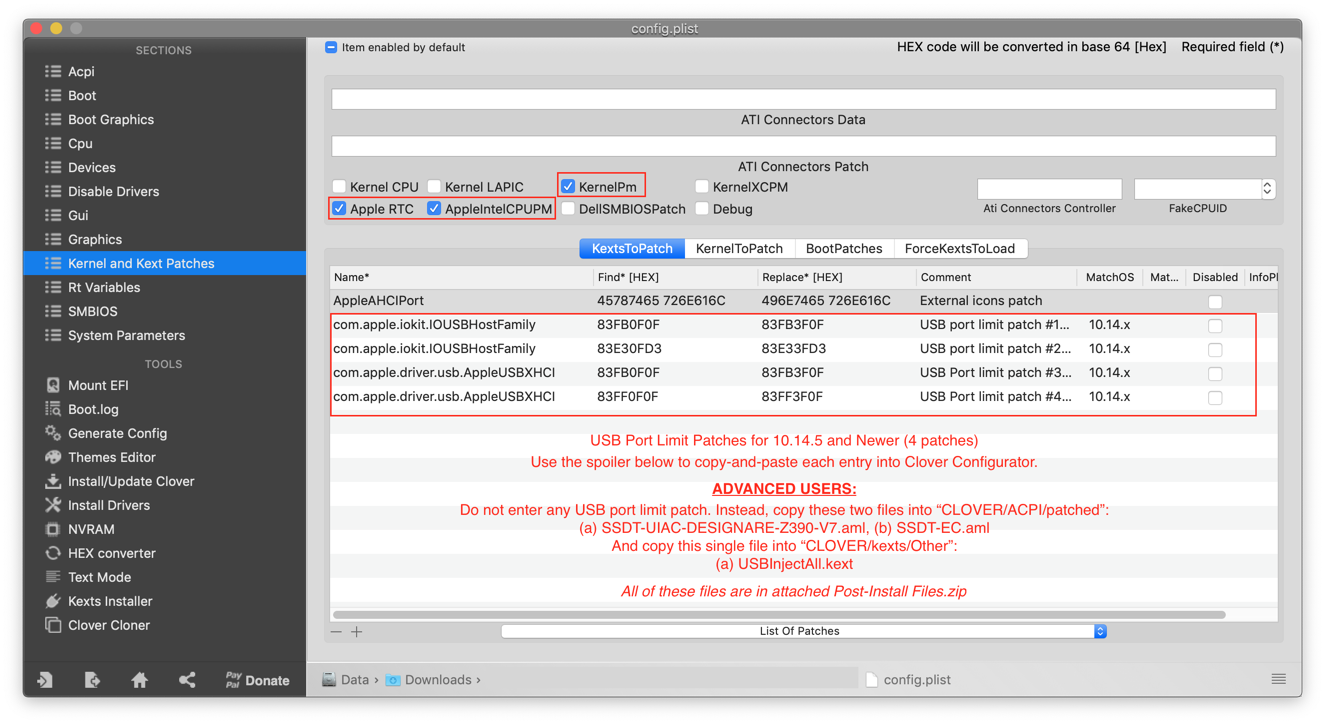
In the Kernel and Kext Patches section we make the changes as shown. If there are any USB port limit patches already present, delete and replace them with the ones shown in the diagram. The spoiler below contains the values to be copied-and-pasted. NOTE: The two black USB 2.0 ports (HS09/HS10) will not work with BIOS version F6 until after Post-Installation.
NOTE: The two black USB 2.0 ports (HS09/HS10) will not work with BIOS version F6 until after Post-Installation.
For 10.14.2 through 10.14.4:
In the Kernel and Kext Patches section we make the changes as shown. The first two lines under Kexts to Patch will already be present. Make sure the USB port limit patch (row 2) is as shown.

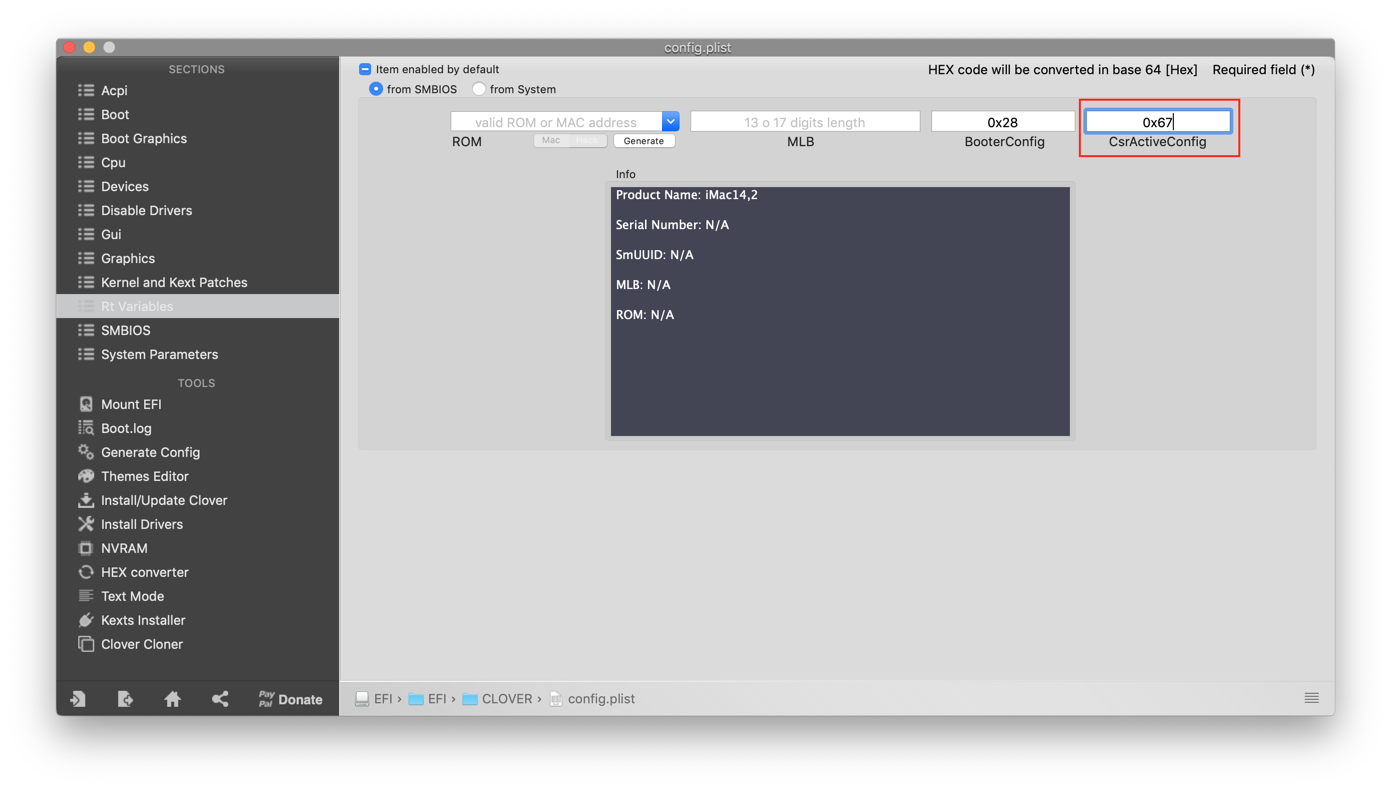
Moving on to RtVariables, set the CsrActiveConfig value to 0x67 as shown.
For 10.14.5 and newer:
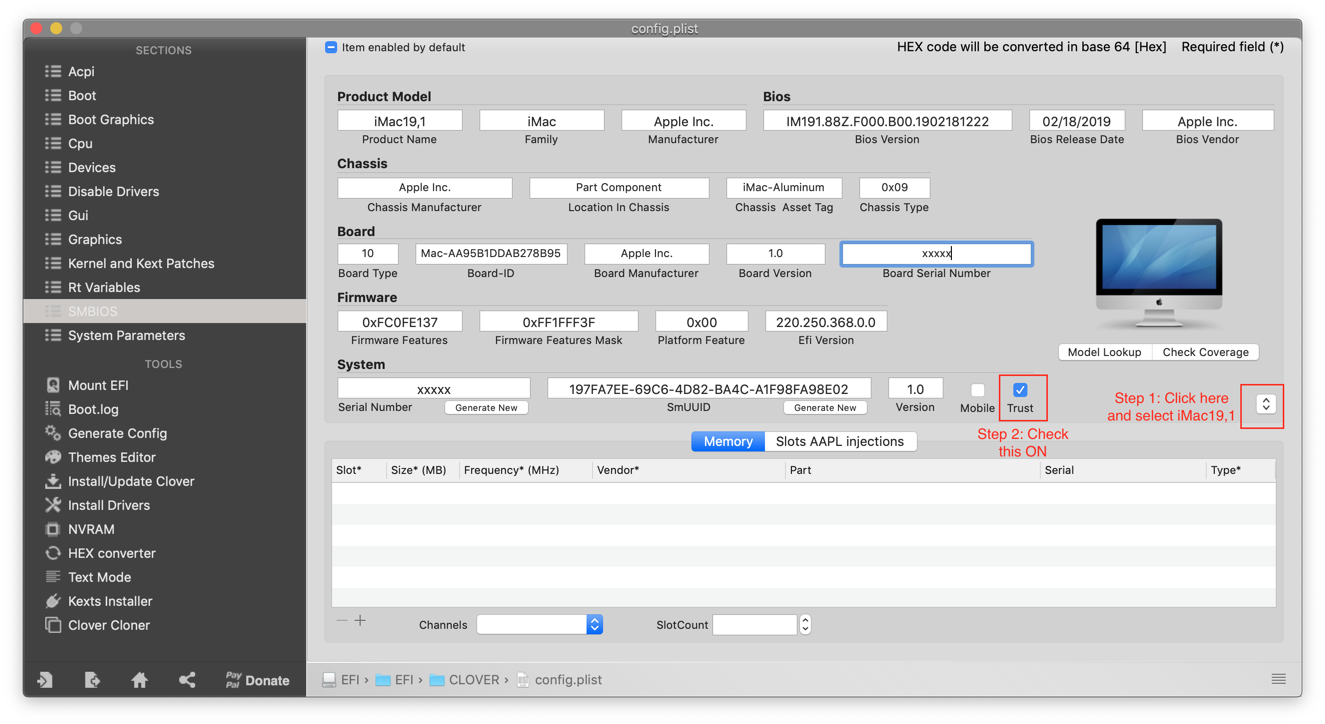
Click the popup shown in Step 1, select iMac19,1 and then enable the Trust checkbox as shown in Step 2.
For 10.14.2 through 10.14.4:
Your SMBIOS page needs no editing. Just verify that it looks like this:

And no changes are needed in System Parameters. Now save the config.plist and quit Clover Configurator.
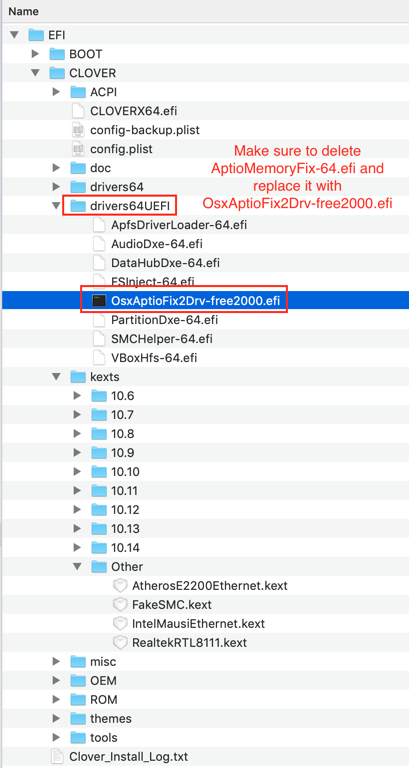
We're almost done. We need to delete AptioMemoryFix-64.efi from the CLOVER/drivers64UEFI folder on the EFI partition of the USB install disk and replace it with OsxAptioFix2Drv-free2000.efi as shown in the red box below. Please download this EFI file from the bottom of this guide.
And finally we need to copy Lilu and WhateverGreen to the CLOVER/kexts/Other folder. Starting with macOS 10.14.3, these two kexts are necessary at this first stage of installation. They can be downloaded from here:
Just copy the files named Lilu.kext and WhateverGreen.kext. The resulting folder should look like this:

WARNING: Some motherboards will fail to boot with PluginType enabled at this stage. To play it safe, you may elect to keep this turned off until post-installation stage.
ACPI settings have a section 2 as shown below. Make these additional changes as well.
Now let's modify the Boot section as shown. Verbose allows us to peer into the inner workings of the boot sequence. Once everything is installed and functional, you may disable Verbose. "Slide=0" is essential for preventing memory allocation errors at boot time.
The resulting Boot Arguments should look like this:
There are no changes in Boot Graphics or CPU. So let's move on to Devices and make the changes shown. We are intentionally setting IntelGFX to 0x12345678. This disables acceleration on iGPU, but allows the HDMI port to function. Don't worry -- we'll enable full iGPU acceleration in Post-Installation.
There are no changes to Disable Drivers or Gui. So let's move ahead to Graphics and make the changes shown. We are also intentionally blanking out ig-platform-id and enabling Inject Intel.
For 10.14.5 and newer:
In the Kernel and Kext Patches section we make the changes as shown. If there are any USB port limit patches already present, delete and replace them with the ones shown in the diagram. The spoiler below contains the values to be copied-and-pasted. NOTE: The two black USB 2.0 ports (HS09/HS10) will not work with BIOS version F6 until after Post-Installation.
Name: com.apple.iokit.IOUSBHostFamily
Find: 83FB0F0F
Replace: 83FB3F0F
Comment: USB port limit patch #1 10.14.x modify by DalianSky(credit ydeng)
MatchOS: 10.14.x
Name: com.apple.iokit.IOUSBHostFamily
Find: 83E30FD3
Replace: 83E33FD3
Comment: USB port limit patch #2 10.14.x modify by DalianSky(credit PMHeart)
MatchOS: 10.14.x
Name: com.apple.driver.usb.AppleUSBXHCI
Find: 83FB0F0F
Replace: 83FB3F0F
Comment: USB Port limit patch #3 10.14.x modify by DalianSky(credits PMheart)
MatchOS: 10.14.x
Name: com.apple.driver.usb.AppleUSBXHCI
Find: 83FF0F0F
Replace: 83FF3F0F
Comment: USB Port limit patch #4 10.14.x modify by DalianSky(credits PMheart)
MatchOS: 10.14.x
Find: 83FB0F0F
Replace: 83FB3F0F
Comment: USB port limit patch #1 10.14.x modify by DalianSky(credit ydeng)
MatchOS: 10.14.x
Name: com.apple.iokit.IOUSBHostFamily
Find: 83E30FD3
Replace: 83E33FD3
Comment: USB port limit patch #2 10.14.x modify by DalianSky(credit PMHeart)
MatchOS: 10.14.x
Name: com.apple.driver.usb.AppleUSBXHCI
Find: 83FB0F0F
Replace: 83FB3F0F
Comment: USB Port limit patch #3 10.14.x modify by DalianSky(credits PMheart)
MatchOS: 10.14.x
Name: com.apple.driver.usb.AppleUSBXHCI
Find: 83FF0F0F
Replace: 83FF3F0F
Comment: USB Port limit patch #4 10.14.x modify by DalianSky(credits PMheart)
MatchOS: 10.14.x
For 10.14.2 through 10.14.4:
In the Kernel and Kext Patches section we make the changes as shown. The first two lines under Kexts to Patch will already be present. Make sure the USB port limit patch (row 2) is as shown.
Moving on to RtVariables, set the CsrActiveConfig value to 0x67 as shown.
For 10.14.5 and newer:
Click the popup shown in Step 1, select iMac19,1 and then enable the Trust checkbox as shown in Step 2.
For 10.14.2 through 10.14.4:
Your SMBIOS page needs no editing. Just verify that it looks like this:
And no changes are needed in System Parameters. Now save the config.plist and quit Clover Configurator.
We're almost done. We need to delete AptioMemoryFix-64.efi from the CLOVER/drivers64UEFI folder on the EFI partition of the USB install disk and replace it with OsxAptioFix2Drv-free2000.efi as shown in the red box below. Please download this EFI file from the bottom of this guide.
And finally we need to copy Lilu and WhateverGreen to the CLOVER/kexts/Other folder. Starting with macOS 10.14.3, these two kexts are necessary at this first stage of installation. They can be downloaded from here:
Just copy the files named Lilu.kext and WhateverGreen.kext. The resulting folder should look like this:
We have now completed a fairly basic CLOVER configuration. We're not concerned with getting everything working at this time. We just want enough of the system available to us so that Mojave can be installed. The USB Port Limit patch, for example, makes all USB ports available -- even if some of the logical ports do not physically exist. The Ethernet kext, as another example, provides compatibility with one of the two onboard Ethernet controllers. We are therefore setting up a fairly generic system at this stage. In Post-Installation we will make it a very specific system.
Double-check your work, then eject the USB flash disk and prepare for installation. The first step is to modify BIOS settings. Boot the Hackintosh and press DEL key to enter BIOS Setup. Then proceed with the modifications shown below.
NOTE: If your monitor is connected to a discrete GPU in a PCIe slot (not iGPU) and you don't see the BIOS splash screen, connect an HDMI-capable monitor to the HDMI port on the motherboard and reboot. You should now see the BIOS splash screen. Press DEL to enter BIOS Setup and set Peripherals --> Initial Display Output --> PCIe x Slot where "x" is the slot containing your discrete GPU. Save BIOS settings, connect your monitor back to the discrete GPU, and reboot.
BIOS Modifications: Flash Gigabyte BIOS version F4 or Newer
Please select the spoiler corresponding to the firmware currently on your motherboard.
(Thanks to @Zip1 for helping put this together!)
- Press F2 to toggle to Advanced Mode.
- Press F7 to Load Optimized Defaults.
- Tweaker
- Advanced CPU Settings → VT-d → Enabled → VT-d must be enabled for AppleVTD
- Extreme Memory Profile (X.M.P.) → Profile 1
- Settings
- Internal Graphics → Enabled
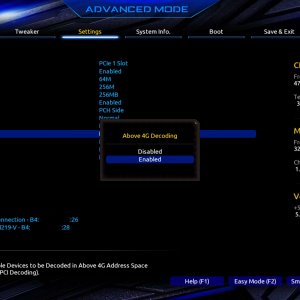
- Above 4G Decoding → Enabled
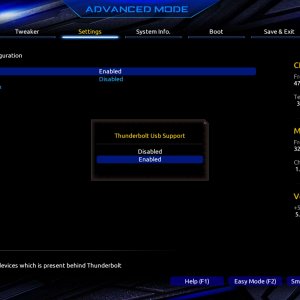
- Thunderbolt(TM) Configuration
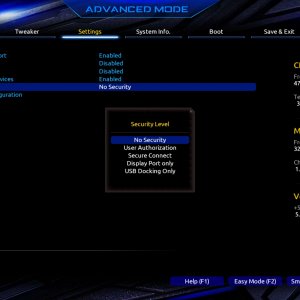
- Security Level → No Security
This will trigger a 'Save & Exit' dialog so press ESC to close the dialog. - Discrete Thunderbolt(TM) Configuration
- Thunderbolt USB Support → Enabled
- GPIO3 Force Pwr → Enabled
- Security Level → No Security
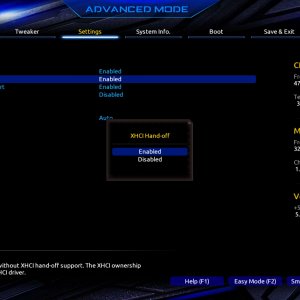
- USB Configuration
- XHCI Handoff → Enabled
- Boot
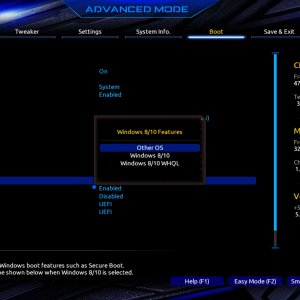
- Windows 8/10 Features → Other OS
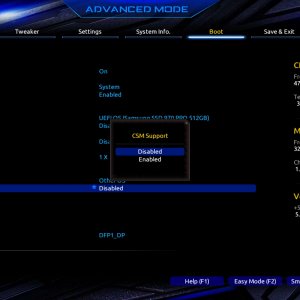
- CSM Support → Disabled
Some devices such as GPUs may require CSM Support to be enabled. There is no harm in setting this to either Enabled or Disabled. Use the setting that works best.
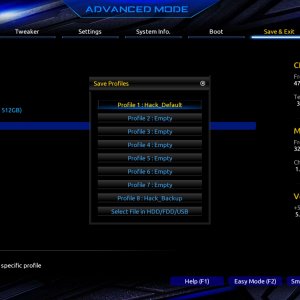
- Save & Exit → Save Profiles → Save to Profile 1
This preserves the firmware settings for easy recovery.
- Boot → CFG-Lock → Disabled


- Save & Exit
- Load Optimized Defaults then make (or confirm) the following settings -- important settings in bold:
- M.I.T.
- Extreme Memory Profile (X.M.P.) → Profile 1
- BIOS
- Windows 8/10 Features → Other OS
- CSM Support → Disabled. Some devices require CSM Support to be enabled. There is no harm in setting this to either Enabled or Disabled.
- Secure Boot will be disabled by default, but good to check
- Peripherals
- Initial Display Output → PCIe Slot 1. If your discrete graphics card is in Slot 2, change this appropriately.
- Intel Platform Trust Technology (PTT) → Disabled
- Thunderbolt(TM) Configuration
- TBT Vt-d Base Security → Disabled
- Thunderbolt Boot Support → Disabled
- Security Level → No Security
- Discrete Thunderbolt Configuration
- Thunderbolt USB Support → Enabled
- GPIO3 Force Pwr → Enabled
- DTBT Configuration (no changes made although I did try the following two, but not sure if there's any benefit):
- Reserved Memory → 737
- Reserved PMemory → 1184
- USB Configuration
- Legacy USB Support → Enabled
- XHCI Hand-off → Enabled
- Network Stack Configuration
- Network Stack → Disabled
- Chipset
- Vt-d → Disabled
- Internal Graphics → Enabled
- DVMT Pre-Alloc → 64M (May not be present in BIOS F6 and later.)
- DVMT Total Gfx Mem → 256M (May not be present in BIOS F6 and later.)
- Audio Controller → Enabled
- Above 4G Decoding → Enabled
- Power
- ErP → Disabled
- RC6 (Render Standby) → Enabled
- Save & Exit
- Choose Save and Exit to save BIOS settings and reboot machine.
Preflight checklist:
- BIOS has been upgraded to F4 or newer.
- BIOS settings have been applied.
- Discrete GPU (Radeon RX series) has been installed and 8-pin PCI power cable connected.
- BCM94360CS2 WiFi/BT module must be installed onto a PCIe x1 adapter card and inserted into an available PCIe x1 slot on motherboard. See Components section for exact specifications.
- If you have an Ethernet cable, plug it into the port labeled Intel i219, which is closest to the audio jacks. Only this port will be active in first stage.
- USB install disk inserted into
a USB 2.0 port at HS09 or HS10 or intoone of the USB 3.0 ports at HS07/SS07 (see PDF for layout information). A USB 3.0 flash disk is recommended and it should be inserted into a USB 3.0 port at HS07/SS07.If for some reason you run into problems during the 1st or 2nd stage of the installation, move the USB disk to a dedicated USB 2.0 port (HS09 or HS10) and try again. - NOTE: For macOS 10.14.4 and later please do not use either of the two black USB 2.0 ports at HS09 or HS10. They will be disabled until post-installation modifications have been applied. Instead, use any of the USB 3.0 ports at HS07/SS07.
- Plug USB keyboard/mouse into any of the blue USB 3.0 ports
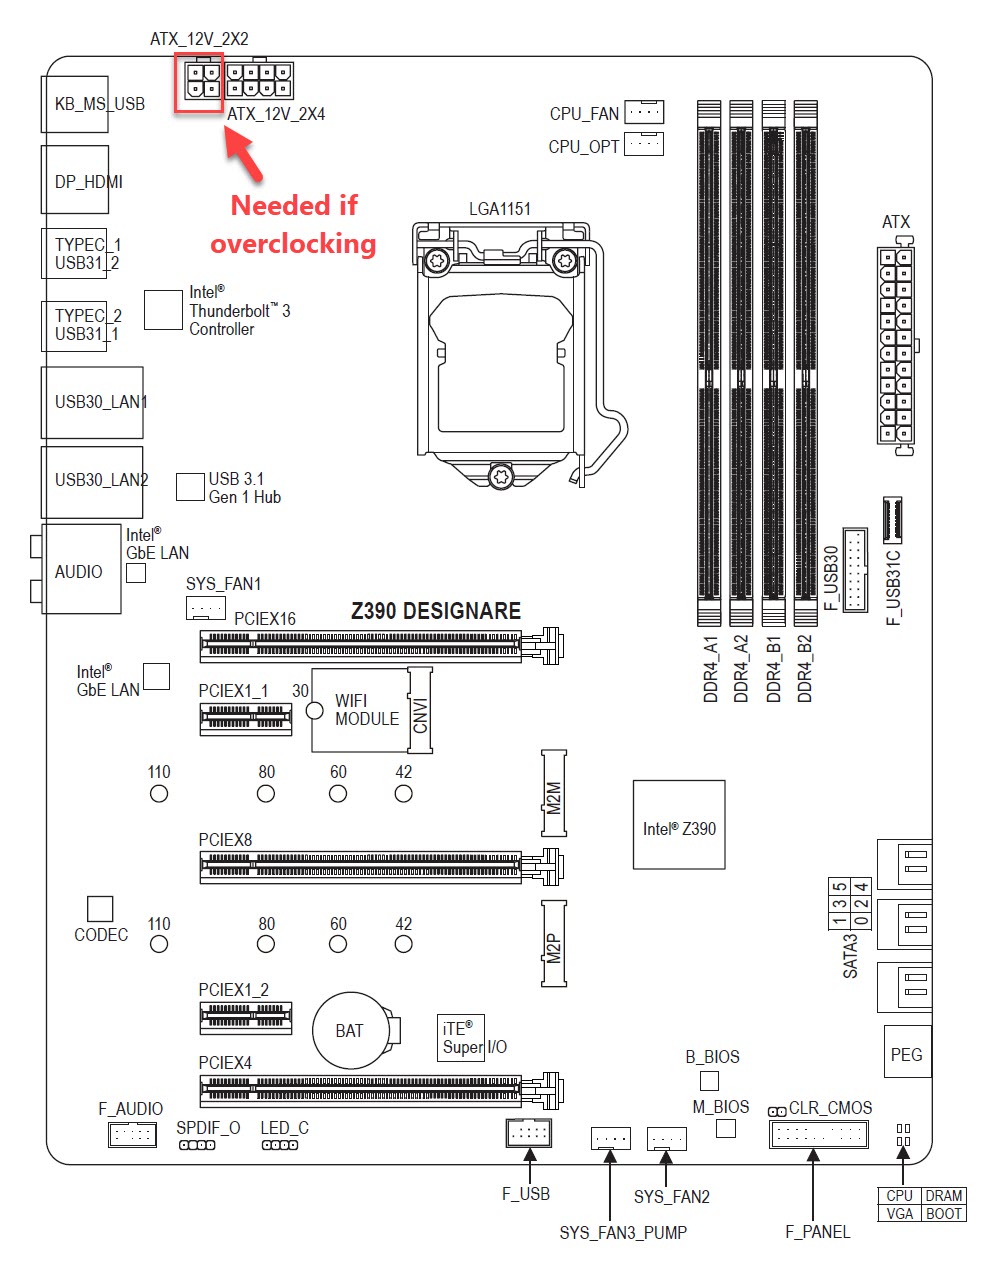
HS09 and/or HS10. If only one of these ports is available, you may have to pull keyboard out, plug mouse in, pull mouse out, plug keyboard in, etc. to share the port. In my case the Logitech keyboard and mouse are both connected to a single Logitech wireless receiver plugged into HS10. So two devices use only one USB 2.0 port.Do not connect USB keyboard and mouse to a USB hub during installation. Plug keyboard and mouse directly into any two available blue USB 3.0 ports. - This motherboard has two CPU power connectors marked ATX_12V_2X2 and ATX_12V_2X4 located at the top left. The 8-pin connector (ATX_12V_2X4) must be connected, but the 4-pin connector (ATX_12V_2X2) is only needed if over-clocking (per Gigabyte Tech Support).
After some activity you will be presented with the Mojave Installer GUI. From the list of options, choose Disk Utility to erase the target Mojave disk. Be absolutely certain to choose Show All Devices from the top left of Disk Utility. Then select the parent name of the target disk from the tree view on the left side. You will now see options to select Name, Format, and Scheme. If you don't see these 3 options, stop and double-check your steps.
- Name your disk Mojave. You can change it later.
- Format may be either: APFS or MacOS Extended (Journaled). If you select the latter option, it will be converted to APFS automatically.
- Scheme must be: GUID Partition Map.
After the reboot, press F12 at the BIOS screen and choose the same USB flash disk to boot from.
Clover will appear again, but this time there will be a new volume called: Boot macOS Install from Mojave. Choose this one if it's not already selected.
Now Phase 2 installation will begin. A progress bar will appear stating that the process will take 15 to 30 minutes depending on the speed of your USB disk. If you're installing 10.14.2 through 10.14.4, a few seconds later the system will suddenly reboot! You will see another EXC_CORPSE_NOTIFY exception, and again this is perfectly normal. After the reboot, press F12 at the BIOS screen and choose the same USB flash disk to boot from. When Clover boot menu appears, once again choose Boot macOS Install from Mojave. This will continue the Phase 2 process.
This stage will take 15 to 30 minutes. When complete, there will be a 5 to 10 second countdown to auto-reboot. Let the system count down and reboot itself.
After the reboot, press F12 at the BIOS screen and choose the same USB flash disk to boot from. When Clover boot menu appears, you will see a number of new disk volumes:
- Boot macOS from Mojave
- Recovery volume
- Prebooter volume
- Others
When the Welcome screen appears choose your region, your keyboard, etc. But do not sign in to iCloud at this time. Choose Setup Later instead. Signing into iCloud registers the serial number of the computer, but this serial number will change in Post-Installation, which will then result in two new systems being registered in iCloud. So skip iCloud sign-in until post-installation is done and you've rebooted after post-installation.
Now that Mojave is up and running, we need to enable all of the goodies on this motherboard, such as hot-plug Thunderbolt 3, both of the gigabit Ethernet ports, on-board Realtek audio, Broadcom Bluetooth, etc. And we also need to enable various Mojave features such as sleep, wake, Messages, FaceTime, etc. This is all accomplished in Post Installation, which begins right now...
Post Installation:
Note: In previous versions of the build guide there were two post-installation methods. The former "black box" method (METHOD 2) has been removed in order to focus on the detailed step-by-step method that provides a better understanding of the process and improves your ability to troubleshoot problems.
You should have already downloaded Post-Install Files.zip onto the USB install disk. If you haven't done so, you may download this zip file directly to your Mojave downloads folder (or any other suitable location). Mojave should automatically decompress (unzip) the file.
Step-by-step post-installation guides are provided in the four "spoilers" below that should now be opened and followed in sequence...
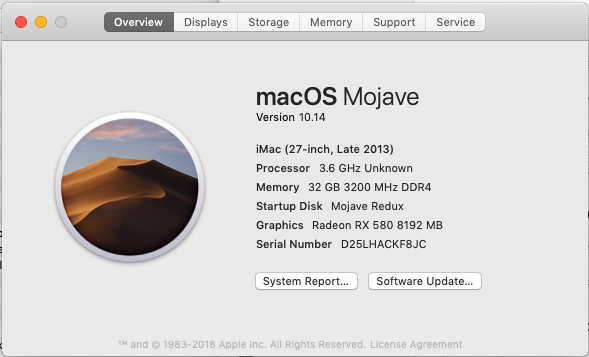
About this Mac shows we have iMac14,2 SMBIOS (27-inch, Late 2013). The Radeon RX 580 is natively recognized.
IORegistryExplorer lists all logical USB ports, even if some don't physically exist. This is the result of applying the "No Port Limit" patch in config.plist.
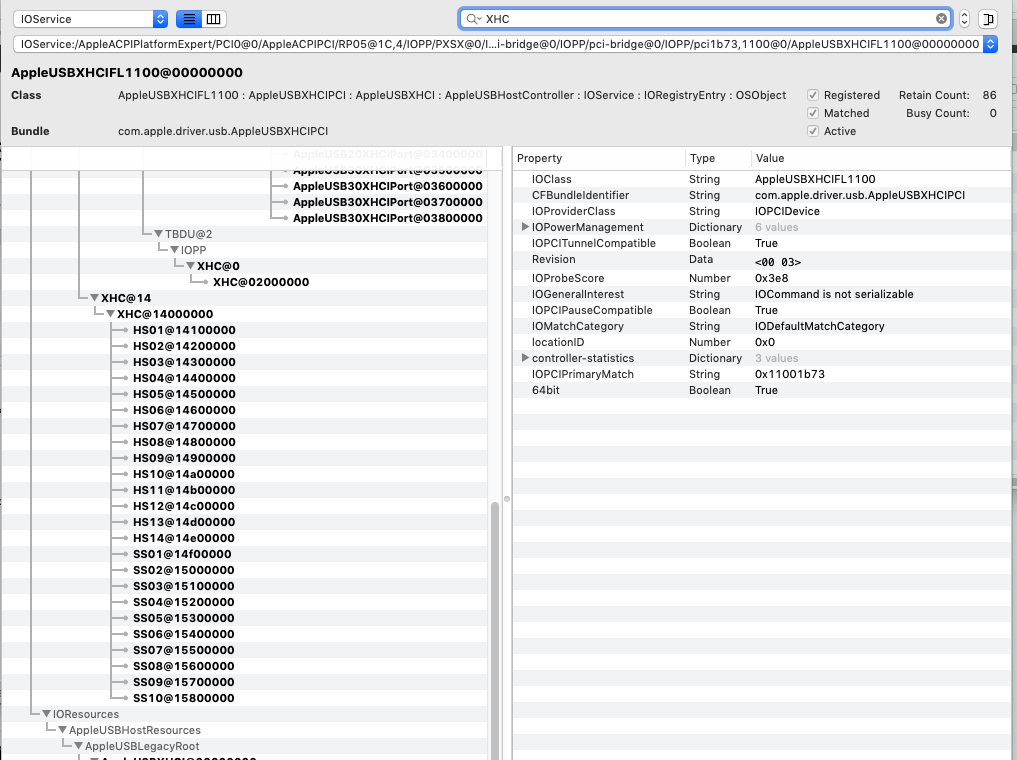
IORegistryExplorer also shows that my Thunderbolt 3 OWC Dock is available because the Titan Ridge TB3 controller is natively supported by MacOS. But if I unplug the OWC Dock at this time and plug it back in, it will not work. So there is no hot plug capability at this time.

If we look at the top of this image we see there's a Bluetooth Host Controller on HS14 (high speed USB port 14). This is the CNVi card that comes with the motherboard. However, this device is not supported. In post-installation, we will disable HS14 and enable HS11 where the Broadcom Bluetooth card is connected.

Here we can see that GFX0 (UHD 630 iGPU) is connected to IONDRVFramebuffer, which is a default, non-accelerated driver. In post-installation we'll see this changed to the accelerated AppleIntelFramebuffer.

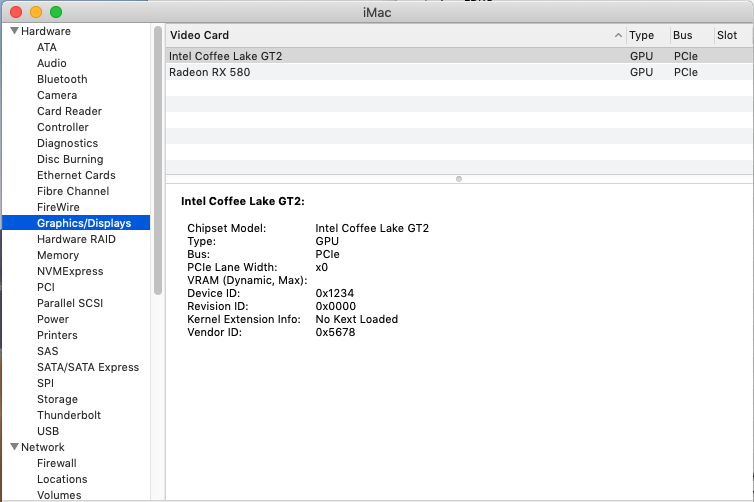
Under Graphics Displays we see that the iGPU is currently identified as Coffee Lake GT2. This will be fixed in post.
Currently no built-in audio devices are recognized. But audio ports on the OWC Dock are natively supported. In post, we'll get on-board audio working as well.

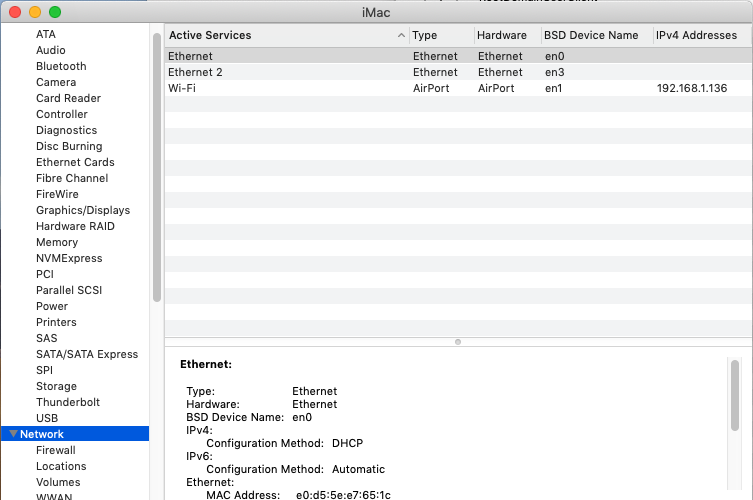
Only one of the two built-in Ethernet ports is recognized (in this image the port labeled "ethernet" is on the OWC Thunderbolt 3 dock). In post, we'll get both internal gigabit ports activated.

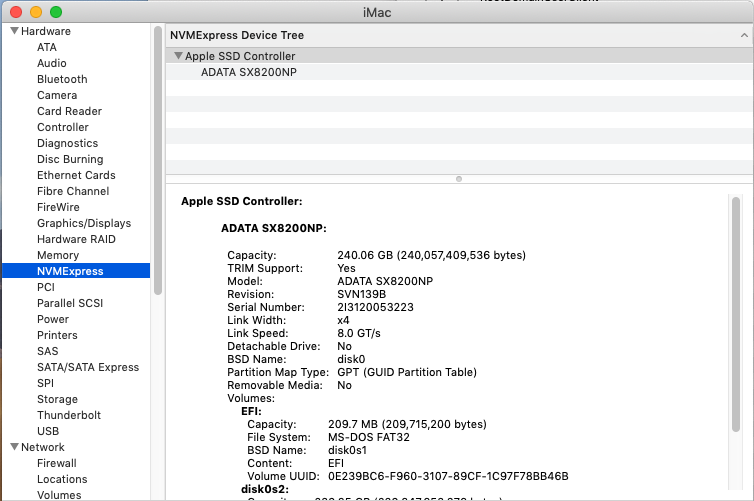
Here we see that TRIM is already enabled for NVMe drives.
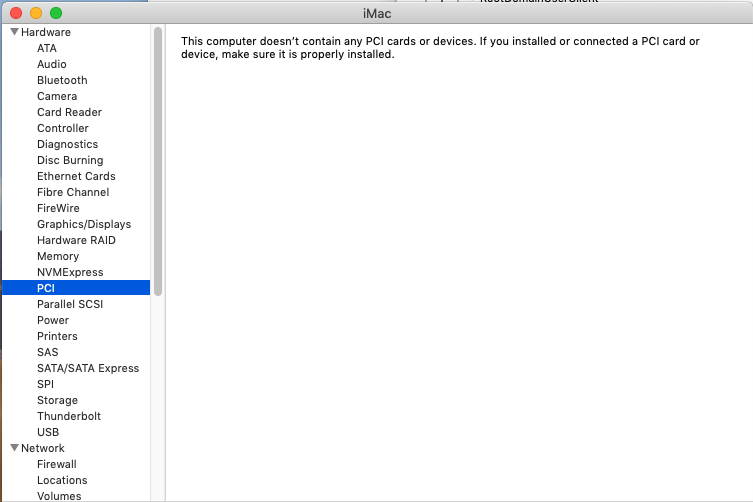
Currently the PCI page is completely empty. This will change significantly after post.
Here we see that TRIM is not active on SATA SSD. The config.plist TRIM Enabler patch will fix this in post.
All USB 2.0 and USB 3.x ports are recognized. The Broadcom Bluetooth controller (on USB HS11) is also showing up natively!

We only have 3 network devices right now. After post, we'll have 5! Bluetooth PAN is an important one for Handoff, Continuity, AirDrop, etc. but it will active after post.
IORegistryExplorer lists all logical USB ports, even if some don't physically exist. This is the result of applying the "No Port Limit" patch in config.plist.
IORegistryExplorer also shows that my Thunderbolt 3 OWC Dock is available because the Titan Ridge TB3 controller is natively supported by MacOS. But if I unplug the OWC Dock at this time and plug it back in, it will not work. So there is no hot plug capability at this time.
If we look at the top of this image we see there's a Bluetooth Host Controller on HS14 (high speed USB port 14). This is the CNVi card that comes with the motherboard. However, this device is not supported. In post-installation, we will disable HS14 and enable HS11 where the Broadcom Bluetooth card is connected.
Here we can see that GFX0 (UHD 630 iGPU) is connected to IONDRVFramebuffer, which is a default, non-accelerated driver. In post-installation we'll see this changed to the accelerated AppleIntelFramebuffer.
Under Graphics Displays we see that the iGPU is currently identified as Coffee Lake GT2. This will be fixed in post.
Currently no built-in audio devices are recognized. But audio ports on the OWC Dock are natively supported. In post, we'll get on-board audio working as well.
Only one of the two built-in Ethernet ports is recognized (in this image the port labeled "ethernet" is on the OWC Thunderbolt 3 dock). In post, we'll get both internal gigabit ports activated.
Here we see that TRIM is already enabled for NVMe drives.
Currently the PCI page is completely empty. This will change significantly after post.
Here we see that TRIM is not active on SATA SSD. The config.plist TRIM Enabler patch will fix this in post.
All USB 2.0 and USB 3.x ports are recognized. The Broadcom Bluetooth controller (on USB HS11) is also showing up natively!
We only have 3 network devices right now. After post, we'll have 5! Bluetooth PAN is an important one for Handoff, Continuity, AirDrop, etc. but it will active after post.
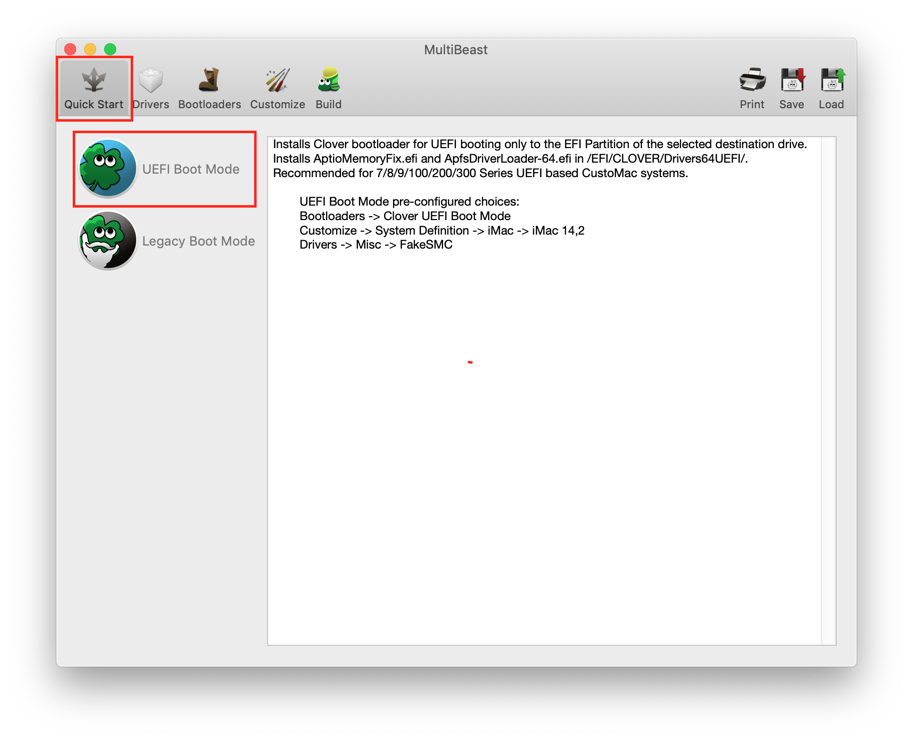
We begin our post-installation work by launching MultiBeast 11.2.0. The first step is to choose UEFI Boot Mode.
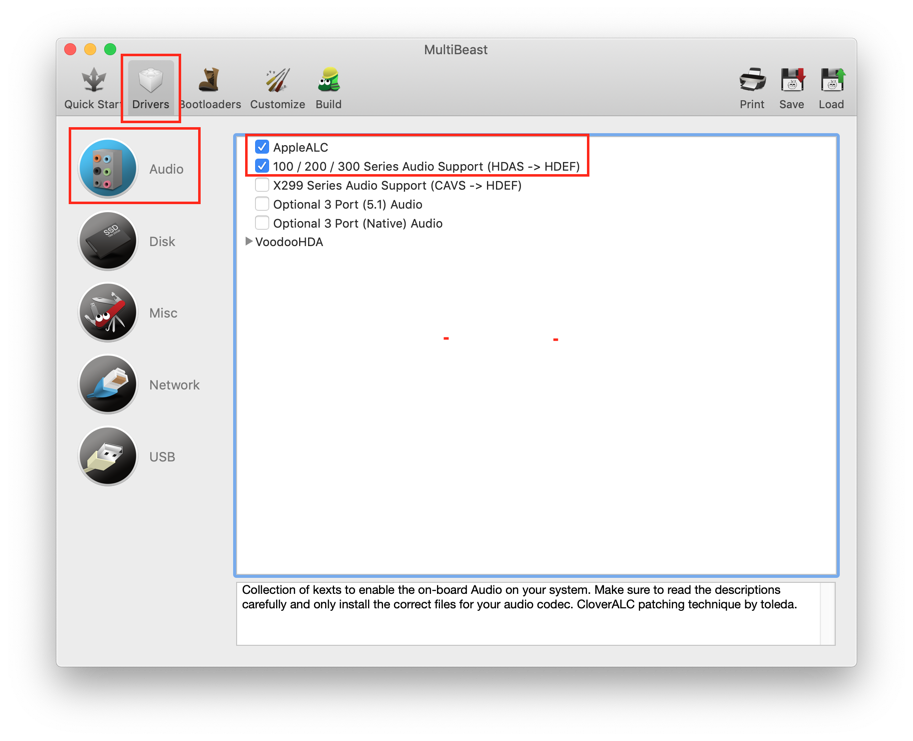
Now we'll go through the Drivers one by one, starting with Audio. We enable the first two options. NOTE: Although we enable AppleALC, this version of MultiBeast appears to have a bug which prevents AppleALC from being installed. We'll still keep this checked on in case a future version fixes the issue, and we'll manually install AppleALC from Post-Install Files.zip as described later in this section. Update: MultiBeast 11.2.1 fixes this problem and it will install AppleALC properly.
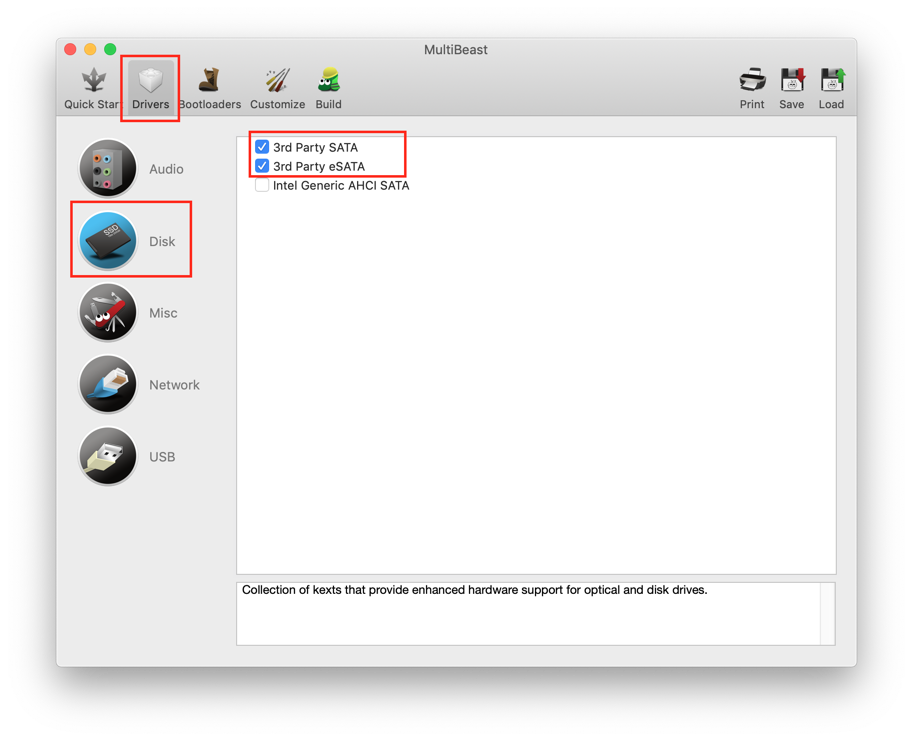
For Disk options, we choose the first two in order to provide support for third-party SATA/eSATA PCIe cards.
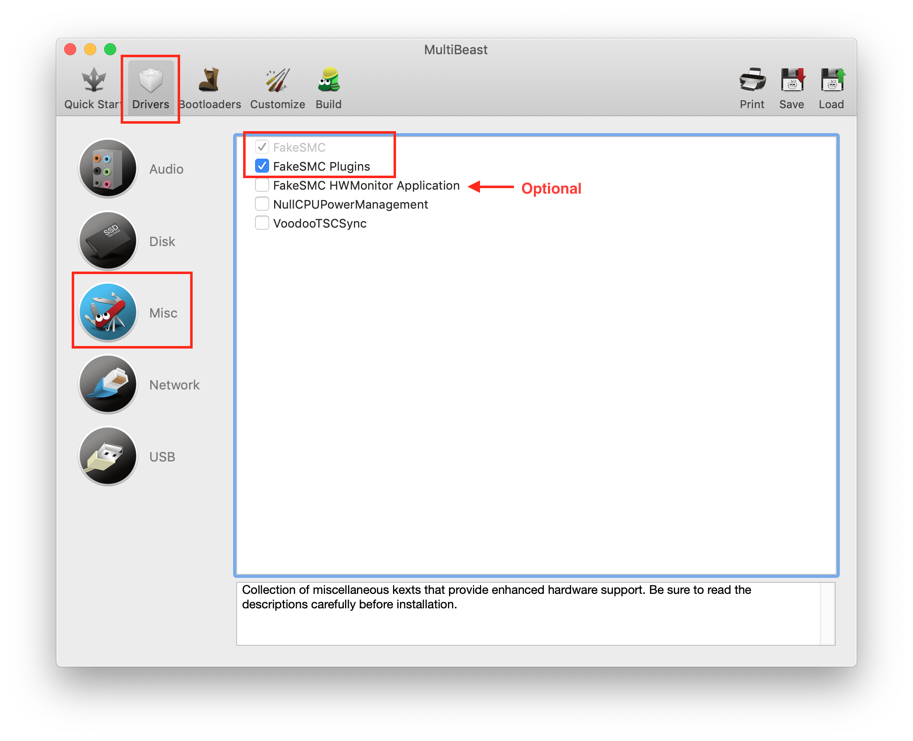
For Misc options, we enable FakeSMC Plugins. To monitor CPU, GPU, and hard drive temperatures, you may use the third-party iStat Menus app or the free FakeSMC HWMonitor Application.
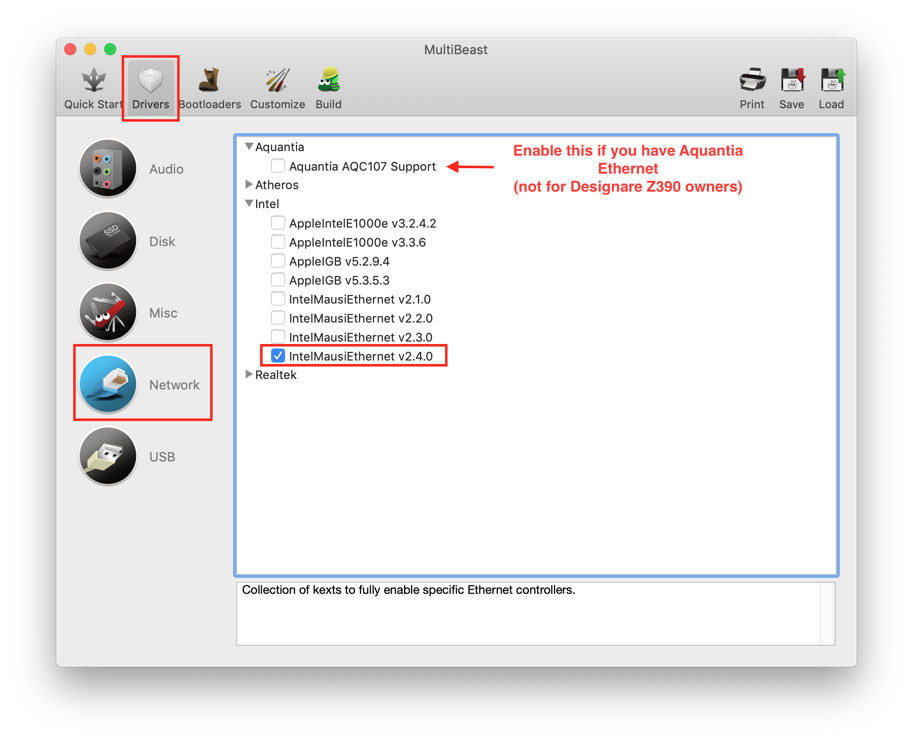
For Network options, we choose this one, but the Intel i211 will need a Smalltree driver that we'll install later. NOTE: Somewhere on the web you might find newer versions of the IntelMausiEthernet driver. Please do NOT install anything other than 2.4.0 at this time. Users have reported incompatibilities with newer versions.
For USB options, we choose the last two options:

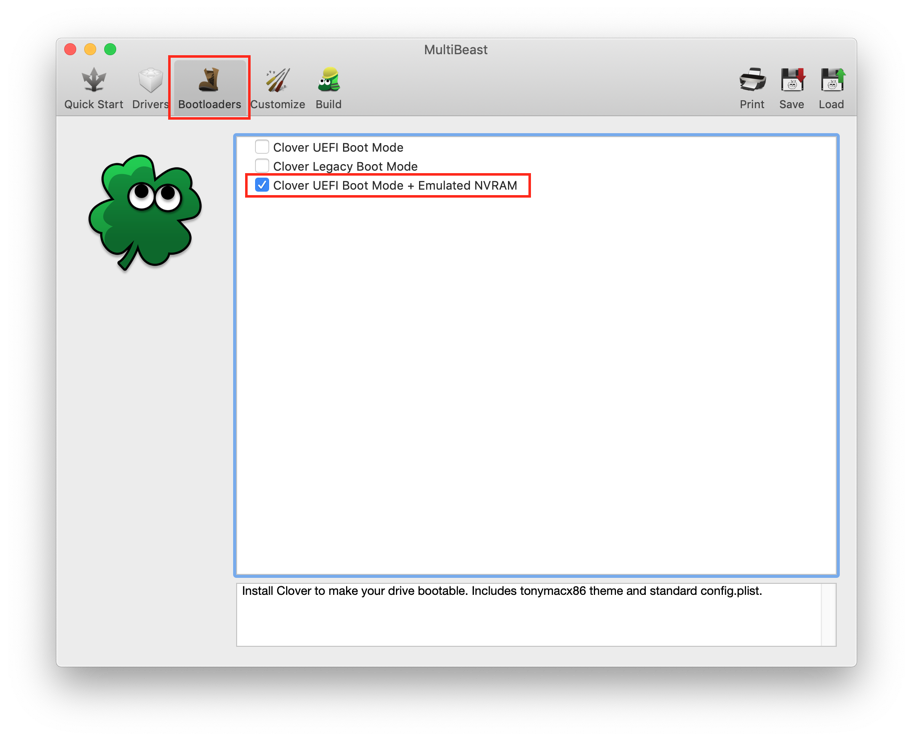
For Bootloader options, we choose UEFI with Emulated NVRAM. Emulated NVRAM provides better compatibility with Messages and FaceTime.
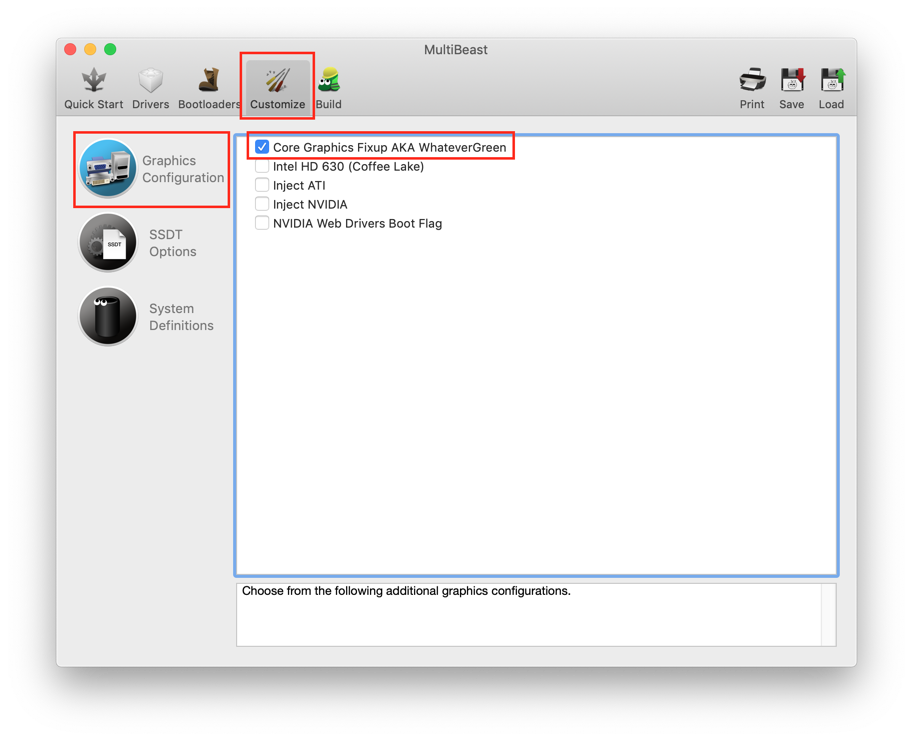
Now we'll go through the Customize options, starting with Graphics Configuration. We choose only the first item:
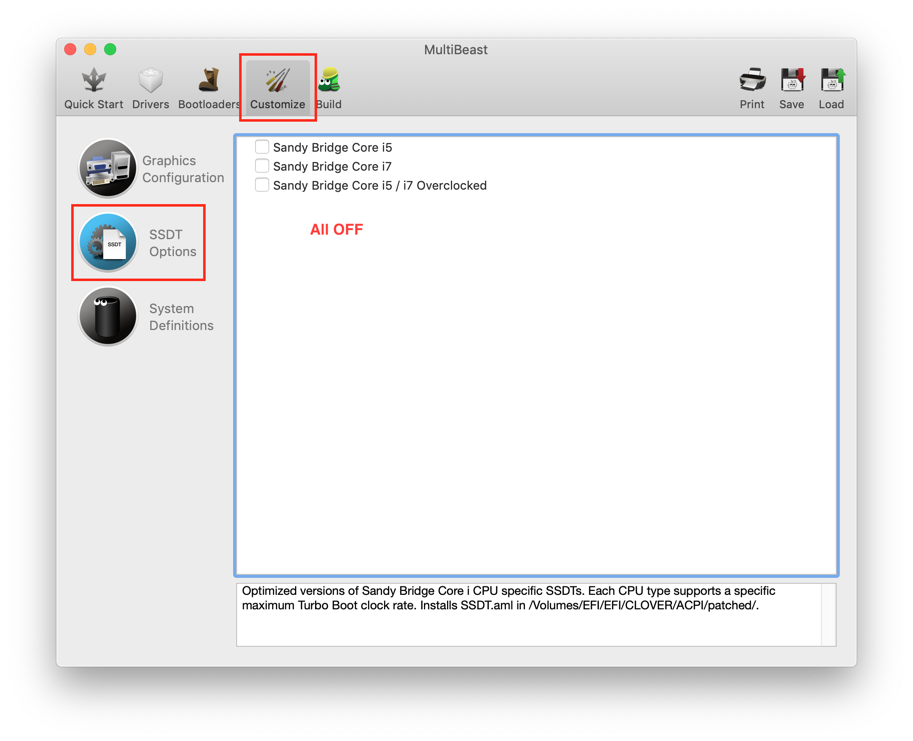
There are no SSDT options for us to check, so we leave everything turned off:
For 10.14.5 and newer:
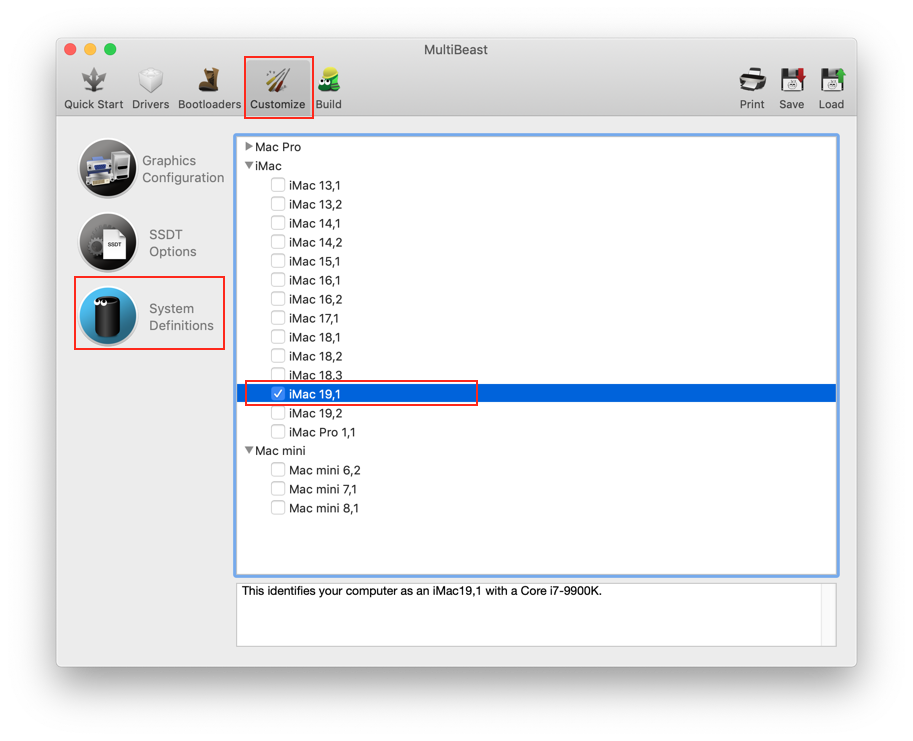
For System Definition we choose iMac19,1:
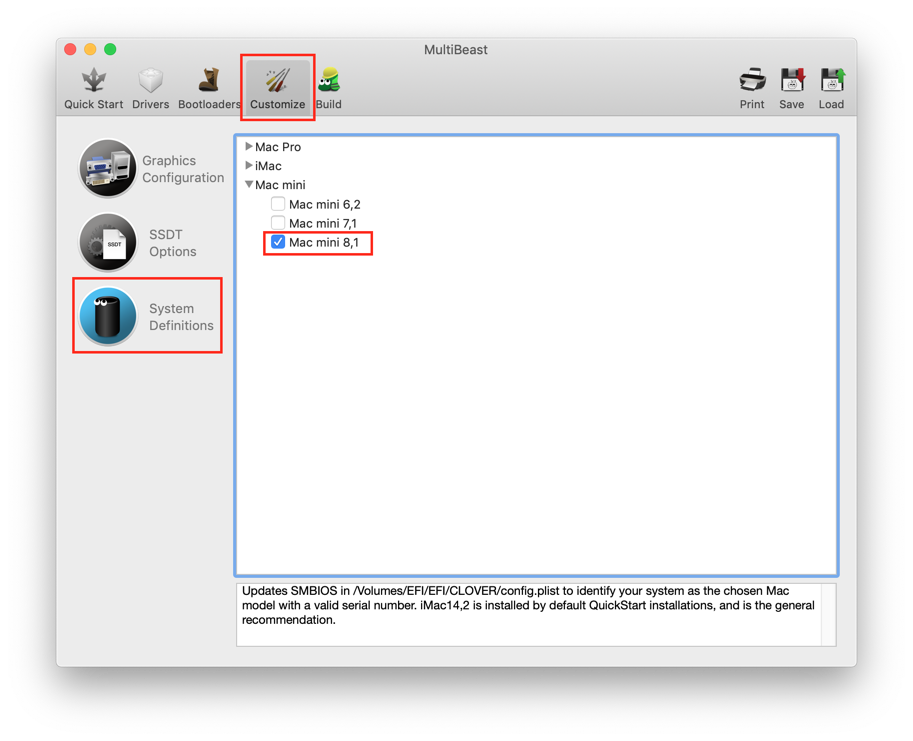
For 10.14.2 through 10.14.4:
For System Definition we choose Macmini8,1:
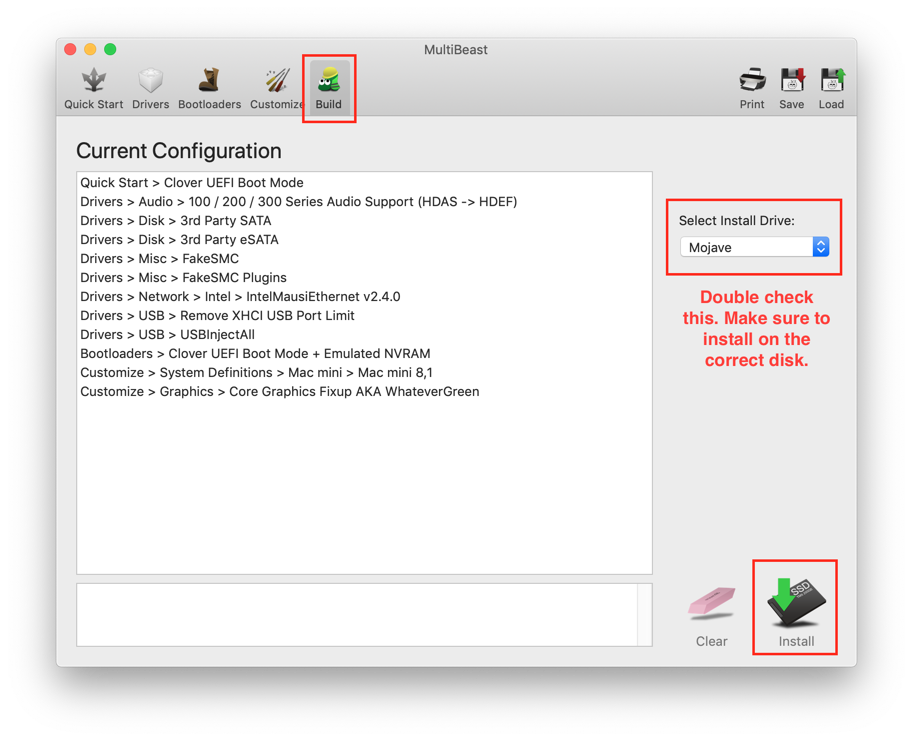
That completes the configuration. The Summary page should look like this. On the right side under Select Install Drive make sure you've selected the correct drive name (your internal Mojave SSD). Then click Install on the bottom right.
It will take a few minutes to complete the installation:

But we're not done yet. Do not reboot. Additional steps follow...
Now we'll go through the Drivers one by one, starting with Audio. We enable the first two options. NOTE: Although we enable AppleALC, this version of MultiBeast appears to have a bug which prevents AppleALC from being installed. We'll still keep this checked on in case a future version fixes the issue, and we'll manually install AppleALC from Post-Install Files.zip as described later in this section. Update: MultiBeast 11.2.1 fixes this problem and it will install AppleALC properly.
For Disk options, we choose the first two in order to provide support for third-party SATA/eSATA PCIe cards.
For Misc options, we enable FakeSMC Plugins. To monitor CPU, GPU, and hard drive temperatures, you may use the third-party iStat Menus app or the free FakeSMC HWMonitor Application.
For Network options, we choose this one, but the Intel i211 will need a Smalltree driver that we'll install later. NOTE: Somewhere on the web you might find newer versions of the IntelMausiEthernet driver. Please do NOT install anything other than 2.4.0 at this time. Users have reported incompatibilities with newer versions.
For USB options, we choose the last two options:
For Bootloader options, we choose UEFI with Emulated NVRAM. Emulated NVRAM provides better compatibility with Messages and FaceTime.
Now we'll go through the Customize options, starting with Graphics Configuration. We choose only the first item:
There are no SSDT options for us to check, so we leave everything turned off:
For 10.14.5 and newer:
For System Definition we choose iMac19,1:
For 10.14.2 through 10.14.4:
For System Definition we choose Macmini8,1:
That completes the configuration. The Summary page should look like this. On the right side under Select Install Drive make sure you've selected the correct drive name (your internal Mojave SSD). Then click Install on the bottom right.
It will take a few minutes to complete the installation:
But we're not done yet. Do not reboot. Additional steps follow...
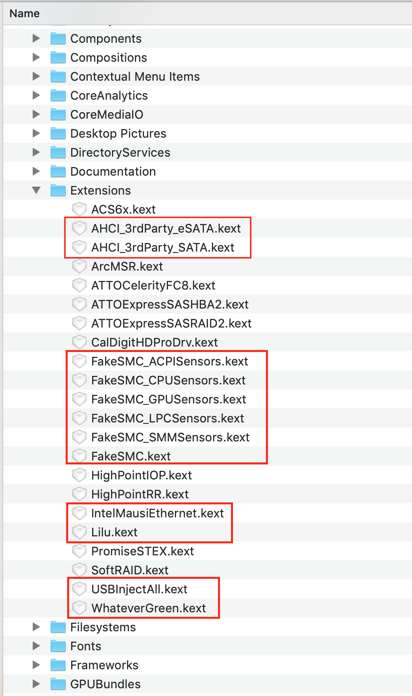
Let's have a look at the changes made by MultiBeast. Here we're looking at /Library/Extensions on the Mojave disk. We can see that a number of kernel extensions (kext files) have been added:
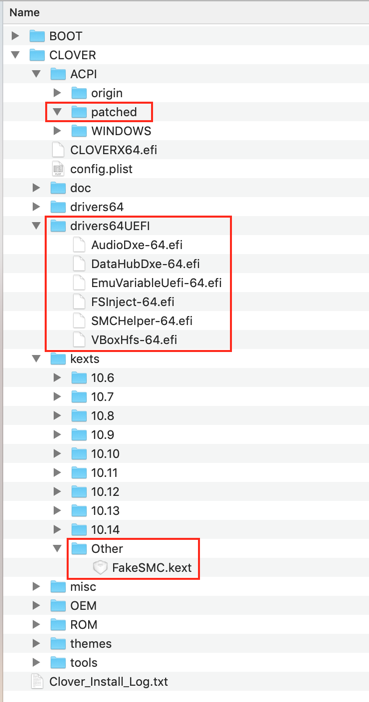
Now we expand the EFI/CLOVER folder to check things out. Here we can see that ApfsDriverLoader-64.efi and AptioMemoryFix-64.efi are missing. (Update: this problem has been fixed in MultiBeast 11.2.1.) However, your drivers64UEFI folder content may be different. Don't worry; we'll soon replace everything in this folder.
But first, let's run Clover Configurator, open the config.plist file and start making some final changes. Here we make changes to section 1 of ACPI settings. These settings help enable auto-sleep. FixHeaders provides an extra measure of security against kernel panics due to unprintable characters (as does MATS under Drop Tables). PluginType enables native CPU power management on Haswell and newer Intel CPUs. Optionally, you can also add DMAR to Drop Tables in order to prevent some issues with Vt-d. When clicking on FixIPIC be careful not to accidentally click on FixUSB because this will immediately lead to ACPI errors at boot.
We also have to enable a coupe of settings in section 2 of ACPI settings.
And then we make changes to the Boot settings. That slide=0 is a life saver. And darkwake=0 enables one-key wake from sleep. dart=0 provides extra protection against Vt-d issues. debug=0x100 prevents reboot on kernel panics, allowing you to observe, hopefully, the cause of the panic. Optionally, enable keepsyms=1 so the OS prints extra information related to a kernel panic.
Also enable the checkbox for disablegfxfirmware to prevent certain (rare) hangups during boot. This may also reduce graphics glitches when IGPU is used to drive a display monitor.
Finally, it may be a good idea to add "shikigva=60" (press + icon and type it in) if your system is unable to provide hardware support for H.264. A third-party app called VideoProc can be run after installation to determine whether you have both HEVC and H.264 hardware support.
Now we make some changes to Devices. The native iGPU on 9th gen Coffee Lake is 3E988086, which is not supported in MacOS 10.14.2 and 10.14.3. So we "fake" it to its closest cousin, which is 3E928086. But the iGPU is fully supported in macOS 10.14.4 and later so we do not fake the ID and leave it as 0x0. We also enable FixOwnership for USB, Inject 16 for Audio, and enable ResetHDA.
In the Kernel and Kext Patches section, we add the TRIM enabler patch from the pop-up menu at the bottom of the window. When we do so, it is disabled by default as shown.
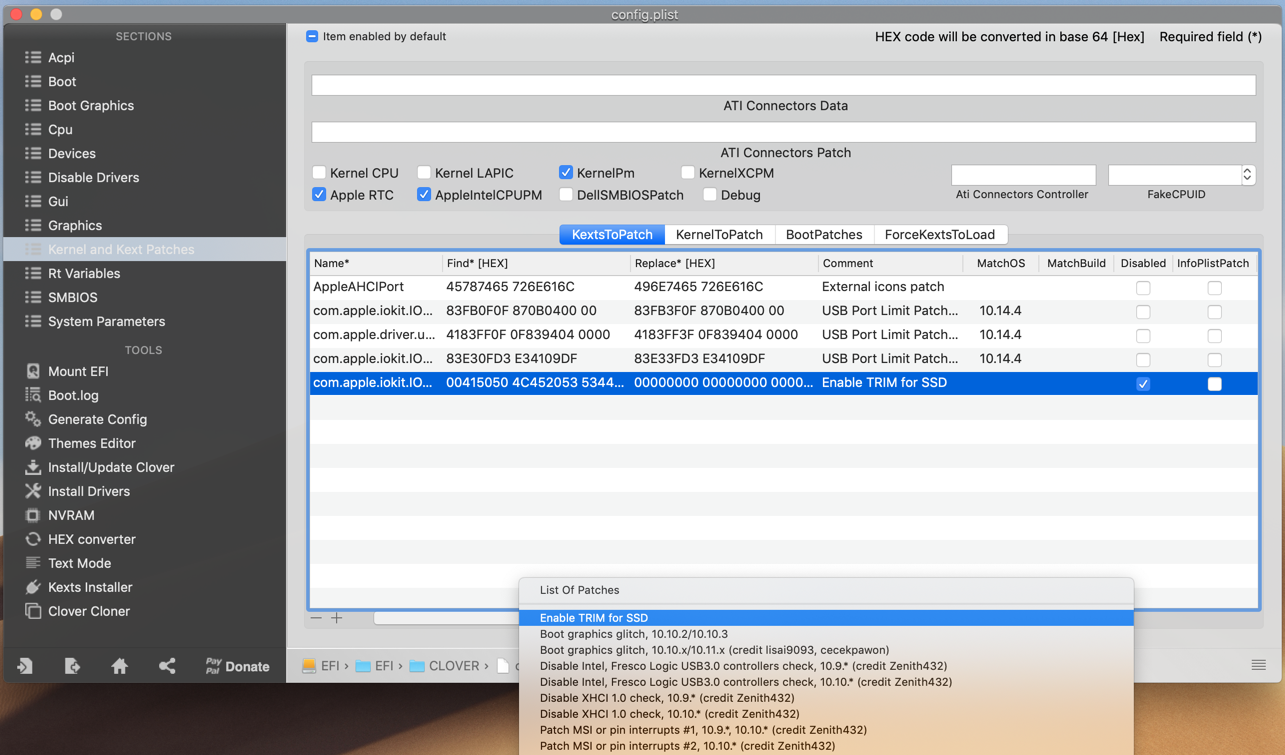
We need to enable the TRIM enabler patch and disable the three or four USB port limit patches because we'll install a custom USB SSDT later in this section. So the Disabled column should look like this:
Now we skip forward to SMBIOS (we'll come back to RtVariables shortly) in order to define our system name and serial number.
For 10.14.5 and newer:
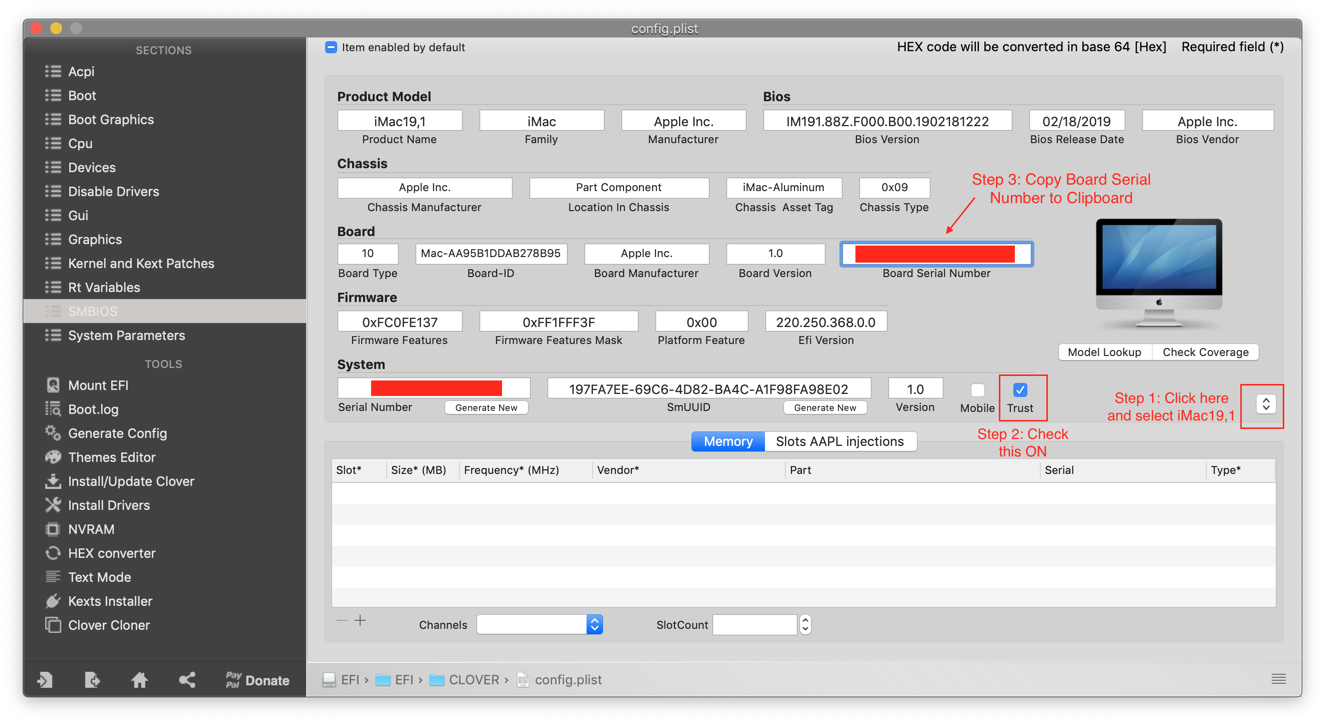
We'll choose iMac19,1 to populate all of the empty boxes. Follow the three steps shown in the diagram.
For 10.14.2 through 10.14.4:
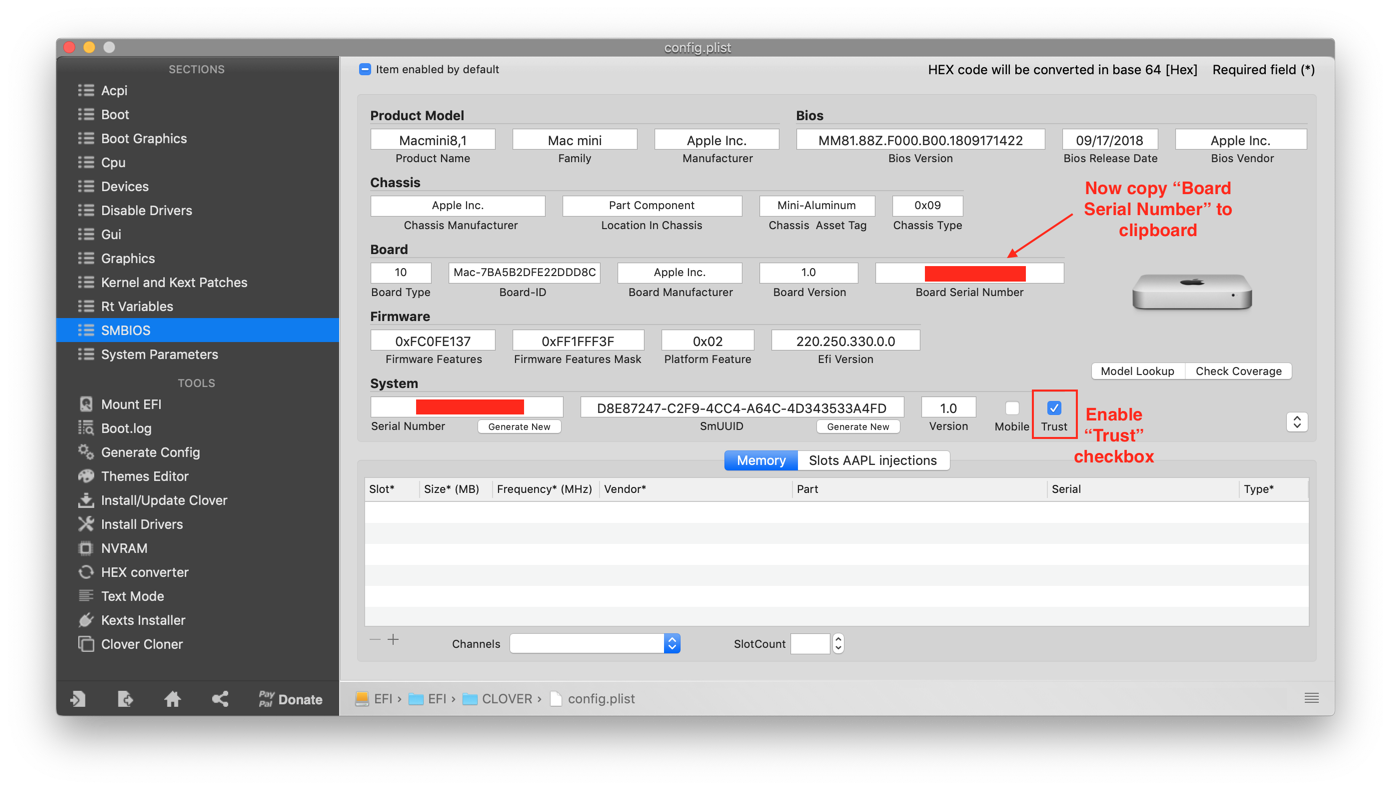
We'll choose Macmini8,1 to populate all of the empty boxes. Be careful not to accidentally choose iMac8,1. Note that Macmini8,1 is not supported in 10.14.1 or earlier.

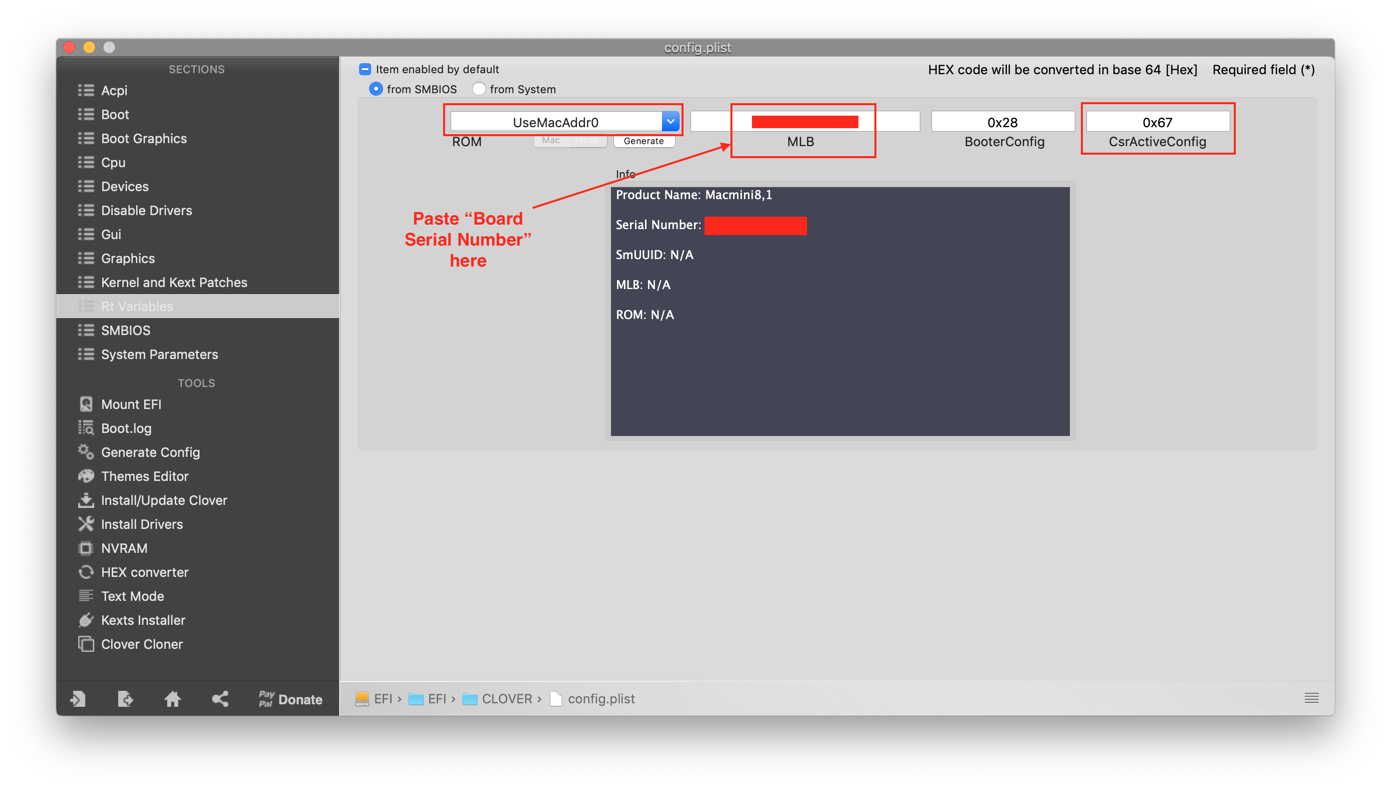
Now we see that all the empty boxes are filled. We have to do 2 things now: (1) Check the Trust box, (2) Copy the Board Serial Number to clipboard.
Now we return to the Rt Variables page. We have to do three things here: (1) Choose "UseMacAddr0" for ROM, (2) Paste the serial number into the MLB section, (3) Enter 0x67 for CsrActiveConfig (this allows unsigned kernel extensions to be loaded and run).
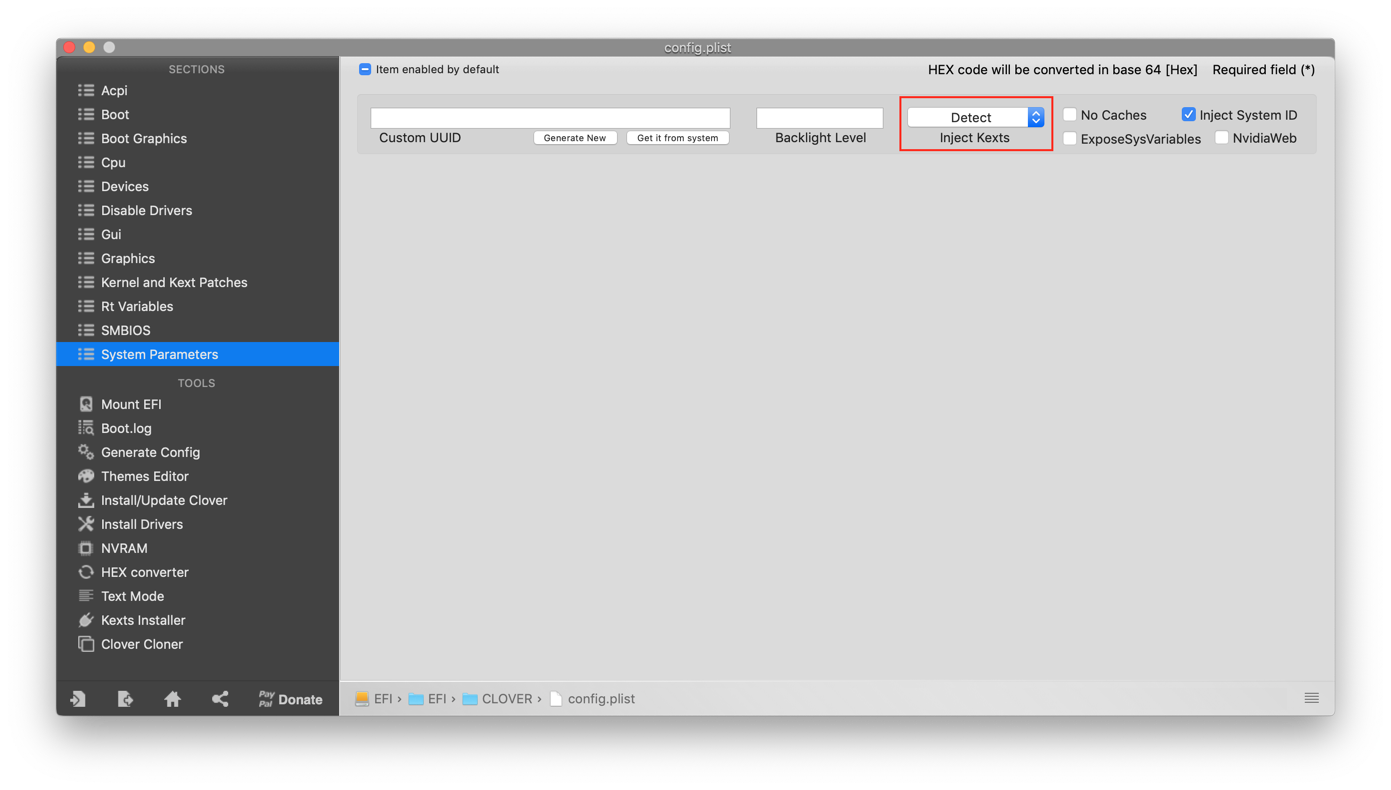
Finally, in System Parameters we must set "Inject Kexts" to "Detect" as shown and ensure that "Inject System ID" is checked on. MultiBeast installs a version of Clover in which the "Detect" option does not seem to work.
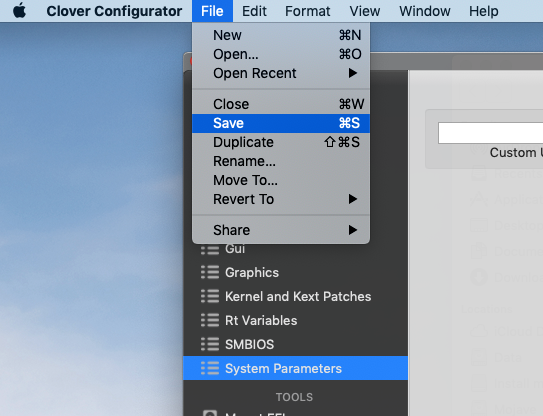
Save the file and Quit from Clover Configurator.
Download Post-Install Files.zip if you haven't done so already. This contains all of the files we need for the remaining steps. First let's just take a look at the contents of this zip:
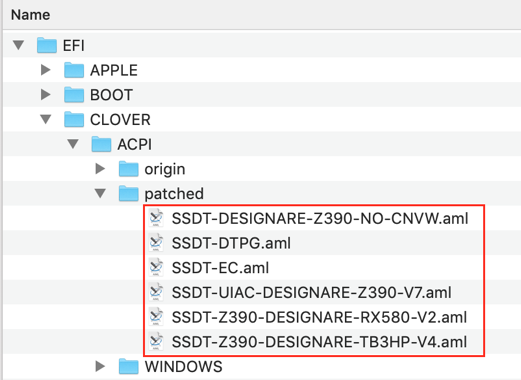
Now we need to copy 6 ACPI patches to the CLOVER/ACPI/patched folder on the EFI partition of the Mojave disk. These are essential patches that:
NOTE 2: If you're using the Gigabyte AORUS Extreme motherboard, use the custom USB and Thunderbolts SSDTs from the spoiler Gigabyte Z390 AORUS Extreme Owners.
Your CLOVER/ACPI/patched folder should now look like this: (If you don't have RX 580 or it's not in Slot-1 then of course you should not include "SSDT-Z390-DESIGNARE-RX580-V2.aml".)
Now we're going to delete everything from drivers64UEFI folder and replace its contents with those from Post-Install Files.zip. First, select all files inside drivers64UEFI folder, then right-click and choose Move to Trash:
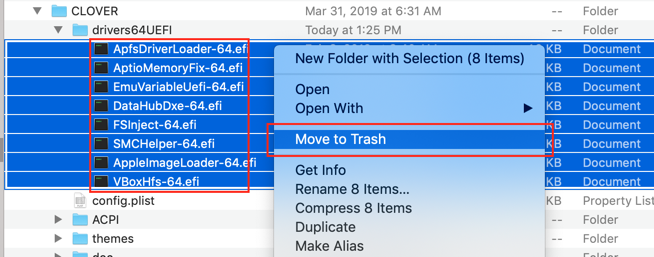
Then empty the trash:

Then select all of the files in the Copy-to-drivers64UEFI folder (located in Post-Install Files.zip) and drag-and-drop them into your CLOVER/drivers64UEFI folder.
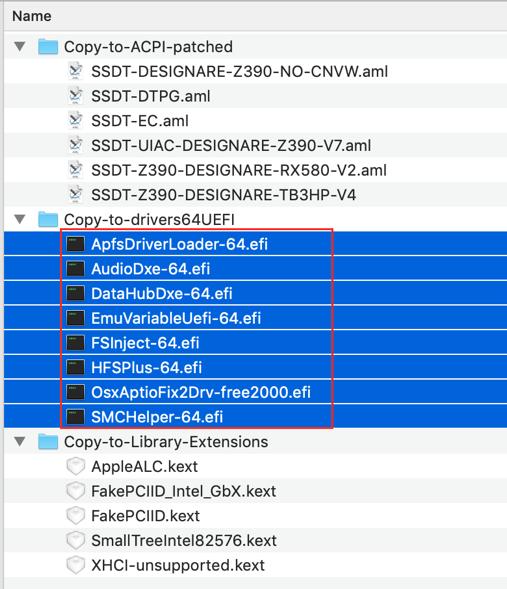
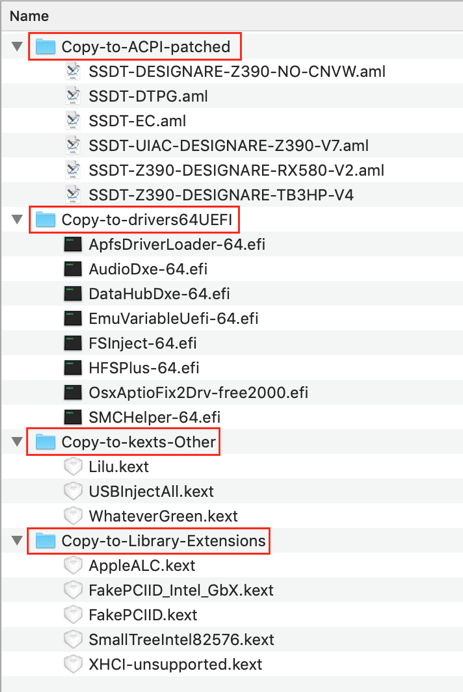
Starting with macOS 10.14.3 it became necessary to add Lilu, WhateverGreen, and USBInjectAll to the CLOVER/kexts/Other folder. These kexts should be copied from Post-Install Files.zip to CLOVER/kexts/Other. The resulting CLOVER directory should look like this:
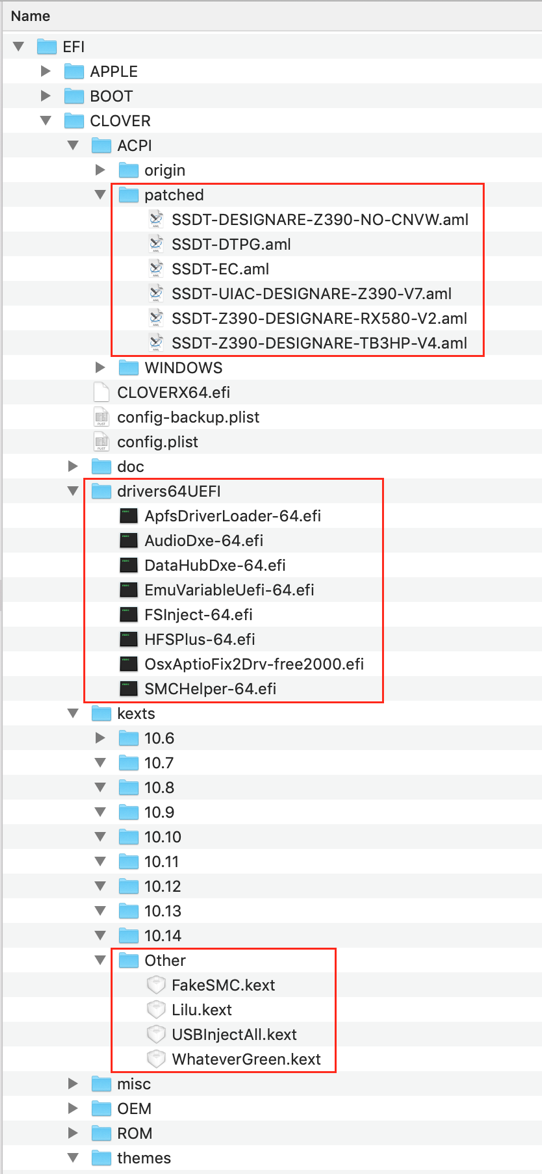
Please take a moment to double-check your work. All of the files in the image above must be present in your CLOVER folder.
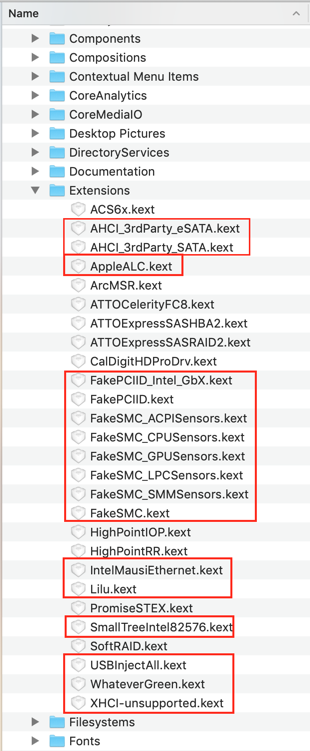
Now we need to install five (5) kexts to /Library/Extensions. All of these files are included in Post-Install Files.zip:
The /Library/Extensions (or /L/E) folder should now contain all of the files indicated in red.
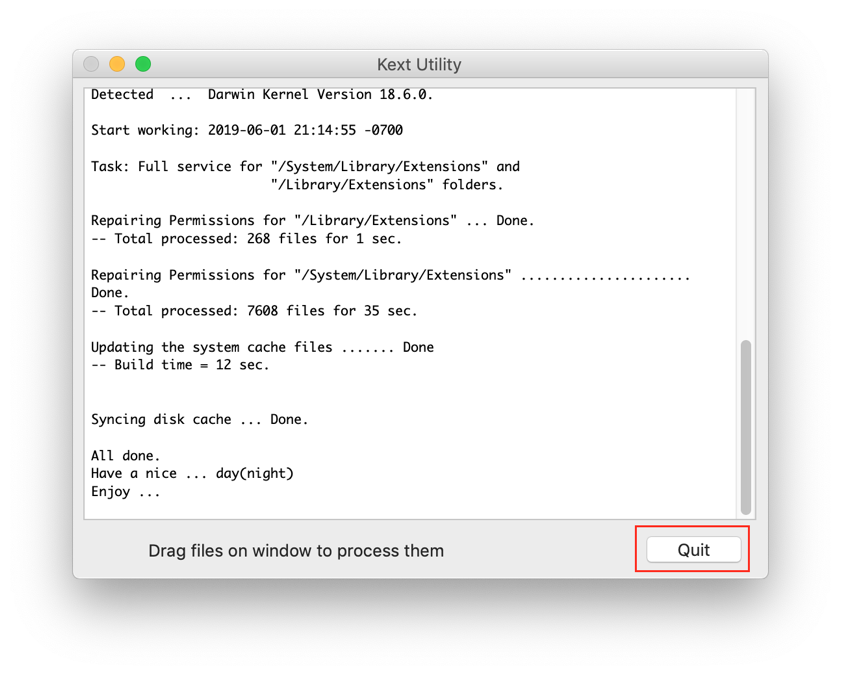
Now we must rebuild the kernel kext cache by running Kext Utility. You can download this tool immediately by clicking here. Just launch Kext Utility and wait for it to complete -- you will see the button on lower right side change to "Quit" as shown:
WARNING: If you're not using an external PCIe graphics card, but are relying entirely on the onboard Intel iGPU with an HDMI connection, then you must apply the framebuffer patch described in the section Using the UHD 630 to Drive HDMI and DP Monitors. Failure to do so will result in a blank screen when you reboot.
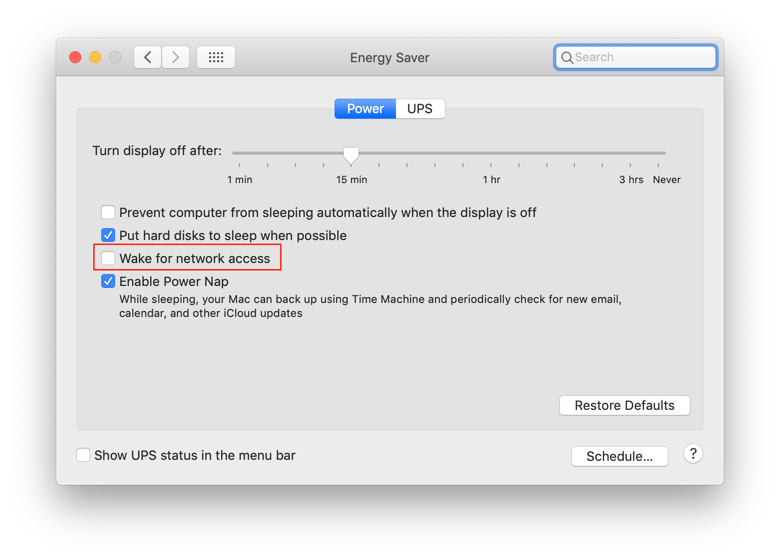
And lastly, we must disable Wake for Network Access in System Preferences --> Energy Saves in order to avoid drastically reduced WiFi speeds after wake-from-sleep.
- AHCI_3rdParty_eSATA.kext
- AHCI_3rdParty_SATA.kext
- FakeSMC.kext
- FakeSMC_xxxxSensors.kext (5 FakeSMC sensor kexts)
- IntelMausiEthernet.kext
- Lilu.kext
- USBInjectAll.kext
- WhateverGreen.kext
Now we expand the EFI/CLOVER folder to check things out. Here we can see that ApfsDriverLoader-64.efi and AptioMemoryFix-64.efi are missing. (Update: this problem has been fixed in MultiBeast 11.2.1.) However, your drivers64UEFI folder content may be different. Don't worry; we'll soon replace everything in this folder.
But first, let's run Clover Configurator, open the config.plist file and start making some final changes. Here we make changes to section 1 of ACPI settings. These settings help enable auto-sleep. FixHeaders provides an extra measure of security against kernel panics due to unprintable characters (as does MATS under Drop Tables). PluginType enables native CPU power management on Haswell and newer Intel CPUs. Optionally, you can also add DMAR to Drop Tables in order to prevent some issues with Vt-d. When clicking on FixIPIC be careful not to accidentally click on FixUSB because this will immediately lead to ACPI errors at boot.
We also have to enable a coupe of settings in section 2 of ACPI settings.
And then we make changes to the Boot settings. That slide=0 is a life saver. And darkwake=0 enables one-key wake from sleep. dart=0 provides extra protection against Vt-d issues. debug=0x100 prevents reboot on kernel panics, allowing you to observe, hopefully, the cause of the panic. Optionally, enable keepsyms=1 so the OS prints extra information related to a kernel panic.
Also enable the checkbox for disablegfxfirmware to prevent certain (rare) hangups during boot. This may also reduce graphics glitches when IGPU is used to drive a display monitor.
Finally, it may be a good idea to add "shikigva=60" (press + icon and type it in) if your system is unable to provide hardware support for H.264. A third-party app called VideoProc can be run after installation to determine whether you have both HEVC and H.264 hardware support.
Now we make some changes to Devices. The native iGPU on 9th gen Coffee Lake is 3E988086, which is not supported in MacOS 10.14.2 and 10.14.3. So we "fake" it to its closest cousin, which is 3E928086. But the iGPU is fully supported in macOS 10.14.4 and later so we do not fake the ID and leave it as 0x0. We also enable FixOwnership for USB, Inject 16 for Audio, and enable ResetHDA.
In the Kernel and Kext Patches section, we add the TRIM enabler patch from the pop-up menu at the bottom of the window. When we do so, it is disabled by default as shown.
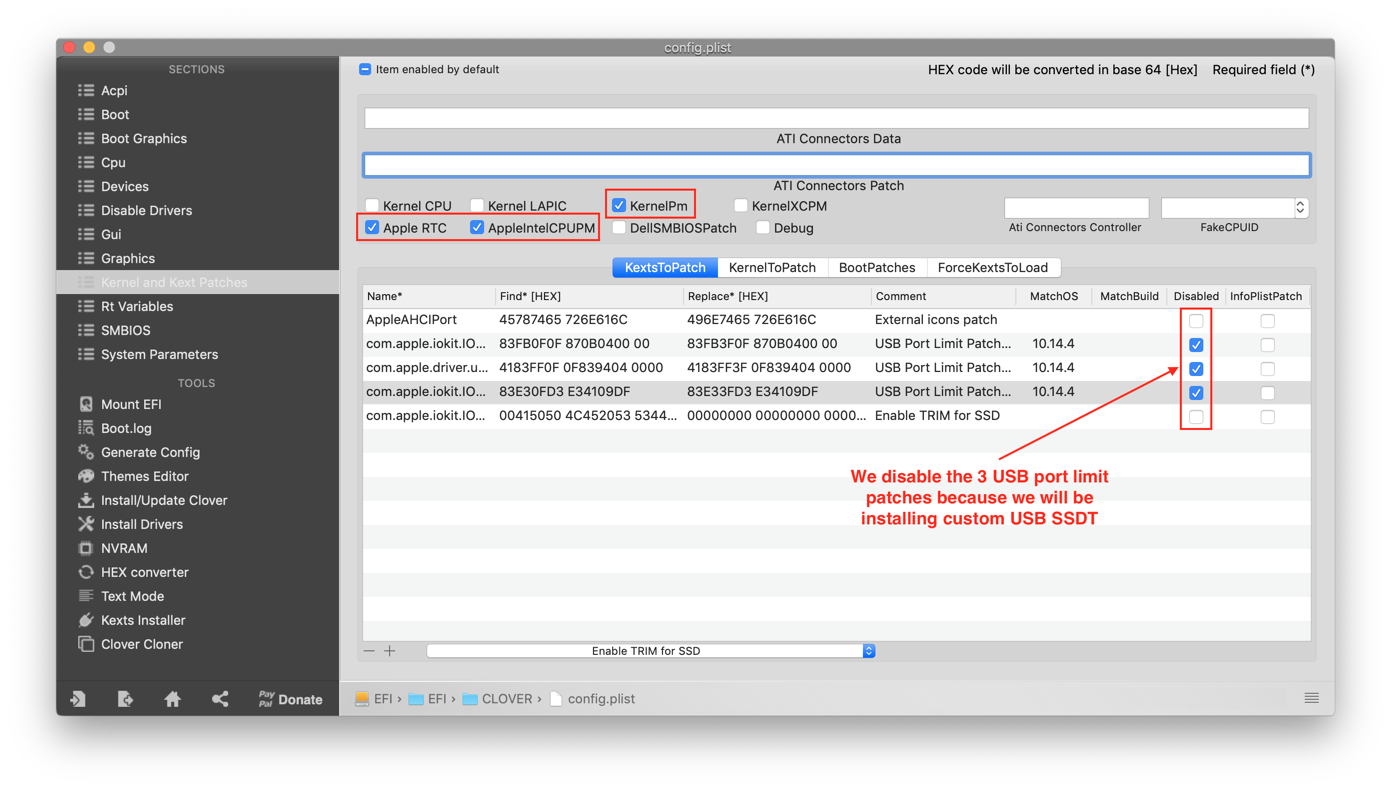
We need to enable the TRIM enabler patch and disable the three or four USB port limit patches because we'll install a custom USB SSDT later in this section. So the Disabled column should look like this:
Now we skip forward to SMBIOS (we'll come back to RtVariables shortly) in order to define our system name and serial number.
For 10.14.5 and newer:
We'll choose iMac19,1 to populate all of the empty boxes. Follow the three steps shown in the diagram.
For 10.14.2 through 10.14.4:
We'll choose Macmini8,1 to populate all of the empty boxes. Be careful not to accidentally choose iMac8,1. Note that Macmini8,1 is not supported in 10.14.1 or earlier.
Now we see that all the empty boxes are filled. We have to do 2 things now: (1) Check the Trust box, (2) Copy the Board Serial Number to clipboard.
Now we return to the Rt Variables page. We have to do three things here: (1) Choose "UseMacAddr0" for ROM, (2) Paste the serial number into the MLB section, (3) Enter 0x67 for CsrActiveConfig (this allows unsigned kernel extensions to be loaded and run).
Finally, in System Parameters we must set "Inject Kexts" to "Detect" as shown and ensure that "Inject System ID" is checked on. MultiBeast installs a version of Clover in which the "Detect" option does not seem to work.
Save the file and Quit from Clover Configurator.
Download Post-Install Files.zip if you haven't done so already. This contains all of the files we need for the remaining steps. First let's just take a look at the contents of this zip:
Now we need to copy 6 ACPI patches to the CLOVER/ACPI/patched folder on the EFI partition of the Mojave disk. These are essential patches that:
- SSDT-Z390-DESIGNARE-NO-CNVW.aml: Disable the unusable Intel CNVi WiFi/BT module so that x1 cards can work properly in x1 slots. Without this SSDT, certain x1 PCIe cards will not function properly in x1 slots. This is recommended for all users.
- SSDT-DTPG.aml: Provide a helper module for the above SSDT to work properly.
- SSDT-EC.aml: Create a fake Embedded Controller (EC) device necessary for injecting USB power properties so that high-current devices such as iPads can charge.
- SSDT-UIAC-DESIGNARE-Z390-V7.aml: Properly configure USB ports (HS14 disabled, HS11/HS12 enabled). USB power properties also injected via USBX device.
- SSDT-Z390-DESIGNARE-RX580-V2.aml: Display devices "AMD RX 580" and "AMD RX 580 Audio" in System Information. If you have an AMD Vega, AMD Pro WX 9100, or AMD Radeon VII then skip this file completely and instead refer to the spoiler Vega56 and Vega64 Fan and Crash Solutionfor important information.
- NOTE: If your graphics card is in PCIe Slot 2, delete SSDT-Z390-DESIGNARE-RX580-V2.aml and replace it with SSDT-Z390-DESIGNARE-RX580-SLOT2-V2.aml (attached separately below).
- SSDT-Z390-DESIGNARE-TB3HP-V4.aml: Enable hot plug capability for Thunderbolt 3 and activate USB 3.1 ports.
NOTE 2: If you're using the Gigabyte AORUS Extreme motherboard, use the custom USB and Thunderbolts SSDTs from the spoiler Gigabyte Z390 AORUS Extreme Owners.
Your CLOVER/ACPI/patched folder should now look like this: (If you don't have RX 580 or it's not in Slot-1 then of course you should not include "SSDT-Z390-DESIGNARE-RX580-V2.aml".)
Now we're going to delete everything from drivers64UEFI folder and replace its contents with those from Post-Install Files.zip. First, select all files inside drivers64UEFI folder, then right-click and choose Move to Trash:
Then empty the trash:
Then select all of the files in the Copy-to-drivers64UEFI folder (located in Post-Install Files.zip) and drag-and-drop them into your CLOVER/drivers64UEFI folder.
Starting with macOS 10.14.3 it became necessary to add Lilu, WhateverGreen, and USBInjectAll to the CLOVER/kexts/Other folder. These kexts should be copied from Post-Install Files.zip to CLOVER/kexts/Other. The resulting CLOVER directory should look like this:
Please take a moment to double-check your work. All of the files in the image above must be present in your CLOVER folder.
Now we need to install five (5) kexts to /Library/Extensions. All of these files are included in Post-Install Files.zip:
- AppleALC.kext -- this enables onboard Realtek ALC-1220VB audio.
- XHCI-Unsupported.kext -- this provides support for USB Controllers such as the 0xA36D controller on this motherboard.
- FakePCIID_Intel_GbX.kext -- this modifies the sub-vendor ID of the Intel i211 to match Smalltree's sub-vendor ID.
- FakePCIID.kext -- this applies the information provided in the kext above.
- SmallTreeIntel82576.kext -- this contains a driver for the Intel i211 gigabit Ethernet controller.
The /Library/Extensions (or /L/E) folder should now contain all of the files indicated in red.
Now we must rebuild the kernel kext cache by running Kext Utility. You can download this tool immediately by clicking here. Just launch Kext Utility and wait for it to complete -- you will see the button on lower right side change to "Quit" as shown:
WARNING: If you're not using an external PCIe graphics card, but are relying entirely on the onboard Intel iGPU with an HDMI connection, then you must apply the framebuffer patch described in the section Using the UHD 630 to Drive HDMI and DP Monitors. Failure to do so will result in a blank screen when you reboot.
And lastly, we must disable Wake for Network Access in System Preferences --> Energy Saves in order to avoid drastically reduced WiFi speeds after wake-from-sleep.
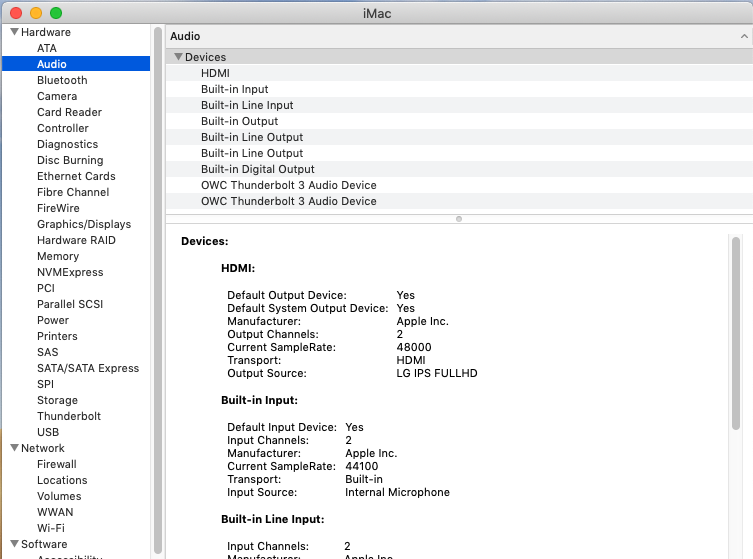
After making the preceding changes, reboot the computer. After logging back in, we can take another look at the system configuration. Let's start with System Information --> Audio. We can see our built-in audio devices have appeared thanks to AppleALC 1.3.4 or later. (OWC Thunderbolt Audio devices are from my OWC 14-port Thunderbolt 3 dock.)
Moving on to Ethernet Cards we now see 3 of them. The Intel i211 is enabled through the Smalltree driver. (The first Ethernet device is from my OWC Thunderbolt 3 Dock.)
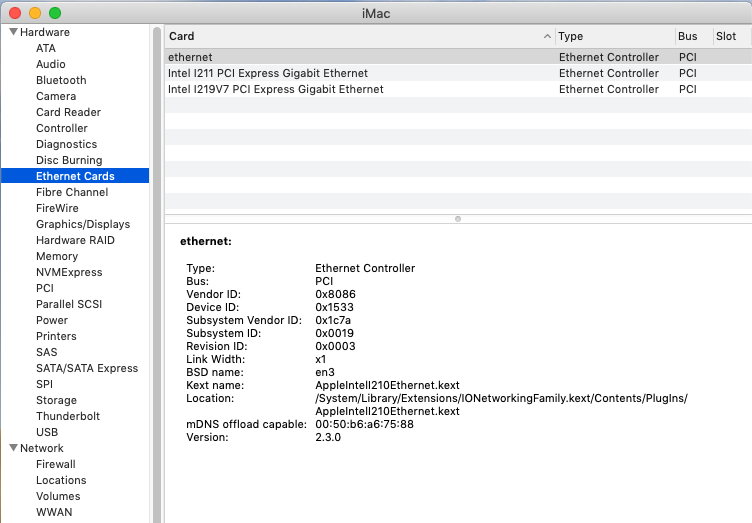
Looking at Graphics Displays we see that Intel UHD 630 is properly named. Moreover, it has 1536MB VRAM and Metal support. This means the accelerated AppleIntelFramebuffer is now attached to this device. (Once "Inject Intel" is checked-off, we will not see the IGPU in Graphics Displays, which is normal. IGPU status can be checked by running IORegistryExplorer, scrolling the device tree to "IGPU" and seeing whether "AppleIntelFramebuffer..." appears as a child node under "IGPU".)
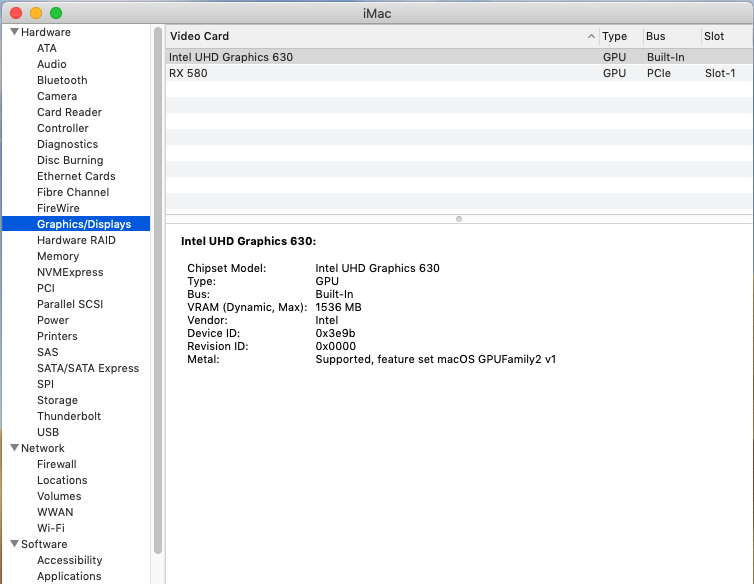
The formerly empty PCI page is now quite busy. NOTE: Thunderbolt controller and Thunderbolt devices will appear here in the PCI page. The Thunderbolt page will only say No drivers loaded. This is normal for a Hackintosh because of the lack of Thunderbolt Bus and Thunderbolt Local Node.

Previously we saw that TRIM was not enabled on SATA SSDs, but the situation is different now:
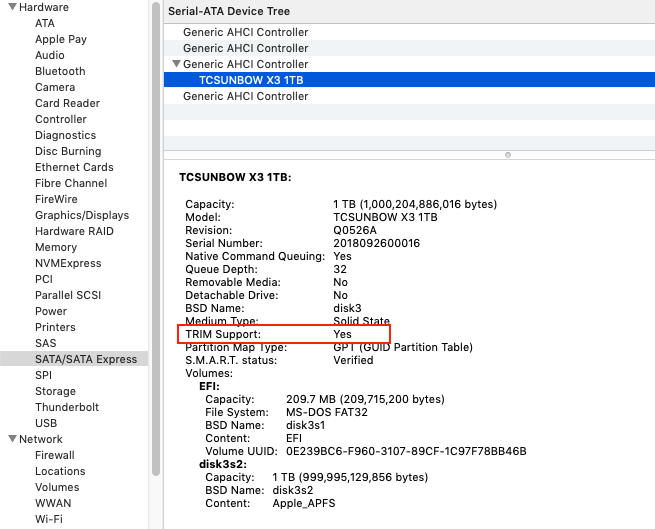
Not much changed here. The Broadcom Bluetooth device is still here. Remember that we installed a Custom USB SSDT, but we enabled port HS11.
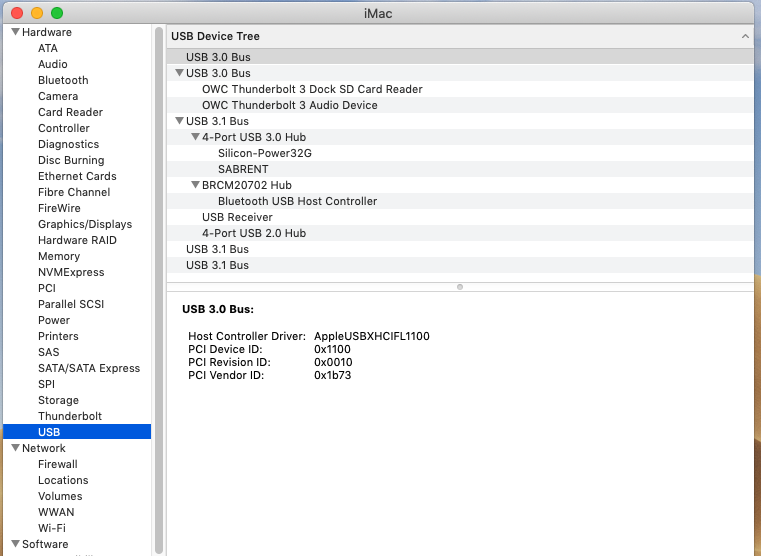
Now we have 5 network devices instead of 3. Bluetooth PAN is active now. Initially the system had 2 Bluetooth devices: Intel and Broadcom. Because we disabled the Intel device, the Broadcom has now been activated.
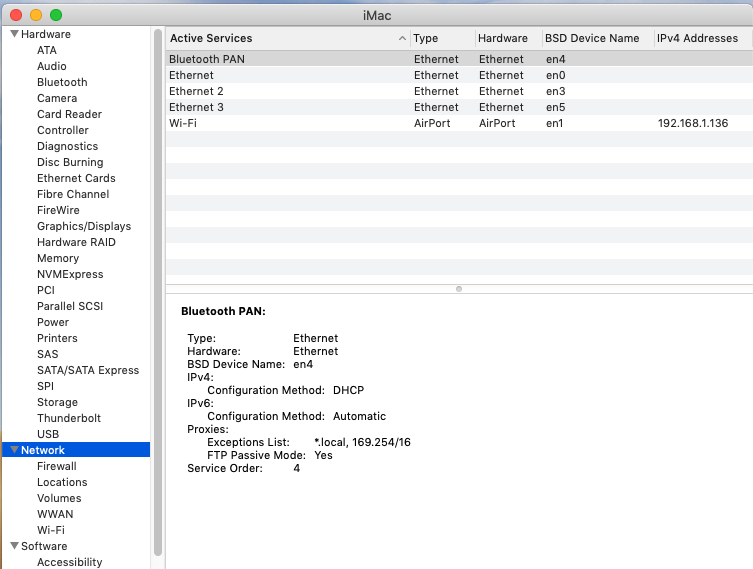
Moving on to Ethernet Cards we now see 3 of them. The Intel i211 is enabled through the Smalltree driver. (The first Ethernet device is from my OWC Thunderbolt 3 Dock.)
Looking at Graphics Displays we see that Intel UHD 630 is properly named. Moreover, it has 1536MB VRAM and Metal support. This means the accelerated AppleIntelFramebuffer is now attached to this device. (Once "Inject Intel" is checked-off, we will not see the IGPU in Graphics Displays, which is normal. IGPU status can be checked by running IORegistryExplorer, scrolling the device tree to "IGPU" and seeing whether "AppleIntelFramebuffer..." appears as a child node under "IGPU".)
The formerly empty PCI page is now quite busy. NOTE: Thunderbolt controller and Thunderbolt devices will appear here in the PCI page. The Thunderbolt page will only say No drivers loaded. This is normal for a Hackintosh because of the lack of Thunderbolt Bus and Thunderbolt Local Node.
Previously we saw that TRIM was not enabled on SATA SSDs, but the situation is different now:
Not much changed here. The Broadcom Bluetooth device is still here. Remember that we installed a Custom USB SSDT, but we enabled port HS11.
Now we have 5 network devices instead of 3. Bluetooth PAN is active now. Initially the system had 2 Bluetooth devices: Intel and Broadcom. Because we disabled the Intel device, the Broadcom has now been activated.
Although we've installed the following kexts already, you may check the links below to see if newer versions are available, and if so, you may optionally download and install newer versions:
Install latest versions in /Library/Extensions using KextBeast to install the kexts and Kext Utility to repair permissions and rebuild kernel caches. Put these kexts on your Desktop and run KextBeast; then you may delete the kexts from your desktop. (Note: KextBeast will install all kexts that happen to be on your Desktop so ensure that only these kexts are on the Desktop.)
This concludes post-installation.
Finishing Up
Reboot the machine now, log back into Mojave and sign in to iCloud. Then run Messages and, if asked, sign in. Finally, run FaceTime and, if asked, sign in as well.
Please re-review the "Installation Overview" steps at this time. And welcome to your new Mac! The MacRumors website has compiled an excellent set of How To's covering a broad spectrum of Mojave features. Your experience may not be complete without taking a look.
EmuVariable is needed in order to activate Messages, FaceTime, Handoff, and Continuity. Once activated, EmuVariable is not strictly needed, but after every macOS update it will be necessary to install EmuVariable in order to reactivate Messages, FaceTime, etc. For this reason EmuVariable should remain installed at all times (this is a change from the previous version of this Guide, which recommended that EmuVariable be deleted after post-installation).
Going the Extra Mile
Installation and post-installation are complete, but the system can be fine-tuned further. The next few sections cover a broad set of topics that can significantly enhance the user experience.
One of the first concerns is to decide upon a final System Definition (SMBIOS name and Platform ID). Users of audio/video apps such as Final Cut Pro, iMovie, Adobe Premiere, Adobe Photoshop, and many other such applications should consider switching to a headless platform ID in which the discrete GPU drives the display monitor and the iGPU is either disabled or used for compute tasks. The table below summarizes the various options available as of the release of macOS 10.14.5.
Update 20 Jun 2020: Please see this post by @verendus before switching your System Definition (SMBIOS name).
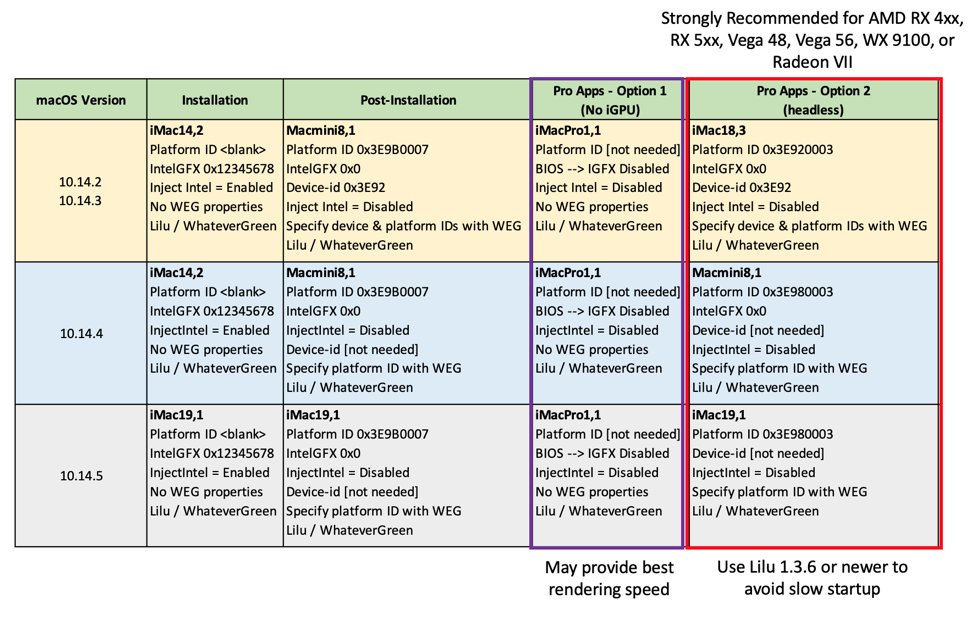
Please click here for an example of how to set headless platform ID 0x3E980003 for 10.14.4 and later. Also note that "WEG" is a common abbreviation for WhateverGreen. For additional options (for 10.14.4 and earlier), refer to the section For Final Cut Pro X (FCPX) and iMovie Users below.
Easy Bootable Backup
There's a good reason this topic is mentioned first and foremost. A Hackintosh is not a Macintosh. Apple neither tests nor qualifies its operating system to run on our custom-configured and custom-built systems. We are entirely on our own. There is no Apple Care for a Hackintosh, no Tech Support available to answer late night emergencies, no warranty, and no guarantees that things will work today or tomorrow. We must therefore rely on ourselves to be proficient enough to identify and troubleshoot most of the problems we encounter. That, actually, is part of the fun of Hackintosh! If you're not willing to hack or learn to hack then you're in the wrong business.
While many problems can be fixed quickly, we can encounter much more difficult problems for which the fastest and most effective remedy is a full restore from a full backup. But what if your system fails to boot? This often happens during OS updates. If you cannot boot, you cannot restore. So this brings us to the topic of making a bootable backup.
There are two parts to a bootable backup: (1) the operating system partition and (2) the EFI partition. A disk is un-bootable without a properly configured EFI partition. One of the best one-click ways of backing up both items (1) and (2) is by using Carbon Copy Cloner from Bombich Software. Another option is Super Duper!, but the instructions here apply, for now, to Carbon Copy Cloner only.
Update 15-Jan-2020: A serious problem in EFIClone script has been found and fixed. The problem occurs when a relatively large number of drives are present in the system, and may cause significant data loss. EFIClone-v4.sh fixes the problem. If you're using an older version of this script, click here to switch to EFIClone-v4.sh.
Mojave 10.14.x users: Click here for Bootable Backup Mini-Guide.
Catalina 10.15.x users: Click here for Bootable Backup Mini-Guide.
Replacing OsxAptioFix2Drv-free2000 with FwRuntimeServices
OsxAptioFix2Drv-free2000 is a vital part of the system boot process. It's an EFI "memory" driver that has allowed this system to boot when no other driver could. It's been part of the installation process from the very beginning. However, around mid 2019 the author of OsxAptioFix2Drv-free2000 issued an extremely dire warning about the possible consequences of its continued use. Although there have been no reports of any damage, an alternative set of drivers has been developed. Everyone is encouraged to switch to the new set, which consists of two files named (a) OcQuirks-4.efi and (b) FwRuntimeServices.efi. Please refer to this post for details.
Home and OS Folders on Separate Drives
I have separated my MacOS/Applications disk from the Home Folders disk. The former is on a 240GB NVMe and the latter is on a 1TB SATA SSD. The proper way to move your home folder is by going to System Preferences --> Users & Groups, unlocking the lower left padlock, right-clicking on your name under Current User, and selecting Advanced Options.... In the subsequent dialog, click the Choose... button located next to "Home directory" and select the new home disk. This allows us to create and maintain a bootable backup SSD more conveniently. However, if your OS and Home folders are on the same disk you'll just need a bigger backup SSD.
If your OS and Home folders are currently on the same disk and you would like to separate them, please have a look at this guide by @Thaigyver.
External Disks Not Ejected During Sleep
External hard drives are not always ejected prior to Sleep. This is a fairly common problem that afflicts regular Macs as well. At one point I left the computer idle for 90 minutes, and returned to a chorus of 30 "disk not ejected" warnings upon wake. Fortunately a little utility called Jettison solves this problem. There's a 15-day trial period and the price is USD $4.95. Once installed, it will automatically eject all external disks. You can manually choose "eject and sleep" from Jettison's own menu, but that is purely optional.
Update 3 Sep 2019: Enabling X.M.P. Profile in BIOS and using DDR4 memory modules faster than 2666MHz may be causing this problem. Please see this post by @CN7. If you're using RAM that is faster than 2666MHz, it is possible to enable X.M.P. Profile 1 anyway, but set System Memory Multiplier to 26.66. This will cap the speed to 2666MHz and prevent the disk eject issue when sleep is invoked. Please see this post by @jhahn.
Different FakeSMC
UniBeast and MultiBeast install a complete set of SMC (System Management Controller) kexts that allow macOS to interface with various motherboard devices and ports. FakeSMC and its associated Sensor kexts are also used for monitoring temperatures, clock frequencies, and other parameters. However, the current version of FakeSMC does not adequately support the ITE IT87x LPC chip in the Designare Z390 and most other Gigabyte motherboards. As a result, CPU voltage and fan speeds are not monitored. Applications such as HWMonitor and iStat Menus therefore do not show voltages and fan RPM.
Fortunately, the latest VirtualSMC, which is a Lilu plug-in like AppleALC and WhateverGreen, does report CPU voltage and fan RPM on this motherboard. VirtualSMC requires VirtualSMC.efi and three companion kexts (SMCSuperIO.kext, SMCLightSensor.kext, SMCProcessor.kext). If you wish to experiment with this as an alternative to FakeSMC, please see the preliminary mini-guide.
Update 19 July 2019: VirtualSMC 1.0.6 (and newer) is showing very good results. Here's an updated quick-guide to replace FakeSMC with VirtualSMC: https://www.tonymacx86.com/threads/...olt-3-i7-9700k-amd-rx-580.316533/post-1984173
FakeSMC and its companion kexts for ACPI Sensors, CPU Sensors, GPU Sensors, etc. are built together and work together as a unit. The individual kexts are typically not interchangeable between different builds. The FakeSMC set of kexts provided through MultiBeast 11.x.y works with this motherboard, but it does not provide as much detailed information as a different full set of kexts developed by KGP and others for the X99 chipset and described in section E.14 of this remarkably comprehensive thread. The kexts used by KGP in his iMacPro X99 system seem to work quite well on the Designare Z390. You may choose to install either the FakeSMC set provided through MultiBeast or the X99 variant attached here as filename KGP-X99-FakeSMC.zip. If you choose this one, copy all files to the CLOVER/kexts/other directory and delete FakeSMC.kext and all of the FakeSMC sensor kexts from /Library/Extensions. There should be only one FakeSMC. You can use Finder to delete FakeSMC kexts from /Library/Extensions, but you must then run Kext Utility to rebuild the kernel cache. If you are not comfortable with this, don't do it and just use FakeSMC installed through MultiBeast.
To TRIM or Not to TRIM
As shown in “Spoiler: System Status BEFORE Post-Installation”, TRIM is enabled by default on APFS NVMe drives, but not on SATA SSDs. Some people warn against using TRIM on SATA SSD boot drives. Others warn against TRIM on any third party SATA SSD. I’ve enabled TRIM on my SATA SSD containing the home folder. If I encounter any problems I’ll report them here, but so far so good.
Thunderbolt 3 Experiences
A modern Mac is not a Mac without Thunderbolt 3! And the primary allure of the Designare is its built-in Titan Ridge TB3 controller. Because TB3 compatibility is a key feature for interested buyers, we'll compile a list of successfully tested devices in this section. Note: Thunderbolt 1 devices will not work when directly connected to this motherboard, but they should work when connected through a Thunderbolt 2 dock or a Thunderbolt 3 dock that uses an Alpine Ridge or earlier controller chip.
NOTE 1: Hackintoshes currently do not support Thunderbolt Local Node that allows two Macs to connect over a Thunderbolt cable for functions such as Target Disk Mode, Target Display Mode, and Ethernet Thunderbolt Bridge. The Thunderbolt section in System Information will therefore say No drivers are loaded.
Update 1-Apr-2020: This is no April Fool's joke, but Thunderbolt Bus/Local Node have now been achieved by flashing modified firmware to the Thunderbolt firmware chip on the motherboard. To determine whether this is something worth doing, click here to review a list of Thunderbolt devices and capabilities that become compatible only after new firmware is flashed.
NOTE 2: For owners of LG UltraFine 5K (original and 2019 models): This system will send a 4096x2304 signal via a single DisplayPort 1.2 stream to the LG 5K monitor. The monitor will subsequently scale it to 5K, resulting in a picture that is extremely close to that of a true 5K signal. Please click here and here for additional information. If you occasionally experience a boot-to-black-screen using the UltraFine 5K with macOS Catalina (as described here), then see this post for a possible solution.
The following components have been tested successfully by their owners:
- Universal Audio Devices UAD Apollo x8p by @NoiseCoalition
- Universal Audio Devices UAD Octo Satellite via TB2 to TB3 adapter by @logritm
- Universal Audio Devices UAD Apollo 16mk2 and UAD Satellite QUAD (in a chain with 2x Apollos and a Satellite QUAD) by @buddhaburger
- Universal Audio Devices Apollo 8P and UAD Octo Satellite via Apple TB2 to TB3 adapter by @ndrik
- Universal Audio Devices UAD Apollo Twin MKII by @xanderevo
- OWC Thunderbay 4 External Storage Array by @DJ4MC
- G-Technology G-RAID and OWC Thunderbay 4 with a Startech TB3-to-TB2 adapter, by @PicLock
- LG UltraFine 5K Display by @TheAsocial
- Akitio Thunder3 Quad X by @Lensjocky
- Akitio Thunder2 Quad with an Apple TB2-to-TB3 adapter by @avtor
- Apogee Symphony I/O Mk II and OWC Express 4M2 NVMe SSD Enclosure by @james-bond007
- MOTU 8A Audio Interface and OWC Thunderbolt 2 Dockby @JimSalabim. The MOTU 8A is a Thunderbolt 1 device that works through the OWC Thunderbolt 2 dock. The dock, being a TB2 device, is connected to the motherboard via a TB2 to TB3 adapter.
- Update: The MOTU 8A Thunderbolt 1 device will work on this motherboard with just an Apple TB2-to-TB3 adapter; no dock needed! See this post for details.
- LaCie 2Big Thunderbolt 2 and LaCie d2 4TB Thunderbolt 2 via Apple TB3-to-TB2 adapter by @carloshferrari. The LaCie d2 is daisy chained to the LaCie 2Big. The 2Big is connected to the Designare Z390 via TB3-to-TB2 adapter.
- Plugable Thunderbolt 3 Docking Station by @rj510
- Apogee Element 24 Audio Device with Apple TB2-to-TB3 adapter by @FormerUser-594785
- Sonnet Solo 10GbE TB3 Network Adapter by @skittlebrau
- PreSonus Quantum TB2 Audio Interface via Apple TB2-to-TB3 adapter by @loloduarte
- MOTU 16A Audio Interface via TB3-to-TB2 adapter by @synnys
- MOTU 1248 Audio Interface by @Snoots
- Blackmagic Multidock Thunderbolt 2 version with TB3-to-TB2 adapter by @vidvi
- Areca ARC-5028T2 via Apple TB3-to-TB2 adapter by @Isoyalat
- PROMISE Pegasus2 M4 RAID array by @malekmtl
- 2019 LG UltraFine Display 4k (24MD4KL) by @igadgetry
- Universal Audio Devices UAD Apollo x6 by @bitport
- UAD Apollo Twin Duo Mk1 via Apple TB3-to-TB2 adapter by @timc3. This is notable for being a Thunderbolt 1 device.
- Samsung X5 External TB3 SSD by @MuffinCrumbs
- Blackmagic UltraStudio for Thunderbolt with TB2-to-TB3 adapter by @digumo
- 2019 LG UltaFine 5K (model 27MD5KL) by @sidhellman. It is necessary to either (a) disable IGPU in BIOS or (b) set ig-platform-id to 0x3E9B0007 (non-headless). Option (b) will cause Final Cut Pro and iMovie to crash on launch, so video editors should adopt option (a).
- BlackMagic UltraStudio 4K Mini by @ubidefeo
- Focusrite Red 4Pre Thunderbolt 2 Audio Interface with Startech TB3 to TB2 adapter by @Snoots
- LG 32" UltraFine 4K 32UL950-W Thunderbolt 3 Monitor by @ferdinands
- Areca ARC-5026 4-Bay TB2 and USB 3 RAID Enclosure via TB3-to-TB2 adapter by @RAPWare
- CalDigit TS3 Plus Thunderbolt 3 Dock by @digumo
- StarTech Dual Bay Drive Enclosure (model S252SMTB3) with TB3-to-TB2 adapter by @digumo
- Decklink 4K Extreme 12G mounted inside a Sonnet eGFX Breakaway Box by @roastable
- AMD Vega 56 mounted inside a Sonnet eGFX Breakaway Box by @zgonda
- Focusrite Clarett 2Pre by @oopsmybad. This is the older Thunderbolt version, not the newer USB version. Please see the link for important details about enabling and configuring this Thunderbolt 1 device. Owner's manual can be downloaded from here.
- Universal Audio Devices UAD Arrow by @heartmusic
- Apogee Ensemble audio interface by @miffro
- Presonus Quantum 2626 audio interface by @BjornF1978
- Slate Digital VRS-8 audio interface by @luckyal. See also this post which states that BIOS:Vt-d should be enabled and dart=0 should be removed from Boot Arguments. Additionally, from the ACPI section of Clover Configurator, table "DMAR" should not be dropped.
- RME Fireface UFX+ audio interface with TB3-to-TB2 adapter by @lambusser
- ATEN 7220 Thunderbolt Switch via Apple TB3-to-TB2 adapter by @mathgeek
- UAD Apollo Twin X DUO by @clichequiche
- AVID HD Native Thunderbolt by @buddhaburger
- Sonnet Twin 10G dual 10Gbps Ethernet breakout box by @roastable
- LG UltraFine 5K (27MD5KL) by @zakinster using a GC-Titan Ridge add-in-card
- OWC 14-Port Thunderbolt 3 Dock by me
- The 27-inch Apple Thunderbolt Display(via adapters) does not work as reported by @AlexD.
- Update 16 Apr 2020: After flashing modified Thunderbolt firmware on the Designare Z390 motherboard, it is finally possible to use the Apple Thunderbolt Display. Refer to Contributed Files and Tips for details.
- Antelope's Thunderbolt-based Zen Tour and possibly Orion devices may not work because of quirks in Antelope's drivers.
- LaCie eSATA Hub is a Thunderbolt 1 device that is not compatible with this system with a TB3-to-TB2 adapter.
The Phanteks Evolv X is a relatively large and spacious mid-tower ATX case. It made quite a splash at its introduction at Computex 2018 in Taipei and was sold out for weeks. Because of its tremendously flexible cooling options (120mm, 140mm, 240mm, 280mm, 360mm, 420mm) and knowing that the soldered Intel 9th Gen CPUs with 8 cores run hot, I opted for a 280mm Raijintek Orcus all-in-one liquid cooler and 3 Antec 140mm case fans. Idle temps using default BIOS Fan Curves hover between 22-26 C and under load they rarely climb above 40-45 C. As I run heavier loads (long video transcodes) I'll update this section. A spinner built into the thermal block of the Orcus indicates speed of the pump; during light loads, the spinner barely moves.
To reduce fan noise we can create custom fan curves in BIOS. This post shows the settings I've applied to the Antec chassis fans.
Contributed Files and Tips
Helpful files and tips contributed by forum members will be added to this section.
- Custom USB SSDTs:
MacOS imposes a limit of 15 USB ports. If you followed the build guide, the 15 USB ports were defined and enumerated using a custom USB SSDT and the USBInjectAll kext. There is, however, another way to define and enumerate USB ports, and it's done via Hackintool (developed by @headkaze). This method uses a simple default SSDT (SSDT-EC.aml) and places all of the port definition data into an info.plist file that gets wrapped into a kext.
Note: The standard method using USBInjectAll and SSDT-UIAC-DESIGNARE-Z390-V(n).aml is perfectly fine. But if you're simply curious about the alternative method or have a specific reason to switch, you may do so. In that case, first delete both of these files.
Thanks to @FormerUser-594785 for using the Hackintool method to provide us the following alternative solution for enabling 15 USB ports:
- SSDT-EC.aml <-- this should be copied to CLOVER/ACPI/patched folder in the EFI partition of the Mojave SSD
- USBPorts.kext <-- this is the kext containing the USB port list. It should be copied to /Library/Extensions and to CLOVER/kexts/Other. Then run Kext Utility to rebuild kernel caches.
Thanks to @ripe_md for contributing a custom USB SSDT for the Fractal Design Define R6 case.
If you have this or a similar case with front panel I/O consisting of a USB Type C port, 2 USB 2.0 ports, and 2 USB 3.0 Type A ports, this should work for you too. The files are contained in Fractal Design Define R6.zip. Instructions:
- Mount the EFI partition of your Mojave internal disk, delete the existing file SSDT-UIAC-DESIGNARE-Z390.V<n>.aml from the CLOVER/ACPI/patched folder.
- Copy SSDT-UIAC-DESIGNARE-Z390-FD-DEFINE-R6-V3.aml and SSDT-EC.aml to the CLOVER/ACPI/patched folder and reboot. This V3 of the SSDT enables both HS11 and HS12, which allows devices such as internal Bluetooth and CPU coolers to be connected to the two USB 2.0 ports available through the F_USB internal USB header on the motherboard. Additionally, USB power properties are injected to enable high-current devices such as iPads to charge.
- The other 2 files in the ZIP archive are reference documents. Be sure to study them both, particularly the PDF. Do not copy either the PDF or .dsl file(s) to the CLOVER/ACPI/patched folder.
The resulting CLOVER/ACPI/patched folder should contain these files:
- SSDT-UIAC-DESIGNARE-Z390-FD-DEFINE-R6-V3.aml (NOTE: Another version of this SSDT, named SSDT-UIAC-DESIGNARE-Z390-FD-DEFINE-R6-USB2-ON-TB-V3.aml is available in the ZIP. This version enables USB 2 devices on the two Thunderbolt 3 ports at HS08 and HS13. If you choose this file, delete the other one.)
- SSDT-EC.aml
- SSDT-DESIGNARE-Z390-NO-CNVW.aml
- SSDT-DESIGNARE-Z390-TB3HP-V4.aml
- SSDT-DTPG.aml
- Optionally, if you have an RX 580 in Slot-1: SSDT-Z390-DESIGNARE-RX580-V2.aml
A custom USB SSDT and Thunderbolt 3 SSDT are available for your motherboard in the attached file named Z390-AORUS-EXTREME-SSDTS.zip. To install, unzip and copy the following 4 .aml files to CLOVER/ACPI/patched folder of the EFI partition on your Mojave SSD and reboot. Be sure to delete any pre-existing Thunderbolt and USB SSDTs from that folder.
The PDF file in the archive is a description of the USB port layout. This is for reference purposes only and should not be copied to your EFI partition. Files in the archive are as follows:
- SSDT-Z390-AORUS-EXTREME-TB3HP-V4.aml (Thunderbolt 3 Hot Plug SSDT).
- SSDT-DTPG.aml (Required by the Thunderbolt SSDT).
- SSDT-UIA-AORUS-EXTREME-Z390-V3.aml (Defines USB ports and injects USB power properties; USB port limit patch not needed if you use this SSDT).
- SSDT-EC.aml (Injects a fake Embedded Control or EC device necessary for USB power properties).
- USB ports Gigabyte Z390 Xtreme.pdf -- A reference PDF identifying USB ports that were activated. This document is for reference purposes only and should not be copied to the CLOVER folder. Thanks to @frickergg for the document.
The resulting CLOVER/ACPI/patched folder should contain these files:
- SSDT-UIAC-AORUS-EXTREME-Z390-V3.aml
- SSDT-EC.aml
- SSDT-DESIGNARE-Z390-NO-CNVW.aml
- SSDT-Z390-AORUS-EXTREME-TB3HP-V4.aml
- SSDT-DTPG.aml
- Optionally, if you have an RX 580 in Slot-1: SSDT-Z390-DESIGNARE-RX580-V2.aml
If you do not use an AMD RX 580 graphics card, then delete the RX580 SSDT.
If you have a Gigabyte AORUS Extreme or AORUS Extreme Waterforce motherboard installed in a BeQuiet Dark Base Pro 900 Rev 2 case, you may use the following custom USB SSDT. USBInjectAll.kext must be installed in order for the SSDT to take effect.
- SSDT-UIAC-AORUS-EXTREME-DARKBASE-PRO-900-Z390-V3.aml
- Simply copy this file into the CLOVER/ACPI/patched folder of the EFI partition of your Mojave SSD and reboot. Make sure that SSDT-EC.aml is already present in the CLOVER/ACPI/patched folder.
- Vega Fan and Power Control:
Please note that macOS 10.14.5 and newer provides robust support for AMD Vega 56, Vega 64, and Radeon VII. No fan and power control solution of any kind is necessary, so the suggestions below apply to 10.14.1 through 10.14.4 only.
Thanks to @xanderevo for this information.
If you're experiencing maxed-out fans and crashes under heavy load with a Vega56 or Vega64 GPU, you might try either of the 2 solutions shown below.
Solution 1:
This solution is based on @kgp's custom SSDT for Vega64, which was adapted for PCIe Slot 1 on the Designare Z390 motherboard. ACPI paths were modified accordingly. Procedure for this solution is as follows:
- Download the file SSDT-Z390-VEGA64.aml from the bottom of this post.
- Mount the EFI partition of your Mojave SSD.
- Navigate to the EFI/CLOVER/ACPI/patched folder.
- If any other GPU SSDT is present in that folder (such as SSDT-Z390-DESIGNARE-RX580.aml) delete it.
- Copy SSDT-Z390-VEGA64.aml into this folder and reboot.
- When the system restarts, log back in and check System Information --> PCI to ensure that the Vega card is listed. Then watch for any loud fans or high power consumption.
- If this SSDT does not resolve the problem, remove it and try the next solution below.
Solution 2:
This solution was adapted from this original post. Custom power settings will be injected through Clover. When the modifications shown below are applied, the Devices page in Clover Configurator will look like this:

Procedure:
Open the EFI config.plist to make the changes:View attachment 376397
The required parameters are:
Devices: PciRoot(0x0)/Pci(0x1,0x0)/Pci(0x0,0x0)/Pci(0x0,0x0)/Pci(0x0,0x0)
Properties Key: PP_PhmSoftPowerPlayTable
Properties Value: b6020801 005c00e1 060000ee 2b00001b 00480000 0080a903 00f04902 00320008 00000000 00000000 00000000 00000201 5c004f02 46029400 9e01be00 28017a00 8c00bc01 00000000 72020000 9000a802 6d014301 9701f049 02007102 02020000 00000000 08000000 00000000 05000700 03000500 00000000 00000108 20038403 b603e803 1a044c04 7e04b004 01014605 01018403 000860ea 00000040 19010001 80380100 02dc4a01 0003905f 01000400 77010005 90910100 066cb001 00070108 d04c0100 00008000 00000000 001c8301 00010000 00000000 000070a7 01000200 00000000 00000088 bc010003 00000000 00000000 c0d40100 04000000 00000000 00442302 00050000 00000100 00000058 02000600 00000001 000000b8 7c020007 00000000 01000000 000560ea 00000040 19010000 80380100 00dc4a01 0000905f 01000000 08286e00 00002cc9 000001f8 0b010002 80380100 03905f01 0004f491 010005d0 b0010006 c0d40100 0700086c 39000000 245e0000 01fc8500 0002acbc 00000334 d0000004 686e0100 05089701 0006eca3 01000700 01683c01 00000104 3c410000 00000050 c3000000 00008038 01000200 00247101 00040000 01080098 85000040 b5000060 ea000050 c3000001 80bb0000 60ea0000 940b0100 50c30000 0200e100 00940b01 00401901 0050c300 000378ff 00004019 01008826 010050c3 00000440 19010080 38010080 38010050 c3000005 80380100 dc4a0100 dc4a0100 50c30000 06007701 00007701 00905f01 0050c300 00079091 01009091 01000077 010050c3 00000118 00000000 0000000b e412e803 24133700 0a005403 90019001 90019001 90019001 90010000 00000002 043107dc 00dc00dc 002c0100 00590069 004a004a 005f0073 00730064 00400090 92976096 00905500 00000000 00000000 00000000 00000000 0202d430 00000210 60ea0000 0210
Value Type: DATA
(SECOND VALUE)
Properties Key: model
Properties Value: AMD Radeon RX Vega 64
Value Type: STRING
Save and reboot. You can check the GPU state before and after by typing this in Terminal:
Credit goes to CMMChris from hackintosh forum.de (PPT Hex Generator tool in excel).Code:while sleep 1; do clear;ioreg -l |grep \"PerformanceStatistics\" | cut -d '{' -f 2 | tr '|' ',' | tr -d '}' | tr ',' '\n'|grep 'Temp\|Fan\|Clock'; doneThanks to @mcljot for this detailed guide for controlling the very stubborn fans on the Sapphire PULSE Vega56. This solution may be applicable to other Vega cards, but it has only been tested on this specific make and model.
This guide requires the use of two helper files that are attached to the end of the build guide. Both of these files should be downloaded at this time:
- gfxutil-1.76b.zip
- VGTab_en_v0.4.zip
Procedure:
- If you already have a VegaTab_56.kext installed in /System/Library/Extensions (/S/L/E) or /Library/Extensions (/L/E) or CLOVER/kexts/Other, move or delete that file. We will be creating a new one.
- If you deleted the file from /S/L/E or /L/E, run Kext Utility to rebuild kernel caches. This is mandatory any time a kext is added or removed from /S/L/E or /L/E. But this is not needed if the file is deleted only from CLOVER/kexts/Other.
- Run Terminal from the Utilities folder and cd to the directory containing the two files you downloaded earlier (gfxutil and VGTab_en).
- Type
sudo xattr -rd com.apple.quarantine VGTab_en.app. This will remove quarantine status, if it exists, from the downloaded files. To verify that this was successful, type this once again:xattr VGTab_en.app. If you get an empty reply, you are good to go. - Run VGTab_en and create a configuration for yourself. This utility creates a .kext file on your Desktop called VegaTab_XX.kext.
- In the directory that contains the downloaded gfxutil, type
./gfxutil -f GFX0to retrieve the PCI path of the Vega GPU. Keep the Terminal window open for now so you can copy the PCI path to your config.plist in a subsequent step below. - Back on the Desktop, right-click on the VegaTab_XX.kext file and choose Show Package Contents. Then open the Contents folder followed by the file info.plist. Use a suitable plist editor or BBEdit.
- Scroll down to the bottom and copy everything in the <dict> tags immediately under the
<key>aty_properties</key>tag. - Open your config.plist in a suitable editor and paste (a) your Vega GPU path from gfxutil and (b) info.plist content into the
<key>Properties</key>section of your config.plist. Make sure you open and close your tags correctly. The result should look like this (but use your own PCI path produced by gfxutil):
XML:<key>Properties</key> <dict> <key>PciRoot(0x0)/Pci(0x1,0x0)/Pci(0x0,0x0)/Pci(0x0,0x0)/Pci(0x0,0x0)</key> <dict> <key>PP_DisableClockStretcher</key> <integer>1</integer> <key>PP_DisablePowerContainment</key> <integer>1</integer> <key>PP_DisableULV</key> <integer>1</integer> <key>PP_EnableUploadFirmware</key> <integer>0</integer> <key>PP_Falcon_QuickTransition_Enable</key> <integer>1</integer> <key>PP_GfxOffControl</key> <integer>0</integer> <key>PP_PhmSoftPowerPlayTable</key> <data> pwIIAQBcAO8GAAAOLAAAGwBIAAAAgKkDAPBJAgAyAAgA AAAAAAAAAAAAAAAAAAIBXABAAjcClACPAbQAHgF6AIwA rQEAAAAAYwIAAJAAmQJeATQBiAFoNgIAcQICAgAAAAAA AAgAAAAAAAAABQAHAAMABQAAAAAAAAABCCADhAO2A+gD GgRMBH4EsAQBAeIEAQGEAwAGYOoAAABAGQEAAdxKAQAC AHcBAAOQkQEABWywAQAHAQjQTAEAAACAAAAAAAAAHIMB AAEAAAAAAAAAAIi8AQACAAAAAAAAAAC07wEAAwAAAAAA AAAAgAACAAQAAAAAAAAAAMg/AgAFAAAAAAEAAADIWAIA BgAAAAABAAAAGG0CAAcAAAAAAQAAAAAEYOoAAABAGQEA ANxKAQAAkF8BAAAACChuAAAALMkAAAH4CwEAAoA4AQAD kF8BAAT0kQEABdCwAQAGwNQBAAcACGw5AAAAJF4AAAH8 hQAAAqy8AAADNNAAAARobgEABQiXAQAG7KMBAAcAAWg8 AQAAAQQ8QQAAAAAAUMMAAAAAAHARAQABAACAOAEAAgAA AQgAmIUAAEC1AABg6gAAUMMAAAGAuwAAYOoAAJQLAQBQ wwAAAnj/AABAGQEAtCcBAFDDAAADtCcBANxKAQDcSgEA UMMAAASAOAEAkF8BANxKAQBQwwAABdxKAQAAdwEAkF8B AFDDAAAGAHcBAAB3AQCQXwEAUMMAAAcAdwEAkJEBAAB3 AQBQwwAAARgAAAAAAAAAC+QSkAFgCUsACgBUA5ABkAGQ AZABkAGQAZABAAAAAAACBDEHpQClAKUALAEAAFkAaQBK AEoAXwBzAHMAZABAAJCSl2CWAJBVAAAAAAAAAAAAAAAA AAAAAAACAtQwAAACEGDqAAACEA== </data> <key>PP_PhmUseDummyBackEnd</key> <integer>0</integer> <key>PP_ToolsLogSpaceSize</key> <integer>524288</integer> </dict> <key>This is the beginning of the next device in the list</key> - And you're done. Entering this content in the config.plist manually means that you don't have to inject the VegaTab_XX.kext that may interfere with WhateverGreen, which you presumably are already using. In case it isn't clear, if you follow these steps, do not install the VegaTab_XX.kext file anywhere! Not in the CLOVER folder, not in S/L/E, and not in L/E. Delete it from your desktop to avoid confusion!
- If you want to run VGTab_en again and generate a new fan speed configuration, you only have to copy the long
<data>entry from the info.plist file into your config.plist. The other values remain the same.
Fan and power control properties tend to vary appreciably between different brands of Vega cards. The settings below are made especially for the Asus ROG Strix Vega 64 and have been found to work very well. Thanks to @JimSalabim for sharing this tip.
Procedure:
- Mount the EFI partition of the Mojave SSD and open config.plist using Clover Configurator.
- Go to the Devices page and add the following entry to Properties. The final result is shown in the screenshot below.
- Click the + icon under the Devices* box and enter the following PCI address for the Vega card in Slot 1:
PciRoot(0x0)/Pci(0x1,0x0)/Pci(0x0,0x0)/Pci(0x0,0x0)/Pci(0x0,0x0). - Click the + icon under the properties box on the right side and add
AAPL,slot-name|Slot-1|STRINGas shown in the screenshot. - Click the + icon again and enter Properties Key*
PP_PhmSoftPowerPlayTable, Properties Value* from the spoiler below, and set Value Type toDATA. - Click the + icon again and enter
model|AMD Radeon RX Vega 64|STRINGas shown. - Save the file and reboot.
B6020801005C00E1060000902C00001B004800000080A90300F0490200320008000000000000000000000000000002015C004F02460294009E01BE0028017A008C00BC0100000000720200009000A8026D0143019701F04902007102020200000000000008000000000000000500070003000500000000000000010820038403B603E8031A044C047E04B0040101460501018403000860EA00000040190100018038010002DC4A010003905F010004007701000590910100066CB00100070108D04C01000000800000000000001C83010001000000000000000070A7010002000000000000000088BC0100030000000000000000C0D401000400000000000000004423020005000000000100000000580200060000000001000000B87C0200070000000001000000000560EA00000040190100008038010000DC4A010000905F0100000008286E0000002CC9000001F80B0100028038010003905F010004F491010005D0B0010006C0D401000700086C39000000245E000001FC85000002ACBC00000334D0000004686E0100050897010006ECA30100070001683C01000001043C41000000000050C3000000000080380100020000247101000500000108009885000040B5000060EA000050C300000180BB000060EA0000940B010050C300000200E10000940B01004019010050C300000378FF0000401901008826010050C300000440190100803801008038010050C300000580380100DC4A0100DC4A010050C30000060077010000770100905F010050C300000790910100909101000077010050C300000118000000000000000BE4120000B80B4E002A00540390019001900190019001900190010132003700020010070401040104012C0100005B0069004A004A005F007300730064004000000097609600905500000000000000000000000000000000000202D4300000021060EA00000210 - Final Cut Pro X (FCPX) and iMovie Users:
Please note that the tips below are not recommended for macOS 10.14.5 and newer. They are applicable to macOS 10.14.1 through 10.14.4. Final Cut Pro and iMovie users running macOS 10.14.5 and newer should see Going the Extra Mile.
If you're a Final Cut Pro X or iMovie user and you have a discrete graphics card installed (e.g. RX580, Vega, Pro WX) then the configuration presented in this guide will cause FCPX and iMovie to crash on startup. Two solutions are provided here.
Solution 1: If you're using 2 or more monitors and wish to continue using on-board video ports such as the two DisplayPorts (4K60) provided through the two Thunderbolt (USB-C) connectors, or the single on-board HDMI (4K30) port, then Solution 1 is for you. If you have a Thunderbolt 3 dock or Storage Array or other device that provides a DisplayPort output, then that output will only work through Solution 1.
- In BIOS --> Peripherals --> Set Initial Display Output --> IGFX.
- Connect one monitor to either Thunderbolt 3 port (DisplayPort) or HDMI.
- Your computer's BIOS and Clover screens will only appear through the on-board video port.
- Connect the other monitor to any port on your discrete graphics card (AMD Radeon RX580, Vega, Pro WX 9100).
Solution 2:
- SMBIOS: Use either iMac18,3 or iMacPro1,1.
- Devices: IntelGFX = 0x0
- Devices: Devices* = PciRoot(0x0)/Pci(0x2,0x0)
Properties:- Key = framebuffer-patch-enable | Value = 01000000 | Type = Data
- Key = AAPL,ig-platform-id | Value = 0300923E | Type = Data (you may also try 0300913E)
- Key = device-id | Value = 9B3E0000 | Type = Data
- Graphics: FB Name = Orinoco (only for RX580)
- Graphics: ig-platform-id = <make sure this is empty>
- Graphics: Inject Intel = false
- Graphics: Inject ATI = false
Framebuffer Orinoco is for RX580 only.
Result:
- FCPX and iMovie work
- JPG Quick Look works
- Sleep/wake works
Lots of juicy benchmark data and procedures for verifying iGPU are provided in this wonderful post by @kenntkim66:
In the previous Spoiler we discussed some system configuration options for Final Cut Pro and iMovie users. More recent experience has shown that Vega owners who use Pro video applications (Final Cut, Premiere, DaVinci Resolve, etc.) and various Pro audio applications will realize noticeably better performance by doing the following:
- Disabling iGPU in BIOS.
- Setting SMBIOS to iMacPro1,1. The actual iMac Pro uses discrete graphics only and has no built-in iGPU.
- Applying an appropriate Vega fan/power curve.
- Removing the following WhateverGreen parameters from Devices --> Properties:
- device-id
- AAPL,ig-platform-id
- framebuffer-patch-enable
- Specific Troubleshooting Tips:
Random crashes and lockups can be caused by any of a number of factors ranging from badly behavior software to hardware failures. Because they're random, these crashes are often difficult to reproduce and isolate. A list of troubleshooting guidelines will be posted and updated here.
- Tip 1: Thanks to @NoiseCoalition for providing this tip. Download and run Memtest to verify your memory sticks. Memtest identified a faulty DIMM on his system.
If you have installed a Firewire PCIe card and find that your computer does not shutdown, then you can try this fix:
- Mount the EFI partition of your Mojave SSD.
- Run Clover Configurator and open your config.plist.
- In the ACPI section, enable the checkbox for FixFirewire.
- Save the file and reboot.
Thanks to @victor.vhv for this tip!June 2019: Several owners are reporting signal attenuation or flaky connection problems with Bluetooth devices. Please refer to this guide for detailed troubleshooting guidelines.
Thanks to @loghound for putting this together. - Miscellaneous:
Real Macs use F1 and F2 keys to control display monitor brightness. To enable the same functionality on your Hackintosh there are at least these 2 options.
Option 1: Contributed by @ripe_md.
If you want to control the brightness of an external monitor (DCI support) via F1/F2 with your Apple keyboard and a number of third-party keyboards:
- Install and configure the KAMIKAZEUA fork of the app "Native Display Brightness" (download latest zip file from the link). Move the file to the Applications folder. Double-click to launch the app and if presented with a security warning (e.g. file downloaded from an unknown source), go to System Preferences --> Security & Privacy, select the General tab and allow the application to run from the bottom part of the window. Once launched, the app will register itself into the Login Items page under System Preferences --> Users & Groups. The app will therefore launch automatically on every boot.
- In order to enable the specific keys on your Apple keyboard and some third-party keyboards you have to add two patches to the "Kernel and Kext Patches/KextsToPatch"section in your config.plist:
- Patch 1
- Name: com.apple.driver.AppleHIDKeyboard
- Find: 30783030 30373030 33622C30 78666630 31303032 30
- Replace: 30783030 30373030 33622C30 78303030 37303033 62
- Comment: Enable dim keys by Wern
- MatchOS: empty
- Disabled: disable checkbox
- InfoPlistPatch: enable checkbox
- Patch 2
- Name: com.apple.driver.AppleHIDKeyboard
- Find: 30783030 30373030 33612C30 78666630 31303032 31
- Replace: 30783030 30373030 33612C30 78303030 37303033 61
- Comment: Enable dim keys by Wern
- MatchOS: empty
- Disabled: disable checkbox
- InfoPlistPatch: enable checkbox
- Patch 1
Option 2: Contributed by @bluepr0
Install the application MonitorControl by following instructions in the link.If you own a NZXT Kraken X42, X52, X62, X72, or M22 all-in-one liquid cooler and you have connected its USB cable to the F_USB header on the Designare motherboard, then you may try the following procedure to monitor the cooler and control its fans and lights:
If you are not using V7 of the custom USB SSDT, please update it first. We need Version 7 (or latest version) of the custom USB SSDT because the NZXT Kraken uses one of the internal USB 2 ports (either HS11 or HS12 depending on whether a USB splitter has been used), which is disabled many previous versions of the USB SSDT. The latest version is included in Post-Install Files.zip and has the filename: SSDT-UIAC-DESIGNARE-Z390-V7.aml (as of this writing). Mount the EFI partition of your Mojave SSD, delete the existing UIAC aml file from CLOVER/ACPI/patched folder, copy the new file into that folder, and reboot.
liquidctl is developed and maintained by Jonas Malaco Filho at this GitHub site:
GitHub - liquidctl/liquidctl: Cross-platform CLI and Python drivers for AIO liquid coolers and other devices
Cross-platform CLI and Python drivers for AIO liquid coolers and other devices - liquidctl/liquidctl github.com
liquidctl supports Homebrew on macOS. This means we can install current version and future updates as follows:
- First, install Xcode from the Mac App Store.
- Then install Homebrew from Terminal by typing:
/usr/bin/ruby -e "$(curl -fsSL https://raw.githubusercontent.com/Homebrew/install/master/install)"
- Finally, install liquidctl from Terminal by typing:
brew tap jonasmalacofilho/liquidctlbrew install liquidctl
brew upgrade liquidctl
liquidctl/docs at main · liquidctl/liquidctl
Cross-platform CLI and Python drivers for AIO liquid coolers and other devices - liquidctl/liquidctl
github.com
Below is a sample script that sets fans, pump, and LEDs on a Kraken liquid cooler. You may modify the file according to your needs. Copy the code below into a file called liquidctl.sh in your home folder or Documents folder (or anywhere you have read/write permission). You may use TextEdit in Plain Text mode to create this file.
Thanks to @jfgosselin for the tip!Code:#!/bin/bash # just in case the device is not ready liquidctl initialize # set fans to generous speed in 5 steps liquidctl set fan speed 20 25 32 40 42 52 52 70 60 100 # set pump speed to range in 2 steps liquidctl set pump speed 20 60 60 100 # set lights liquidctl set ring color spectrum-wave liquidctl set logo color spectrum-wave liquidctl status
Now that liquidctl has been installed, you might want to have it launch automatically at startup. If so, the following guide by @mcljot will help you achieve that.
Procedure:
- In Terminal, "cd" to the folder containing liquidctl.sh that you created above. Then give it file-execute permission by typing
chmod +x liquidctl.sh. - Copy the liquidctl.sh script to /Users/Shared.
- Create a new file called liquidctl.plist in /Library/LaunchAgents. Admin privileges are needed for this operation, so you may use a command such as
sudo vi /Library/LaunchAgents/liquidctl.plist. - Copy and paste the code below into this file:
XML:<?xml version="1.0" encoding="UTF-8"?> <!DOCTYPE plist PUBLIC "-//Apple//DTD PLIST 1.0//EN" "http://www.apple.com/DTDs/PropertyList-1.0.dtd"> <plist version="1.0"> <dict> <key>Label</key> <string>liquidctl.sh</string> <key>ProgramArguments</key> <array> <string>/Users/Shared/liquidctl.sh</string> </array> <key>RunAtLoad</key> <true/> </dict> </plist> - Assign ownership of the liquidctl.plist file to user root:
sudo chown root /Library/LaunchAgents/liquidctl.plist. - Check that you've done everything correctly by attempting to load the .plist manually:
sudo launchctl load /Library/LaunchAgents/liquidctl.plist. If this command returns anything other than a blank line, go back and check your steps.
If you find yourself needing to mount the EFI partition regularly -- whether during OS installation, OS fine-tuning, making regular backups, etc. -- @headkaze has released a very convenient MountEFI tool that installs on the menu bar and is always available with a single mouse click! What could be easier?!
It can be downloaded by clicking here:
Quite a few users have Windows already installed on this system in a dual-boot configuration. In order to add a third boot option -- Linux in this case -- please consult this mini-guide by @faithie999:
Microsoft releases Feature Updates to Windows on a periodic basis. These are different from security and bug fix releases, and contain new and updated functionality. Unfortunately, Windows will interfere with the EFI partition of other drives in the system, and may prevent Clover from starting.
It’s been suggested by some users that Windows should be installed in the M2M slot (closest to CPU) so that it updates/modifies its own EFI partition. Just as Linux enumerates all disks as /dev/sda, /dev/sdb, /dev/sdc, etc. based on an internal hardware order, Windows does a similar thing. It enumerates disks as disk1, disk2, disk3, etc. and will update/modify the EFI partition on the first disk that contains an EFI partition. M2M is disk1. M2P is disk2, and the SATA ports take it from there. Therefore, moving the Windows NVMe SSD to the M2M slot will attach it to disk1 and Windows should no longer interfere with any other EFI partitions on other disks.Note that I have not tested this myself.Update 17 May 2019: This has been confirmed to work. More details located here.
When actually installing Windows, all other NVMe and SATA drives should be physically removed from the system. Failure to do so may result in a number of installation errors. In BIOS, it may be wise to change Windows 8/10 Features to Windows 8/10 or Windows 8/10 WHQL. After installation is completed, this should be changed back to Other OS.
If you wish to use WiFi and Bluetooth with Windows, please follow this Mini-Guide:
The AMD RX 580 is natively supported in macOS Mojave, but these cards are available from multiple vendors in multiple configurations and may have firmware (VBIOS) differences between them. Some cards work flawlessly, others require a little bit of hacking.
If you run VideoProc --> Setting --> Options, and you notice that H.264 and/or HEVC is not enabled (see screenshot), try downloading the attached dummy141.kext zip, copy the unzipped kext to /Library/Extensions and run Kext Utilility to rebuild kernel cache.
Reboot and run VideoProc once again to determine whether H.264 and HEVC are both operational.
 The Designare Z390 has 6 internal SATA-3 headers. Depending on the type of NVMe SSD installed in the M2M and M2P slots, one or more SATA ports will not be available. This is discussed in the section SATA Port Limitations. Nevertheless, it is possible to install several SATA drives inside the PC case. By default, however, these drives are not hot-pluggable.
To enable hot plug of any internally-connected SATA drive(s) please follow this procedure:
- Individually enable the Hot Plug function for each desired SATA port. This is done from BIOS --> Peripherals --> SATA --> Hot Plug.
- Add the following Kext patch using Clover Configurator --> Kernel and Kext Patches:
- Name*: AppleAHCIPort
- Find* [HEX]: 40600200
- Replace* [HEX]: 00000000
- Comment: SATA Hot Swap I/O Error Fix
Thanks to @Zip1 for the tip!Although the Fenvi FV-T919 is the recommended WiFi/BT card, there are alternatives. If you already have a Bluetooth USB dongle and are simply looking for a high-speed WiFi card, the TP-Link Archer T9E AC1900 is a good choice. Install it into PCIe Slot 4 and use the attached SSDT (SSDT-Z390-ARPT.aml) to provide informational properties to macOS. Must be used in combination with SSDT-DTPG.aml, which is included in Post-Installation Files.zip.
Thanks to @nifranza for the SSDT!@byteminer posted an Oscar winning post-installation summary. One of the sections includes a discussion on overclocking and contains an overclocking PDF from Gigabyte. Please click here.
@svandive referred us to this link that contains a detailed yet simple overclocking guide for the Gigabyte Z390 AORUS Master, but can be adapted for the Designare Z390.The USB SSDT provided in this build guide creates an auxiliary device called "USBX", which is responsible for enabling AppleBusPowerController that allows high current devices to charge. iPads, for example, need extra current from USB ports. In some cases, however, USB ports might fail to deliver the extra current even if "USBX" is present. In this case, try the following remedy contributed by @P1LGRIM:
- Disconnect the electricity power to the PSU.
- Press and hold the ON/Power button for 30 seconds, then release.
- Reconnect power, boot into macOS, and try again.
The Designare Z390 uses an Intel Titan Ridge Thunderbolt controller running firmware version 33, also known as NVM 33. PCIe add-in-cards with Titan Ridge controllers are also available, and they will ship with different firmware versions. We have found that Titan Ridge NVM 43 is somewhat problematic and should be avoided. Earlier firmware versions such as NVM 23 and NVM 33 are more compatible.
Nevertheless, thanks to @jiffyslot for sharing the following tips and experiences:
Thanks to @NCMacGuy for showing us that Apple Thunderbolt Display does indeed work. It is necessary to flash the modified Thunderbolt firmware to the on-board Titan Ridge controller. The procedure is described in the first two spoilers at the very top of this build guide: Thunderbolt Local Node and Thunderbolt Bus Investigation and Mini-Guides for Flashing SPI ROM Chips.
A Thunderbolt 3 to Thunderbolt 2 adapter is also required because the Apple Thunderbolt Display is a Thunderbolt 1 device.
If the system is in headless mode (Platform ID 0x3E980003) we connect a short DisplayPort cable from a discrete GPU (AMD RX 580, for example) to the DP-In port on the rear IO panel. The TB3-to-TB2 adapter plugs into the Thunderbolt port closest to the HDMI port on the rear panel. The Apple Thunderbolt Display then connects to the TB3-to-TB2 adapter.
Note that BIOS and Clover screens may not be visible on first boot, so it's necessary to press Enter (blindly) at the Clover Boot Menu. During late macOS boot stage, the Apple Thunderbolt Display should turn on. On a subsequent warm boot, the BIOS and Clover screens will likely appear. If you have a second monitor, the BIOS and Clover screens will appear on that monitor instead.
Please see these and subsequent posts for details and screenshots.
@MatiCohen directed us to the GitHub site of 'zxystd' who is currently developing native macOS drivers for various Intel WiFi and Bluetooth modules by using the Linux source code as a reference.
A native Intel Bluetooth driver is already available that works with Bluetooth devices, but not yet with Handoff. A native Intel WiFi driver is still in development phase. These are very promising drivers so we'll be monitoring the development closely!
Link to native Intel WiFi driver.
Link to native Intel Bluetooth driver.
These drivers are in development and do not work completely. Unless you are beta-testing them for the developer, please do not use them. For now, no support of any kind will be provided in this thread.
Micro-Guide for Installing Intel Bluetooth Driver
Micro-Guide for Installing Intel WiFi DriverThanks to @Elias64Fr for providing this tip. If Sidecar (in macOS Catalina) is not officially supported for your Hackintosh's sysdef (e.g. MacBookPro15,1) or is not supported on your iPad, it may be possible to enable the feature anyway by following the procedure in this GitHub site: https://github.com/ben-z/free-sidecarThanks to @mattystonnie, @CMMChris, and @rj510 we can provide a significant speed boost to the following AMD GPUs:
- Vega 56
- Vega 64
- Radeon VII
- RX 5500 and 5500 XT
- RX 5700 and 5700 XT
For some applications it is necessary to disable wake from USB. Some Corsair and RME Audio devices connected to this motherboard can prevent sustained sleep. Thanks to @lambusser for finding a way to disable wake from USB. When this solution is applied, only the Power Button can wake the system.
Please see this post for details (or click here for micro-guide). The solution consists of two parts:
- Copy SSDT-GPRW.aml to the CLOVER/ACPI/patched folder. File is located in the referenced post.
- Add an ACPI rename to config.plist:
- Comment: change Method(GPRW,2,N) to XPRW, pair with SSDT-GPRW.aml
- Find: 4750525702
- Replace: 5850525702
Bluetooth keyboard and mouse might take several seconds to reconnect after wake from sleep, which delays the overall process of waking. By disabling X.M.P. Profile in BIOS, bluetooth devices will reconnect quickly, which will also speed up the wake process. Click here for additional details.
Credit: @3DmanIf you're having difficulty activating 3 monitors with an AMD RX 5xx GPU, try this solution through Clover:
- Clover --> Devices --> FakeID --> ATI --> 0x067FF002
- Clover --> Graphics --> Inject ATI --> Enable
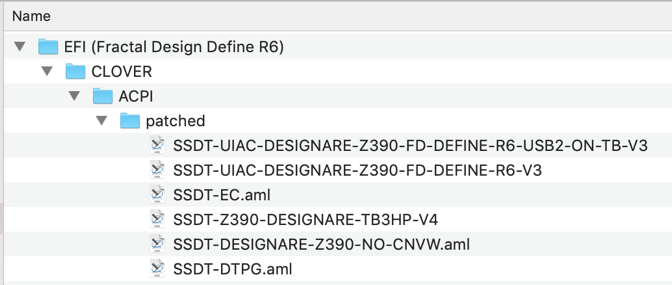
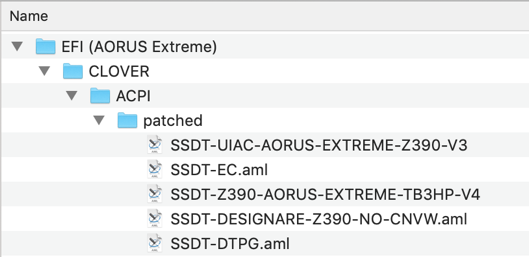


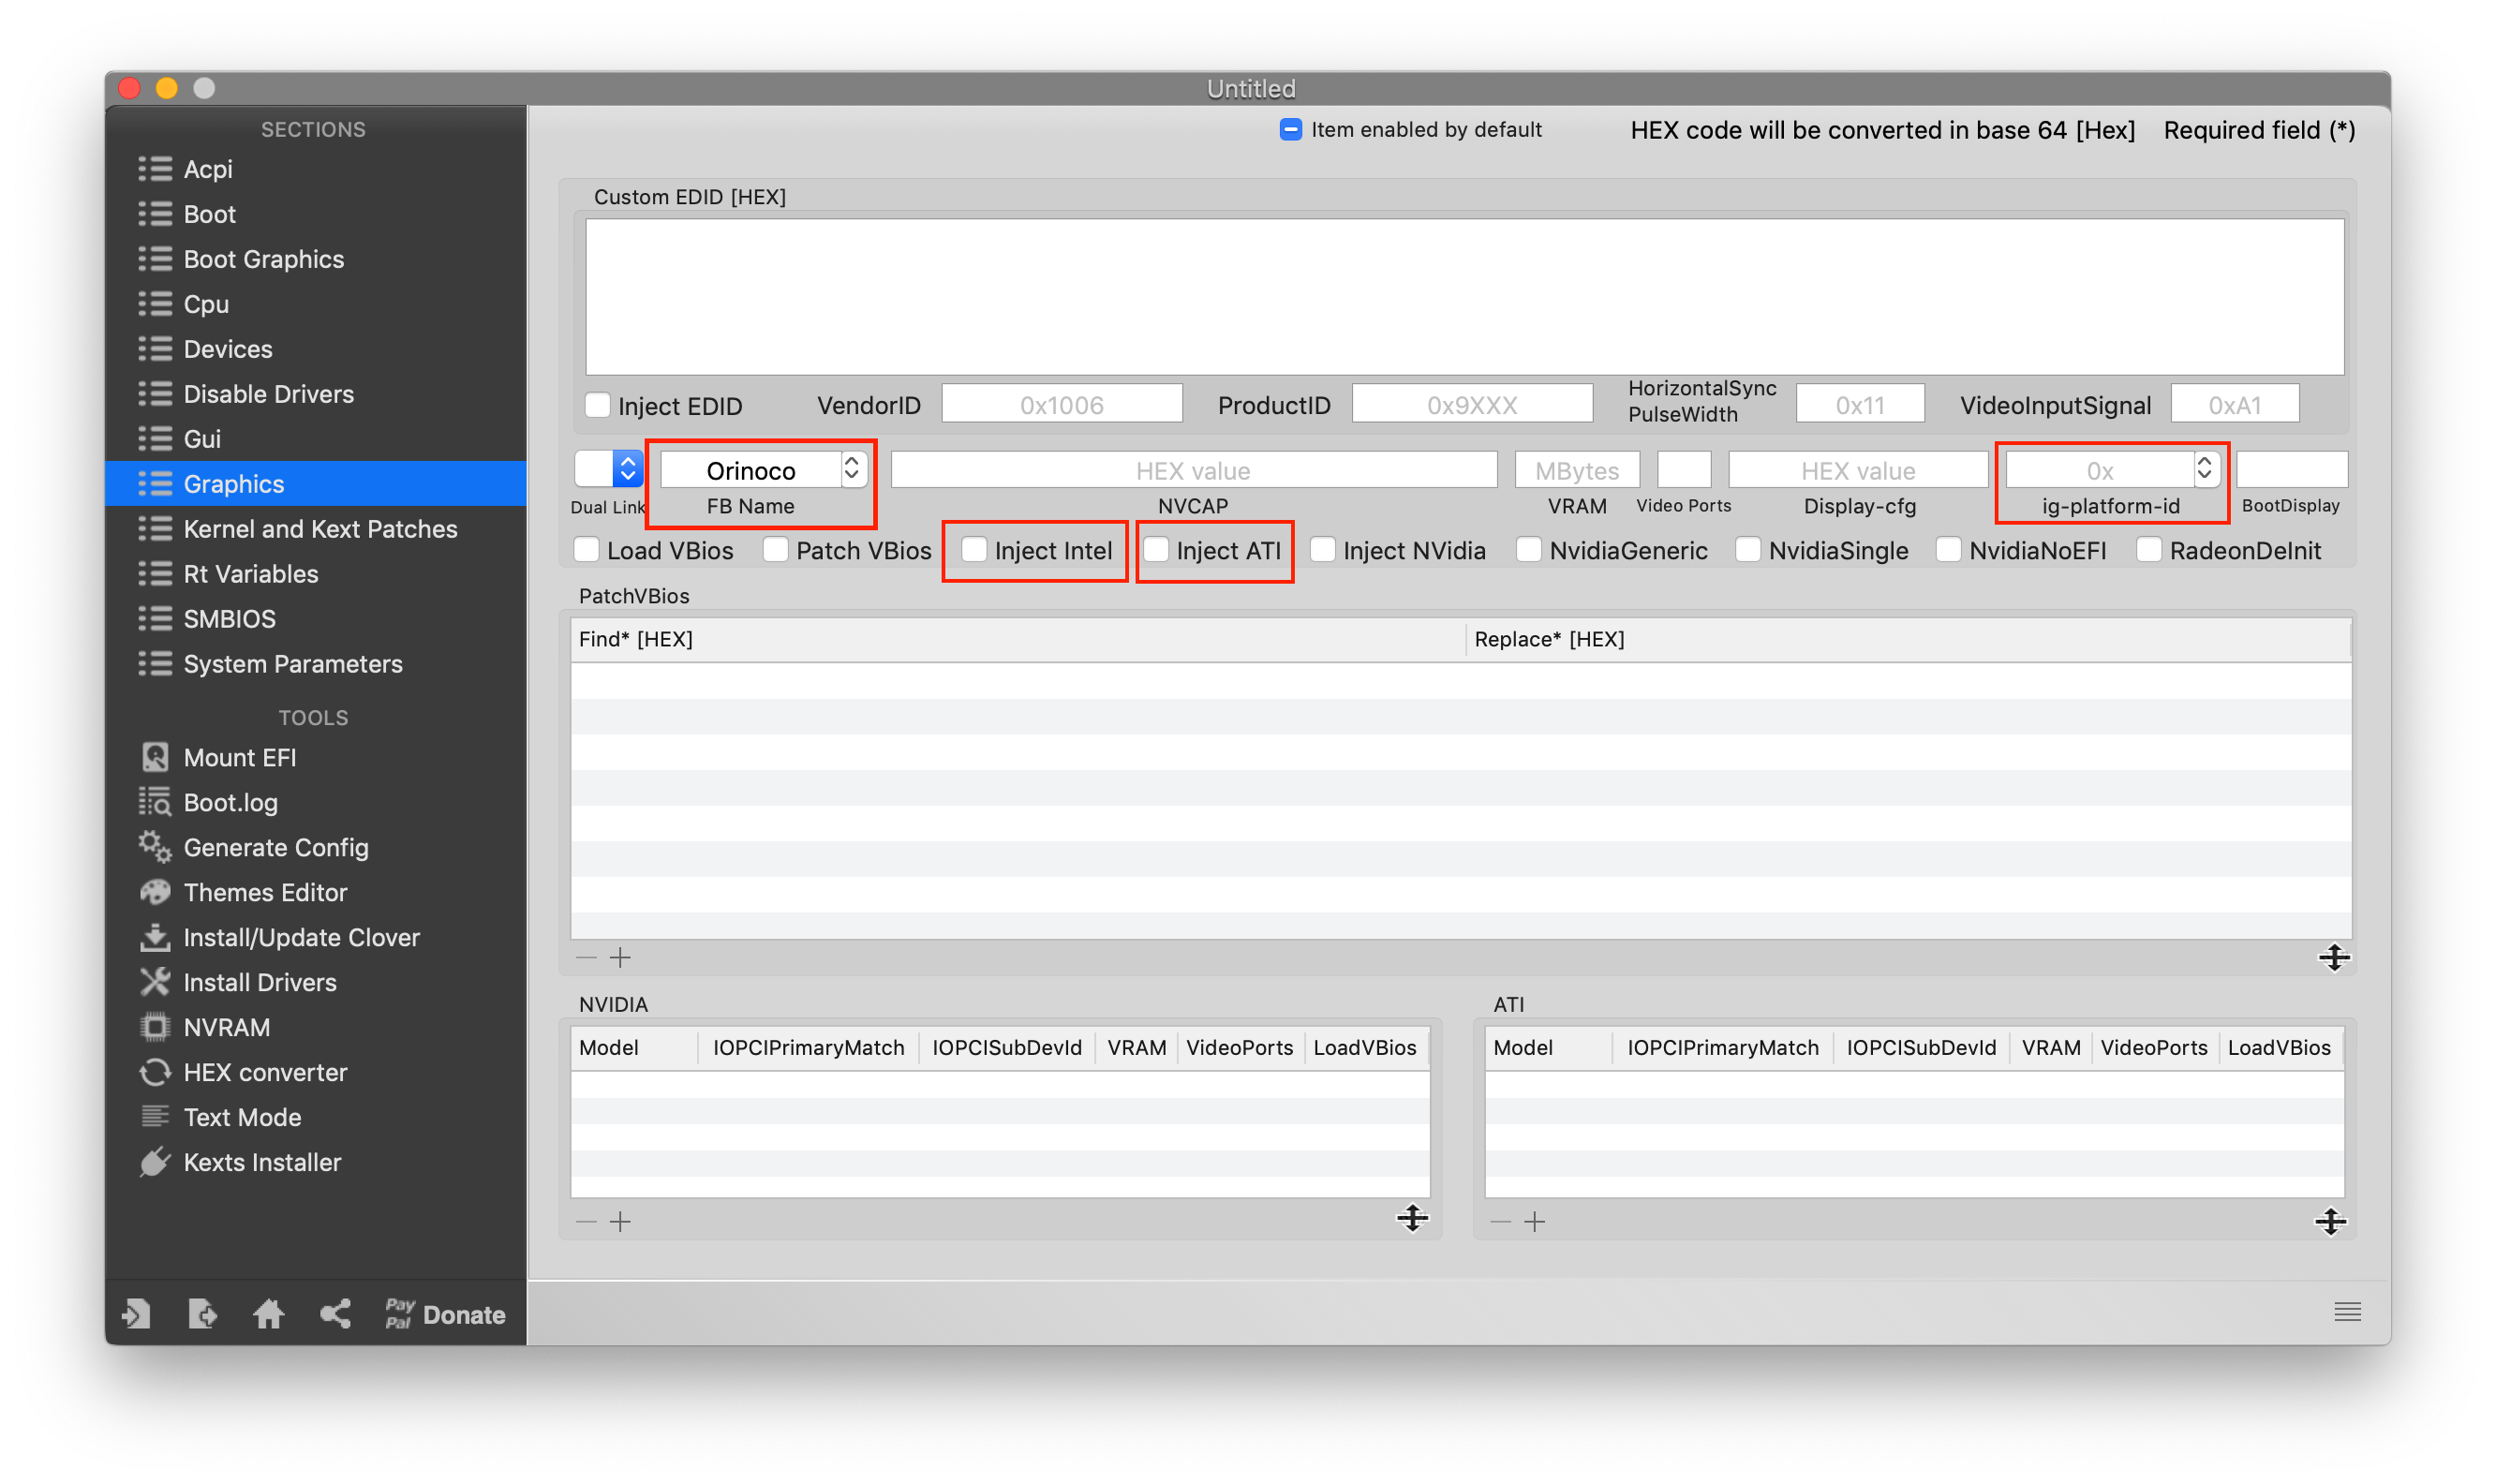
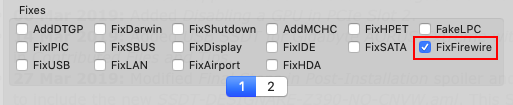
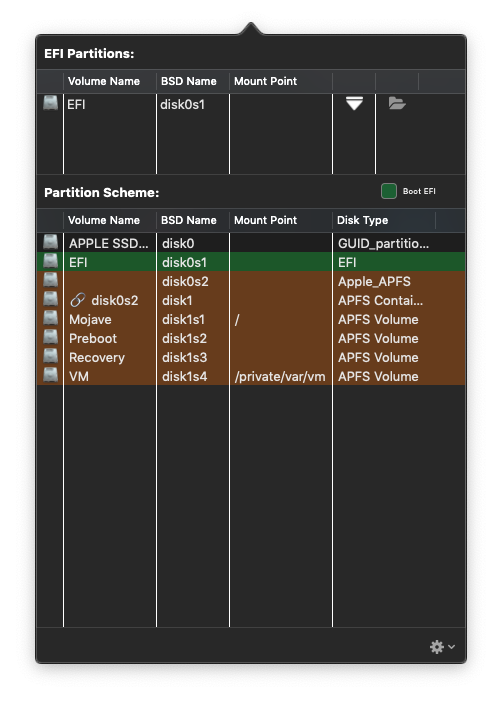

In order to keep the build procedure simple, we took the liberty of maximizing point-and-click options in Clover Configurator. But now that the installation is complete, we can apply the following procedure to inject audio properly and to enable onboard HDMI port. If you plan to run the system in headless mode where the iGPU will not be driving a display monitor, then only make the change for audio injection. NOTE: If using a discrete GPU, headless mode is strongly recommended, so only apply the changes for injecting audio.
For audio injection only, the procedure is:
- Start by mounting the EFI partition on the Mojave internal SSD and run Clover Configurator. In Clover Configurator, open your config.plist and set Devices --> Audio --> Inject = NO.
- Then copy-paste the indicated lines directly into config.plist, just after <key>properties</key>.
XML:
        <key>Properties</key>
        <dict>
                        // 1. Copy the lines shown below
                        // 2. Paste them into your config.plist under <key>Properties</key>
            <key>PciRoot(0x0)/Pci(0x1f,0x3)</key>
            <dict>
                <key>AAPL,slot-name</key>
                <string>Built In</string>
                <key>device_type</key>
                <string>Audio Controller</string>
                <key>layout-id</key>
                <data>
                EAAAAA==
                </data>
                <key>model</key>
                <string>Realtek ALC1220-VB</string>
</dict>- Start by mounting the EFI partition on the Mojave internal SSD and run Clover Configurator. In Clover Configurator, open your config.plist and make the changes shown in the screenshot (i.e. make sure everything is turned off or cleared out in Graphics):
- Then save config.plist and quit Clover Configurator.
- Now open a text editor such as BBEdit, TextWranger, or TextEdit. If using TextEdit, be sure to select Format --> Make Plain Text from the menu bar. Open your config.plist and insert the entire <key>Properties</key> section below <key>Devices</key>.
- Save the file and quit from your text editor.
- To make sure that no errors were introduced, run Clover Configurator again and open the just-modified config.plist. If there are any syntax errors in the XML, Clover Configurator will inform you right away. If you see errors, double-check your work. But if there are no errors reported, simply quit Clover Configurator and reboot.
- When you log back in, you should be able to connect an HDMI display to the on-board HDMI port. And the audio ports on the I/O panel should still function properly. In Preferences --> Sound --> Output you will now see "Built-In" replaced by "Headphones".
XML:
    <key>Devices</key>
    <dict>
                // 1. Copy everything below this line and paste it in the same location in your config.plist
                // 2. Be sure to delete any pre-existing <key>Properties</key> block
        <key>Properties</key>
        <dict>
            <key>PciRoot(0x0)/Pci(0x1f,0x3)</key>
            <dict>
                <key>AAPL,slot-name</key>
                <string>Built In</string>
                <key>device_type</key>
                <string>Audio Controller</string>
                <key>layout-id</key>
                <data>
                EAAAAA==
                </data>
                <key>model</key>
                <string>Realtek ALC1220-VB</string>
            </dict>
            <key>PciRoot(0x0)/Pci(0x2,0x0)</key>
            <dict>
                <key>AAPL,ig-platform-id</key>
                <data>
                BwCbPg==
                </data>
                <key>AAPL,model</key>
                <string>Intel UHD 630</string>
                <key>AAPL,slot-name</key>
                <string>Internal</string>
                <key>device_type</key>
                <string>Graphics Processor</string>
                <key>enable-hdmi20</key>
                <data>
                AQAAAA==
                </data>
                <key>framebuffer-con0-busid</key>
                <data>
                BQAAAA==
                </data>
                <key>framebuffer-con0-enable</key>
                <data>
                AQAAAA==
                </data>
                <key>framebuffer-con0-flags</key>
                <data>
                xwMAAA==
                </data>
                <key>framebuffer-con0-index</key>
                <data>
                AQAAAA==
                </data>
                <key>framebuffer-con0-pipe</key>
                <data>
                EgAAAA==
                </data>
                <key>framebuffer-con0-type</key>
                <data>
                AAQAAA==
                </data>
                <key>framebuffer-con1-busid</key>
                <data>
                BgAAAA==
                </data>
                <key>framebuffer-con1-enable</key>
                <data>
                AQAAAA==
                </data>
                <key>framebuffer-con1-flags</key>
                <data>
                xwMAAA==
                </data>
                <key>framebuffer-con1-index</key>
                <data>
                AgAAAA==
                </data>
                <key>framebuffer-con1-pipe</key>
                <data>
                EgAAAA==
                </data>
                <key>framebuffer-con1-type</key>
                <data>
                AAQAAA==
                </data>
                <key>framebuffer-con2-busid</key>
                <data>
                BAAAAA==
                </data>
                <key>framebuffer-con2-enable</key>
                <data>
                AQAAAA==
                </data>
                <key>framebuffer-con2-flags</key>
                <data>
                xwMAAA==
                </data>
                <key>framebuffer-con2-index</key>
                <data>
                AwAAAA==
                </data>
                <key>framebuffer-con2-pipe</key>
                <data>
                EgAAAA==
                </data>
                <key>framebuffer-con2-type</key>
                <data>
                AAgAAA==
                </data>
                <key>framebuffer-con3-busid</key>
                <data>
                AAAAAA==
                </data>
                <key>framebuffer-con3-enable</key>
                <data>
                AQAAAA==
                </data>
                <key>framebuffer-con3-flags</key>
                <data>
                IAAAAA==
                </data>
                <key>framebuffer-con3-index</key>
                <data>
                /////w==
                </data>
                <key>framebuffer-con3-pipe</key>
                <data>
                AAAAAA==
                </data>
                <key>framebuffer-con3-type</key>
                <data>
                AQAAAA==
                </data>
                <key>framebuffer-patch-enable</key>
                <data>
                AQAAAA==
                </data>
            </dict>
</dict>With gratitude to @headkaze who actually took the initiative to incorporate a large number of framebuffer connector patches into Hackintool, we can greatly simplify the task of enabling the on-board HDMI port. Follow the
mini-guide located here.
mini-guide located here.
Using the UHD 630 to Drive HDMI and DP Monitors
On January 5, 2019 a solution was found for activating the on-board HDMI port with accelerated video. This solves the widespread "black screen" problem that occurs when the iGPU is properly configured (i.e. when the AppleIntelFramebuffer is attached). The Designare Z390 has three video ports:
- Two Thunderbolt 3 ports that can each drive a DisplayPort monitor via USB-C to DisplayPort cable. This works out-of-the-box without any modification and can drive DisplayPort monitors at up to 4K60.
- A single HDMI v1.4 port capable of driving a monitor at up to 4K30. To enable this port, we have to modify a handful of WhateverGreen framebuffer settings (Lilu and WhateverGreen are required).
- See the section above, Injecting Audio and Enabling On-Board HDMI for installation details.
Specifying Device Names and Types
This is for purely cosmetic purposes. The System Information --> PCI page on real Macs contains a fairly comprehensive list of hardware components. The Thunderbolt and RX580 SSDTs provide this information for Titan Ridge Thunderbolt and AMD Radeon RX 580. The previous section (Injecting Audio and Enabling UHD 630 HDMI) provides this information for the Realtek ALC1220-VB audio controller and Intel UHD 630 iGPU.
But if you would like to add two more entries that describe the Intel USB 3.1 USB controller and the Broadcom 94360CS2 WiFi/Bluetooth card, then simply copy and paste the <key>Arbitrary</key> section to your config.plist. It can appear as the first item under <key>Devices</key> as shown in the spoiler below.
After applying Thunderbolt SSDT, AMD RX580 SSDT, Audio Injection, UHD 630 HDMI, and the code shown below, the resulting PCI information page should look like the image below. (The extra devices shown here are provided by my OWC Thunderbolt 3 dock.)
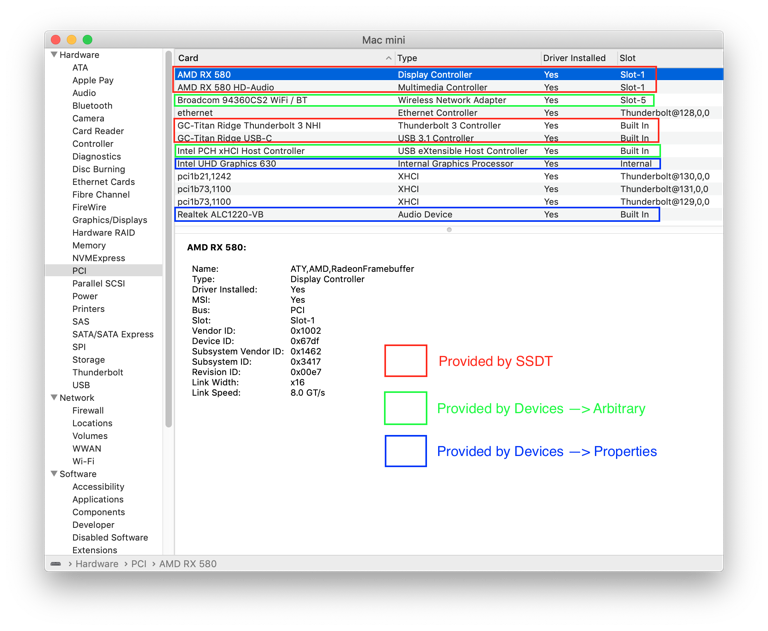
Code:
    <key>Devices</key>
    <dict>        // copy and paste everything BELOW this line
        <key>Arbitrary</key>
        <array>
            <dict>
                <key>Comment</key>
                <string>Intel PCH USB 3.1 xHCI Host Controller</string>
                <key>CustomProperties</key>
                <array>
                    <dict>
                        <key>Disabled</key>
                        <false/>
                        <key>Key</key>
                        <string>AAPL,slot-name</string>
                        <key>Value</key>
                        <string>Built In</string>
                    </dict>
                    <dict>
                        <key>Disabled</key>
                        <false/>
                        <key>Key</key>
                        <string>model</string>
                        <key>Value</key>
                        <string>Intel PCH xHCI Host Controller</string>
                    </dict>
                </array>
                <key>PciAddr</key>
                <string>00:14.0</string>
            </dict>
            <dict>
                <key>Comment</key>
                <string>Broadcom 94360CS2</string>
                <key>CustomProperties</key>
                <array>
                    <dict>
                        <key>Disabled</key>
                        <false/>
                        <key>Key</key>
                        <string>AAPL,slot-name</string>
                        <key>Value</key>
                        <string>Slot-5</string>
                    </dict>
                    <dict>
                        <key>Disabled</key>
                        <false/>
                        <key>Key</key>
                        <string>model</string>
                        <key>Value</key>
                        <string>Broadcom 94360CS2 WiFi / BT</string>
                    </dict>
                    <dict>
                        <key>Disabled</key>
                        <false/>
                        <key>Key</key>
                        <string>device_type</string>
                        <key>Value</key>
                        <string>Wireless Network Adapter</string>
                    </dict>
                </array>
                <key>PciAddr</key>
                <string>05:00.0</string>
            </dict>
</array>Specifying CPU Name in 'About this Mac'
NOTE: This procedure does not apply to macOS 10.14.4 and newer because those operating systems provide native support for 9th Gen Intel CPUs.
Because Intel's 9th generation Coffee Lake processors are not part of any currently shipping Macs, their CPU names are not shown properly in 'About this Mac'. For the i7-9700K we will see this instead: Processor 3.6 Ghz Unknown. Changing this is quite straightforward, as described in the spoiler below.
- If your "About this Mac" dialog box is open, close it.
- Finder --> open the Mojave /System/Library folder.
- Then open the PrivateFrameworks sub-folder.
- Then open the AppleSystemInfo.framework sub-folder.
- Then open the Versions/A/Resources sub-folder.
- You will see a lot of different language/region files here (localization files). If your system language is English, open the English.lproj sub-folder.
- You will find a single file here called AppleSystemInfo.strings
- Make a backup of that file (perhaps to your Documents or Downloads folder).
- Now copy that file to Desktop -- do not edit the original file in its original location.
- Edit the copy that is on the Desktop. Use Xcode or BBEdit or TextEdit to open the file. (If using TextEdit, make sure to select "Make Plain Text" from the Format menu.)
- Look for "UnknownCPUKind" and right under that will be "<string>Unknown</string>".
- Change that to something suitable. In my case I changed it to "<string>Intel i7-9700K</string>". Do NOT enter a processor speed. MacOS will do that automatically.
- Save the file -- your editor might complain that the file is not writable, but it should allow you to make it writable. I used BBEdit, which is an amazing editor.
- Now drag-and-drop the edited file to the folder in Step 5. You'll need to enter your password when prompted.
- That's it. Open "About this Mac" and the change should be reflected immediately.

Credit for procedure goes to: https://www.idownloadblog.com/2017/01/13/how-to-modify-about-this-mac-hackintosh/
Fixing Sleep and Wake Issues
If you've followed the Guide properly, sleep and wake should work. But when certain modifications are made to the system -- such as setting Initial Display Output to IGFX or back to a PCIe Slot in BIOS or changing SMBIOS, to name a few -- then it's possible that auto-sleep may no longer function. To fix this problem, follow the steps in the spoiler below.
Open Terminal from the Utilities folder and type the following:
You will something like this:
Now delete all of them by typing the command below, and reboot -- MacOS will rebuild the files automatically:
Be very careful -- don't make any mistakes!
When the system wakes from sleep, it is possible that WiFi speed will be adversely impacted (i.e. WiFi will be very slow). To avoid this, disable Wake for Network Access from System Preferences --> Energy Saver.
Code:
cd /Library/Preferences
ls -l com.apple.PowerManagement.*
Code:
-rw-r--r--  1 root  wheel  1349 Jan 28 04:17 com.apple.PowerManagement.61C48C50-8216-5692-8A44-0EE34A6E1959.plist
-rw-r--r--  1 root  wheel   749 Jan 28 04:17 com.apple.PowerManagement.plist
Code:
sudo rm com.apple.PowerManagement.*When the system wakes from sleep, it is possible that WiFi speed will be adversely impacted (i.e. WiFi will be very slow). To avoid this, disable Wake for Network Access from System Preferences --> Energy Saver.
Disabling a GPU in PCIe Slot 2
If you have both macOS and Windows installed on this system, and are using an Nvidia graphics card in Slot 2 (the middle long x16 PCIe slot) that works only under Windows, then it is possible to make that card invisible to macOS. This will prevent any issues in macOS related to the unsupported Nvidia card; even the default VESA graphics driver will not load.
To render the Slot 2 GPU invisible:
- Download the attached SSDT-Designare-Z390-Disable-Slot-2-GPU.aml.
- Mount the EFI partition of your Mojave SSD.
- Copy the file to the CLOVER/ACPI/patched folder in the EFI partition.
- Reboot.
Although the Designare Z390 motherboard has 6 onboard SATA ports, some of them become unusable when a SATA or PCIe M.2 SSD is installed in the top M2M or bottom M2P slots. The restrictions are shown on Page 29 of the user manual, from which the image below was taken.
- If you install a PCIe or SATA M.2 SSD into the top M.2 slot (M2M) you will lose the last 2 SATA ports (SATA4 and SATA5).
- If you install a PCIe M.2 SSD into the bottom M.2 slot (M2P) you will lose the first SATA port (SATA0).
- If you install a SATA M.2 SSD into the bottom M.2 slot (M2P) you will lose the second SATA port (SATA1).
- SATA2 and SATA3 are never impacted and therefore always available.
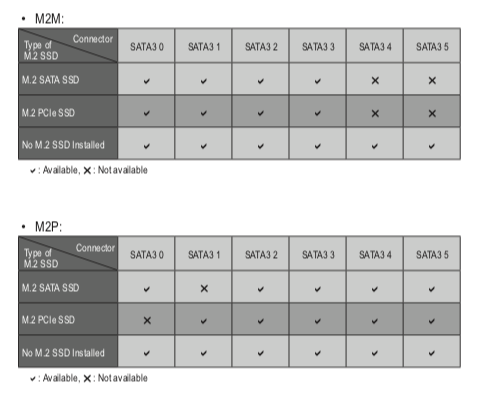
To overcome these restrictions, we can buy a PCIe x1 card that provides 4 internal SATA ports. The following cards should work:
- https://www.amazon.com/gp/product/B00AZ9T3OU/?tag=tonymacx86com-20 (Works in Catalina; credit @mephitismephitis)
- https://www.newegg.com/Product/Product.aspx?Item=N82E16815124159
- https://www.amazon.com/dp/B07NZSBQ5S/?tag=tonymacx86com-20
- https://www.amazon.com/dp/B07KNXZFRH/?tag=tonymacx86com-20
- https://www.amazon.com/gp/product/B07S8CB398/?tag=tonymacx86com-20 (May not work in Catalina and Big Sur)
This is a very advanced topic that only applies to very rare circumstances. If the device driver for a peripheral is unable to install because of the locked MSR 0xE2 register, it is possible to unlock the register by following a mini guide provided here.
A simpler "micro guide" may also be followed by clicking here.
Enabling Native NVRAM
To enable native NVRAM without relying on workarounds such as EmuVariableUefi, please refer to the mini-guide by clicking here.
Upgrading from Clover 4xxx to Clover 5xxx
After Mojave has been fully installed, boot from the internal Mojave SSD. At the Clover Boot Menu check the version of Clover, which is usually displayed at the bottom of the screen or by pressing "A" for About. If Clover 4xxx is running, it may be upgraded to Clover 5xxx by following the mini-guide linked here.
Is this Guide Applicable to Other Configurations?
Although the Guide has been tested only with the configuration stated in the Components section, it should be applicable to the following other configurations:
- Any 9th Gen Intel Core CPU with On-Board UHD 630 iGPU (Coffee Lake refresh).
- Any 8th Gen Intel Core CPU with On-Board UHD 630 iGPU (Coffee Lake).
- Any natively supported PCIe graphics card. This applies to graphics cards whose drivers are entirely built into MacOS Mojave and supported by Apple. This includes, but is not limited to, the following: AMD RX 560, RX 570, RX 580, Vega 56, Vega 64, nVidia GTX 780, nVidia GTX 680, nVidia 8800 GT, nVidia GT 120, nVidia Quadro K5000.
- Gigabyte AORUS Xtreme owners must install the WiFi/BT card in one of the long slots. If it's installed in a short x1 slot, macOS installation will fail.
Firewire Cards
For Firewire support, the following cards have been tested by users of this system:
- SYBA Low Profile PCI-Express 1394B/A Firewire Card Model SD-PEX30009
- Startech Firewire
- Vantec 2+1 FireWire PCIe card - Works only in the PCIEX8 slot
- It is also possible to use an Apple Firewire-to-TB2 adapter connected to an Apple TB2-to-TB3 adapter and plug it into one of the two Thunderbolt ports on the rear panel. This avoids having to plug any cards in the PCIe slots. More details here:
Summary
As far as I've been able to test, everything works except Thunderbolt 1 devices. Some applications such as Final Cut Pro and iMovie require either a headless configuration or setting BIOS --> Initial Display Output to IGFX.
14 Feb 2019: The on-board Intel i211 Ethernet port using the SmallTreeIntel driver does not participate in 802.3ad LACP link aggregation.
08 Jan 2019: Final Cut Pro X users please see the section Contributed Files and Tips for important information.
What Works
- Thunderbolt 3 with hot plug capability. Some devices may exhibit issues due to drivers or other factors.
- Sleep, Wake, Reboot, Shutdown. Wake from sleep now requires a single keypress. Thanks to @e-troc for the suggestion to use darkwake=0.
- WiFi and Bluetooth using the BCM94360CS2 card with a PCIe x1 adapter.
- Handoff, Continuity, AirDrop, Continuity Camera, Unlock with Apple Watch.
- Quick Look, Preview, HEVC, H.264.
- iMessage, FaceTime, App Store, iTunes Store.
- Both of the onboard gigabit Ethernet ports.
- Fully accelerated video from the RX 580, which is natively supported.
- Intel UHD 630 for both compute tasks and driving HDMI and two DP monitors.
- On-board audio based on the Realtek ALC 1220-VB.
- TRIM is enabled on NVMe without any patches. TRIM is enabled on SATA SSD with the TRIM Enabler patch (config.plist).
- Geekbench 4 CPU Score: Single-Core 6495
- Geekbench 4 CPU Score: Multi-Core 33398
- Geekbench 4 Compute Score (UHD630): 25159 OpenCL
- Geekbench 4 Compute Score (RX580): 136532 OpenCL
- GeekBench 5 CPU Score: Single-Core 1207
- GeekBench 5 CPU Score: Multi-Core 7835
- GeekBench 5 Compute Score (RX580): 40145 OpenCL
- GeekBench 5 Compute Score (RX 5700 XT): 49809 OpenCL
- GeekBench 5 Compute Score (RX 5700 XT): 36220 Metal

- Disk Speed Benchmarks for:
- ADATA SX8200 240GB NVMe PCIe x4 (~3000 MB/sec)!
- Sunbow 1TB SATA SSD (~500 MB/sec)
- Samsung Bar Plus 32GB USB 3.1 Flash Disk (~200 MB/sec)

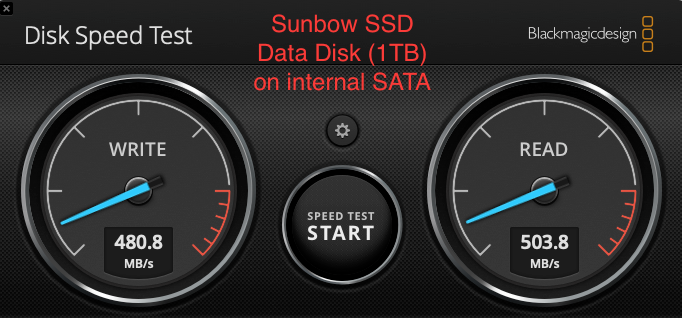
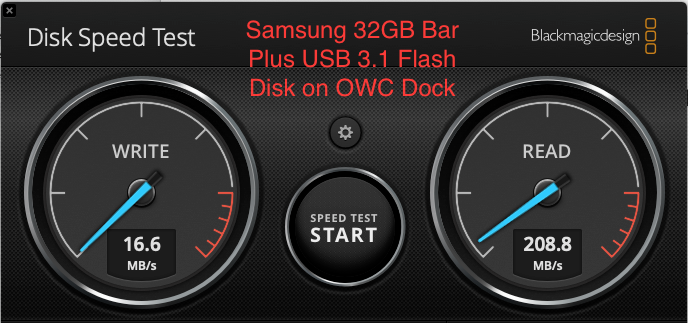
Edits/Updates
- 17 Dec 2018: Added Post-Installation Method with detailed illustrated guide using MultiBeast 11.0.1.
- 18 Dec 2018: Replaced screenshots for Clover Configurator (ACPI and DEVICES) in Post-Installation METHOD 2. The new settings enable auto-sleep, inject layout ID 7 for audio, etc. Also added section Different FakeSMC for more advanced users wishing to try out a different set of FakeSMC kexts.
- 19 Dec 2018: Disk Speed benchmarks added.
- 20 Dec 2018: Added To TRIM or Not to TRIM.
- 21 Dec 2018: Modified screenshots related to USB port limit patches for
10.14 and10.14.1+. - 23 Dec 2018: Added Thunderbolt 3 Experiences.
- 25 Dec 2018: Added Installation Overview and Thermals.
- 28 Dec 2018: Added installation notes for discrete graphics card in Slot 2. Thanks to @ripe_md for the SSDT.
- 01 Jan 2019: Happy New Year! The build guide has been substantially revamped based on lots of user feedback.
- 02 Jan 2019: Added Contributed Files and Tips.
- 06 Jan 2019: Added Using the UHD 630 to Drive HDMI and DP Monitors.
- 07 Jan 2019: Added Is this Guide Applicable to Other Configurations?
- 08 Jan 2019: Added a solution for Final Cut Pro X and iMovie users experiencing a crash at startup. See details in Contributed Files and Tips.
- 19 Jan 2019: Added custom USB and Thunderbolt 3 SSDTs for Gigabyte Z390 AORUS Extreme. See details in Contributed Files and Tips.
- 21 Jan 2019: Added Injecting Audio and Enabling On-Board HDMI.
- 27 Jan 2019: Added Specifying CPU Name in 'About this Mac'.
- 28 Jan 2019: Added Fixing Sleep and Wake Issues.
- 09 Feb 2019: Modified the spoiler Final Steps in Post-Installation. All third-party kernel extensions (kexts) are to be installed in /Library/Extensions.
- 10 Feb 2019: Added Specifying Device Names and Types.
- 14 Feb 2019: Added Monitor and Control NZXT Kraken All-in-One Coolers. See details in Contributed Files and Tips.
- 04 Mar 2019: Added Headkaze's MountEFI Menu Bar Tool. See details in Contributed Files and Tips.
- 04 Mar 2019: Added Sapphire PULSE Radeon RX Vega56 Fan Control. See details in Contributed Files and Tips.
- 06 Mar 2019: Added Disabling a GPU in PCIe Slot 2.
- 14 Mar 2019: Added USB SSDT for Gigabyte AORUS Extreme with BeQuiet Dark Base Pro 900 Rev 2. See details in Contributed Files and Tips.
- 27 Mar 2019: Modified Final Steps in Post-Installation spoiler and updated the Post-Install Files.zip attachment to include the new SSDT-DESIGNARE-Z390-NO-CNVW.aml. This SSDT disables the unusable Intel CNVi WiFi/BT card and thereby allows PCIe x1 cards to function properly in PCIe x1 slots. This is recommended for all users.
- 01 Apr 2019: Added Solving shutdown problem with Firewire card installed, Asus ROG Strix Vega 64 Fan and Power, and Additional tip for users of Pro video/audio apps. See details in Contributed Files and Tips
- 06 Apr 2019: Updated the build guide for macOS 10.14.4 using UniBeast 9.1.0 and MultiBeast 11.1.0.
- 12 Apr 2019: MultiBeast 11.1.0 --> MultiBeast 11.2.0.
- 17 Apr 2019: Added Alternative USB Port Enumeration for Designare Z390 and SATA Port Limitations. See details in Contributed Files and Tips.
- 28 Apr 2019: Updated USB high speed (HSxx) and super speed (SSxx) diagrams. New version of Designare-Z390-IO-Layout.pdf uploaded.
- 12 May 2019: Added Installing Linux - Dual/Multi Boot. See details in Contributed Files and Tips.
- 18 May 2019: Updated for macOS 10.14.5.
- 19 May 2019: Added Modifying CFG Lock Parameter to Unlock 0xE2 MSR Register.
- 27 May 2019: Added Tips for Installing Windows 10 and Fixing HEVC and H.264 Functionality with RX 580. See details in Contributed Files and Tips.
- 27 May 2019: Updated Different FakeSMC section to refer to preliminary mini-guide for using VirtualSMC to monitor CPU voltage and fan RPM.
- 01 Jun 2019: USB SSDTs updated to inject power properties necessary for charging high current devices such as iPads. Please see Final Steps in Post-Installation. For owners of Fractal Design Define R6, BeQuiet Dark Base Pro 900 Rev 2, and Gigabyte AORUS Extreme please refer to appropriate sections under Contributed Files and Tips.
- 02 Jun 2019: Added Easy Bootable Backup.
- 17 Jun 2019: Added Enabling SATA Hot Plug. See details in Contributed Files and Tips.
- 29 Jun 2019: Added Bluetooth Signal Loss or Flaky Connection. See details in Contributed Files and Tips.
- 18 Jul 2019: Added Firewire Cards.
- 19 Jul 2019: Updated Different FakeSMC section with new information about VirtualSMC.
- 25 Jul 2019: Added SSDT for TP-Link Archer T9E AC1900 PCIe WiFi card. See details in Contributed Files and Tips.
- 04 Aug 2019: Updated for macOS 10.14.6.
- 20 Sep 2019: Simplified the liquidctl install instructions for NZXT liquid coolers. See details in Contributed Files and Tips.
- 22 Sep 2019: Revised the setting of BIOS --> CSM Support to either Disabled or Enabled.
- 16 Oct 2019: Updated the Easy Bootable Backup section for Catalina.
- 15 Dec 2019: Added Replacing OsxAptioFix2Drv-free2000 with FwRuntimeServices.
- 20 Dec 2019: Added a comment about resolving boot-to-black-screen with LG UltraFine 5K in Catalina. See Thunderbolt 3 Experiences.
- 15 Jan 2020: Updated the Easy Bootable Backup section to alert users to update EFIClone script to the latest V4 (EFIClone-v4.sh).
- 20 Jan 2020: Added NOTE 8 to the top of this guide.
- 26 Jan 2020: Added spoiler Thunderbolt Local Node and Thunderbolt Bus Investigation near the top of the guide.
- 27 Jan 2020: Added section Enabling Native NVRAM.
- 04 Feb 2020: Added section Overclocking and Other Information. See details in Contributed Files and Tips.
- 26 Feb 2020: Added section If USB Ports Cannot Charge High Current Devices. See details in Contributed Files and Tips.
- 26 Mar 2020: Added section Tips for Universal Audio Devices UAD Apollo Thunderbolt Connection. See details in Contributed Files and Tips.
- 27 Mar 2020: Added section Upgrading from Clover 4xxx to Clover 5xxx.
- 16 Apr 2020: Added section Apple Thunderbolt Display. Yes it works! See details in Contributed Files and Tips.
- 17 Apr 2020: Added section Development of Native Driver for Intel WiFi and Bluetooth. See details in Contributed Files and Tips.
- 18 Apr 2020: Added section Sidecar Patch for Unsupported Macs. See details in Contributed Files and Tips.
- 24 Apr 2020: Added section Significantly Boosting AMD Radeon GPU Performance. See details in Contributed Files and Tips.
- 06 May 2020: Added section Disable Wake from USB (Wake only with Power Button). See details in Contributed Files and Tips.
- 29 Jul 2020: Added section Speed Up Wake from Sleep, esp. with Bluetooth Keyboard/Mouse. See details in Contributed Files and Tips.
Attachments
-
KGP-X99-FakeSMC.zip158.8 KB · Views: 3,349
-
OsxAptioFix2Drv-free2000.efi17.8 KB · Views: 6,063
-
SSDT-Z390-DESIGNARE-RX580-SLOT2-V2.aml1.2 KB · Views: 4,584
-
SSDT-Z390-VEGA64.aml2.1 KB · Views: 3,333
-
SSDT-UIAC-DESIGNARE-Z390-V5.aml695 bytes · Views: 3,618
-
gfxutil-1.76b.zip97.2 KB · Views: 2,571
-
VGTab_en.zip437.8 KB · Views: 2,334
-
USB kext and SSDT.zip8.4 KB · Views: 4,647
-
Designare-Z390-IO-Layout.pdf1.5 MB · Views: 3,503
-
dummy141.kext.zip2.2 KB · Views: 2,227
-
Post-Install Files.zip1.3 MB · Views: 9,230
-
SSDT-UIAC-AORUS-EXTREME-DARKBASE-PRO-900-Z390-V3.aml848 bytes · Views: 2,008
-
SSDT-Z390-ARPT.aml368 bytes · Views: 2,144
-
Fractal Design Define R6.zip486.4 KB · Views: 1,923
-
Z390-AORUS-EXTREME-SSDTS.zip2.7 MB · Views: 2,020
-
SSDT-Designare-Z390-Disable-Slot-1-GPU.aml210 bytes · Views: 628
-
SSDT-Designare-Z390-Disable-Slot-2-GPU.aml210 bytes · Views: 717
Last edited: