Contribute
Register

[SUCCESS] Gigabyte Designare Z390 (Thunderbolt 3) + i7-9700K + AMD RX 580

Hello @CaseySJ

I used the CMD-Shift-. and it revealed many folders that were faded, not as bright as the others. Also I had some of those faded folders with the red minus sign attached. I do not know why. Anyways, I decided to go with the terminal command you suggested. It added the needed folders to the Home Volume, but when comparing those folders to those in Volumes/Mojave/Users/username(me), they did not contain everything the same. Just an FYI, Volumes/Mojave/Users/username/Library contains 55 items, Volumes/Home/Library contains 36 items. When I tried to copy over the Library folder so they would be the same I just got a pop window saying "Library" can't be modified or deleted because it's required by mac OS.

I thank you for your help, but I will probably start again tomorrow with a CCC restore and try it again. Kinda makes me sad, I had a sweet system going. Oh well, that is all part of the fun of hacking.
Yes, always have a full backup before embarking on adventures of this sort!

It's been a long time since I did this, but you may want to follow this sequence:
  1. Format the new disk as APFS and give it a suitable name. Mine is labeled Data.
  2. Before changing your home folder location from System Preferences, copy everything from the old home folder to the new home folder/disk.
  3. This time use sudo rsync -av /Volumes/Mojave/Users/<username>/* /<destination>. Use of sudo may solve the problem where only 36 of 55 items were transferred.
  4. Compare the destination to the source and if you're satisfied that all files have been copied, then go to System Preferences and change the home folder.
Again, it's been a while since I did this so some experimentation may be necessary.
 
Well. That's what I do with my Hack. Pro audio work. I've an UAD card, several pro audio interfaces, and tons of plug ins.

I used migration to copy from old machine to new machine and all my plugins for ProTools were copied over. I didn't check the others, but moving VST and AU folders isn't difficult. I suspect Apple knows enough to move these folders.
 
You know, of course, that there’s a healthy market for used Nvidia GTX 1080s, especially the Ti models! And you know that not only are you missing out on Mojave, but soon you’ll be missing out on Catalina as well. And all for what? A little GPU that can not only be sold, but repurposed for a wonderfully powerful gaming PC.

This will sound harsh, but it’s not directed at you. It’s directed at everyone who’s spending hundreds or thousands on new 9th-Gen CPUs, motherboards, memory sticks, coolers, etc., but choosing to keep their system anchored in the ever distant past of High Sierra. What’s the point if your hardware makes your overall system obsolete from an operating system point of view?

AMD GPUs including the Vegas are so inexpensive now and so well supported in 10.14.5 that it’s just pure sadism to toil night and day over such an avoidable problem!

Deep breath taken. Feel much better now.

Regarding the black screen problem:
  • Try disabling the Nvidia Web Driver (nv_disable=1 in Boot Arguments) to see if the default VESA driver initializes the 1080Ti (without acceleration, but without black screen either).
  • Attempt a hot connect. When the screen goes black, unplug the video cable and re-plug. Does the monitor light up?
  • Try using a different connector type. For example, if you’re using DP, switch to HDMI, and vice-versa.
Thanks for replying!

Totally understandable. I guess it might help if I explain that I do video editing work in Premiere on both my desktop and laptop (15in Retina, Mid 2014 with a...GT 750m), so by nature I'm stuck in High Sierra until (fingers crossed) Apple and Nvidia play nice again. I've been considering picking up an AMD for the desktop, but mah CUDA cores!

In terms of the black screen problem, yes nv_disable=1 gives me the expected glitchy, yet usable image to work with. Card reads as "Display 25 MB".

Nothing happens when I re-plug. Same cold blackness.

I have tried both Display Ports, HDMI, and DVI, same result (for reference I have (2) 30" Apple Cinema Displays, and (1) Wacom Cintiq 21UX LCD tablet for my usual set-up).

However, last night after another clean install (with the card removed and utilizing the iGPU), the card was recognized and worked (drove 3 displays, Premiere GPU acceleration). Then this morning, black screen again. Rebooted with a display in the HDMI and suddenly everything was working again: plugged in all 3 of the aforementioned displays and all worked. Then I went to have breakfast and came back to black screen. Restart (again with the single display connected via HDMI) and back in. So, it seems I have some, albeit finicky, functionality.

All that being said, I am considering grabbing an AMD GPU to have on stand by since I have a few projects with strict deadlines so won't be able to do too much tweaking until this weekend.
 
@mikeymumbles,

Some comments and suggestions:
  • At this time if you boot up with 1 monitor connected via HDMI and then plug all remaining monitors, things work.
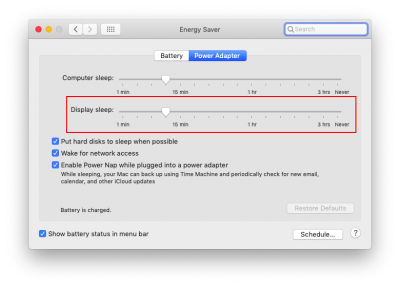
  • But when you return after a short break, you find black screens again. This might be due to Energy Saver settings that turn off the display after 15 minutes by default.
  • Let's try this experiment:
    • Boot with only 1 monitor connected via HDMI.
    • Reduce the Display Sleep parameter to 1 or 2 minutes and wait for monitor to go black.
    • Wait 15 seconds.
    • Press 1 or 2 keys to wake monitor.
    • Does it wake up (again, only 1 monitor and it should be connected via HDMI)?
  • The screenshot below is from my MacBook Air.
    Screen Shot 2019-06-10 at 1.32.06 PM.png
    • With all monitors connected, try setting this parameter to Never just for a day or two.
    • If there's no problem, then it just means that the monitors do not wake from sleep.
    • Have you tried pressing 2 keys on the keyboard?
For now we can say there are 2 problems:
  • Black screen when booting with all monitors connected.
  • Black screen when waking from sleep with all monitors connected.
And we can say that the following work (or need to be tested):
  • No black screen when booting with 1 monitor over HDMI.
  • No black screen when waking from sleep with 1 monitor over HDMI (to be tested).
Do you have the latest version of Clover on your EFI partition? (Please make backup of EFI partition before attempting to update Clover.) Have a USB flash disk ready with EFI copied from your main High Sierra disk so that USB disk can be used for emergency boot/recovery.
 
I used migration to copy from old machine to new machine and all my plugins for ProTools were copied over. I didn't check the others, but moving VST and AU folders isn't difficult. I suspect Apple knows enough to move these folders.

Moving the folders is easy, it's some forms of copy protection that make this difficult. Were there no copy protection based on certain key components of my hack(or Mac), I could just replace my EFI folder and transplant my current NVME SSD into a new machine for my planned upgrade.
I don't like dongle bases protection(iLok, e-licenser) much, but changing computers is dead easy with these.
 
Followed everything for preinstall.
I managed to create the secondary boot from the ssd. Then when I try booting from it, the ssd I get a panic attached.
Any ideas?
410662
 

Attachments

  • config.plist
    8.1 KB · Views: 143
Followed everything for preinstall.
I managed to create the secondary boot from the ssd. Then when I try booting from it, the ssd I get a panic attached.
Any ideas?
View attachment 410662
Please boot from your USB install disk and select “Boot macOS from Mojave” at the Clover Boot Menu.

Then mount EFI partition of Mojave SSD and compress/upload the CLOVER folder.

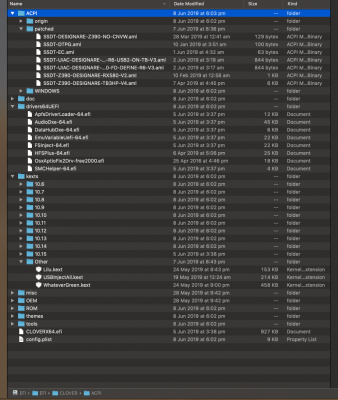
Also upload a screenshot of your /Library/Extensions folder.
 
Yes, always have a full backup before embarking on adventures of this sort!

It's been a long time since I did this, but you may want to follow this sequence:
  1. Format the new disk as APFS and give it a suitable name. Mine is labeled Data.
  2. Before changing your home folder location from System Preferences, copy everything from the old home folder to the new home folder/disk.
  3. This time use sudo rsync -av /Volumes/Mojave/Users/<username>/* /<destination>. Use of sudo may solve the problem where only 36 of 55 items were transferred.
  4. Compare the destination to the source and if you're satisfied that all files have been copied, then go to System Preferences and change the home folder.
Again, it's been a while since I did this so some experimentation may be necessary.
Hello @CaseySJ

Thanks for your reply, I didn't see it until I finished though. I guess I was a bit excited this morning to solve this with an idea I had. Anyways, just to follow-up, I did get everything working just fine.

After a late night of continued research and then a good nights sleep I realized in fact that I did not ruin anything on my computer nor did I need to use CCC to reinstall my back-up. All I needed to do was point my computer to look in the correct area to see the Home Folder back in its original location and then start over.

If you are interested, this is what I did to move my Home Folder.

1.) Install SSD and format APFS/Guide Partition, this is the destination drive.
2.) Follow path to find Home Folder (the folder with a house icon), Volumes/Mojave/Users/<username>.
3.) Copy the Home Folder, make sure it is the folder that has the house icon, that is the only folder the computer will recognize as the Home Folder.
4.) On the destination drive create a folder, let's call it "Moved Home Folder".
5.) Paste the Home Folder into the new "Moved Home Folder" on destination drive.

Note: Creating a folder on the destination drive and placing the Home folder inside that folder should allow you to store other items on the SSD without any possibility of interfering with the Home Folder.

6.) Once it has finished copying, check to make sure both home folders have the same folders inside. If you check the original and the new Home Folders for size after it has copied, they should be very close, but probably not the exact same size.

Note: When I did this, both folders where the same except the new Home Folder did not have a Trash folder. But all is working fine with the trash.

7.) Now the Home Folder is moved, but we need to tell the computer where to look for it.
8.) Launch System Preferences, then Users & Groups and unlock the padlock at the bottom left corner with your password.
9.) Select your user name, right click, advanced options.
10.) In the new window that opened, hit the "Choose" button to the right of the Home directory box.
11.) In the Finder window that just opened, follow the path to your new Home Folder on your destination drive.
12.) Hit Open at the bottom right corner, then Ok, and follow the pop-up window to restart.
13.) Once the computer has restarted, check to make sure the new Home Folder is working by looking on the destination drive where the new Home Folder is and it should now have the House icon.
14.) Can also check by opening a new Pages or Numbers document and saving a blank document to the desktop or documents folder then make sure that is in the new Home Folder.
15.) Once this is done, you can go to the old Home Folder on the original drive, it will still be there but no longer has the House icon. At this point it is just taking up space and you may delete it if you want.

Thanks for all your help
 
@CaseySJ
What is the reason for not using USBInjectAll.kext and XHCI-unsupported in your USB installer EFI?
I actually cannot get my install to start without them. I got this shortly after selecting the USB drive in clover for the first round (see attached).
So I put them back in the kext folder and get the install to work again. Is there anything I now have to do differently in the remainder of the post install because I have used these kexts?
 

Attachments

  • 0EDDDAA3-301A-463E-BD5A-97C40444F4B0.jpeg
    0EDDDAA3-301A-463E-BD5A-97C40444F4B0.jpeg
    3.8 MB · Views: 178
Yes, for iMac18,3 you should enable IGFX in BIOS. But note that Platform ID has been entered incorrectly in your screenshot. We have to enter values in reverse byte order so:
  • Devices --> Properties --> AAPL,ig-platform-id must be 0300923E or 0300983E for headless mode in 10.14.4
  • Devices --> Properties --> device-id should be deleted because 10.14.4 recognizes the Coffee Lake iGPU

Changing system definition (e.g. iMac18,3 to iMac19,1) is like switching to a new computer. Your software will have to be licensed again. And a new computer will appear in your iCloud account.

So I would recommend:
  • Backup the system first.
  • Update to 10.14.5 without changing system definition.
  • After making sure everything is okay (wait 3-5 days), back up the system again.
  • Then try to switch system definition only if necessary as follows:
    • Logout of iCloud.
    • Deregister any application that has a deregister or deauthorize function. Just launch each application one by one and check for such a function.
    • Change system definition to iMac19,1 and reboot. This is easy to do from the SMBIOS section of Clover Configurator. Just use the pop-up menu on bottom right to select iMac19,1.
      • Then copy the new Board Serial Number to RtVariables --> MLB.
    • After the reboot, login to iCloud. This should be done first. This will register a new Mac in your iCloud account. You can log into the iCloud account (with Safari) and eventually delete the old computer (don't delete it right now).
    • Then login to Messages and FaceTime if you use them.
    • Now launch your applications one by one and re-register them.
Hi, Thanks again. I have followed your instructions and I'm running 10.14.5 ok. I did get freeze panics at startup when I had my android phone plugged into the top USB port on the R6. Also when I have power on when AC Back is enabled in the bios.
I changed the devices properties in configurator. Can you please check my clover set up in case I've made any other mistakes
 

Attachments

  • Screenshot 2019-06-11 at 11.06.16 am.png
    Screenshot 2019-06-11 at 11.06.16 am.png
    296.6 KB · Views: 219
  • config.plist
    9.2 KB · Views: 242
Last edited:
Back
Top