Contribute
Register

[SUCCESS] Gigabyte Designare Z390 (Thunderbolt 3) + i7-9700K + AMD RX 580

so I tried just booting it with the usb drive and it restarts automatically after the clover screen . I mounted the EFI usb partition on my real Mac and took a screenshot of the drivers64UEFI folder if that is the correct one to modify , the OsxAptioFix2Drv-free2000. is inside

Every time I try to boot from the USB with F12, when I get to the Clover screen and select Boot macOS from Mojave, the system restarts.
 
I don't know what to do. I tried flipping the PSU switch a number of times with every time the same result. Should I do a reinstall of macOS? Or can this be fixed? I still don't get why this happened. Everything was working fine. I just put the card in the first time in the PCIe x8 by mistake, but the system booted normally after that. When I realized I put the card in the wrong slot, I switch it to the the correct PCIe x4 slot. When powered and turned it back on, it wouldn't boot in to macOS.

Have you pulled the card out while powered off and unplugged it, waited 2 minutes and then tried to turn the system on without the card to allow it to do a check of installed hardware?
 
@CaseySJ Question based on what you mentioned to me earlier, with setting up the "headless" setup I am going to use the mini guide and replace e the SSDT my questions, should I switch down to 19,1 iMac or can I leave myself on iMac Pro 1,1 when I make these changes to enable headless?
 
ok
That is configured correctly. At the Clover Boot Menu, which boot option are you selecting?

If these problems started after installing the Thunderbolt card, have you tried removing the Thunderbolt card?

If the system continues to give problems, please install Mojave using the build guide from Post #1. Do not use the Catalina Mini-Guide because it’s a black box procedure that doesn’t really have any instructional or educational value.

I will delete the Catalina Mini-Guide soon.

The primary build guide (Post #1) should allow you to become your own “first responder”. As you know, Hackintosh comes with no support or warranty. Each of us has to become our own first responder. That requires knowing what each step does and how those same steps can be performed in alternative ways to solve or troubleshoot the specific problems we’re facing.

I am 2,500 miles away from home on vacation. So you see, Hackintosh comes with no guarantees of any kind! We must become more self sufficient.


OK. I took out the card again. Same problem. I tried to run the install to reinstall Mojave as you suggested, and I get the same thing; see attachment. I'm going a bit crazy. Hahaha. I'm sure it can be fixed. Thanks for all the help. I don't want to bother you mush longer. It's just that I was so close everything was working and then nothing.
 

Attachments

  • IMG_4076.jpg
    IMG_4076.jpg
    2.2 MB · Views: 68
@CaseySJ I have read your guide keenly and its so well detailed that I could not resist asking for your help we have similar builds except for my motherboard.Could you please take a look at my p.list and IOREG and point where I should adjust it to improve the performance of my hack.I strongly think my p.list is my downfall here.Your help is highly regarded.
 

Attachments

  • Amyre’s iMac.ioreg
    17 MB · Views: 68
  • config.plist
    27.1 KB · Views: 98
Last edited:
@CaseySJ Just set up the headless and the SSDT based on the tags in the guide you linked how will I know if it was successful? lol sorry I'm sure that's a dumb question

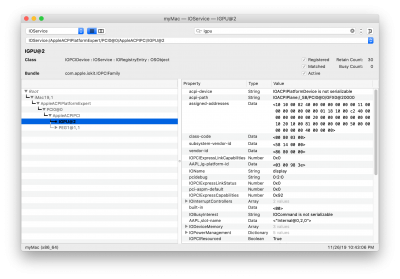
There are a few places you can check. IORegistryExplorer (search for igpu) & 
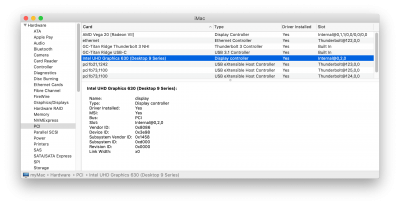
System Information -> PCI for example. But if you want to see when/how much it's being used, then you'll want to install the 
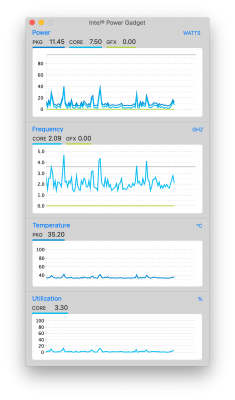
Intel Power Gadget. This is how you can see when and how much the integrated graphics is being used.

In the included image it's the green line (GFX) which indicates iGPU usage. For example, if you're running Final Cut Pro and it's opting to use the iGPU, then you'll see the green line spike up.

Also, if the iGPU is not listed in the System Info -> PCI then that doesn't mean it's not installed. I think it only shows there if everything is as expected in your clover config.plist which is in Clover Configurator -> Devices -> Properties.

If it shows within the Intel Power Gadget then it is, for sure, enabled. Otherwise it won't show the GFX values.

Also, note that depending on your SMBIOS the iGPU may not be used. For example iMacPro1,1 doesn't have an iGPU, but I've read on this forum that it can still be enabled using that SMBIOS. iMac19,1 does have an iGPU and is used for encoding/decoding.

In my case, I use iMac19,1 (which allows for Sidecar use within Catalina) but I use shiki values which cause the iGPU to not be used by applications such as FinalCut Pro. There will be some apps which can still take advantage of the iGPU being enabled. VideoProc, for example, will still be able to use the iGPU for HEVC encoding.
 

Attachments

  • IORegistry iGPU.png
    IORegistry iGPU.png
    664.6 KB · Views: 59
  • System Information.png
    System Information.png
    532.7 KB · Views: 54
  • Intel Power Gadget.png
    Intel Power Gadget.png
    516.7 KB · Views: 57
Last edited:
Hello @WhosMac

Because you're planning to do a fresh install of Catalina 10.15.1 with a Radeon RX 5700 XT, you could be our test subject for an updated installation procedure. Certain steps will be replaced with new versions of UniBeast and MultiBeast in the future.

If you're willing to be a test subject, please try the mini guide below that streamlines most of the work. By the way:
  • What is the make/model of your NVMe SSD?
  • Are you using a WiFi/BT card such as Fenvi FV-T919? If so, which slot is it in?

** Experimental Mini-Guide for Direct Installation of Catalina 10.15.1 **
WARNING: This guide may fail with AMD RX 5700 and 5700 XT GPUs. Click here for details.

This Guide...
  • Uses OcQuirks-4 and FwRuntimeServices instead of OsxAptioFix2Drv-free2000.
  • Uses VirtualSMC from the beginning.
  • Applies all custom SSDTs from the beginning. No USB Port Limit patches are needed.
    • Hides Intel CNVi WiFi/BT card from macOS.
    • Enables Thunderbolt hot plug.
    • Configures USB ports and enables high-current delivery.
  • Sets iGPU to headless platform ID 0x3E980003. Use of a discrete AMD GPU is required.
  • Sets shikigva and shiki-id to allow DRM content playback in TV, Music, and Podcast apps.
  • Uses Clover 5xxx (v5098 or newer).
  • Uses the modified SmallTreeIntel82576 kext that directly supports Intel i211 Ethernet. No need for FakePCIIID.kext and FakePCIID_Intel_GbX.kext.
  • Sets boot parameter agdpmod=pikera to prevent black screen problem with some RX 5700 series GPUs.
  • Assumes there's a Broadcom 94360-based WiFi/BT card (such as Fenvi FV-T919) in the bottom short PCIe x1 slot. If you don't have such a WiFi/BT card, you should still be able to use this guide.
  • Uses Clover kext injection instead of installing kexts in /Library/Extensions. This is subject to change.
Preparation:
  • Set BIOS parameters according to main guide in Post #1.
    • Set Initial Display Output to PCIe 1 Slot (if RX 5700 XT or other supported AMD GPU is in Slot 1)
  • Connect monitor to RX 5700 XT or other supported AMD GPU.
Step 1: Create USB Install Disk
  • Use a 16 to 32 GB flash drive.
  • Format the USB drive in Disk Utility. Select View --> Show All Devices and click the parent name of your USB drive on left sidebar. Failure to do so will be catastrophic. Then select Erase and enter:
    • Name: Catalina-USB (use exactly this name)
    • Format: MacOS Extended (Journaled) --- do not use APFS here
    • Scheme: GUID Partition Map
  • Download Catalina installer from App Store on a supported Mac. Check that it's in the Applications folder.
    • Also check that the USB disk has been mounted and its name is Catalina-USB
    • Open a Terminal window and type:
      sudo "/Applications/Install macOS Catalina.app/Contents/Resources/createinstallmedia" --volume /Volumes/Catalina-USB
    • Enter your Mac password when requested.
    • This step will cause your USB install disk to be renamed to Install macOS Catalina.
    • If you encounter any errors, stop and report those errors.
  • Download Clover v5098 or newer from GitHub by clicking here and downloading the xxxx.pkg file.
    • Launch the Clover installer and allow the app to run (System Preferences --> Security & Privacy --> General).
    • Click Continue, Continue, Change Install Location... and select the USB flash disk!
    • Then click Customize -- don't overlook this.
    • These 2 buttons are located here:
      View attachment 436339
    • Check that the Customize page looks exactly like this:
      View attachment 436340
    • Notice that Install RC scripts on target volume is unchecked. This is where you become our test subject! We'd like to start the installation without rc scripts and see what happens with shutdown and reboot. If shutdown and reboot don't work, then we can come back and install rc scripts.
    • Click the Install button.
  • Copy Clover Configurator to the standard partition of the USB flash disk (not the EFI partition).
  • The EFI partition of the USB install disk will already be mounted (Clover installer will do this automatically).
    • Open the EFI Folder on the EFI partition of USB disk. You'll see a CLOVER folder, of course.
    • Open the CLOVER folder.
    • Download the attached Catalina Fresh Install.zip into your Downloads folder on the Mac (not on the USB disk).
      • Open the CLOVER/drivers/UEFI folder on the USB disk (EFI partition) and:
        • Delete all files in that folder and empty the trash.
        • Locate the folder Copy-to-drivers-UEFI in the above ZIP file you downloaded.
        • Copy all .efi files from this folder into CLOVER/drivers/UEFI
      • Open the CLOVER/kexts/Other folder on the USB disk (EFI partition) and:
        • Delete all files in that folder and empty the trash.
        • Locate the folder Copy-to-kexts-Other in the above ZIP file you downloaded.
        • Copy all .kext files from this folder into CLOVER/kexts/Other
      • Open the CLOVER/ACPI/patched folder on the USB disk (EFI partition) and:
        • Locate the Copy-to-ACPI-patched folder in the above ZIP file you downloaded.
        • Copy all .aml files from this folder into CLOVER/ACPI/patched
      • Finally, locate config.plist in the same ZIP file you downloaded.
        • Copy the config.plist to the CLOVER folder on the USB install disk, overwriting the one that is there already.
        • Now open the config.plist (from USB install disk) with Clover Configurator 5.7.0.0 or newer.
          • Go to the SMBIOS page.
          • Click the pop-up menu on the lower right and select iMac19,1.
          • Then check-on the Trust checkbox.
            View attachment 436342
          • Everything else is already set in this file. So save it and quit Clover Configurator.
  • Eject the USB flash disk.
Step 2: Install Catalina (note the difference between BIOS Boot Menu and Clover Boot Menu)
  • Insert the USB install disk into the Hackintosh and boot.
  • Press F12 at BIOS Splash screen to bring up the BIOS Boot Menu and select the USB flash disk.
  • When Clover Boot Menu appears, select Boot macOS Install from Install macOS Catalina
  • Follow the onscreen progress and report any issues.
  • When the installer starts, you'll need to run Disk Utility from inside the installer, select your target Catalina NVMe SSD, and format it.
    • Be sure to select View --> Show All Devices and click on the parent name of the Catalina SSD. Failure to do so will be catastrophic.
    • Then select:
      • Name: Catalina (you can change it later)
      • Format: APFS
      • Schema: GUID Partition Map
    • Then begin the macOS installer.
  • NOTE 1:
    • Whenever the macOS installer starts, you'll see a lot of log messages on screen because verbose mode is enabled in config.plist.
    • When the last log message appears on screen there might be a 2-3 minute wait before the screen switches to graphics mode. Just be patient. If the delay is more than 7 minutes, let us know.
  • There might be one or two reboots.
    • Each time the system reboots, press F12 at BIOS splash screen to open the BIOS Boot Menu.
    • Select the USB install disk from the BIOS Boot Menu.
  • Now you'll be back at the Clover Boot Menu:
    • Whenever you see a boot option called Boot macOS Install from Catalina, choose that option.
    • Do not select the USB disk.
  • NOTE 2:
    • MacOS installation will resume and you'll see X Minutes Remaining.
    • It may take up to 10 minutes for the number "X" to begin to count down.
    • So if you see, for example, "28 Minutes Remaining", it may stay like that for 10 minutes before the number 28 counts down.
    • If it takes more than 15-30 minutes to begin the countdown, let us know.
  • If everything goes according to plan, you'll be greeted with the Catalina Welcome screen.
    • Follow the onscreen guide.
    • You may also sign in to iCloud when asked.
  • If you encounter any problems, stop and let us know.
Step 3: Post Installation
  • We'll make this really simple for now.
  • Run Clover Configurator which was copied to the USB flash disk in Step 1.
    • Click Mount EFI on left sidebar of Clover Configurator
    • Mount EFI partitions of (a) USB flash disk and (b) Catalina SSD.
    • Copy the entire EFI Folder from EFI partition of USB disk to EFI partition of Catalina SSD.
    • If you like, you can open config.plist from the Catalina EFI partition and remove the -v Boot Arguments flag. This will stop the detailed log messages at startup and shutdown.
  • Eject USB flash disk.
  • Reboot directly from Catalina SSD.
  • Does it work? Report any issues.

Update: Just got through performing this procedure successfully, so consider it validated, but not widely tested.


Just finished the installation, so far everything works perfectly. I was having sleep/wake issues previously on the same OS version and I was gonna downgrade to Mojave to see if it fixes the issues, but I'm glad I found this post. The installation was so simple and everything is so much more stable than my previous installation. However, I'll run more tests and report back if there is any issues. Thanks a ton @CaseySJ, truly appreciate everything you've been doing for the Hackintosh community! :headbang:
 
The Catalina Mini-Guide includes post-installation, which is simply the process of copying EFI folder from USB to Catalina SSD. You should not use MultiBeast here. You should also not update Clover.

If you ran MultiBeast or installed Clover v4961 (or other 4xxx) then it’s best to delete EFI folder from Catalina SSD and re-copy the EFI folder from USB install disk.
Thanks for the help! Seems like everything is running smoothly now!
The SSD not being recognized was due to a faulty SATA cable :/
Super guides!
 
Hello @WhosMac

--8<--- What is the make/model of your NVMe SSD?
  • Are you using a WiFi/BT card such as Fenvi FV-T919? If so, which slot is it in?

** Experimental Mini-Guide for Direct Installation of Catalina 10.15.1 **
WARNING: This guide may fail with AMD RX 5700 and 5700 XT GPUs. Click here for details.

--8<---

860 EVO SSD M.2.
Fenvi in Lower mini slot
Radeon VII

Perfect install - absolutely no problems at all and exactly as described

Thank you Casey
 
Last edited:
Back
Top