
jaymonkey
Moderator
- Joined
- Aug 27, 2011
- Messages
- 4,080
- Motherboard
- GB Z490 Vision D
- CPU
- i9-10850K OC @ 5.2 GHz
- Graphics
- RX6800-XT+UHD630
- Mac
- Mobile Phone

An iDiot's Guide To Lilu and its Plug-in's
Last Update: 22nd Jan 2021 (Add note about OpenCore config.plist modifications)
About this Guide
Note: This guide was written when Clover was the boot loader of choice as such the config.plist examples in this guide are mostley Clover specific ... if you are using OpenCore as your boot loader then the guide is still relevant however the formatting of the OpenCore config.plist is slightly different and some parameters may need to be added to NVRAM variables rather than as separate <keys>.
This guide is written as a helping hand to those users who have some understanding of using legacy hackintosh methods but are considering using Lilu as a means to migrate to MacOS Mojave/Catalina or want to use Lilu in place of traditional/legacy MacOS patching methods.
Before we go any further I should state for the record that I have no direct affiliation with Lilu, my first encounter with it was in early 2017 when i needed to resolve an issue with the refresh rate of the 4K display on my laptop. Since then I've followed its development closely (along with its plug-in's) and now consider it to be one of the most essential tools in the Hackintosh community toolbox.
Over the last year this guide has grown in size rapidly so to make it easer to navigate I have now split the guide in to different chapters :-
- Chapter-1: What is Lilu
- Chapter-2: Hackintool
- Chapter-3: How to install Lilu and it's Plug-in's
- Chapter-4: WhateverGreen --> Patches the kernel and system kexts for GPU support (Intel/AMD/Nvidia)
- Section-4.1: HD 4600 Configuration
- Section-4.2: Headless IGPU Configuration
- Section-4.3: HI-DPI & Dual Displays
- Section-4.4: DRM Issues
- Chapter-5: AppleALC --> Dynamic patching of AppleHDA for non officially supported codecs
- Section-5.1: Trouble Shooting AppleALC
- Section-5.2: HPET Issues
- Chapter-6: AirportBrcmFixup --> Various patches for Broadcom Airport Wi-Fi cards
- Chapter-7: Other Useful Lilu Plug-in's
- Chapter-8: Final Thoughts
Chapter-1: What is Lilu ?
Lilu is a MacOS "Patching Engine " that allows for on-the-fly patching of the kernel, system extensions and Apps, Lilu offers a number of benefits over more traditional hackintosh methods, in summary these are :-
- Does not depend on a specific boot-loader
- Works in Recovery mode and the MacOS Installer/Updater
- Supports a symbolic patching engine
- Enables API access to the kernel, system extensions and Apps
- Allows modification of running processes
Lilu has its own SDK (Software Development Kit) allowing anyone with the right coding skills to write a Lilu plug-in, as such it has gained a following of dedicated developers and has become the preferred 'Patching Engine' for many Hackintosh gurus.
The three most popular Lilu plug-in's are WhateverGreen, AppleALC and AirportBrcmFixup and each of these have their own dedicated chapters in this guide, for a for a full list of all the available Lilu plug-in's and where to get them you can use this link.
Important Note: Lilu plug-in's are generally fully self contained solutions and will (in most cases) replace all legacy Clover patches and Injection/Enabler kext's for a plug-in's given purpose, as such you should remove any existing Clover settings, FakeID's, patches ..etc and any alternate kext's that have been already installed for a plug-in's purpose ... for example when installing AppleALC you should remove (or disable) all Clover AppleHDA patches and uninstall any HDA Enabler, patching or dummy kext's. Failure to remove associated patches and kext's can result in unpredictable and often unstable results.
Each Lilu plugin has its own documentation and linked support threads that are usually detailed in the readme.md file or the Wiki on a plug-in's Git-Hub project page. You should familiarise yourself with these resources as they list the best places to get more specific help.
Binary releases of Lilu and plug-in's are downloaded by visiting the appropriate Git-Hub project and clicking on the Releases tab, you'll be shown the release history with the most recent version available at the top of page. Most users should download the latest Release version, in some rare cases you may need to download the Debug version or an earlier release.
In some very rare cases you may need to download Lilu's or a plug-in's source code and compile it yourself using Xcode, this will only need to be done when a specific fix or support for a new device has been added to the project and a public binary release is not yet available. When compiling a Plug-in you will need to copy the latest Debug version of Lilu into the project resources folder as all plugins need to be compiled against Lilu's API.
Note: Hackintool (detailed below) can now download most kext's source code and compile them for you which simplifies things considerably for those that are unfamiliar with Apple's Xcode development tools.
Lilu and its plug-in's can be used on any Hackintosh system running MacOS Sierra or later and is highly recommended for MacOS Mojave and Catalina.
Chapter-2: Hackintool

We're going to be using Hackintool (formally called Intel FB-Patcher) a lot in this guide which is written and maintained by @headkaze. Hackintool is powerful post install utility that everyone should have in their hackintosh tool box. It can help with many aspects of configuring and checking MacOS including debugging iMessage, PCI device spoofing, USB patching, kext maintenance (including compiling them for source code) and generating device patches. In this guide we will only use a few of its many features but i recommend that everyone install it and explore its capabilities.
If you don't already have Hackintool installed , download it now using this direct link, unzip and install it as you would any other application. For more info on Hackintool including a change log see this post.
@headkaze is constantly improving Hackintool with a new releases being pushed out weekly so always be sure to check for updates using the apps built-in "Check For Updates" feature.

Chapter-3: How to Install Lilu & Plug-in's
Lilu and it's plug-in's are provided as 3rd party MacOS Kernel Extensions (kext's). I recommend that you download them directly from the acidanthera development teams Git Hub pages to ensure that you are using the latest version of each kext and that they have not been altered in any way.
The following links will take you directly to each kext GitHub Page :-
To download a kext click on "Releases" on the project page and download the latest release version, unzip each archive and copy all of the kexts into one place such as a temporary folder on your desktop.
There are two methods to install 3rd party kexts on MacOS kexts, which method you use is down to personal choice.
Method 1: Kext Injection via Clover
Mount your EFI partition and copy the kexts you need to the following location :-
Code:
EFI/Clover/Kexts/OtherEnsure that you have the following set in your config.plist :-
Code:
    <key>SystemParameters</key>
    <dict>
        <key>InjectKexts</key>
        <string>Yes</string>
    </dict>
Method 2: Kext Injection via OpenCore (Recomended for Big Sur and above)
Mount your EFI partition and copy the kexts you need to the following location :-
Code:
EFI/OC/Kexts/You will then need to add them to the kext section of the OpenCore config.plist so that they can be injected correctly. OpenCore configuration is somewhat off topic for this guide but this is a quick and easy method :-
- Open your config.plist with ProperTree
- Select "OC Snapshot" from the Apps "File" menu
- ProperTree will scan your kext folder and automatically add/update any new kext's found to your config.plist.
- Save the updated config.plist.
- Goto the OpenCore Sanity Checker web site.
- Select the correct CPU architecture / generation ( eg: Haswell, Kaby Lake etc..).
- Select the Correct OpenCore version you are using (eg: 0.6.0).
- Drag your modified config.plist into Sanity Checker or click the button to browse to it.
- Sanity Checker will then create a report and list any errors found.
- Re-open your config.plist with ProperTree and use the info from Sanity Checker to fix any errors.
- Once done save the config.plist.
- Perform steps 5-9 again to check that you've fixed all the issues correctly.
I personally recommend the Dortania OpenCore guide :-
Method 3: Install kexts in /Library/Extensions
Installation of kexts into /Library/Extensions is covered in detail in this guide :-
[GUIDE] Installing 3rd Party Kexts - El Capitan, Sierra, High Sierra, Mojave, Catalina
Installing 3rd Party Kexts in /Library/Extensions Note: This guide was originally written to support MacOS Mojave and older versions (< r5200) of the Clover boot-loader. The methods detailed here are now considered legacy methods and should only used with older versions of MacOS as detailed...
Chapter-4: WhatEverGreen
When it was first released in 2017 WhatEverGreen only supported AMD GPU's, other GPU types such as Nvidia and Intel IGPU's along with some other display related patches where supported by Lilu using separate specific plug-ins. However, as of mid 2019 WhatEverGreen merges the existing AMD GPU Support with all of the following plugins:-
- IntelGraphicsDVMTFixup --> Intel IGPU DVMT Pre-allocation patches
- IntelGraphicsFixup --> Various patches to support Intel IGPU's
- NvidiaGraphicsFixup --> Various patches to support Nvidia GPU's
- CoreDisplayFixup --> Patches MacOS to support High DPI displays (pixel clock patch)
- Shiki --> Patches MacOS to support DRM protected video playback
- AzulPatcher4600 --> Specific patches for the Azul framebuffer on HD4600 IGPU
- AppleBacklightFixup --> Plug-in to enable backlight control on Lap-Tops
- EnableLidWake --> Plug-in to allow lid wake on certain Lap-Tops
Important: It should be noted that as of July 2019 all of the above plug-in's are depreciated and are no longer supported. Use of them in conjunction with WhatEverGreen or the current version of Lilu could result in Kernel Panics or abnormal MacOS behaviour.
WEG Pre-requisites
First you must remove all IGPU injections, settings, fake id's .. etc from Clovers config.plist, failure to do so can cause conflicts with WhatEverGreen resulting in unexpected results.
Install the latest versions of Lilu and WhatEverGreen in to /L/E (see the How to Install section towards the top of this guide) and reboot your computer.
Installing WhatEverGreen should take care of renaming all of the required device identities in the ACPI tables for us so if you have any of the following Clover ACPI Fixes/Renames in your config.plist you should remove or disable them:-
- Change/Rename GFX0 to IGPU
- Change/Rename PEG0 to GFX0
- Change/Rename HECI to IMEI
Note: There is one exception to the above rule, if you have a laptop and are using the hot-patch SSDT-PNLF.aml to enable backlight control then you should keep the Change/Rename GFX0 to IGPU ACPI fix in place otherwise the code in the hot-patch SSDT-PNLF.aml will not work correctly.
dGPU's (AMD & Nvidia)
For AMD and Nvidia users, Installing Lilu + WhatEverGreen will ensure that the correct AMD or Nvidia framebuffer is set and apply a number of dGPU related fixes and patches such as correcting the ACPI device names and enabling all monitor outputs (which should solve the common boot to black screen issue).
Simply installing Lilu + WhatEverGreen should be enough to enable your dGPU and get things working, for more experienced users there are a number of optional boot arguments that can be used with AMD and Nvidia GPU's which are detailed in the WhatEverGreen readme.md and manual.
As detailed in the Lilu overview above, you should remove any and all dGPU specific fixes and patches from your Clover config.plist and allow Lilu and WhatEverGreen to do all the work.
Intel IGPU's
For IGPU only or mixed GPU (dGPU + IGPU) systems, WhatEverGreen offers us a quick and easy method of enabling and customising the IGPU for MacOS than the traditional legacy methods of using Clover or statically patched Intel IGPU driver and framebuffer kext's.
Important: If you have a laptop with dual GPU's (dGPU + IGPU) with switched graphics, IE the dGPU is routed through the IGPU then you must disable the dGPU first before continuing, see RehabMans guide for more info.
IGPU DVMT pre-allocation memory Size
In order for MacOS to use a IGPU it must have a DVMT pre-allocation memory size of at least 64MB, if you have this option in your BIOS then it's pretty straight forward as you can simply set it to at least 64MB (or 128MB) and move on.
Unfortunately not all BIOS's (especially laptop's) allow you to manually set the DVMT pre-allocation memory size.
In some cases the default DVMT pre-allocation size may be enough, you can check this this by booting into windows and checking the IGPU Detected Video Memory size, see this post for more information :-
An iDiot's Guide To Lilu and its Plug-ins
@jaymonkey I echo all the praise in the posts above. I'm reasonably technology-savvy, but a real amateur on much of the detail involved in hackintoshes. Your guides are so detailed but very easy to follow and understand. I used your guides to clean up my Kexts with good results and you made me...
If your default DVMT pre-allocation size is less that 64MB then you need to resolve this issue first, there are a number of possible solutions but which one will work for you depends on your hardware, a search of these forums will result in a number of guides/posts for you to experiment with.
WhatEverGreen IGPU Auto Detect/Auto Configure
More recent versions of WhatEverGreen (V1.3.0+) have a much improved IGPU Auto Detect/Auto Configuration feature that can configure the IGPU on most systems without you having to do any additional work.
First make sure you have followed the instructions in the WEG Pre-requisites sections above ..
Now all you need to do is install Lilu + WhatEverGreen (see Chapter 3 - How to install Lilu and it's Plug-in's) and reboot. If the Auto Detect/Auto Configuration has worked you should have a functional IGPU. After installation and a reboot you can use Hackintool to check the configuration of your IGPU - see the section titled "Testing your Changes" towards the end of this chapter.
It should be noted that the SMBIOS your using can either hinder or help WEG's Auto Detect/Auto Configuration feature.
If you have a dGPU (AMD or Nvidia) installed in the system then WEG will attempt to configure your IGPU with a "Headless" configuration, however in order for it to have any chance of working you must ensure that the IGPU and dGPU are configured correctly in the BIOS, see Section 4.2 for more info.
Despite being much improved, WhatEverGreen's Auto Detect/Auto Configuration is not perfect, and wont work on all systems as there are simply too many variables to consider. If you find that this is the case on your system then you will have to manually configure WhatEverGreen with the specifics of your IGPU.
WhatEverGreen IGPU Manual Configuration
WhatEverGreen is configured using Device Properties, this is a relatively new method of defining custom properties in a devices ioreg directory tree using Clover and was added specifically at the request of the Lilu developers who work closely with the Clover developers.
For a bit more information on Device Properties see this post in the Clover dev blog.
A Device Property is defined in Clover's config.plist Devices -> Properties section, a property consists of a name and a data value assigned against a device's PCI path. Both the PCI path and the property name(s) are defined as <key> types, the value of a property is defined as one of three types:-
- As a <data> type
- As a <number> type
- As a <string> type
IGPU Device Properties
All IGPU patching is done in Hackintool's Patch mode which is the second icon on the top in-app menu and we use the bottom bar menu to select the Patch mode's sub-function. Click on Patch and then select the Info sub-function.

Note-1: If Hackintool correctly identifies your CPU Generation but the PlatformID drop down menu is empty and the Framebuffer and Connector sub-functions show no data then you should click on "FrameBuffer" in Hackintool's top menu and select the MacOS version you are using.

Note-2: If Hackintool is unable to identify your CPU Generation automatically and/or you see ??? in the Current Framebuffer Info box or Hackintool incorrectly selects the wrong generation of CPU then you can manually select the correct CPU Generation using the dropdown menu :-

The first time you run Hackigtool it will attempt to detect your IGPU and select the default PlatformID for it, in many cases this will be wrong so the fist thing we need to do is select the correct one.
With the Info sub-function selected, the type of IGPU detected will be displayed in the lower Current Framebuffer Info box and details of the the selected PlatformID and any matching System Definitions (SMBIOS) will be displayed in the upper Selected Framebuffer Info box.
For example the first time I run Hackintool on my 2017 HP Spectre X360 laptop Hackintool selects 0x591B0000 as the PlatformID and suggests MacBookPro 14,3 as the System Definition (SMBIOS).

This shows conflicting information, the IGPU is correctly detected and displayed as a HD 620 IGPU in the Current Framebuffer Info box but the Selected Framebuffer Info box shows that 0x591B0000 is for a HD 630 IGPU so we know that PlatformID 0x591B0000 is incorrect, we can change this by using the PlatformID dropdown menu to select the correct one, if you don't already know the PlatformID you need then select each one in turn from the drop down menu until you find one that matches your IGPU type.
If you are configuring a Laptop then make sure you select a Mobile PlatformID (Mobile = Yes), if you are configuring a desktop system then make sure Mobile = No.
For my HP Spectre X360 laptop I already know that I need 0x59160000 so i select it using the dropdown menu.

We can now see that the IGPU type in the Selected Framebuffer Info box matches the IGPU type in the Current Framebuffer Info box which in the case of my HP Spectre X360 laptop is a Mobile HD 620 IGPU, and that the recommended System Definition (SMBIOS) is MacBookPro 14,2 ... I am already using the MacBookPro 14,1 SMBIOS which is close enough.
Special note on desktop HD 4600 IGPU: If you have a Haswell CPU with a HD 4600 IGPU and no dGPU (IE: solo IGPU system) then one would assume that you would use the Intel HD 4600 PlatformID of 0x04160000. However from my experience it seems that use of this PlatformID will result in either no output being sent to the monitor or glitchy behaviour. You may have different results but it did not work for me on three different HD 4600 systems. After some trail and error I found that setting the PlatformID to 0x0D220003 (Intel Iris Pro Graphics 5200) and device-id to 0x0412 (Intel HD 4600) with the iMac 14,2 SMBIOS works very well for solo HD 4600 IGPU systems, although if you want to use HDMI you may need to patch the defined frame buffer connectors (See here). I can't really explain the reason for this oddity but it is most likely down to differences in the AZUL Framebuffer kext that MacOS uses for Haswell IGPU's compared to other Intel IGPU frame buffers.
Important: Always use the correct System Definition (SMBIOS) for the selected PlatformID, Hackintool will in many cases display the recommended SMBIOS in the Upper Selected Framebuffer Info box. Use of a non matching PlatformID and System Definition (SMBIOS) can result in abnormal MacOS behaviour.
List of all known PlatfromID's: This document lists all known PlatfromID's for each CPU generation :-
WhateverGreen/Manual/FAQ.IntelHD.en.md at master · acidanthera/WhateverGreen
Various patches necessary for certain ATI/AMD/Intel/Nvidia GPUs - acidanthera/WhateverGreen
 github.com
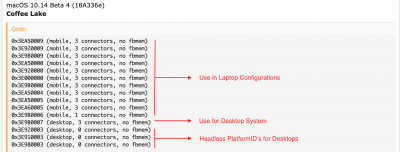
Move down the document until you find the matching CPU generation, each list shows desktop and mobile PlatfromID's make sure you use the correct type. If the number of connectors is '0' then that means its a Headless PlatfromID which is discussed in more detail below.
Note: There are a few PlatformID's where Hackintool will not list any recommend System Definitions (SMBIOS) or show "Unknown" next to "Model(s)" in the upper Selected Framebuffer Info box, this means that there are no matching Mac Models using that combination of CPU, IGPU & PlatformID however the IGPU PlatformID is still valid and should work, however if possible I recommend selecting an alternative PlatformID that has a framebuffer that matches your IGPU and also has a recommended/matching System Definition (SMBIOS) if at all possible.


Non Matching PlatformID
If you can't find a PlatformID that matches your IGPU exactly then you will have to pick the nearest matching one, for example if you have a UHD 620 IGPU then the nearest matching would be one of the UHD 630 PlatformID's, another example would be a HD 4400 IGPU, in that instance you should choose one of the HD 4600 or HD 5200 PlatformID's. In these cases you may have to try a number of different PlatformID's before you find one that works well for you.
If you have a laptop be sure to choose a Mobile IGPU PlatfromID (Mobile = Yes)
If you use the PlatfromID of a non matching IGPU then you will also have to spoof the device id of the target IGPU type .(See the section titled "Spoofing the IGPU" further down below)
Non Matching SMBIOS
If you can't find a PlatformID with a recommended System Definition (SMBIOS) it does not mean that things wont work, it just means that you'll have to take your best guess at finding the nearest matching SMBIOS to your Hackintosh hardware, a good tool that can help you make this decision is MacTracker.
Note: If you need to change your SMBIOS then be sure to logout of all of Apple's on-line services such as iCloud and use the methods detailed in An iDiot's Guide To iMessage to set new system ID's and check the serial number is valid but unregistered.
Headless IGPU PlatformID's
Genuine desktop Mac's such as most iMacs and some Mac Mini systems use a Headless IGPU PlatformID to inform MacOS that the IGPU does not have any physical display connectors but it is still enabled for IGPU hardware accelerated features.
When a IGPU is configured as Headless MacOS uses it as a sort of GPU co-processor alongside the dGPU for features such Airplay Display Mirroring, JPEG previews, H264/H265 Encoding & Decoding, Sidecar ... etc. This technology is called Intel Quick Sync (IQS) and MacOS is highly optimised to use it. The MacOS VideoToolBox API as well as apps such as Quicktime and FCPX are also highly optimised to use Intel Quick Sync and expect the IGPU to be enabled and configured as Headless when using a SMBIOS that supports it.
If you want to know a bit more about Intel Quick Sync then have a look at this Wikipedia page :-
Intel Quick Sync Video - Wikipedia
Warning: If you disable the IGPU but use a SMBIOS that expects it to be enabled then you will most likely experience issues with Video payback, JPEG previews and features such as Airplay and Sidecar (on supported SMBIOS's) will not work. Many 3rd party video conversion utilities such as VideoProc are really nothing more than a simple GUI wrapper to the MacOS VideoToolBox API and these too will fail to work correctly if you do not configure the IGPU correctly.
Important: If you have a X99 or X299 based Hackintosh system that uses an Intel Xeon CPU then do not attempt to set a Headless IGPU Headless PlatformID as there is no IGPU present in commercially available Xeon CPU's.
If you don't need to use a Headless configuration, skip down to the next section WEG Configuration Continued.
Headless IGPU Configuration (Desktop systems only)
To use the IGPU in headless mode you must first set the following BIOS options :-
- IGPU -> Enabled
- Primary Display Adapter -> dGPU (PEG)
- Multi-Monitor Mode -> Enabled (if option is present in BIOS)
- 10th Gen - Comet Lake CPU = SysDef: imac20,x
- 8/9th Gen - Coffee Lake CPU = SysDef: imac19,x
- 7th Gen - Kaby Lake CPU = SysDef: imac18,x
- 6th Gen - SkyLake CPU = SysDef: imac17,x
- 4th Gen - Haswell CPU SysDef: imac14,x or imac15,x
- 3rd Gen - Ivy Bridge CPU SysDef: imac13,x or macmini6,x
- 2nd Gen - Sandy Bridge CPU = SysDef: imac12,x or macmini5,x
Currently known Headless PlatformID's are :-
- 10th Gen - Comet Lake
- Intel HD Graphics CFL = 0x9BC80003 (use on MacOS 10.15.5+)
- 8/9th Gen - Coffee Lake CPU
- UHD-630 IGPU = 0x3E910003 or 0x3E920003 or 0x3E980003 (use on MacOS 10.14.6+)
- 7th Gen - Kaby Lake CPU
- HD-630 IGPU = 59120003 (use on MacOS 10.13.X)
- Unknown = 0x59180002 (not recommended)
- 6th Gen -SkyLake CPU
- HD-510 IGPU = 0x19020001
- GT2f IGPU = 0x19170001
- HD-530 IGPU = 0x19120001
- Iris Pro 580 = 0x19320001
- 4th Gen - Haswell CPU
- HD-4600 IGPU = 0x0412000B or 0x04120004
- 3rd Gen - Ivy Bridge CPU
- HD-4000 IGPU = 0x01620006 or 0x01620007
- 2nd Gen - Sandy Bridge CP
- HD-3000 IGPU = 0x00030030
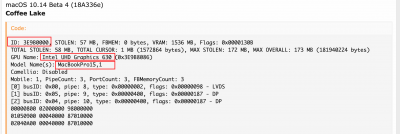
You can confirm that a selected PlatformID is Headless in Hackintool by clicking on the Connectors sub-function, all entries should have the following values:-
- index = -1
- bus id = 0x00
- pipe = 0
- type = dummy
Example using the Haswell headless PlatformID of 0x0412000B

Note-1: Headless IGPU mode only works on dual GPU (dGPU + IGPU) desktop systems, it will not work on dual GPU laptops where both GPU's output to the same display panel, as such you should always disable the dGPU on laptops, see RehabMans guide for more info.
Note-2: As already stated, use of a Headless PlatformID is only guaranteed to work when used in-conjunction with one of the recommended Mac System Definitions (SMBIOS), use of other System Definitions may result in an unstable system.
Note-3: When using a Headless PlatformID the IGPU should NOT show up in System Information -> Hardware -> Graphics/Displays even though it is enabled in your BIOS, this is normal and is one way of confirming that the Headless IGPU mode is activated.
Note-4: When using a Headless PlatformID it is normal for the IGPU frequency trace in Intel Power Gadget to stay locked at a set frequency and on some systems you may not see a IGPU trace at all.
Note-5: If your system is equipped with one or more working Thunderbolt 3 port(s) that you want to use to drive a display via an adapter and you have dGPU + Headless IGPU then you will need to enable the "Above 4G Decoding" option in your motherboards BIOS.
Note-6: After configuring your IGPU as headless you can check everything is correct by using IORegistryExplorer to examine your IOREG, search for "IGPU", you should see the IGPU entry with the property AAPL, ig-platform-id set to the Headless PlatformID (in reverse byte order) and a matching model description :-

Note-7: You can use the attached VDADecoderChecker App to confirm that your IGPU is configured correctly for hardware video decoding. Sandy Bridge CPU's and above will support hardware H.264 encode and decode, if you have Kaby Lake or later then you will also have hardware support for HEVC (H.265).
Note-8: There is now no need to use the VDADecoderChecker app detailed in Note-6 above as newer versions of Hackintool will automatically test your IGPU and display the results in the GPU Info box on the Info -> System page, allowing you to confirm that your IGPU is configured correctly and that QE/CI, Metal and VDA Decoder are all working :-

WEG configuration Continued
You can click through the other sub-functions in Hackintool's Patch mode to view the currently selected framebuffer settings and change any if needed.
When everything is how you want it, click on the Patch sub-function.
Spoofing the IGPU.
If you are using a non matching PlatfromID for your IGPU then you must also and Spoof your IGPU Device ID.
For example, If you have UHD 620 IGPU you will find that there are no PlatformID's for it, the nearest matching PlatformID would be a UHD 630 IGPU so you should select one of the UHD 630 PlatformID's and then Spoof your IGPU as a UHD 630.
To Spoof your IGPU select the Advanced sub-page, Check Spoof Video Device and select the Target IGPU device id in the dropdown menu next to it.
The screen shot below shows how we would spoof a UHD 620 IGPU as a UHD 630 :-

IGPU Patch Generation
Next click on the General sub-page and select Devices / Properties and check Graphic Device, deselect everything else for the time being. Now click on the Generate Patch button. In most cases WhatEverGreen only needs AAPL,ig-platform-id (or AAPL,snb-platform-id on Sandy Bridge systems) to be injected as a Device Property in order to correctly configure the IGPU. The additional properties are optional but useful to help identify the IGPU correctly. In the following example I've run Hackintool on my 2017 HP Spectre X360 laptop which has an Intel HD-620 IGPU and is using a "PlatformID"of "0x59160000".

You can now copy and paste the patch code snippet into your config.plist taking care to keep the correct structure, you only need to copy the <Key> and its <dict> block of code (which ends with </dict>).. using the above example I would highlight and copy :-

You then need mount your EFI partition and open your config.plist in a code editor (I use BBEDIT) and then paste the code into the Devices -> Properties section of you config.plist ... using the above example this is what it would look in my config.plist.
Code:
<key>Devices</key>
    <dict>
        <key>Properties</key>
        <dict>   <<----- Insert Patch code from Hackintool after this

            <key>PciRoot(0x0)/Pci(0x2,0x0)</key>
            <dict>
                <key>AAPL,ig-platform-id</key>
                <data>
                AAAWWQ==
                </data>
                <key>AAPL,slot-name</key>
                <string>Internal</string>
                <key>device-id</key>
                <data>
                FlkAAA==
                </data>
                <key>device_type</key>
                <string>VGA compatible controller</string>
                <key>framebuffer-patch-enable</key>
                <data>
                AQAAAA==
                </data>
                <key>model</key>
                <string>HD Graphics 620</string>
            </dict>

        </dict>
    </dict>
Note-1: This is only an example to show the correct structure, your config.plist will likely include additional lines of existing code.
Note-2: If you are editing a fresh config.plist is possible that you may not have the <key>Properties</key> section below <key>Devices</key> if this is the case you should first insert :-
Code:
        <key>Properties</key>
        <dict>


        </dict>
And the insert the generated code from Hackintool's patch generator between <dict> and </dict>
Copying the patch code from Hackintool's code generator and pasting it into your config.plist is in my opinion the easiest and most reliable method. However you can if you want use a Plist editor, Xcode or even Clover Configurator to add the properties but you will need to enter each property and its value one at a time making it more time consuming and prone to errors.
Note-2: The data values generated by Hackintool are base-64 encoded, if you use a Plist Editor or Clover Configurator to edit your config.plist then you will need to convert the base64 values into Hex and some values such as AAPL,platform-id and device-id will need to be entered in Reverse Byte Order (without the leading "0x") you can use Hackintool's calculator function to do the conversion.
Note-3: On Sandy Bridge systems the name of the Device Property will be AAPL,snb-platform-id (not AAPL,ig-platform-id)
Here is an example of adding the above AAPL,ig-platform-id and device-id properties using PlistEdit-Pro :-

Alternatively you can use Clover Configurator :-
- Open Clover Configurator and load your config.plist and select the Devices section
- Towards the bottom of page you will see two tab buttons labelled Arbitrary and Properties
- Click on the Properties button
- Click on the "+" icon under the left panel
- Copy and paste the PCI path <key> value (starts with PciRoot) from the generated patch code into the "Devices" field
- Click on the "+" icon under the right panel
- Type in "AAPL, ig-platform-id" (AAPL,snb-platform-id for Snady Bridge) into the "Properties Key" field
- Type in the value into the "Properties Value" (see Note-2 below)
- Repeat steps 7 + 8 for device-id.

Note-1: When using Clover Configurator we define the PCI path of the IGPU in the left panel and the name and data value of each Device Property in the right panel.
Note-2: The value for AAPL, ig-platform-id is entered (and displayed) in hex Reverse Byte Order without the leading "0x" so for the above example of "0x59160000" the correct value is "00001659", and the device-id value would be "16590000" you can use Hackintool's calculator function to do the conversion if your not sure.
Important: All other Clover options for IGPU enabling and spoofing (FakeID's) should be left blank/empty in the "Devices" section of your config.plist file.
Important: Remove all options in the "Graphics" section of your config.plist such as Inject Intel, ig-platform-id ... etc :-

In most cases you should also remove any DSDT edits or SSDT Hot Patches associated with the IGPU, as all ACPI patching should be taken care of by WhatEverGreen as long as your have defined the IGPU Device Properties correctly.
Black Screen after booting MacOS or some display connectors not working ?
For most users the Device Properties generated by Hackintool should be enough for WhatEverGreen to correctly configure your IGPU, however on some systems it may be necessary to further modify the framebuffer defaults in oder to get all of the IGPU ports/connectors working correctly. For example you may need change a IGPU port connector from DVI to Display Port or Display Port to HDMI, you can use Hackintool to modify these more advanced settings and then generate updated patch code to add as additional Device Properties to your config.plist.
I wont cover patching the frame buffer connectors in this guide as the process is already covered in CaseySJ's excellent guide which covers the topic in more detail :-
[GUIDE] General Framebuffer Patching Guide (HDMI Black Screen Problem)
General Framebuffer Patching Guide using Hackintool Please do not quote this guide in its entirety. Post a link instead. 15 Jan 2019: Intel FB-Patcher has been renamed to Hackintool. 19 Jan 2019: Guide overhauled. Please be aware of possible HDMI hot-plug issues. After boot you may have to...
High DPI Displays & Dual Monitors
If you have a High DPI display (>1080P) or video panel connected to the IGPU like i do on my laptop then you will need to add -cdfon as a MacOS boot argument, this enables WhatEverGreen's pixel-clock patches (that used to be handled by the now depreciated CoreDisplayFixUp plug-in) and allows for higher display resolutions and refresh rates on High-DPI display panels such as 4K @ 60Hz.

You can also add the -cdfon argument using Clover Configurator :-

If booting with OpenCore then you need to add it to the NVRAM section like so (using OpenCore Configurator) :-

I also recommend increasing the IGPU's VRAM from the default value of 1536MB to the 2048MB maximum, which can help if your IGPU is driving dual 1080P displays (or single 4K display). If you already have the property <key> framebuffer-patch-enable in the device properties section of your config.plist then you just need to add :-
Code:
                <key>framebuffer-unifiedmem</key>
                <data>
                AAAAgA==
                </data>
If you don't already have the property <key> framebuffer-patch-enable in the device properties section of your config.plist then you need to add :-
Code:
                <key>framebuffer-patch-enable</key>
                <data>
                AQAAAA==
                </data>
                <key>framebuffer-unifiedmem</key>
                <data>
                AAAAgA==
</data>Note: Increasing VRAM to 2048MB on systems that are connected to a single 1080P display or when using a Headless PlatformID will have no beneficial effect.
For those users who want to use a Plist editor to add the 2048MB VRAM patch here is an example screen shot of PlistEdit Pro with just the basic PlatformID device properties and the VRAM patch defined, you can also see the raw patch code in the lower red box :-

And this is how it looks in Clover Configurator :-

Testing your Changes
Once you have made all the changes necessary to your Config.plist, save it and reboot, if you've followed the guide correctly your IGPU should now be working. If you encounter problems check that you have installed the Kexts correctly as detailed in the How to Install section of this Guide. Another very common mistake is that the value for the Device Property AAPL,ig-platform-id (or AAPL,snb-platform-id on Sandy Bridge systems) has been entered incorrectly.
Once you have completed installing and configuring WhatEverGreen, re-run Hackintool and check the Info -> System -> GPU Info section which will display the configured IGPU details and that hardware acceleration for QE/CI, Metal and VDA decoder are all enabled/supported :-

It's also advisable to check/test that WhatEverGreen has renamed the HECI device in your DSDT as IMEI and that it is active in the ioreg, run the following command in terminal :-
Code:
ioreg | grep IMEITerminal should report the IMEI device path and the status, here is an example :-
Code:
| | +-o IMEI@16 <class IOPCIDevice, id 0x100000264, registered, matched, active, busy 0 (36 ms), retain 11>As stated in the prerequisites section of this guide, WhatEverGreen should take care of sorting out the IMEI (Intel Management Engine Interface) , however in some very rare cases it appears that it can fail. If you get an error when performing the above test then use the Clover HECI -> IMEI Rename/Fix.
Code:
                <dict>
                    <key>Comment</key>
                    <string>change HECI to IMEI</string>
                    <key>Disabled</key>
                    <false/>
                    <key>Find</key>
                    <data>
                    SEVDSQ==
                    </data>
                    <key>Replace</key>
                    <data>
                    SU1FSQ==
                    </data>
                </dict>
You can also use Clover Configurator to enable the HECI -> IMEI Rename/Fix.

DRM Content - Video Playback Fails / Black Screen
Playback of DRM content on non Mac Hardware can be tricky to resolve and depending upon your systems configuration may not even be possible. I'm no expert on the subject but I've added what info and knowledge I have on the subject below which may be of help.
Why DRM does not work on IGPU only systems
Native MacOS DRM playback on Haswell and later IGPU only systems is currently not supported on non-Apple hardware (IE: Hackintosh) due to Apple's use of customised microcode/firmware within the CPU/IGPU. Exactly what Apple have customised is still not fully understood but it is suspected that they have customised certain aspects of the Intel ME (Management Engine), the HECI (Host Embedded Controller Interface) and the Intel EPID (Enhanced Privacy ID).
The net result of this is that the PAVP (Protected Audio Video Path) and HDCP (High-bandwidth Digital Content Protection) features are non-functional on a IGPU only Hackintosh resulting in playback issues with DRM protected content.
It is not known if Intel supply Apple with pre-customised CPU's/IGPU's (like they did with XEON CPU's on their older Mac Pro models) or if Apple do it themselves by means of a modified ME update.
Some research and investigation has been done on this issue by the acidanthera team (developers of Lilu & WEG ..etc) but so far there is no clear solution. If you want a more technical understanding of this issue I highly recommended you read vit9696's comments on the subject here :-
Provisioning support in IGPU · Issue #586 · acidanthera/bugtracker
There are many issues with the matter, and I want to try to raise some attention to the problem from potentially interested parties. I kindly ask people without technical information to ignore this...
github.com
The acidanthera team are looking for competent developers to assist in fully understanding the issue and contribute to developing a possible solution, if you think you fit the bill then you should respond to the above case on GitHub, but please do not waste their time by asking dumb questions like "Is there any news on this" .. if there was we would know.
Netflix and Amazon Prime Video Work Around
For certain Web Based DRM content you can try using Chrome rather than Safari which should work for Netflix and Amazon Prime Video although in most cases you will only be able to play content at SD resolutions due to Chrome's use of the "WideVine" DRM API (which is software based) and known issues with HDCP on non-Apple Hardware.
DRM fixes in WhatEverGreen via Shiki Module for AMD GPU's
With the December 2019 point release of Lilu and WhatEverGreen the developers added a new method to enable some native MacOS DRM support on Non-Apple hardware (IE a Hackintosh).
This new method requires that the system has a supported AMD GPU installed as it effectively spoofs some of the changes in MacOS when using the iMacPro1,1 SMBIOS (see the workaround below) but without the need to actually use the iMacPro1,1 SMBIOS.
The procedure is very simple :-
- First update Lilu to 1.4.0 (or later) and WhatEverGreen to 1.3.5 (or later)
- Secondly add the following MacOS boot argument to your config.plist :-
Code:
shikigva=16You can do this either in Clover Configurator :-

Or by editing your config.plist with a plist or code editor :-

Once you have made the changes save your config.plist and reboot.
Adding the shikigva=16 boot flag causes WhatEverGreen to patch MacOS and certain Apple Apps to use the AMD GPU for DRM authentication and decode.
The Apps that are currently patched by WEG are :-
- iTunes (MacOS Mojave)
- QuickTime Player (MacOS Mojave & Catalina)
- Apple TV (MacOs Catalina)
- Apple Music (MacOS Catalina)
Playback of DRM content in Safari is not enabled by shikigva=16 but it is being worked on by means of a new Shiki bit-mask value (see Dec 8th Update Below).
So far I've tested this new AMD DRM enabling method on the following systems :-
- Haswell i7 4790K CPU with AMD Vega 64 GPU using iMac15,1 SMBIOS (White Knight build in my sig)
- Haswell i3-4330 CPU with AMD WX 4100 GPU using iMac14,2 SMBIOS (Media Mac build in my sig)
Update: 8th December 2019
WEG version 1.3.6 and later includes a new Shiki bit mask value (+64) to enable AMD GPU steaming DRM decode in Safari for services like Netflix and Amazon Prime, however it is still in development and currently does not work with all AMD GPU's / system configurations.
To enable the new feature use the boot argument shikigva=80 (BitMask = 16 + 64).
Full details of all the shikigva= bit-mask values and what they do can be found in this compatibility Matrix :-
WhateverGreen/Manual/FAQ.Chart.md at master · acidanthera/WhateverGreen
Various patches necessary for certain ATI/AMD/Intel/Nvidia GPUs - acidanthera/WhateverGreen
github.com
I tried shikigva=80 (with Lilu 1.4.1 & WEG 1.3.6) on my desktop system (Haswell i7 4790K CPU / Vega 64 GPU) and it did not work for me when attempting to playback Netflix DRM content (although the system no longer freezes like it did before). The acidanthera team are working hard to improve and refine this AMD based DRM fix and i will post updates below as and when further progress is made.
Update 17th May 2020
After updating to Lilu version 1.4.4 and WEG 1.3.9 and using the shikigva=80 boot argument on my desktop system (Haswell i7 4790K CPU / Vega 64 GPU), I can now play NetFlix DRM protected content in Safari in HD perfectly so it looks like more progress has been made by the acidanthera team on this. Amazon Prime Video still does not work and displays an error message. From the release notes it looks like Lilu version 1.4.4 and WEG 1.3.9 solves the crashing issue when using the DRM fixes in-conjunction with AMD Polaris based GPU's. Unfortunately I dont own a Polaris based GPU so i am unable to test to confirm.
How to help the acidanthera team with the DRM fixes.
If you experience issues using the shikigva=xxx boot argument or want to give the development team feedback (both good and bad) then you should post on the official WEG support thread so that you can help the developers to iron out any bugs and compatibility issues.
WhatEverGreen Support Topic
This Post is for helping users with issue that come with Whatevergreen Feel free to join in and help users if you know your stuff also get the devs of whatever green to join as wellWhatevergreen has a few issues Multi-monitor Support is lacking as 2 monitors seems to be the limit for some even if...
www.insanelymac.com
Whilst the DRM fixes that the acidanthera team have implemented in LilU + WEG are impressive and continue to improve with each new release of Lilu + WEG they do not (in most cases) currently enable every DRM possibilty.
If DRM is important to you and you have a AMD GPU then you may want to consider using the iMac Pro SMBIOS workaround which is detailed below.
iMacPro1,1 SMBIOS + AMD GPU - DRM Workaround
This workaround works best on Coffee Lake and later based CPU systems but as Coffee Lake is a Skylake refresh it will also work on Skylake (6th Gen) and Kaby Lake (7th Gen) systems as well.
The only additional hardware requirement is that you must have a MacOS supported AMD GPU installed (EG: RX 580, Vega 56 or 64 ..etc) that is correctly configured (usually with Lilu + WhatEverGreen).
All you need to do is to use the iMacPro1,1 SMBIOS, this works because the iMac Pro does not have a IGPU so it uses the AMD GPU(s) for DRM authentication and decoding.
User @Jaco1960 has done some testing with this workaround and found that the most complete way of getting DRM working was to use the iMacPro1,1 SMBIOS with the IGPU disabled. Unfortunately SideCar will not work in this configuration as a iMac Pro uses the T2 Chip to do the on-the-fly encoding.
The results of his testing are as follows :-

Important: If you decide to use the iMacPro1,1 SMBIOS then you should not use the shikigva=XXX boot flag.
Using the iMacPro1,1 SMBIOS with the IGPU disabled will force MacOS to use the AMD dGPU for all video hardware acceleration features that would normally be processed on a headless IGPU including jpg & video encode/decode in finder, Airplay ... etc. Using the iMacPro1,1 SMBIOS can be a useful workaround for those users who have had issues correctly configuring the IGPU as headless or have experienced issues when the IGPU is enabled.
One possible negative to using this workaround is that you may loose native CPU Power Management as a real iMac Pro has a Intel Workstation XEON class CPU which the iMacPro1,1 SMBIOS is fully optimised for. Many users have successfully resolved this issue with the use of the CPUFriend kext .... courtesy of the acidanthera development team.
GitHub - acidanthera/CPUFriend: Dynamic macOS CPU power management data injection
Dynamic macOS CPU power management data injection. Contribute to acidanthera/CPUFriend development by creating an account on GitHub.
github.com
How well this method will work on older CPU's is hard for me to say as they lack some of the CPU instruction sets and features of newer CPU's. I did try it on my Desktop Video editing system which has a Haswell i7 4790K CPU and a Vega 64 GPU (see the MonkeyMac Pro build in my signature for full specs) and everything seemed to work just fine including Amazon Prime Video in full HD on Safari.
DRM fixes in WhatEverGreen via Shiki Module for Nvidia GPU's
I don't have any systems with Nvidia GPU's so I am unable to test or give any advice, however looking at the Shiki compatibility Matrix linked above it seems that it may be possible to get DRM video playback working in Apple TV+ by using the boot argument shikigva=256 with the IGPU disabled and using a iMac or MacMini SMBIOS.
As far as i can tell there is no solution for Netflix or Amazon Prime Video working with Safari when using a Nvidia GPU.
Chapter-5: AppleALC
AppleALC is a plug-in for Lilu that dynamically patches the AppleHDA kext to enable High Definition Audio (HDA) support on non-native audio codec's. Like WhatEverGreen it replaces many of the patches and kext's that we have traditionally used to enable Audio in MacOS, as such you must remove all existing AppleHDA enablers, patches, dummy kext's, DSDT Edits ... etc and ensure you have a vanilla AppleHDA kext before installing AppleALC.
Nvidia HDMI Audio
AppleALC can enable HDMI audio on most Nvidia GPU's and all you need to do is install Lilu + AppleALC (see the How to Install section towards the top of this guide), if you have a supported card AppleALC will detect it and enable the HDMI audio controller. To see a list of supported Nvidia devices see this page, the Nvidia devices are at the bottom of the list.
On-Board Audio Codec support
AppleALC supports many different built-in (on-board) Audio codecs from Realtek (ALC), Conexant, IDT and others, in most cases all we need to do is install Lilu + AppleALC and make a simple configuration change to the config.plist but before we do that you should understand how AppleALC works.
Understanding how AppleALC works
AppleALC works a bit different to traditionally pre-patched or dummy kext AppleHDA solutions, the best way to think of AppleALC is as a large database of codec connector, layout and platform patches. Upon loading, Lilu/AppleALC will automatically detect the type of audio codec you have and will dynamically apply a set of codec patches from its database to AppleHDA.
The patch set that AppleALC will use is defined by using an index identifier. For backwards compatibility (and terminology) the patch set index identifier is the value of a property called "layout-id" which has traditionally been used in the hackintosh world to select a layout in a pre-patched version of AppleHDA (or dummy HDA kext).
AppleALC wake verbs
As an added bonus, AppleALC also takes care of wake verbs for most codec's so there is no need to install/use Codec Commander.
Lilu & AppleALC interactions
When Lilu loads it finds the value of "layout-id" and passes it to AppleALC which creates a new Device Property called "alc-layout-id" that inherits this value. AppleALC then sets the value of "layout-id" to a new target ID (usually 7) and patches the target layout in AppleHDA (using Lilu's patching engine) with the connector info, platform and layout files required for your codec (indexed by the value of "alc-layout-id").
This method allows AppleALC to negate the dropped layout-id's in Mojave (see the Audio section of this post for more info ) as the injected value of "layout-id" is only used as an index in AppleALC's codec patch database. It should be noted that AppleALC will use this layout-id re-mapping scheme on all versions of MacOS not just Mojave.
Check Supported Codecs
To see if AppleALC supports your codec look for its name in the source code's Resources folder. If your codec is not supported then you can ask for it be included in the next version by posting on the official AppleALC help thread. Create a post with the details of your codec (see post #1 in the help thread) ). One of the guru's there should see your post and offer to help, you will probably need to generate a codec dump in linux, I'm not going to cover that here as its out of the scope of this guide but whoever picks up your post and offers to help will give you a link on how to do this.
If your codec is already supported by AppleALC you can check which layout's are supported by opening the info.plist file within the appropriate codec folder, from the code you can see which layout id's are available, the comments may give you a clue as to which one to use,
As an example my 2017 HP Spectre X360 laptop has a Realtek ALC295 codec, so i open the info.plist within the ALC295 sub folder :-

In this example I know that Mirone's patch set is the one I need which is layout 3, in your instance read each of the comments to find a layout description that matches your system, if your not sure make a list of all of the available layout-id values and try each one in turn until you find one that works. You can also use Hackintool to see which layouts are supported (detailed in Method 2 below).
AppleALC Configuration
First install the latest versions of Lilu and AppleALC in to /L/E (see the How to Install section towards the top of this guide), now all you need to do is to configure AppleALC with the layout-id you want to use, there are two methods you can use to do this.
Method 1 (Legacy Clover value)
Lilu supports querying Clover for the value of "layout-id" from the legacy parameter "Clover/Devices/Audio/Inject" in your config.plist so all you need to do is to set the string value of "Inject" to the correct layout id for your codec.
Example using layout 3 :-
Code:
    <key>Devices</key>
    <dict>
        <key>Audio</key>
        <dict>
            <key>AFGLowPowerState</key>
            <true/>
            <key>Inject</key>
            <string>3</string>
            <key>ResetHDA</key>
            <true/>
        </dict>
If you use Clover Configurator then the setting is in the Devices Section

It should be noted that it's quite likely that Lilu will drop this legacy method of reading the value of "layout-id" from "Clover/Devices/Audio/Inject" at some point in the future, so you may be better of using the second method which uses Device Properties and brings AppleALC configuration in-line with other Lilu plug-in's such as WhatEverGreen.
If you don't know what Device Properties are see the "Configuration" section of the WhatEverGreen part of this guide above.
Method-2 (Device Properties) - Recommended
First you need install the Lilu and AppleALC kext's (see the "How to Install" section of the guide towards the top)
Now edit your config.plist and set the string value of "Clover/Devices/Audio/Inject" to "No"
Save the changes and reboot your PC.
Boot back into macOS and run Hackintool (make sure that it is up-to-date)
Use the following procedure to generate the Audio Device Properties and add them your config.plist :-
Click on the Audio icon, you should now see the detected Codec type(s), select the HDA codec by clicking on the line entry, the devices info should now be detailed in the Audio Info box and a drop down menu where you can select the codec layout you want to use, the drop down menu will only contain the valid layout-id's that are applicable to the detected codec.

Once you have made your selection, click on the Patch icon and select the Patch sub-function, if you want your Audio device to have the correct name and show up in the PCI devices section of System Information then check the Spoof Audio option on the Advanced options (un-check everything else on the Advanced page)

Now click on General and uncheck everything except for Device / Properties and the Audio Device options, then click on Generate Patch.

You can now copy and paste the code from the Hackintool code generator straight into your config.plist making sure you keep the <dict> structure correct you only need to highlight the PCI <key> and the <dict> block below it :-

And here is what it looks like once pasted in to my config.plist :-
Code:
    <key>Devices</key>
    <dict>
        <key>Properties</key>
        <dict>   <---- Insert code generated by Hackintool after this

            <key>PciRoot(0x0)/Pci(0x1f,0x3)</key>
            <dict>
                <key>AAPL,slot-name</key>
                <string>Internal</string>
                <key>device-id</key>
                <data>
                cKEAAA==
                </data>
                <key>device_type</key>
                <string>Audio device</string>
                <key>layout-id</key>
                <data>
                AwAAAA==
                </data>
                <key>model</key>
                <string>Sunrise Point-LP HD Audio</string>
            </dict>

        </dict>
    </dict>
Note-1: If you are editing a fresh config.plist is possible that you may not have the <key>Properties</key> section below <key>Devices</key> if this is the case you should first insert :-
Code:
        <key>Properties</key>
        <dict>


        </dict>
And the insert the generated code from Hackintool's patch generator between <dict> and </dict>.
Note-2: This is only an example to show the correct structure, your config.plist will likely include additional lines of existing code.
For those wanting to use a Plist editor here is an example of adding the layout-id 3 Device Property using PlistEdit-Pro :-

Alternatively you can use Clover Configurator :-
- Open Clover Configurator and load your config.plist and select the Devices section
- Towards the bottom of page you will see two tab buttons labelled Arbitrary and Properties
- Click on the Properties button
- Click on the "+" icon under the left panel
- Copy and paste the PCI path key (starts with PciRoot) from the generated code into the "Devices" field
- Click on the "+" icon under the right panel
- Type in "layout-id" into the "Properties Key" field
- Type in your "layout-id" value into the "Properties Value" field as a 8 digit Hexadecimal (eg 3 = 03000000)

Note-1: We define the audio device's PCI path key in the left panel and the Device Property in the right panel.
Note-2: The data values generated by the Hackintool code generator are in base-64 so if you use Clover Configurator or plist editor then you will have to convert the value to an 8 digit hex number, you can use the calculator function in Hackintool to do this. For example you want to use layout id 13, Hackintool generates a base64 value of "DQAAAA==" if we enter this in to Hackintool's calculator we get a hex value of "0d 00 00 00", enter this as the value for "layout-id" without the spaces.

After making the changes/edits save your config.plist and reboot, now you can test if the audio working. If audio is not working then work through each of the valid layout-id's for your codec, saving the config.plist file and rebooting between each test.
If after testing all valid values of layout-id for your codec audio is still not working then you may have a codec configuration that needs a new patch set ... as with a non-supported codec, the best place to get help is the official AppleALC help thread. Create a post with the details of your codec (see post #1 in the help thread) ) and write that none of the existing layouts work on your system. One of the AppleHDA guru's should see your post and offer to help.
Trouble Shooting AppleALC
Checking if AppleALC has loaded Correctly
We can easily check if AppleALC has loaded and initialised correctly by using IORegisteryExplorer, if you don't already have this installed you can download it using this link.
Run IORegisteryExplorer and enter "HDEF" in the search box, you should now see the ioreg directory tree for your "HDEF" device, using the above example this is what mine looks like :-

Note: If you don't see HDEF and you are sure that you have installed Lilu + AppleALC correctly see the section below titled ACPI HDA/Codec Rename Issues.
In the above screen grab w can see that AppleALC has automatically created a new property called "alc-layout-id" which has inherited the layout-id value of 3 as defined in the config.plist (using Clover/Devices/Audio/Inject or as a Device Property) ... remember that this is the index value to the patch set in the AppleALC patch database. We can also see that "layout-id" has now been set to 7 which is the target layout in AppleHDA that AppleALC has patched and that MacOS is using.
If you don't see "alc-layout-id" in your "HDEF" directory tree then AppleALC is not loading or initialising correctly, the usual cause of this is that the kexts have not been installed correctly. Try deleting the Lilu + AppleALC kext's from /L/E, download them again and re-install using the method detailed in the How to Install section of this guide.
HPET Issues (High Precision Event Timer)
After following the guide to install AppleALC and performing the above check you find that the "alc-layout-id" property exists in the ioreg and the value for it and the property "layout-id" seem correct but you still have no sound then its possible that you might be suffering form an IRQ Conflict caused by the HPET (High Precision Event Timer).
The HPET is a basic requirement for Audio in MacOS to work correctly and almost all install guides on this forum state that you should enable the HPET option in your BIOS, however on some motherboards and laptops the native DSDT code for the HPET can cause a IQR conflict that can stop the AppleHDA kext initialising correctly and/or cause 'scratchy' audio.
One method of checking for this issue is by executing the following command in terminal :-
Code:
kextstat | grep 'Lilu\|AppleALC\|AppleHDA'In the resulting output you should see the Lilu, AppleALC & AppleHDA kexts listed ...
Code:
MonkeyPro-2018:~ Jay$ kextstat | grep 'Lilu\|AppleALC\|AppleHDA'
   20    4 0xffffff7f81041000 0x22000    0x22000    as.vit9696.Lilu (1.2.8) 54014689-C8DA-318B-84F4-944BBA7AD2AC <8 6 5 3 2 1>
   23    0 0xffffff7f811bd000 0xdf000    0xdf000    as.vit9696.AppleALC (1.3.3) B60FCBAF-6BC2-36EF-A1E6-D5BE2863C35B <20 13 8 6 5 3 2 1>
  138    1 0xffffff7f830a7000 0x1d000    0x1d000    com.apple.driver.AppleHDAController (282.10) 70256EC9-AF38-31BD-A3C5-9C0E30B64AA3 <137 113 107 13 8 7 6 5 3 1>
  157    0 0xffffff7f8323a000 0xb7000    0xb7000    com.apple.driver.AppleHDA (282.10) B2208DA8-8CD9-36D8-BD59-C6D9A5379585 <156 138 137 124 113 107 7 6 5 3 1>
  159    0 0xffffff7f830c6000 0x2000     0x2000     com.apple.driver.AppleHDAHardwareConfigDriver (282.10) C4F674A0-5828-3D97-82BF-A81C8B8BDDBA <5 3>
As you can see from the above example if AppleHDA is loading then you will also see the AppleHDAController and AppleHDAHardwareConfigDriver kexts but the important one to note is AppleHDA.
If you do not see AppleHDA in the output (com.apple.driver.AppleHDA) then first check your BIOS settings and ensure that you have the HPET option enabled, if it is enabled and you still do not see AppleHDA in the output from the above command then you'll need to patch the HPET code in your DSDT.
The simplest method is to use the Cover option FixHPET in ACPI/DSDT/Fixes :-
Code:
    <key>ACPI</key>
    <dict>
        <key>DSDT</key>
        <dict>
            <key>Fixes</key>
            <dict>
                <key>FixHPET</key>
                <true/>
You can also apply the fix using Clover Configurator :-
This should work for most users however if after applying the Clover HPET fix you still find that AppleHDA is not loading (using the above terminal command) then you may need to apply the fix directly to your DSDT, RehabMan has a DSDT patch in his Repo which you can apply to your DSDT using MaciASL:-
Code:
#Maintained by: RehabMan
# HPET fix to avoid AppleIntelCPUPowerManagement panic
into method label _STA parent_hid PNP0103 remove_entry;
into device name_hid PNP0103 code_regex Name\s\(_STA\,\s+0x0F\) remove_matched;
into device name_hid PNP0103 insert
begin
Name (_STA, 0x0F)\n
end;

into method label _CRS parent_hid PNP0103 remove_entry;
into device name_hid PNP0103 insert
begin
Method (_CRS, 0, NotSerialized)\n
{\n
    Return (BUF0)\n
}\n
end;
To apply the patch open your DSDT in MaciASL, click on the Patch button and copy/paste the above code into the patch editor and then click on Apply, save the patched DSDT and try again, for more info on patching your DSDT see Rehabmans full guide, make sure you disable the Clover fix is already applied.
ACPI HDA/Codec Rename Issues
Like WhatEverGreen, AppleALC and Lilu should apply the appropriate ACPI renames to your DSDT automatically, however sometimes it can fail in which case you may need to apply the renames manually. You can confirm if your device has been renamed successfully by using IORegistryExplorer and searching for HDEF.

If HDEF exists in your ioreg then there is no need to do any further checks, however if it is not found and you have correctly installed Lilu + AppleALC and configured layout-id using one of the two methods detailed in this section of the guide then you should try applying the HDEF rename manually.
First check the native name of your HDA device by opening your vanilla (without edits) DSDT in MaciASL and search for "HDEF", if no results are found then try searching for "HDAS" if that search fails try searching for "AZAL"
If your HDA device is called "HDEF" then there is no need to rename the device, however if it is called "HDAS" then add the following Clover rename patch to the "Clover/ACPI/Patches" section of your config.plist :-
Code:
                <dict>
                    <key>Comment</key>
                    <string>change HDAS to HDEF</string>
                    <key>Disabled</key>
                    <false/>
                    <key>Find</key>
                    <data>
                    SERBUw==
                    </data>
                    <key>Replace</key>
                    <data>
                    SERFRg==
                    </data>
                </dict>
If your HDA device is called "AZAL" then the rename patch is :-
Code:
                <dict>
                    <key>Comment</key>
                    <string>change AZAL to HDEF</string>
                    <key>Disabled</key>
                    <false/>
                    <key>Find</key>
                    <data>
                    QVpBTA==
                    </data>
                    <key>Replace</key>
                    <data>
                    SERFRg==
                    </data>
                </dict>
You can also rename the HDA device using Clover Configurator by selecting the appropriate rename patch :-

Chapter-6: AirportBrcmFixup
This plug-in is pretty straight forward, it includes a set of patches required for native and non-native Broadcom Airport/Wi-Fi cards. The patches deal with things like enabling continuity and handoff, renaming your WiFi as an Airport device, plus a few other handy patches. As with all the other Lilu plug-in's in most cases (see notes below) you should remove all previous WiFi related patches and enabler kext's.
One reason to consider using this plug-in is that it negates the problem that you can no longer use a Clover patch to enable Handoff on MacOS 10.13.X and 10.14.X. You don't need to set any Device Properties for this plug-in, if it finds a supported WiFi device it will apply all the necessary patches automatically.
If you don't already know the VID & PID of your installed WiFi adapter then you can use Hackintool to identify your device, click on the PCI icon and find your WiFi device in the list and make a note of the Vendor ID (VID) and Device ID (PID).

In the above example my WiFi device has a VID of 14E4 (Broadcom) and a PID of 43BA (BCM43602 Chipset)
To see if your WiFi device is supported, take a look at the info.plist on the projects Git-Hub project page and search for your WiFi Devices PID.

If you see your devices VID + PID in the list then your good to go, simply install AirportBrcmFixup (and Lilu if not already installed) using the method detailed in the How to Install section of this guide.
If necessary, you can over-ride the default MacOS WiFi local and explicitly set a country code for your WiFi device using the boot argument brcmfx-country=XX, this is sometimes necessary to get 5Ghz WiFi working at full speed on some WiFi routers. A common value for this is "#a" which is a special value that effectively tells MacOS to ignore the WiFi country code set by your router. I've always had to use the "#a" country code on all versions of MacOS in order to get full 5Ghz WiFi bandwidth with my router.

Note 1: I think the guide/readme.md on this plug-in's Git-Hub page is a bit out of date in that states it should be used with other 3rd party WiFi enablers. I believe that earlier versions of AirportBrcmFixup did require the use of additional software depending on what type of card you have. However from my testing it appears that this is no longer the case and AirportBrcmFixup should do pretty much everything required so no need for any other software.
Note 2: AirportBrcmFixup only deals with the Airport/WiFi side of a combo card it does nothing to enable/support Bluetooth. To enable Bluetooth on all my Hackintosh systems I use RehabMans BrcmPatchRAM ... see his Git-Hub Project page for more info.
I've tested AirportBrcmFixup with a DW1830 (BCM43602) in my laptop and a BCM943602CS in my desktop system and it works great, no other patches or enablers needed. .. handoff and continuity have never worked better.
Based on my experience I suggest you try AirportBrcmFixup on it's own and remove all other WiFi/Airport enablers, kext's and patches ... as long as your device is supported (see the info.plsit) you should be ok, if it does not work then you may need to add one of the 3rd party kext enablers mentioned in the readme.md .... please post your success (and failures) below so we can confirm this for other users.
For a full list of all the patches this plug-in provides along with a list of boot arguments see the projects Git-Hub readme.md.
Chapter-7: Other useful Lilu Plug-in's
Here is a list of some other useful Lilu plug-in's, most of these just need to be installed in /L/E and don't require any additional configuration to work, however you should read the documentation for each plug-in before installing just to make sure. I'll try to keep this list updated as other Lilu plug-in's are released.
VirtualSMC
A Lilu plugin that emulates the Apple SMC (System Management Controller) .. typically in the past we have used FakeSMC for this task which having been around for longer is stable and pretty much guaranteed to work on all systems, however it has not been updated in a long time.
Depending on the circumstances VirtualSMC can bring better compatibility with present and future macOS releases providing broader SMC feature support and allowing more flexible SMC key emulation like MMIO, events (like in SMCLightSensor), permission support, etc. On older Macs it can be used to upgrade SMC generation with more features.
As of October 2019 VirtualSMC release 1.0.9 (or later) should work on most systems, its only negative is that motherboard sensor monitoring such as fans, temps, voltages ... etc is still somewhat limited and not as extensive as the sensor plugin's that come with FakeSMC.
If you wish to install VirtualSMC you must first remove all traces of FakeSMC if it was previously installed :-
- Delete FakeSMC.kext from /L/E and /EFI/Clover/Kexts/Other
- Delete SMCHelper-64.efi (or SMCHelper.efi) from /EFI/Clover/Drivers/BIOS and /EFI/Clover/Drivers/UEFI
- Delete All FakeSMC Sensor Plugins from /L/E
- Install Lilu.kext and VirtualSMC.kext to /L/E using Hackintool or one of the other methods detailed in Chapter 3
- Copy Lilu.kext and VirtualSMC.kext to /EFI/Clover/Kexts/Other
- Copy VirtualSMC.efi to /EFI/Clover/Drivers/BIOS and /EFI/Clover/Drivers/UEFI
Some users may need to install LiluFriend with VirtualSMC in order for it to be loaded early enough in the Boot process. I recently switched to using VirtualSMC on both my HP X360 laptop and main desktop (White Knight) hacks and it worked just fine, as a precaution i also installed LiluFriend. So far both systems have been just as stable as when using FakeSMC.
BT4LEContiunityFixup
If after installing AirportBrcmFixup you continue to have BT Continuity issues (AirDrop, Handoff, FaceTime, Apple Watch, Continuity .. etc) you could try installing BT4LEContinuityFixup which applies a few more specific patches to enable MacOS BT-LE Continuity features ... as with the other Lilu plug-in's you should disable or remove any existing Clover Bluetooth patches, but be sure to keep the BrcmPatchRAM kexts in /L/E.
HibernationFixup
As the name suggest this Lilu plug-in allows the enabling of MacOS save-to-disk hibernation modes 3 and 25 on certain systems. I have not used HibernationFixup myself but have read many positive posts that it does work as long as your system meets the hardware requirements (specifically native NVRAM, not emulated). Be sure to read all the documentation first before installing.
NoTouchID
Many of the newer SMBIOS's are for Apple Mac's that include a finger print reader (TouchID), if you use one of these SMBIOS on a Hackintosh then your likely to encounter delays during the boot phase and whenever MacOS prompts for a system password as the TouchID hardware is not present. Installing the NoTouchID plug-in should resolve this issue.
NightShiftUnlocker
By default Apple's night shift feature is only enabled on certain SMBIOS's, this simple Lilu plugin enables Apple's Night Shift feature on those SMBIOS's that don't normally support it. Once installed in /L/E you should be able to access the Night Shift options in System Preferences -> Displays -> Night Shift.
Chapter-8: Final thoughts
Lilu and its plug-in's such as WhatEverGreen, AppleALC and AirportBrcmFixup consolidates everything that has been learnt by the entire hackintosh community over the last five years and does a lot of the hard work that used to achieved with multiple Clover patches, custom and dummy kext's, hot patches ... etc with just a handful of kext's and the injection of a few Device Properties.
Once you take the time to understand Lilu and its plug-in's you will find that they really can simplify the patching of critical area's of MacOS with the minimum amount of effort. Of course there are always going to be exceptions where these solutions wont work but for many users, Lilu and its plug-in's should be considered a viable and mature alternative to the traditional hackintosh methods that we have used for the last few years.
It goes without saying that Lilu and its plug-in's are in constant development so I recommend keeping an eye on the Git-Hub release pages, the latest version of each project will always be shown at the top of the page along with details of the changes and commits to that version. You can use Hackintool (Click on the Installed icon on the in-app menu) to check for updates to Lilu and it's plug-in's.
I'd like to take this opportunity to thank all of the developers involved with Lilu and its plug-in's for all their hard work and their contribution to the hackintosh community, and @headkaze for the constant development of Hackintool , it should be noted that they in-turn (where applicable) acknowledge the original creators of any methods that some of the plug-in's use, these credits can be seen at the bottom of the readme.md on each of the Git-Hub project pages.
Cheers
Jay
Getting further Help and Support
If you need help outside the basic scope of this guide then do not post your question here, please create a new thread in the appropriate sub section of the forums such as Post Install, Laptops .. etc.
If you suspect there is a bug in Lilu or one of it's plug-in's then you should post your findings to the relevant support thread(s) documented in the readme.md of the appropriate Git-Hub project page, the same is true if you need to report an unsupported device for inclusion in the next release.
Attachments
Last edited:
