Contribute
Register

[SUCCESS] Gigabyte Designare Z390 (Thunderbolt 3) + i7-9700K + AMD RX 580

The VRS8 has two Thunderbolt 2 ports according to this:

The Slate Digital website does not seem to have a Technical Spec page so I'm not sure what the "PCIe" interface is. Thunderbolt is an extension of PCIe.

Edit: After rereading @luckyal's post here, I agree you should follow his configuration closely, which means:
  • Use VirtualSMC instead of FakeSMC
  • Use AptioMemoryFix instead of OsxAptioFix2Drv-free2000
  • Keep "slide=0" in Boot Arguments
  • Unlock MSR 0xE2 register
According to others users and @luckyal , once get the configuration the vrs 8,can run with the pcie card included or via thunderbolt, the problem its in the configuration :lol:

Maybe im doing wrong the configuration:

- Once i did all the step of your excepcional guide to install mojave, I deleted the FakeSMC and copied the VirtualSMC in the drive64 folder.

- I deleted OsxAptioFix2Drv-free2000 and copied AptioMemoryFix in the Drive 64 folder

- This is what i get in the boot log of Hackintool
Captura de Pantalla 2019-07-19 a la(s) 1.32.06 p. m..png

- Then in Clover i deleted dart=0 and restart, it's this right?
 
So with two 32GB DIMMs (total 64GB) you see the same startup error message with macOS? Are the 2 DIMMs installed in the correct 2 DIMM slots (cannot be installed in adjacent slots; must skip a slot)?
Yes, I have checked that in the Mainboard manual and it still works in Windows, but Clover still quits working with the same screen ...
Sure, you can try upgrading BIOS to F7. This will reset BIOS settings, so they must be re-configured after the update.
I did that and it didn't help either ...

Something more radical to consider (but only after trying the above):
  • Replace FakeSMC and its sensors with VirtualSMC (this also requires VirtualSMC.efi to be copied into CLOVER/drivers64UEFI).
  • Replace OsxAptioFix2Drv-free2000 with AptioMemoryFix-64.
Ok, I would like to try that, but I have no idea about what you are talking about here ... I guess I will google this tomorrow and see what I can find out. Any links what to read, before I read a lot of trash via Google search? :)

Edit: ... unless you just mean exchanging some files you provided in the first post in the EFI? I guess, I have to call it a day for today - sorry! :) The only thing I don't know in that case: how can you access the EFI partition (on my Mac)? Whenever I plug in the thumb drive after the installation, only the "Install Mac OS Mojave"-partition is there (the EFI did only show up after installing)?
 
Last edited:
Seems you hit the BOGO lottery! Buy One Get One free -- or rather, Build One Get One free. But are you sure the USB ports are correct? Chances of custom USB SSDT from Designare working fully on Asus Maximus Hero are less than 10% :)
I haven't checked all the USB ports yet, but all those I have work ok. All three ports in my case (including a USB type C)
WiFi/Bluetooth card running from internal USB OK, Mouse and keyboards have been running from rear ports without a problem, but I haven't yet checked ALL the USB ports. You may be right in that I'll have to make some small modifications, but then again maybe not.
Last time I installed on my Hero X board I couldn't get sound to work. It works perfectly now, through my case extension and through HDMI to my BenQ monitor - win win :)
 
*** Mini-Guide: How to Replace FakeSMC with VirtualSMC ***

  1. Make a full bootable backup of the current system. This is your insurance.
  2. First we need to remove FakeSMC from 2 places:
    • Place #1: /Library/Extensions folder
      • Use Finder to move FakeSMC.kext and all of the FakeSMC_Sensor*.kext files (should be 5 of them) to your Desktop or Documents or Downloads folder. Just get them out of /Library/Extensions, but save a copy so you can restore them later if needed.
      • The run Kext Utility to rebuild kernel cache.
    • Place #2: CLOVER/kexts/Other folder
      • Mount EFI Partition of the Mojave SSD using "Mount EFI" option in Clover Configurator (on the left side panel).
      • An "EFI" disk icon will appear. Go to the EFI/CLOVER/kexts/Other folder.
      • Move FakeSMC.kext and any FakeSMC_Sensor*.kext files to some location on your Mojave SSD (Desktop, Documents, Downloads).
      • Then open the EFi/CLOVER/drivers64UEFI folder (or EFI/CLOVER/drivers/UEFI for Clover v4988 or newer) and move SMCHelper.efi to the same location on your Mojave SSD.
  3. Now we need to download VirtualSMC.
    • Download the latest release by clicking here. Specifically, get the file called 1.0.X.RELEASE.zip
    • MacOS should automatically unzip the files into a folder called "1" or "1-1" or something like that.
  4. Install VirtualSMC as follows:
    • Make sure the EFI Partition of Mojave SSD is still mounted (see Step 2, Place #2).
    • Now take a look at the folders and files in the VirtualSMC folder that you just downloaded. It should look like this:
      Screen Shot 2019-07-19 at 12.40.34 PM.png
    • Copy the green box item (VirtualSmc.efi) to the CLOVER/drivers64UEFI folder (or CLOVER/drivers/UEFI for Clover v4988 and newer).
    • Copy the three red box items to CLOVER/kexts/Other.
    • Also copy the three red box items to /Library/Extensions and then run Kext Utility to rebuild the kernel cache.
  5. Note that iStat Menus will not currently show all of the fans. It may show at most one. So instead of iStat Menus, please use HWMonitorSMC2. The latest version can always be downloaded from here (the HWSensors3package):
    • https://sourceforge.net/projects/hwsensors3.hwsensors.p/
    • Update 2 May 2020: Download CloverHackyColor's fork of HWMonitorSMC from here.
    • When the DMG file is opened, simply copy the indicated App to the Applications folder.
      Screen Shot 2019-08-11 at 3.24.33 PM.png
    • When launching HWMonitorSMC2 for the first time, you may need to allow the system to run it (System Preferences --> Security & Privacy --> General tab).
  6. Reboot.
 
Last edited:
@FriFlo,

Which SMBIOS name are you using?
  • iMac19,1
  • iMac19,2
  • Macmini8,1
  • iMacPro1,1
  • iMac18,3
 
@Fabrizzioa04,

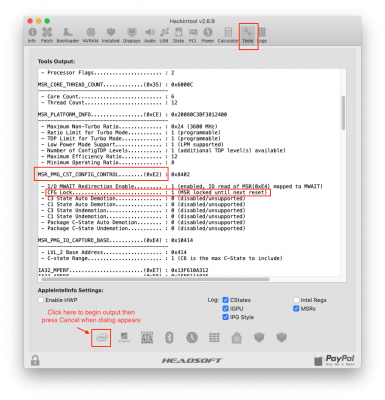
Regarding MSR 0xE2, the screenshot you posted is not conclusive. Please try this in Hackintool:
Screen Shot 2019-07-19 at 5.56.21 PM.png
It should clearly show the MSR 0xE2 register settings.
 
Last edited:
OMG its working finally :headbang::headbang::headbang: Thank you so much to you @CaseySJ and and
@Fabrizzioa04 @FriFlo

You can both benefit from the same instructions so here goes:

How to replace FakeSMC with VirtualSMC:
  1. Make a full bootable backup of the current system. This is your insurance.
  2. First we need to remove FakeSMC from 2 places:
    • Place #1: /Library/Extensions folder
      • Use Finder to move FakeSMC.kext and all of the FakeSMC_Sensor*.kext files (should be 5 of them) to your Desktop or Documents or Downloads folder. Just get them out of /Library/Extensions, but save a copy so you can restore them later if needed.
      • The run Kext Utility to rebuild kernel cache.
    • Place #2: CLOVER/kexts/Other folder
      • Mount EFI Partition of the Mojave SSD using "Mount EFI" option in Clover Configurator (on the left side panel).
      • An "EFI" disk icon will appear. Go to the EFI/CLOVER/kexts/Other folder.
      • Move FakeSMC.kext and any FakeSMC_Sensor*.kext files to some location on your Mojave SSD (Desktop, Documents, Downloads).
      • Then open the EFi/CLOVER/drivers64UEFI folder and move SMCHelper.efi to the same location on your Mojave SSD.
  3. Now we need to download VirtualSMC.
    • Download the latest 1.0.6 release by clicking here. Specifically, get the file called 1.0.6.RELEASE.zip
    • MacOS should automatically unzip the files into a folder called "1" or "1-1" or something like that.
  4. Install VirtualSMC as follows:
    • Make sure the EFI Partition of Mojave SSD is still mounted (see Step 2, Place #2).
    • Now take a look at the folders and files in the VirtualSMC folder that you just downloaded. It should look like this:
      View attachment 417385
    • Copy the green box item (VirtualSmc.efi) to the CLOVER/drivers64UEFI folder.
    • Copy the red box items to CLOVER/kexts/Other.
  5. Reboot.
OMG its working finally :clap::clap::clap: :headbang: :headbang: :headbang: Thank you so much to you @CaseySJ and @luckyal
 
@Fabrizzioa04 @FriFlo

You can both benefit from the same instructions so here goes:

How to replace FakeSMC with VirtualSMC:
  1. Make a full bootable backup of the current system. This is your insurance.
  2. First we need to remove FakeSMC from 2 places:
    • Place #1: /Library/Extensions folder
      • Use Finder to move FakeSMC.kext and all of the FakeSMC_Sensor*.kext files (should be 5 of them) to your Desktop or Documents or Downloads folder. Just get them out of /Library/Extensions, but save a copy so you can restore them later if needed.
      • The run Kext Utility to rebuild kernel cache.
    • Place #2: CLOVER/kexts/Other folder
      • Mount EFI Partition of the Mojave SSD using "Mount EFI" option in Clover Configurator (on the left side panel).
      • An "EFI" disk icon will appear. Go to the EFI/CLOVER/kexts/Other folder.
      • Move FakeSMC.kext and any FakeSMC_Sensor*.kext files to some location on your Mojave SSD (Desktop, Documents, Downloads).
      • Then open the EFi/CLOVER/drivers64UEFI folder and move SMCHelper.efi to the same location on your Mojave SSD.
  3. Now we need to download VirtualSMC.
    • Download the latest 1.0.6 release by clicking here. Specifically, get the file called 1.0.6.RELEASE.zip
    • MacOS should automatically unzip the files into a folder called "1" or "1-1" or something like that.
  4. Install VirtualSMC as follows:
    • Make sure the EFI Partition of Mojave SSD is still mounted (see Step 2, Place #2).
    • Now take a look at the folders and files in the VirtualSMC folder that you just downloaded. It should look like this:
      View attachment 417385
    • Copy the green box item (VirtualSmc.efi) to the CLOVER/drivers64UEFI folder.
    • Copy the red box items to CLOVER/kexts/Other.
  5. Reboot.

After having botched upgrading to VirtualSMC once before a few weeks back, I decided to give it another go to see if there were any meaningful differences between it and the FakeSMC solution.
As it turns out, there are!
This mostly relates to iStat Menus, which I use, but it might translate to other monitoring applications as well.

Specifically:
- I now have properly working Voltage and Wattage monitoring (whereas previously FakeSMC would only report bogus Wattage numbers and no voltages at all) (also, dear lord, my 9900K pulls 230W under full load, so much for the TDP specs)
- Fans are detected and even fan speed is properly sensed (only works for fans directly connected to the motherboard, of course). It even detects my Kraken's pump and reads out its speed properly!
- A thing that had been bugging me for a while got fixed: With FakeSMC in place, iStat menus would properly monitor CPU usage statistics, however, opening the detailed menu by clicking on the menu bar item was very laggy (it took several seconds to open). This lag between the initial click and actually opening the menu is now completely gone and everything runs smooth as silk now.

One thing regarding the guide though: If you are on a version of Clover above 4988, the VirtualSMC.efi file must be put under drivers/UEFI instead of drivers64UEFI.
 
Following the steps from @luckyal, I was wrongly copying the VirtualSMC, i never deleted the files from the library/extensions folder
 
Back
Top