Contribute
Register

[SUCCESS] Gigabyte Designare Z390 (Thunderbolt 3) + i7-9700K + AMD RX 580

I’ve decided to sell my Vega64 and get a Nvidia GPU since I don’t need a lot of GPU power in macOS (mainly office stuff and sometimes Lightroom) and primarily use my GPU in Windows for gaming.

So what’s the best way to use only the IGPU?
I would guess MacMini8,1 would be better than iMac19,1? Right now I’m using iMac19,1, disabled the GPU Slot 1 using an AML file (modified the one from the first page) and I’m also using OsxAptioFix2Drv-free2000.efi. But is there a way not to have to use OsxAptioFix2Drv-free2000.efi? When I had my Vega64 installed and disabled the IGPU, OsxAptioFix2Drv-free2000.efi wasn’t necessary.
It’s okay to continue using iMac19,1 without the Vega64. We just need to set AAPL,ig-platform-id to 0x3E9B0007 to enable the on-board video ports. To use the on-board HDMI, we also have to inject framebuffer connector patches. If you provide your config.plist, I can make this change.

Regarding memory drivers, the recommendation is to just try them all to see which one works:
  • AptioMemoryFix
  • OsxAptioFix3Drv
  • OsxAptioFix2Drv-free2000
I believe "slide=0" may be necessary for all, but you may try the first two with and without the slide argument.
 
Last edited:
The problem occurred between steps 10 and 11. I said step 2 in my post but of course should have said phase 2!

However I may have figured it out. I'm installing to an NVMe M.2 so I skipped the change SAT0 to SATA step in the config edit, left everything else the same, and I'm currently reinstalling... so far so good fingers crossed, half way through phase 2 now. i guess the NVMe simply wasn't mounting?

I'll update in a bit!
Please see my revised reply above regarding iMac19,1 versus iMac19,2.
 
It okay to continue using iMac19,1 without the Vega64. We just need to set AAPL,ig-platform-id to 0x3E9B0007 to enable the on-board video ports. To use the on-board HDMI, we also have to inject framebuffer connector patches. If you provide your config.plist, I can make this change.

Regarding memory drivers, the recommendation is to just try them all to see which one works:
  • AptioMemoryFix
  • OsxAptioFix3Drv
  • OsxAptioFix2Drv-free2000
I believe "slide=0" may be necessary for all, but you may try the first two with and without the slide argument.

Thanks! Will try all the combinations. Maybe a stupid question, but where do I get AptioMemoryFix?
 
I've seen this issue several times, but only when I'm frantically troubleshooting or debugging something that requires frequent reboots.

The problem usually goes away with a full shutdown (i.e. shutdown and remove power cable for 10 seconds) or a CMOS Reset (by shorting two pins on motherboard as explained in the Designare User Manual). Please see if this helps...
It sure did. I removed the power cable for a minute or so. Boot is now at normal speed :D Many thanks Casey!!!
 
The NVMe and SATA SSD that you mentioned are both Mac drives, but is the third drive a Windows drive? If so, where is that drive connected?

Thanks, but no, no windows drive. I have only TonyMac spec drives. 2x 3Tb Baraccuda HDDs (these are not bootable, and do not show up in BIOS) connected via SATA.
The two drives that do show up are Samsung Evo 840 (my old High Sierra system drive) and the Evo 860 (my newly old Mojave drive), connected vis SATA.
The NVMe card is connected to the bottom M2M port. I believe the top port on my mobo is an M2A.

Someone elsewhere has suggested this:
"You have to move your EFI manually to your new M.2. Otherwise, there is no bootloader on this drive and you can not select it as boot drive in your BIOS." Carbon Copy Cloner, however, told me that the drive I was cloning would be bootable. I thought that was kinda the point of CCC, and does the fact that I can boot onto this drive from the Clover screen not mean that the drive is bootable...?
Oh, CCC will not move the EFI folder on a Hackintosh without the EFIClone script as described in the build guide (post 1), section “Bootable Backup”.
 
Oh, CCC will not move the EFI folder on a Hackintosh without the EFIClone script as described in the build guide (post 1), section “Bootable Backup”.
Yeah righto! I just did it manually, and now it appears in the BIOS. I'll use that guide to create a backup/bootable. Thanks!
 
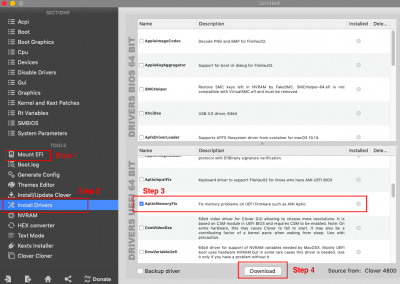
Thanks! Will try all the combinations. Maybe a stupid question, but where do I get AptioMemoryFix?
It can be done through Clover Configurator as shown. Always start by mounting the EFI partition of your Mojave SSD and check that no other EFI partitions are mounted. When the download is done, check that AptioMemoryFix has been downloaded to the correct folder:
  • For Clover 5xxx, it should go to CLOVER/drivers/UEFI folder
    • In this case, if Clover Configurator created a "drivers64UEFI" folder, delete this folder after moving AptioMemoryFix to the "drivers/UEFI" folder.
  • For Clover 4xxx, it should go to CLOVER/drivers64UEFI folder
Screen Shot 2019-09-25 at 1.22.45 PM.png
 
@CaseySJ one last question: how do I get the new drive to be the one that clover automatically boots from at startup. At the moment, my old drive is selected automatically, and I have to use the keyboard to direct it to the new drive at the clover screen.
 
Back
Top