
- Joined
- Jun 3, 2013
- Messages
- 92
- Motherboard
- ASUS TUF Z370 PLUS Gaming
- CPU
- I7 8700k
- Graphics
- NVIDIA GTX 1080TI
- Mac
- Mobile Phone
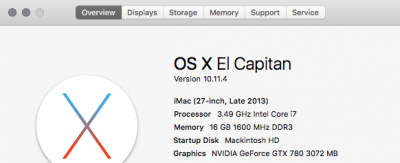
[Success] Fadis96's Build: Z87X-D3H-i7 4770k - Nvidia GTX 780- OSX 10.11.4

ComponentsZALMAN Z11 Plus Midi Tower Computer Case
https://www.amazon.co.uk/dp/B007C008L2/?tag=tonymacx86-21
Gigabyte Z87X-D3H
https://www.amazon.co.uk/dp/B00CU4L4NQ/?tag=tonymacx86-21
Intel i7 4770K with stock cooler
https://www.amazon.co.uk/dp/B00CO8TBQ0/?tag=tonymacx86-21
ZOTAC GeForce GTX 780 Graphics Card Amp Edition
https://www.amazon.co.uk/dp/B00E7HJ0Q2/?tag=tonymacx86-21
16 GB corsair vengeance pro DDR3 1600 RAM
https://www.amazon.co.uk/dp/B00D5X8XT4/?tag=tonymacx86-21
2 x Crucial 250GB SSD
https://www.amazon.co.uk/dp/B004W2JL2A/?tag=tonymacx86-21
2 x SEAGATE 1TB HDD (for extra storage)
https://www.amazon.co.uk/dp/B004HBAGSO/?tag=tonymacx86-21
Samsung 850 Evo 1TB SSD
https://www.amazon.co.uk/dp/B00P738MUU/?tag=tonymacx86-21
Corsair VS650 80 plus PSU
https://www.amazon.co.uk/dp/B00PGUSEBG/?tag=tonymacx86-21
TP-Link TL-WDN4800 WiFi Card
http://www.amazon.com/TP-LINK-TL-WDN4800-Wireless-Express-Low-profile/dp/B007GMPZ0A/
http://www.alternate.de/TP-LINK/TP-LINK+TL-WDN4800,_WLAN-Adapter/html/product/983283/?
Already Owned
ATAPI iHAS524 CD Drive
https://www.amazon.co.uk/dp/B00ERJXTE4/?tag=tonymacx86-21
Apple Wireless Keyboard
http://www.amazon.com/Apple-Wireless-Keyboard-MC184LL-B/dp/B005DLDO4U
http://www.alternate.de/Apple/Apple+Wireless_Keyboard,_Tastatur/html/product/900630/?
Wacom Intuos Pro 4 - med - couldn't find it on amazon so here is Intuos 5
https://www.amazon.co.uk/dp/B00EN27SHY/?tag=tonymacx86-21
Bluetooth Adapter Dongle, GMYLE
https://www.amazon.co.uk/gp/product/B007MKMJGO/?tag=tonymacx86-21
Samsung and Sony Bravia both 1080 displays.
Comments
The Build
This is the first time I bought a pre-build computer and didn't build it myself. The complete setup was sold on eBay for under £1k about 2 or 3 years ago . I decided to buy it, because I needed a new computer and the components were listed in the early adapters guide.
Anyway, I disassembled it, just to be sure everything is done correct. This hackintosh was my second one, I have been using it since mountain lion. This is the most stable hackintosh I have ever owned. I think its more stable than mac computers themselves.
Installation
First thing I did, was to check BIOS Settings. I loaded the defaults and checked SATA Configuration (AHCI). Also i changed the boot order of the drives, so it starts from the drive where OSX is installed(Clover). Then I disabled the internal graphics, WakeOnLan and secure boot. I didn't change anything else. Here are my Settings:
After that I started to create a boot drive using UniBeast (OS X 10.11.4 El Capitan). I booted without any kernel flags. Worked like a charm but it took nearly 30 Seconds for the Language Selection Screen to appear. Installation took about 15 minutes.
Post_Installation
After reboot, press F12 and select the Bootable usb drive, then boot form your SSD drive.
In MultiBeast I chose the following options: ((Expand quote for steps))


Final Settings:

Added the following Boot Arg for the Nvidia GFX

Trouble Shooting
My main issues out of the box:
1.The usb 3 back panel wasn't working:
To fix that, I have installed the 8series usb3 injector (attached), alongside RehabMan's FakePCIID.kext and FAKEPCIIDMUX.kext (attached)
(important!! please don't just reboot after installing these kexts, you need to unplug the computer for 10secs to clear all cache.)
Here is a video I created to shed more light on the infamous USB issue
This fixes any sleep issues you may experience. (SSDT ATTACHED!) I Used this guide (http://www.tonymacx86.com/threads/guide-native-power-management-for-laptops.175801/)
Custom SSDT.aml using ssdtPRgen.sh
Use the ssdtPRgen.sh script by Pike R. Alpha: https://github.com/Piker-Alpha/ssdtPRGen.sh
Instructions for using it are provided in the README.
The generated SSDT.aml should be placed on the EFI partition at /EFI/Clover/ACPI/patched/SSDT.aml.
Based on the current instructions at the README, what follows is a synopsis...
To prepare, you only need to do the first two commands:
Code (Text):
cd ~
curl -o ./ssdtPRGen.sh https://raw.githubusercontent.com/Piker-Alpha/ssdtPRGen.sh/master/ssdtPRGen.sh
chmod +x ./ssdtPRGen.sh
With newer computers (Broadwell, Skylake, and future), make sure you use the beta branch:
Code (Text):
cd ~
curl -o ./ssdtPRGen.sh https://raw.githubusercontent.com/Piker-Alpha/ssdtPRGen.sh/Beta/ssdtPRGen.sh
chmod +x ./ssdtPRGen.sh
Then you can run the script:
Code (Text):
./ssdtPRGen.sh
Note: If you have a CPU currently unsupported by the script (the Beta branch has more comprehensive data, so this is less likely with the Beta), you may have to provide the data for it.
For example, i7-4720HQ:
Code (Text):
./ssdtPRGen.sh -p 'i7-4710HQ' -f 2600 -turbo 3600
By providing the name 'i7-4710HQ' (similar enough to i7-4720HQ), and overrides for the non-turbo and turbo frequencies, the script is successful. Eventually, it would not be necessary, provided the script is updated with the new CPUs.
When it asks if you want to copy to /Extra just respond 'n'. Same for opening ssdt.dsl... respond 'n'.
The results are at ~/Library/ssdtPRgen/SSDT.aml.
Assuming your EFI partition is mounted at /Volumes/EFI, copy that file to EFI partition, /EFI/Clover/ACPI/patched/SSDT.aml
Code (Text):
cd ~
cp ~/Library/ssdtPRgen/ssdt.aml /Volumes/EFI/EFI/Clover/ACPI/patched/SSDT.aml
3. Intel graphics:
I have managed to get it to work but it seems to ever so slightly slow my boot time so I removed it, if anyone need help with the Intel HD 4600, just let me know and ill help you.
I have done it with rehabman's FAKEPCIIDGraphics.Kext
Tip:
Backup, backup, backup!! Use Carbon copy cloner or super duper, to clone your drive. make sure to copy the efi folder.
Note: I cloned the installation into a Raid 0 drive, combining my 2x crucial m4 SSD drives.
Using this terminal command (diskutil appleRAID create stripe Storage JHFS+ disk2 disk3)
Speed test:

Summary
Everything works, including iMessage, FaceTime, sleep!! no issues.
Config file attach but i had to remove the serial numbers so if you're having an issue with iCloud or iMessage. Let me know i can help!
This is by far the most stable Hackinotsh i have ever made. Its a little out of date but it supports all my needs. I'm a graphics designer and editor and I'm very happy with it.
I'm willing to help anyone that needs it!!!
Geekbench Marks

Credit to Tobitobst, i used his build as a template for mine (http://www.tonymacx86.com/threads/success-tobitobsts-haswell-z87x-d3h-i5-4670k-evga-gtx760.109192/)[/size]
") .
.