
- Joined
- Apr 6, 2012
- Messages
- 49
- Motherboard
- ASRock Z97 Extreme4
- CPU
- i3-4330
- Graphics
- R9 270X
- Mac
- Mobile Phone

Introduction
This guide will enable users to install OS X Sierra on an ASRock Z97 Extreme4 motherboard.
Specifications
Motherboard: ASRock Z97 Extreme4
UEFI BIOS version: v2.50
Audio: Realtek 1150
Ethernet: Intel(r) I218V
Graphics: XFX R9-270X 2GB
Drive: 250GB SSD
RAM: G.SKILL Ripjaws X 32GB DDR3 (I know, overkill)
Prerequisites
Access to an operational OS X system
Valid purchase of OS X Sierra installed under Applications
USB drive greater than or equal to 16GB, as recommended by the admin
UniBeast software
MultiBeast software
Essentials such as monitor, mouse, keyboard, etc.
Procedure
To get started, UniBeast bootable drive needs to be created. UniBeast can be downloaded via the Downloads tab.
The USB you are using must be in a specific format for UniBeast.
In the menu bar, click Utilities and select Disk Utility.
Select the drive where UniBeast will be installed.
Click Erase.
Give the drive a name (i.e. Untitled)
Under Format, OS X Extended (Journaled) should be selected.
Under Scheme, GUID Partition Map should be selected as well.
Click Erase.
You can close Disk Utility.
Once created, plug in the USB drive and boot into the Z97 Extreme4 UEFI BIOS.
Press F9 to load UEFI defaults.
For this guide, I have disabled Intel(r) Smart Connect Technology and changed the BBS priorities so the drive where OS X will be installed boots first. Secure Boot is disabled by default and VT-d is not supported.
Press F10 to save and exit.
Press F11 and select the USB where UniBeast is installed.
Once you reach Clover, select Boot Mac OS X from USB.
I did not have to input any arguments for my graphics card, as this card is supported out-of-the-box with the correct Device ID.
You will be brought to a screen where you must choose a language to continue.
The drive you will be using to install OS X Sierra must be formatted.
In the menu bar, click Utilities and select Disk Utility.
Select the drive where Sierra will be installed.

Click Erase.
Give the drive a name (i.e. Macintosh SSD).
Under Format, OS X Extended (Journaled) should be selected.
Under Scheme, GUID Partition Map should be selected as well.
Click Erase.
You can close Disk Utility.
Once you are at the stage where it asks you where to install OS X Sierra, choose the drive that you formatted. In this case, Macintosh SSD.
Once OS X Sierra is installed, your PC will restart.
Press F11 to enter the Boot Menu and select the UniBeast USB.
Once selected, UniBeast will detect the OS X partition and boot from it within 3 seconds.
Go through the initial setup.
Once you reach the Desktop, there is a command that needs to be executed in order for MultiBeast to run.
Open up Terminal and type sudo spctl --master-disable

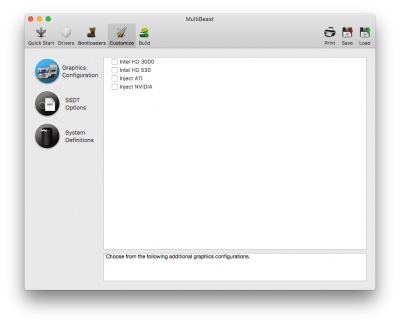
Launch MultiBeast.

Select the Quick Start tab and click UEFI Boot Mode.

Select the Drivers tab and click Audio. Select ALC1150.

Click Network and select IntelMausiEthernet v2.2.0.

Click the Build tab and verify the current configuration.

Click Install.
You will be prompted to enter your password to continue.
Once done, this window will appear.

Restart your PC.
By default, the motherboard will not boot using VBoxHfs-64.efi. Instead, HFSPlus.efi must be used so the EFI partition can be launched.
HFSPlus.efi can be downloaded from GitHub.
To mount the EFI partition, launch EFI Mounter v3. EFI Mounter v3 can be downloaded via the Downloads tab.

Enter your password.
Select the EFI partition where Clover is installed. If you are unsure on which partition to select, you can simply launch Disk Utility and select the drive where OS X Sierra is installed. Then, click Info.
For this guide, the The EFI partition is labeled as disk2s1.

Click Mount.

The EFI partition should mount.

Navigate to /EFI/CLOVER/drivers64UEFI.
Copy HFSPlus.efi to this directory.
Optional: you may remove VBoxHfs-64.efi.
So, now you should be able to boot into OS X Sierra, right? Almost.
")
For some odd reason, even though HFSPlus.efi is in the correct path, it will not load.
So, what needs to be done is to reset the BIOS settings using the jumper installed on the motherboard. I’ve had no luck with resetting to defaults via the GUI UEFI BIOS; it will still not load the EFI partition. So ...
Turn off your PC.
Press the switch on your power supply from 1 to 0.
Unplug the power supply cable and press the power button for 3 seconds.
Release the case panel to expose the motherboard.
Locate the CLRMOS jumper and set the position of the jumper from 1-2 to 2-3.
This will short the pins to reset the UEFI BIOS to default settings.
Save the configuration and exit.
Repeatedly press the F11 key and select the drive where OS X Sierra is installed.
The EFI partition should be read and will boot into Sierra within 3 seconds.
That’s it? Well ...
If a third party SSD is being used for OS X Sierra, TRIM needs to be enabled.
By default, OS X does not enable TRIM for third party SSDs; it has to be forced.
Note: Before proceeding, if you have another SSD that has an OS (i.e. Windows), please unplug the drive just to be safe.
To do so, open up Terminal and type sudo trim force enable. Enter your password.

Input y to proceed.
Input y again to confirm and reboot.
Once your PC reboots, you can check to see if TRIM is enabled via System Information.

As you can see, TRIM is enabled.
You can shutdown your PC and connect any SSDs disconnected.
I hope this guide was helpful towards users who also have an ASRock Z97 Extreme4 motherboard.
Attachments


Last edited: