Contribute
Register

[SUCCESS] Gigabyte Designare Z390 (Thunderbolt 3) + i7-9700K + AMD RX 580

@CaseySJ Anyways a simple power pull worked. I'm guessing this came after the Apollo went through a firmware update.

Bonus, Hotplug needs SW SMI on TBT hot-plug - Disabled.

Please explain steps involved in a "simple power pull." Trying to get my new system to see Apollo Twin but I've tried every Mojave-compatible UAD installer and none will make Apollo Twin appear. [Also, Mojave is not asking for the 4 security/permissions approvals that UAD said it would.]
 
Hi @CaseySJ
Great thanks! It worked after I performed the CMOS reset using a jumper on the motherboard! How can I test the iGPU is working on compute tasks only? Have the monitor running from Activity Monitor, but everything from Premiere Pro seems to stress RX580. What did you do to the config.plist file? Thanks again.

Hi @CaseySJ - after all my joy of seeing two graphics cards, etc., on a simple reboot the same error has reappeared with the iGPU enabled. I am attaching a screenshot the /L/E folder, as requested, but the system fails pretty much instantly as soon as the OS is selected from the Clover boot screen - within the first second, so not sure it is MacOS that is at fault.

Seems odd that it was working fine and now, reverted to old problem. I am confident a CMOS reset will fix it again, but not sure how long for. I notice there's a slight difference in the errors... Any ideas?
 

Attachments

  • CLOVER:ACPI:PATCHED.png
    CLOVER:ACPI:PATCHED.png
    91 KB · Views: 60
  • CLOVER:DRIVERS.png
    CLOVER:DRIVERS.png
    105.7 KB · Views: 55
  • CLOVER:KEXTS.png
    CLOVER:KEXTS.png
    97.3 KB · Views: 60
  • L:E:KEXTS.png
    L:E:KEXTS.png
    309.2 KB · Views: 60
  • Today.jpeg
    Today.jpeg
    1.9 MB · Views: 62
  • two days ago.jpeg
    two days ago.jpeg
    1.8 MB · Views: 53
Hello @azalanz,

Welcome to the forum!
  • Please start by reviewing symptoms and suggestions in posts 4745 and 4746.
  • And then see the follow-up in post 4895.
If this does not help, please let us know.

Thank you very much for the reply Casey!

If I not mistaken, the link you provide to me are talking about using the Nvidia card for display. My system currently running Mojave and soon might be upgraded to Catalina, because I want to try the Sidecar feature (since I also have iPad Pro as my secondary device for drawing). I have no problem with not using my GTX 1080 Ti, the UHD630 are fine with my working needs.

The problem I have are it seems the thunderbolt 3 connection are just sending the display data and without any usb data connection on it. I tried both Thunderbolt port on the motherboard (Z390 Designare) it having the same result, its have no problem displaying 4K image, but still no USB data connection. But I have tried to connect my phone (S10+) with the same port and the same Thunderbolt 3 cable, and it detect the phone with no problem (I can copy and paste files from and to my phone no problem).

I just have (small) hope my tablet works on this hackintosh, so I don't need to buy current gen MacBook Pro or at least using this hackintosh to wait the new gen MacBook with better keyboard.

I know my problem are very niche, but I really appreciate any reply on this matter.

Thank you~
 
Hi @CaseySJ


Hi @CaseySJ - after all my joy of seeing two graphics cards, etc., on a simple reboot the same error has reappeared with the iGPU enabled. I am attaching a screenshot the /L/E folder, as requested, but the system fails pretty much instantly as soon as the OS is selected from the Clover boot screen - within the first second, so not sure it is MacOS that is at fault.

Seems odd that it was working fine and now, reverted to old problem. I am confident a CMOS reset will fix it again, but not sure how long for. I notice there's a slight difference in the errors... Any ideas?
Please delete AptioMemoryFix and replace it with OsxAptioFix2Drv-free2000.
 
Hi!
I'm back and I tried what you advised me to do. Unfortunately, I couldn't go very far because I came up against a mistake in the Terminal. I've tried various tricks, like changing lower-case/middle case, name attached or separated by a space, nothing works. I put below the answers from the Terminal. I would like to point out that I started well on my backup.

Code:
Last login: Mon Nov  4 10:16:31 on ttys000
etiennes-mac:~ etienne$ cd /Volumes/hackintoshssd/usr/bin
-bash: cd: /Volumes/hackintoshssd/usr/bin: No such file or directory
etiennes-mac:~ etienne$ cd /Volumes/hackintosh ssd/usr/bin
-bash: cd: /Volumes/hackintosh: No such file or directory
etiennes-mac:~ etienne$ cd /Volumes/hackintosh SSD/usr/bin
-bash: cd: /Volumes/hackintosh: No such file or directory
etiennes-mac:~ etienne$ cd /Volumes/hackintoshSSD/usr/bin
-bash: cd: /Volumes/hackintoshSSD/usr/bin: No such file or directory
etiennes-mac:~ etienne$ cd /Volumes/HackintoshSSD/usr/bin
-bash: cd: /Volumes/HackintoshSSD/usr/bin: No such file or directory
etiennes-mac:~ etienne$ cd /Volumes/Hackintosh SSD/usr/bin
-bash: cd: /Volumes/Hackintosh: No such file or directory
etiennes-mac:~ etienne$ diskutil list
/dev/disk0 (internal):
   #:                       TYPE NAME                    SIZE       IDENTIFIER
   0:      GUID_partition_scheme                         2.0 TB     disk0
   1:                        EFI EFI                     209.7 MB   disk0s1
   2:                 Apple_APFS Container disk1         2.0 TB     disk0s2

/dev/disk1 (synthesized):
   #:                       TYPE NAME                    SIZE       IDENTIFIER
   0:      APFS Container Scheme -                      +2.0 TB     disk1
                                 Physical Store disk0s2
   1:                APFS Volume Hackintosh SSD          344.6 GB   disk1s1
   2:                APFS Volume Preboot                 45.3 MB    disk1s2
   3:                APFS Volume Recovery                510.4 MB   disk1s3
   4:                APFS Volume VM                      2.1 GB     disk1s4

/dev/disk2 (internal, physical):
   #:                       TYPE NAME                    SIZE       IDENTIFIER
   0:      GUID_partition_scheme                        *6.0 TB     disk2
   1:                        EFI EFI                     209.7 MB   disk2s1
   2:                  Apple_HFS Stockage                6.0 TB     disk2s2

/dev/disk3 (internal, physical):
   #:                       TYPE NAME                    SIZE       IDENTIFIER
   0:      GUID_partition_scheme                        *8.0 TB     disk3
   1:                        EFI EFI                     209.7 MB   disk3s1
   2:                  Apple_HFS Applications            8.0 TB     disk3s2

/dev/disk4 (external, physical):
   #:                       TYPE NAME                    SIZE       IDENTIFIER
   0:      GUID_partition_scheme                        *3.0 TB     disk4
   1:                        EFI EFI                     209.7 MB   disk4s1
   2:                  Apple_HFS Sauvegarde              3.0 TB     disk4s2

/dev/disk5 (external, physical):
   #:                       TYPE NAME                    SIZE       IDENTIFIER
   0:      GUID_partition_scheme                        *4.0 TB     disk5
   1:                        EFI EFI                     209.7 MB   disk5s1
   2:                  Apple_HFS Hackintosh SSD Local... 4.0 TB     disk5s2

/dev/disk6 (external, physical):
   #:                       TYPE NAME                    SIZE       IDENTIFIER
   0:      GUID_partition_scheme                        *4.0 TB     disk6
   1:                        EFI EFI                     209.7 MB   disk6s1
When I'm doing a "cd" in Terminal, I open a finder window and navigate to the folder that I want to "cd" to. In Terminal I type "cd". Then drag the icon of the target folder into the Terminal window. It eliminates any possibility of a typographical error.
 
No joy. Please see attached photos, worth 1000 words, I hope. I've no idea.

I tried both the system preferences-->software update version AND the 10.14.6 combo updater.

Also, I am enclosing the installer error log that came up when it came up with the error, if that helps at all.

The first screenshot shows the MacOS Installer data folder as it comes up on the root every time I run the installer.

Thanks.
When we see the error The installer resources were not found we can do the following:
  • Press these keys together for a moment: SHIFT + CONTROL + ALT/OPTION + COMMAND + H
  • This will open a Terminal window.
  • Type:
    Code:
    cd /
    cd Install\ macOS\ Mojave.app/Contents/Resources
    ./startosinstall --volume /Volumes/MojaveSSD
  • If the name of your Mojave SSD is something other than "MojaveSSD" then replace MojaveSSD above with the actual name of your Mojave SSD.
Thanks, Casey. This didn’t help, but perhaps I’m not doing what you intended. Here are my results:

That key combination didn’t do anything, anywhere. I’m a Mac tech (for more than 20 years), and I’ve never heard of that convo. I tried it both on the Desktop and from the macOS install screen. I just opened Terminal manually from both.

From the Desktop, I ran the first two Terminal commands, and the second line “cd Install\ macOS\ Mojave.app/Contents/Resources” shows up as “no such file or directory”

So, I guessed that you might mean to do this from the installer screen when it gives the error. I tried that, and it accepted the command from “bash#” prompt. However, the next line “./startosinstall --volume /Volumes/MojaveSSD”goes nowhere either. I did change it to my drive “mojave” but it just failed and didn’t start any sort of install.
did I misunderstand somewhere?

I can get you the logs if it would help.

thanks

paul
 
Countered something after restoring the original install of Mojave with CCC.
I cannot update from Mojave to Catalina anymore. My Mojave volume is greyed out for the update.
It says that I have to have a macOS version of Catalina (10.15) or higher. :crazy:
Who has an answer?
Thanks
Schermafbeelding 2019-11-05 om 10.31.01.png
 
Last edited:
*** Mini-Guide ***
Catalina Users: Configure Carbon Copy Cloner for One-Key Bootable Backup

These instructions are for Catalina (10.15.x) users only. Mojave users should refer to the Mini-Guide above.

WARNING: If you are running a non-English installation of Catalina, this procedure requires Catalina 10.15 with Supplemental Updates (Build 19A602) or newer. If you're running an English installation, any version of Catalina is okay.

Prerequisites: These steps are only performed once on a new SATA SSD.
  • Purchase or use a 2.5-inch SATA SSD that is large enough to hold everything in your Catalina OS disk. If your Catalina OS disk is 256GB, use a 256GB SATA SSD. If it's 1TB, use a 1TB SATA SSD. These SSDs have become extremely cost effective and there is no excuse for not purchasing one.
  • Purchase or use a USB 3 external SSD enclosure. These can be purchased from Amazon for under US$10. Here's an example.
  • Install the SATA SSD into the USB 3 enclosure and connect the USB 3 cable to an available blue, yellow or red USB 3 port on the Hackintosh.
  • Run Disk Utility, select View --> Show All Devices, and click on the parent name of the external USB SSD. Double-check that all of these steps have been followed; ask for help if necessary.
  • Select Erase and make sure that a dialog appears with 3 options:
    1. Name: Select something like "Catalina Local Backup".
    2. Format: Select "APFS" (the first item in the pop-up menu).
    3. Scheme: Select "GUID Partition Map". This option is necessary so that an EFI partition gets created.
  • Click Erase at the bottom right of the dialog.
  • Check that Carbon Copy Cloner has Full Disk Access by selecting Grant Full Disk Access to CCC... as shown:
    full

Your SATA SSD will be divided into a primary APFS partition and a secondary EFI partition. When formatting is complete, only the APFS partition will be mounted.

Now we're ready to set up our one-key backup task in Carbon Copy Cloner. This task will copy everything from the APFS and EFI partitions to the external USB SATA SSD.

Step 1: Create Backup Task
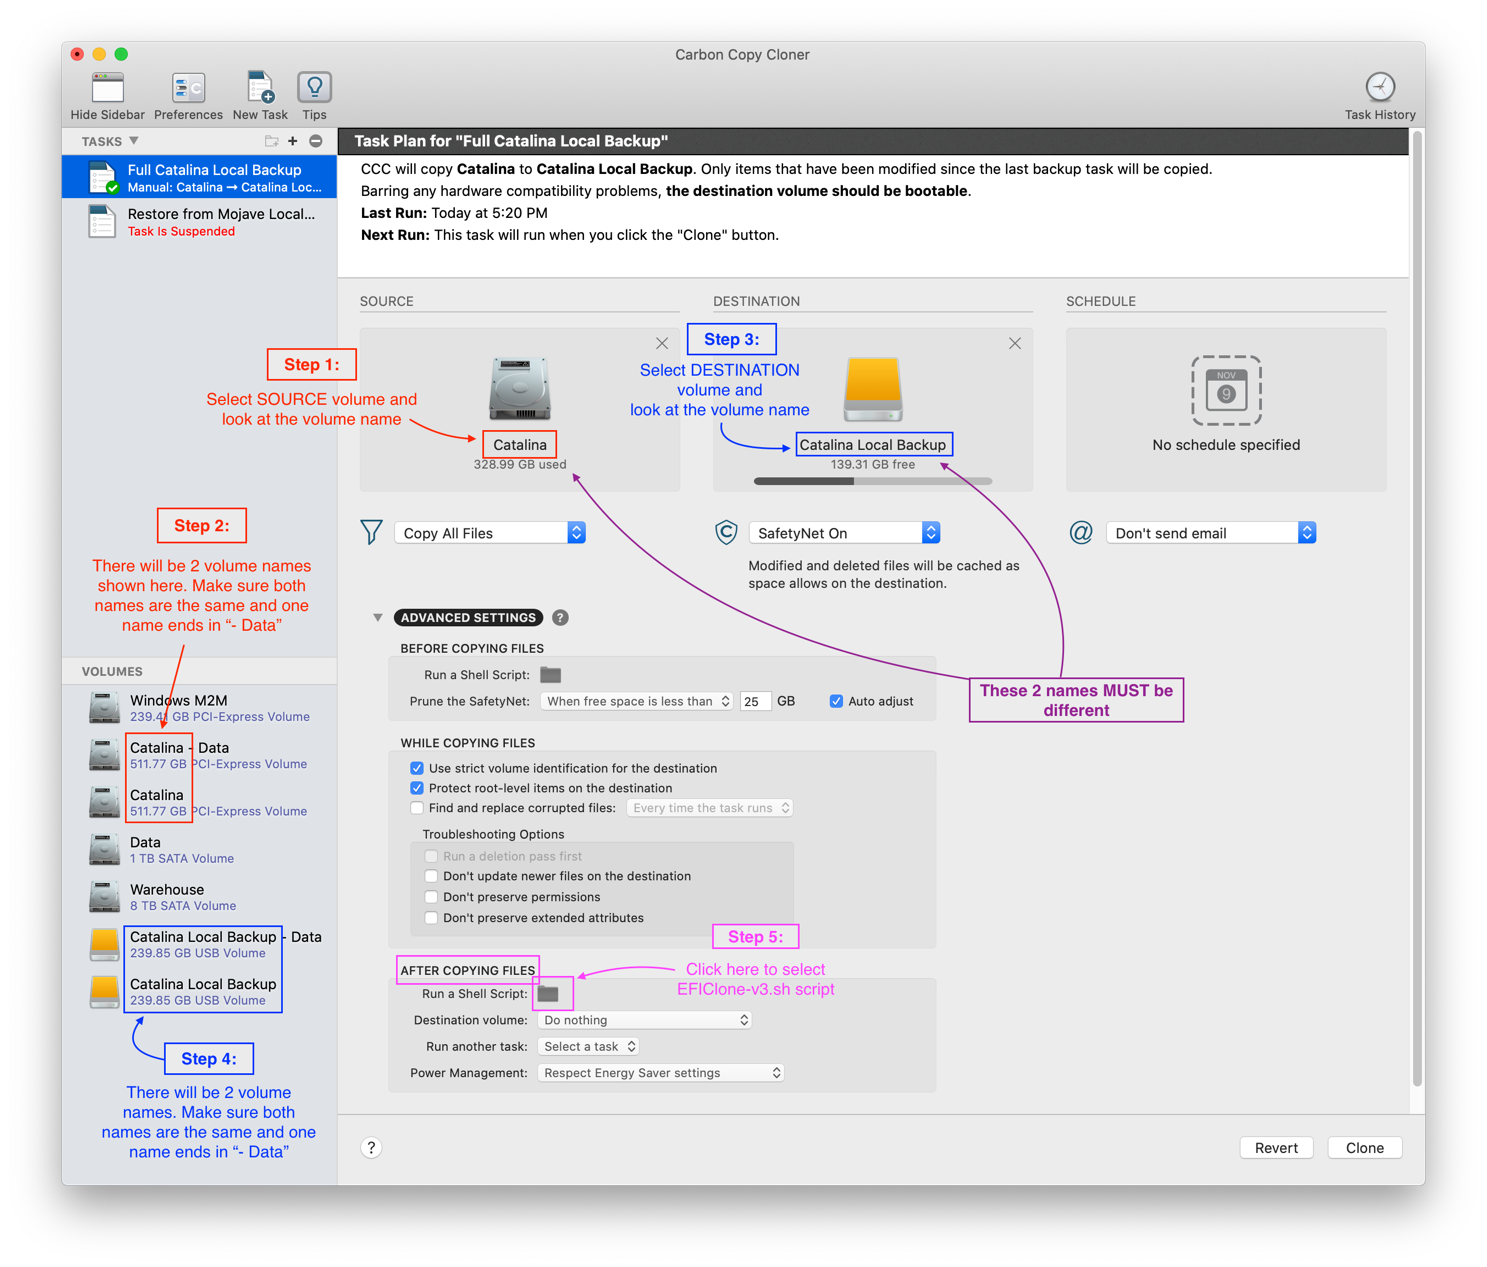
  • Run Carbon Copy Cloner (CCC) and create a new backup task by selecting your Catalina SSD as the SOURCE disk and your external USB SATA SSD as the DESTINATION disk. Note that you must select the currently booted Catalina SSD as the Source disk. The EFIClone-v3 script is based on @byteminer's repository, but has been modified to use only the currently-booted Catalina SSD as the source.
  • Now look at the lower left side of Carbon Copy Cloner (see screenshot below). Your SOURCE disk will contain 2 volume names. In this example (see Step 2 in screenshot) our SOURCE disk has the names Catalina - Data and Catalina. Note that the base name is the same for both -- the base name is just Catalina.
  • Now look at Step 4 in the screenshot below.
    • The DESTINATION disk will have only 1 volume name immediately after the disk has been formatted with Disk Utility. In other words, if the DESTINATION disk is empty, then it will have only 1 volume name. So you can skip Step 4 in the screenshot below.
    • But if a clone has previously been made to the DESTINATION disk, then it will have 2 volume names. So check that the base volume name is the same. In this case, the base volume name is Catalina Local Backup.
  • Follow Steps 1, 2, 3 in the image below, but do not perform Step 5 yet. Skip Step 4 if the DESTINATION disk has just been formatted (i.e. if the DESTINATION disk is empty).
    full
  • WARNING: If the 2 base names of the SOURCE are not the same or the 2 base names of DESTINATION are not the same, you must use Disk Utility to rename the incorrect volume(s).
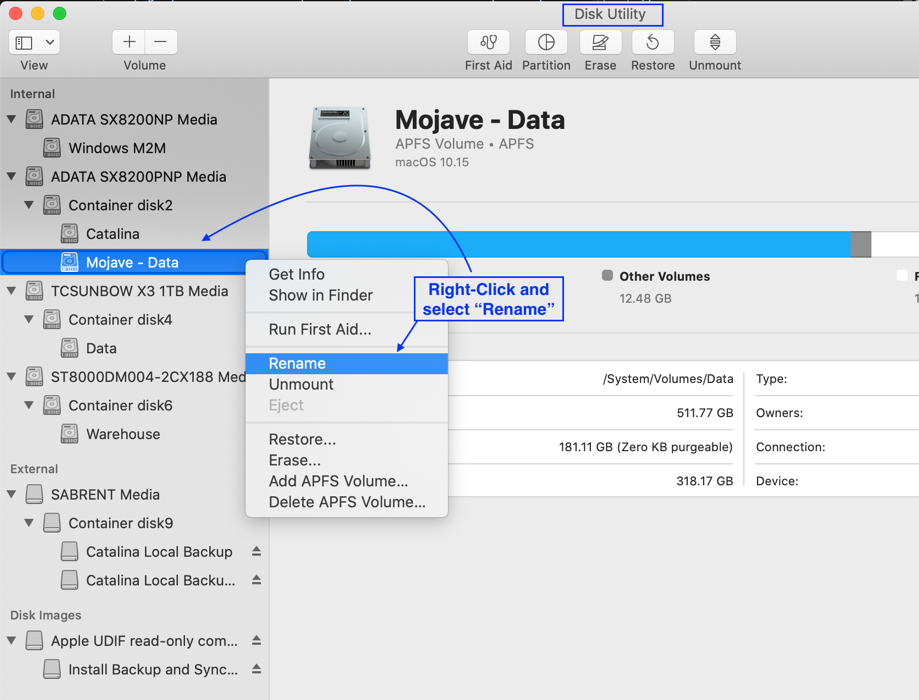
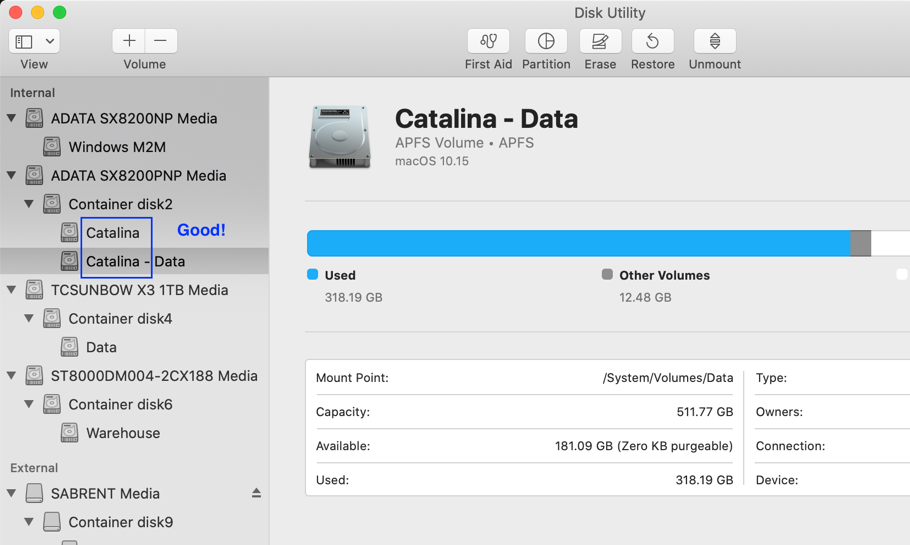
    • Use Disk Utility to fix any volume name mismatches. See screenshots below in which my former "Mojave" drive has a mismatched pair of volume names. This mismatch must be corrected as shown in subsequent images.
      full

      full

      full
  • Now let's get back to Carbon Copy Cloner setup. Here's that screenshot once again:
    full
  • Click on ADVANCED SETTINGS to expand that section, but don't make any changes there yet. In the diagram above, don't perform Step 5 until later.
  • Give the task a name on the left side panel.
  • Compare your screen with the screenshot above. I've named my task Full Catalina Local Backup.
Step 2: Attach EFIClone-v3 script for automated backup of EFI partition
  • Download the attached EFIClone-v3.sh.zip and unzip it if necessary. Note: This version has been specially modified for this use case. It is hard-coded to use the current root folder "/" as the Source Disk and is therefore not suitable for other backup tasks. This version has also been modified to detect the Mac operating system and make special adjustments for Catalina.
  • Open Finder and navigate to the folder containing this file.
  • From Carbon Copy Cloner's Utilities menu, select Reveal CCC's Scripts Folder as shown.
    full
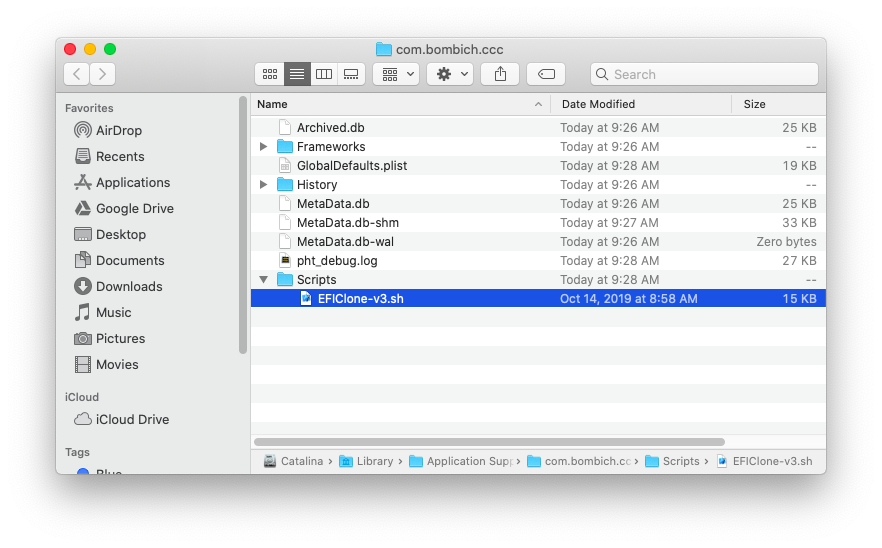
  • Drag and drop EFIClone-v3.sh into the Scripts folder. Catalina will ask for authentication, so enter your password when requested. The Scripts folder should look like this:
    full
  • Now we need to fix ownerships and permissions, which is done easily from the same Utilities menu. When this menu is now selected, notice that the last option has changed to Secure CCC's Scripts folder. Choose this item now.
    full
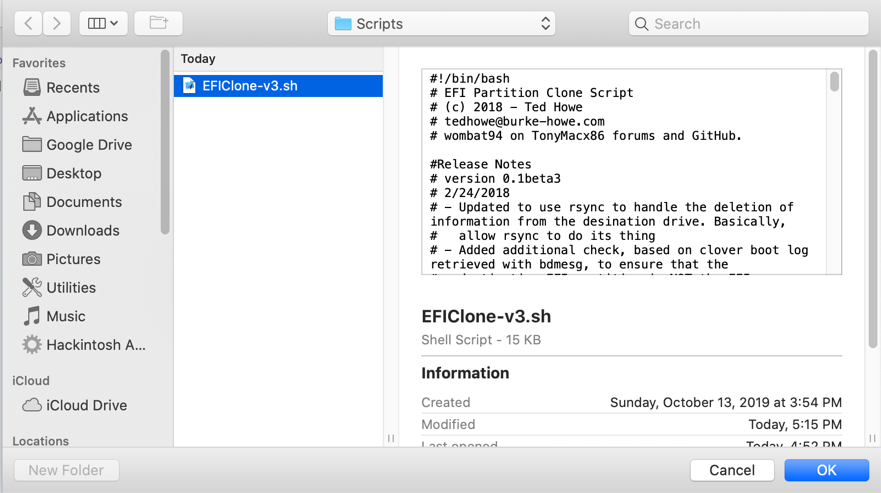
  • Great. We're nearly done. Now let's attach our script to the backup task by clicking the folder icon next to AFTER COPYING FILES --> Run a Shell Script and selecting EFIClone-v3.sh.
    full
  • Verify that your screen matches the items in the red box below.
    full
  • Save the task by pressing CMD-S or File --> Save.

Step 3: Test Run
  • Make sure that the external USB SATA SSD is mounted.
  • Click the Clone button at the bottom right of the CCC window.
  • From the Utilities menu, select Terminal to open a Terminal window.
  • In the Terminal window, type:
    Code:
    cd /System/Volumes/Data/Users/Shared
    tail -f EFIClone.log
  • When the main APFS partition has been backed up, CCC will invoke the EFIClone-v3 script. At that time you will see detailed logs messages in the Terminal window.
  • Press CONTROL-C to stop the log display and quit Terminal.
  • When the CCC backup task is complete, press OK at the top right.
  • Use Clover Configurator or EFI Agent to mount the EFI partition of the external USB SATA SSD.
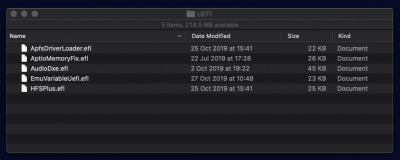
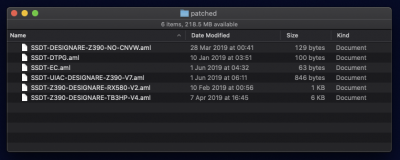
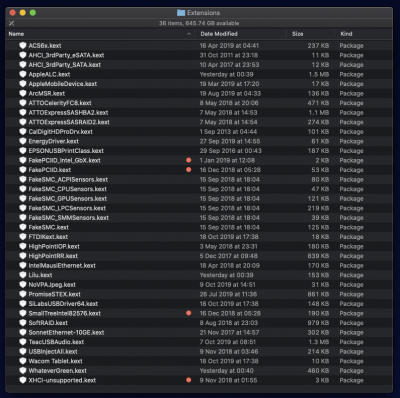
  • Open the CLOVER folder on that partition and check that everything has been copied.
  • Finally, reboot your machine and press F12 at the BIOS splash screen to select the USB SSD as the boot drive.
  • From the Clover Boot Menu, select "Boot macOS from Catalina Local Backup" (replace "Catalina Local Backup" with the actual name you gave to the USB SSD).
  • Make sure Catalina can boot up fully. Then reboot, disconnect the USB SSD, and boot from the internal Catalina SSD.

Keep your bootable USB SSD up to date by running CCC periodically. Simply boot from the normal internal disk, mount the USB SSD, and run the CCC backup task. It will mount both the source and destination EFI partitions automatically and then dismount both EFI partitions after the clone is complete.

If your clone or backup disk is internally mounted (always present in the system), it may be a good idea to disable Spotlight search on that drive because it's just a duplicate. This can be done from System Preferences --> Spotlight as follows:
View attachment 431607
CaseySJ,

I'm having an issue I can't quite figure out and was wondering what you thoughts were. I followed your instructions to backup my Catalina installation to the letter. My backup is on as 500 GB SSD (ADATA SP550) connected to one of the recommended USB3 ports. The backup with it's various partitions mounts fine and looks exactly like my boot drive, a Carbon Copy.
The trouble is when I restart my machine and hit F12 I never see or am presented with the option to boot into Clover
from it. I have attached several images to show you what I mean. I would think there would be an option to boot from
"UFEI OS (ADATA SP550) but it never shows up. I know there's a bunch of drives on my system and suspect there's more than the "boot Menu" can display.
Any idea of how I can resolve this situation?


IMG_4371.jpeg
IMG_4370.jpeg
Screen Shot 2019-11-05 at 10.21.11 AM.png
Screen Shot 2019-11-05 at 10.23.13 AM.png


Thanks in Advance, I'm open to any suggestions..
 
Thank you very much for the reply Casey!

If I not mistaken, the link you provide to me are talking about using the Nvidia card for display. My system currently running Mojave and soon might be upgraded to Catalina, because I want to try the Sidecar feature (since I also have iPad Pro as my secondary device for drawing). I have no problem with not using my GTX 1080 Ti, the UHD630 are fine with my working needs.

The problem I have are it seems the thunderbolt 3 connection are just sending the display data and without any usb data connection on it. I tried both Thunderbolt port on the motherboard (Z390 Designare) it having the same result, its have no problem displaying 4K image, but still no USB data connection. But I have tried to connect my phone (S10+) with the same port and the same Thunderbolt 3 cable, and it detect the phone with no problem (I can copy and paste files from and to my phone no problem).

I just have (small) hope my tablet works on this hackintosh, so I don't need to buy current gen MacBook Pro or at least using this hackintosh to wait the new gen MacBook with better keyboard.

I know my problem are very niche, but I really appreciate any reply on this matter.

Thank you~
The Cintiq might be using USB 2 protocol over the Thunderbolt connection. We can test this theory by temporally enabling HS08 and HS13 (and disabling two other USB ports to avoid exceeding the 15 port limit). If this is something you'd like to try, please do the following:
  • Mount EFI partition of Mojave SSD.
  • Go to the EFI/CLOVER/ACPI/patched folder.
  • Temporarily move SSDT-UIAC-DESIGNARE-Z390-V7.aml to the EFI/CLOVER/misc folder.
  • Copy the attached SSDT-UIAC-DESIGNARE-Z390-HS8-HS13-TEMP.aml to the EFI/CLOVER/ACPI/patched folder.
  • Reboot.
  • Connect the Cintiq and check again.
This SSDT removes HS05 and HS06 in order to add HS08 and HS13.
 

Attachments

  • SSDT-UIAC-DESIGNARE-Z390-HS8-HS13-TEMP.aml
    846 bytes · Views: 66
Last edited:
Back
Top