Contribute
Register

[SUCCESS] Gigabyte Designare Z390 (Thunderbolt 3) + i7-9700K + AMD RX 580

ok, I booted from USB and it worked

rebooted from SSD and it worked too.

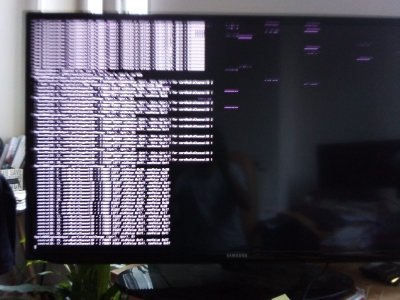
tried play around a bit, sound from jack port did not work so I opened Multibeast and installed first Realtek driver, closed multibeast, reopened and installed voodoo driver. Rebooted and got panic message during verbose debug msg. Rebooted from USB and got same panic. Now I can't access Mojave neither from USB nor from SSD. Looks really strange cause everything was working good.

How can I access mojave and do some changes if it always panics both from USB and SSD?

Thanks @CaseySJ
There is nothing in the build guide regarding Voodoo kexts because only AppleALC is compatible with this motherboard. We just need to download and copy the latest AppleALC.kext into the /Library/Extensions folder and rebuild kernel cache by running Kext Utility.

Also set audio layout to 7. If there's no sound from the audio jack, change the layout to 16, and finally to 1. A reboot is needed after each change. Also check System Preferences --> Sound --> Output to ensure that the built-in audio port(s) are showing up.

To repair the USB install disk, just do this:
  • Insert the USB flash disk in your real Mac.
  • Mount the EFI Partition of that disk using Clover Configurator --> Mount EFI option in the left side panel.
  • Open the EFI/CLOVER/kexts/Other folder and delete the voodoo kext
  • Eject the USB disk and insert into the Hackintosh.
  • Press F12 at BIOS splash screen and choose the USB disk to boot from.
  • At Clover Boot Menu, choose the normal Boot macOS from Mojave
  • After logging in to Mojave, mount the EFI Partition of Mojave SSD and delete voodoo kext from the CLOVER/kexts/Other folder
 
** Interim Update: Thunderbolt Local Node and Thunderbolt Bus **

First of all, don't get too excited. :)

Second of all, the screenshots below were taken on my Asus X99 Deluxe II Hackintosh. They show a complete Thunderbolt device tree!
  • Thunderbolt Local Node --> Successful
    • ThunderboltIPPort defining en6 (Thunderbolt Ethernet Bridge)
    • ThunderboltDPOutAdapter for Target Display Mode
    • AppleThunderboltPCIDownAdapter and AppleThunderboltPCIUpAdapter
  • Thunderbolt Bus --> Successful
    • Notice that Thunderbolt section of System Information does not say "No drivers are loaded". Instead, it displays the Thunderbolt Bus
I have a 2012 MacBook Air with Thunderbolt 2. So later this week I will attempt:
  • Hack-to-Mac Thunderbolt Ethernet connection
  • Hack-to-Mac TargetDisplayMode
  • Hack-to-Mac TargetDiskMode
Fine Print:
  • This only works with the Asus ThunderboltEx II card. It will not work with Asus ThunderboltEX 3.
  • I have the ThunderboltEx II Dual.
  • This card only works on Asus X99 motherboards.
  • Hot plug is not yet working. I just installed the card after approximately 3 weeks of wait (shipped from China via Ali Express) so have not fine-tuned the setup.
  • I have attached a PowerColor Gaming Station eGPU(via Apple Thunderbolt 3 to Thunderbolt 2 adapter) that includes USB 3 ports and an Ethernet port.
    • The USB ports and Ethernet port are working properly!
    • eGPU is not working. Might have to enable CSM Support.
If you were wondering why I built an "ancient" X99-based Hackintosh, this is the answer.

Now the hard part begins. I'll analyze the DSDT/ACPI tables to see if there's anything we can learn. But my suspicion is that the Thunderbolt 2 Falcon Ridge controller is treated differently by macOS Thunderbolt drivers, and it may not require any assistance from the BIOS/Firmware. This could mean, therefore, that any lessons learned from this experiment may not apply to Titan Ridge.

View attachment 419263

Close-up of IORegistryExplorer:
View attachment 419269

Close-up of Thunderbolt section of System Information:
View attachment 419268
Thunderbolt Ethernet Bridge device automatically added to the bottom of the list:
View attachment 419264

Really looking forward to this. Not sure why but this go round (build wise) I cannot get hot plug working. Good luck!
 
thanks for the answer @CaseySJ !

I deleted voodoo and realtek kexts > rebooted from USB > launched macOS mojave > still panic

I took the EFI I sent you earlier (the one that made it work at the beginning) > replaced the EFI in the EFI partition on the USB stick > rebooted from USB > launched macOS mojave > still panic

I don't seem to be able to recover Mojave anymore. Do you know alternative routes? Or do you suggest reinstalling the OS?

Thanks for your patience!
It might be a good idea to reinstall the OS. Because of issues with video output from the Radeon VII, I would encourage the use of a USB-C to DisplayPort video cable such as this one. The cable can be connected to either of the two Thunderbolt ports on the rear panel. Then set BIOS --> Initial Display Output --> IGFX.

After installation is done, let the system run smoothly with the iGPU and make a bootable backup. After that, we can help you with the Radeon VII.
 
Hi Casey, yes, It does hide that file's extension. All good thank you.


I will try the custom USB map. Maybe there is something there


I think my Radeon VII is the wildcard here. But yes, mostly followed and am using VirtualSMC to stop the annoying lag in iStat Menus.

I've never had a full PCI area in system profiler and only get the RadeonVII to show up here if I use the SSDT-Z390-DESIGNARE-RX580-V2.aml. Other users is chock full of stuff in the PCI area.
HEy @JayShay I couldnt see my Radeon Vega VII listed n PCI, am I missing something ? Also I only see ATI Radeon 16 GB in my about details.
 
Unfortunately your configuration has a lot of significant problems:
  • You are using SMBIOS iMacPro1,1. This machine uses an Intel Xeon processor that has no on-board IGPU, so we should delete the iGPU section from devices --> properties.
  • You have older versions of the SSDTs in CLOVER/ACPI/patched
  • You have every conceivable kext in CLOVER/kexts/Other
  • With Mojave 10.14.5 and later, we should not use any Vega SSDT.
  • You have not installed SSDT-DESIGNARE-Z390-NO-CNVW.aml
  • You are using FakeSMC with KGP's sensor kexts for the X99 board. These kexts are not recommended/compatible with latest Mojave release.
  • EmuVariableUefi-64 is missing.
Attached is a modified CLOVER folder that fixes all of these issue. It uses latest VirtualSMC instead of FakeSMC. To install, please do this:
  • Boot your system with the USB Install Disk so that you can boot and login to Mojave.
  • Using Finder, go to /Library/Extensions folder and delete FakeSMC.kextand any of the sensor kexts such as:
    • ACPISensors.kext
    • CPUSensors.kext
    • GPUSensors.kext
    • LPCSensors.kext
  • Then run Kext Utility to rebuild kernel cache.
  • Now mount EFI Partition of Mojave SSD using Clover Configurator ("Mount EFI" option on left side panel).
    • Backup existing CLOVER folder
    • Replace it with the attached CLOVER folder (rename it to just "CLOVER")
    • Remove USB Install Disk
    • Reboot
    • Is the system stable?
Thank you, I managed to isolate and fix the problem. However, as a result of applying your config-plist, Mac will not wake from sleep and will be turned off.
 
Here I am again!

Reinstalled as you suggested. Miraculously, Mojave recognised Radeon VII right from the beginning. I did my MultiBeast and Post-installation files homework and most things worked pretty good.

Audio didn't, so I changed the layout to 7 as suggested > rebooted and craaack

tons of lines of failed VRAM tests and audio problems (controlID: 17, coreAudioChannelID = 2 FRONT RIGHT oldValue 0x41)

I rebooted from USB and managed to re-put audio layout at 16. Reboot and same problem. Now I don't seem to be able to reboot from USB either.

I attach latest EFI folder after MultiBeast post-installation work, pic of error debug, snapshots of system specs after installation before MultiBeast and after MultiBeast. Hope they can help.

ADDITION. Also a nvram.plist file has appeared in EFI root folder. Attached below too.

ADDITION 2. If I put this EFI I zipped below in the USB's EFI and reboot I can actually access Mojave. I've copied this EFI in the place of the on in the SSD, rebooted, still same error about Audio..

Thanks for your amazing work @CaseySJ and all the others!
 

Attachments

  • EFIafterMultibeast.zip
    17.3 MB · Views: 64
  • macOS after Multibeast - things Im unsure if they are good.zip
    6 MB · Views: 99
  • macOS before Multibeast.zip
    22.7 MB · Views: 76
  • 3636d490-c5ad-4d5a-930d-f5597f299d2c.jpg
    3636d490-c5ad-4d5a-930d-f5597f299d2c.jpg
    198.6 KB · Views: 56
  • nvram.plist
    1.9 KB · Views: 61
Last edited:
Please try this:
  • Remove power cable from the wall for 10 seconds. Then plug it back in and boot the computer. Does it work?
  • If it does not boot, shutdown the computer, keep the power plug connected and follow the procedure in the manual to RESET CMOS. Use a flathead screwdriver to short 2 pins as indicated in the user manual. Read that section carefully and locate the correct pins on motherboard. It is a very easy procedure. You should be careful, but no need to be scared! :)
  • If computer still does not boot, insert USB Install Disk and boot the computer. At BIOS Splash Screen press F12 to select the USB boot disk. When Clover Boot Menu appear, choose Boot macOS from Mojave. Then mount EFI partition of Mojave SSD and check your EFI/CLOVER/drivers64UEFI folder. Do you have more than 1 memory fix driver?
    • You may also compress and upload your CLOVER folder if the problem continues.​
I reset CMOS like you told me by using a flathead screwdriver to short 2 pins. Now when I don't have the error locating, but I have this one : https://www.tonymacx86.com/threads/...x-580.267551/page-604#lg=post-1986224&slide=0

So I still can't install macos 10.4.6 :(
 
Alas, Thunderbolt cards can be very motherboard-specific. This SuperMicro card might only work with SuperMicro motherboards. It uses a SGPIO cable that may be incompatible with the F_THBC header on Gigabyte motherboards.

I think a good way to experiment with Falcon Ridge is to find a Gigabyte GA-Z87X-UD7-TH, which has built-in Falcon Ridge.
thanks. my sense, also, after doing some more reading is that add-in cards are probably mobo-specific. GA made TB2 cards, which I assume are falcon ridge, but none are on the used market and are long-since sold out at retailers.

I'll wait till you and the other smart folks here figure out how to get TB3 fully running now that you have a lead on compatibility on the falcon ridge-equipped boards.
 
I reset CMOS like you told me by using a flathead screwdriver to short 2 pins. Now when I don't have the error locating, but I have this one : https://www.tonymacx86.com/threads/...x-580.267551/page-604#lg=post-1986224&slide=0

So I still can't install macos 10.4.6 :(
If the Samsung 970 EVO Plus is installed in your system, you must update its firmware. Please see this post:

When the firmware is updated, delete the Install MacOS Mojave app from the Applications folder on your real Mac and download it once again. Then delete it from the USB Install Disk and copy it from Applications folder to USB install disk. It is possible that this file has been corrupted so this procedure will re-download it.
 
Back
Top