trs96
Moderator
- Joined
- Jul 30, 2012
- Messages
- 25,540
- Motherboard
- Gigabyte B460M Aorus Pro
- CPU
- i5-10500
- Graphics
- RX 570
- Mac
- Mobile Phone

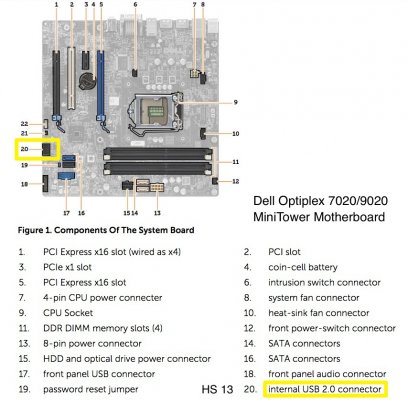
Dell Optiplex 7020/9020 Desktops
macOS 11 Big Sur
This is a separate "cousin" thread to the main Golden Build thread for the Dell Optiplex 7020/9020 desktops. That focuses primarily on macOS Mojave/Catalina. There is a massive amount of useful info in the Golden Build thread that applies to your Dell Optiplex so make sure to read it first. The buyer's guide, in the beginning section, will help you choose the best graphics card and show you other compatible hardware available for your build.
In this thread, we'll focus on the topics of OC (OpenCore) and Big Sur installation on your Dell Optiplex 7020/9020.
Note that not all of the steps in this guide apply to the Optiplex 3020 desktops or the 3020M/9020M micro form factor. Do not use it for those. You can find the link to the 3020 SFF guide in the FAQ section (2nd spoiler) of the OptiMac Golden Build thread or you can click here to see that.
Using the OpenCore Bootloader with Big Sur
Install Big Sur to a clean, separate SSD or HDD to experiment with it first. When you are ready to upgrade to Big Sur and use it full time, then switch to using this new drive. In my testing I've found that a clean install of Big Sur using OC will give you the best results. Clover r5123+ has been modified for use with Big Sur. It makes setting up your config.plist more complicated than simply using OpenCore so avoid it for now. This thread will not support Clover users.
Important Tip #1 OpenCore is a Boot Manager like Clover. It's not simply an improved version of Clover. The code was written by the Acidanthera team as a fresh start to improve upon what Clover can do. You will need to learn many new terms and techniques to have success with OC. (See attached reference manual). Your existing Clover config.plist will not work with OC. You'll need to create a new custom one for OC that works with your specific Optiplex hardware. You'll need to learn how to use the OC snapshots feature of the ProperTree app by CorpNewt. A great tool that makes the whole task of creating your working config.plist much simpler.
Don't be in a hurry to start using OC, study first so that you understand what you are doing. It's going to be a steep learning curve for beginners and even experienced hackintoshers. Using the approach of copy/pasting another person's EFI folder doesn't help you to learn much of anything. When eventual problems occur, your efforts will pay off. You will be able to solve them (OC problems) yourself more easily if you understand the unique features and options of OpenCore. At first the sheer number of Quirks to learn about can appear overwhelming. Don't worry, I'll point out the most important ones that you need to change to be able to boot macOS Big Sur.
Important Tip #2 Use the Late 2014, iMac15,1 SMBIOS to download and install Big Sur. Late 2013 iMac14,1 and 14,2 have been dropped from support in Big Sur. I plan on using 15,1 with my i7-4790 based system. The Late 2014 Retina iMacs had an optional Haswell refresh 4790K CPU so that is the best fit. It will also work well with first gen Haswell CPUs from 2013 such as the i5-4570 and i7-4770. The i5-4590 and i5-4690 also work with iMac 15,1. UPDATE: June 11, 2021 : Apple has dropped support for the 2014 iMacs in Monterey. This is disappointing. The next closest iMac that is supported by Monterey would be the Skylake based Late 2015 iMac17,1. That should work with Monterey. If you will only use the iGPU to power your display, then Macmini 7,1 appears to be the best match for this hardware. Be aware of this if you plan on installing Monterey at some point.
Haswell Refresh CPUs from early 2014 shipped in the Late 2014 27" iMac models.
Important Tip #3 All the Hackintosh related kexts and drivers by Acidanthera will be tested for their compatibility with the OC Bootloader exclusively. This means they may no longer work properly with Clover, unfortunately.
It makes sense that we migrate to OC for macOS Big Sur and future releases by Apple for the very best function and compatibility of our hackintoshes. Since 10.7 Lion, the prelinkedkernel has been the default way for real Macs to boot. This contained a very minimal amount of kexts to get a mac booted. This same bundle is what OpenCore uses to inject kexts, and was hoped to last quite some time. With macOS Big Sur, a huge change happened where Apple no longer makes it the default form of booting. Acidanthera has solved this problem. Make sure to use at least OpenCore 0.6.3 or newer with the public release of Big Sur.
Big Sur Graphics Card Support
It seems that some brands of GT 710 DDR3 are no longer OOB supported by Big Sur. If you have one you'll need to test it. You may get a black screen on boot up. The Quadro K600 (GK107) still works OOB. If you have a GT 710 that works or doesn't work for you, be sure to post your results. If you have a CPU with HD4600 iGPU that is your best choice for basic graphics support. Use DP adapted to HDMI if your monitor has no DP inputs. AMD Polaris and newer Navi cards must have Legacy Option ROM disabled to work normally. Older Nvidia Kepler cards like the K600 need to have Legacy Option ROM enabled, just like the HD4600 iGPU.
If you do have an AMD RX 570 or 580 and want to run triple monitors that should work with no problems. Just note that one of the three DP outputs will not work. You'll have to test your brand of card to figure that out. Here's my RX 570.
Monterey 12.1 is now out and we've learned that Nvidia Kepler cards have lost support and the mid 2014 iMac 15,1 has also been dropped from Monterey. If you are just starting out and definitely want to upgrade to Monterey at some point, you can use either iMac 17,1 or Macmini 7,1 as your SMBIOS. There is a shorter simplified guide for Monterey you can read in Monterey Desktop Guides.
Dell Optiplex 7020/9020 using OpenCore + Intel HD4600 or AMD graphics
Dell Optiplex 7020/9020 OpenCore Guide The original Dell OptiMac Golden Build guide was posted 3 years ago in May 2019. Mojave was the latest macOS version then. I didn't think we would have Monterey support in 2022 but we've found that these models are still fully supported, hence this updated...
Necessary First Steps For All Dell 7020/9020 OptiPlex Owners
BIOS flashing and setup
For new OptiMac owners that haven't installed Catalina or Mojave yet, make sure you are using the latest BIOS. If your Optiplex didn't come with Windows pre-installed, see the following:
How to Create a Windows To Go USB drive
There are now many ways to create a WTG drive with software from different companies. Here's a description of the top 5. Only the first 4 are recommended by the author. https://www.intowindows.com/4-tools-to-create-windows-to-go-usb-of-windows-10/ You can use Rufus to download a Windows 10 iso...
Flash your BIOS to A18 for the 7020 models and A25 for the 9020 Optiplex models. See the Golden Build thread for all the details on how to do this via Windows or by using a FAT32 formatted USB flash drive. After the BIOS flash is complete boot into the BIOS with the F2 key and Load Defaults and click OK then Exit. Your Dell will reboot. Press F2 again to enter the BIOS. The four absolutely mandatory BIOS settings to change are listed below. If your BIOS is not set this way, installing macOS Big Sur will likely fail. Also read and apply "Recommended settings."
General
Boot Sequence -> Boot List Option -> UEFI
Advanced Boot Options -> check box- Enable Legacy Option ROMs (if using HD4600)
AMD graphics cards require disabling Legacy Option ROMs
System Configuration
Sata Operation -> AHCI
Serial Port -> Disabled
Secure Boot
Secure Boot Enable -> Disabled (automatically disabled when you load defaults)
This Spoiler shows you all the other suggested BIOS changes.
Click on it to see what other changes you may need to make.
Summary of BIOS Setting Changes
General
Boot Sequence -> Boot List Option -> UEFI
Advanced Boot Options -> check box- Enable Legacy Option ROMs
If using an AMD RX 560/70/80 -> Disable Legacy Option ROMs
UEFI Boot Path Security -> Set to Never
System Configuration
Integrated NIC -> Enabled
Serial Port -> Disabled
Sata Operation -> AHCI
Video
Primary Display -> Auto (For HD4600 Nvidia or AMD)
To Enable VDA Decoder (Headless - iGPU used for compute)
Primary Display -> Nvida or AMD HD Graphics

Secure Boot
Secure Boot Enable -> Disabled
Power Management
Deep Sleep Control -> Disabled
Virtualization Support (i5 and i7 CPUs only)
VT for Direct I/O -> Disabled (see below if you need it enabled)
General
Boot Sequence -> Boot List Option -> UEFI
Advanced Boot Options -> check box- Enable Legacy Option ROMs
If using an AMD RX 560/70/80 -> Disable Legacy Option ROMs
UEFI Boot Path Security -> Set to Never
System Configuration
Integrated NIC -> Enabled
Serial Port -> Disabled
Sata Operation -> AHCI
Video
Primary Display -> Auto (For HD4600 Nvidia or AMD)
To Enable VDA Decoder (Headless - iGPU used for compute)
Primary Display -> Nvida or AMD HD Graphics
Secure Boot
Secure Boot Enable -> Disabled
Power Management
Deep Sleep Control -> Disabled
Virtualization Support (i5 and i7 CPUs only)
VT for Direct I/O -> Disabled (see below if you need it enabled)
Once you've got the BIOS flashed and set up, Unlocking CFG is mandatory for the Big Sur install to work.
Unlocking CFG and Disabling VT-d (VT for Direct I/O)
CFG Lock prevents macOS from writing to a certain region in your BIOS. macOS does this writing for power management and other reasons. If it can't access those areas, it will not boot. This is why we'll need to boot into a modified GRUB shell and perform this CFG unlock manually before installing Big Sur. See post #6 below for instructions on how to do this.
What is CFG-Lock ? Dortania Guide
The VT-d setting is accessed via the Dell BIOS user interface. You should have already done this step as shown above. If you do want to leave VT-d enabled for use with Windows, then set: Kernel -> Quirks -> DisableIoMapper to True in your OpenCore config.plist.
Using Windows 10 before you install macOS
Even if you never use Windows 10 and your Optiplex came with it, don't erase your HDD just yet. It will be extremely useful to you before macOS Big Sur is installed. Use it to easily flash/update the BIOS. One optional step is to add native NVMe boot support. Don't do this unless you have an NVMe drive you want to boot macOS from. It is not risk free and you could possibly brick your motherboard. If you follow that guide, proceed slowly and perform each step correctly.
This guide at TachyTelic.net shows you step by step how to enable booting from NVMe. You can't flash anyone else's modfied BIOS. The steps in the guide must be done on the same machine that will use the modded BIOS.
Install and boot from an NVMe SSD on a Dell OptiPlex 9020, 7020 or 3020
How to modify the BIOS of a Dell Optiplex 9020, 7020 or 3020 so that it can boot from a PCIe NVMe SSD Drive for maxiumum performance.
 www.tachytelic.net
All About OpenCore
To start learning more of the OpenCore basics please see the Dortania OC Guide for Haswell systems on github.io.
Here's the OpenCore Manual https://dortania.github.io/docs/release/Configuration.html
Last edited: