
trs96
Moderator
- Joined
- Jul 30, 2012
- Messages
- 25,571
- Motherboard
- Gigabyte B460M Aorus Pro
- CPU
- i5-10500
- Graphics
- RX 570
- Mac
- Mobile Phone
The Dell Optiplex 9020 and LG 4K IPS Monitor


____
Components____
Dell Optiplex 7020/9020 Mini-Tower (MT)
Amazon - Newegg
Dell Optiplex 7020/9020 Small Form Factor (SFF)
Amazon - Newegg
Dell Optiplex 9020 Ultra Small Form Factor (USFF)
Amazon - Newegg
Dell Optiplex 9020 Motherboard (MT) mATX Form Factor
Amazon - NeweggRecommended Amazon Seller
4K Monitors 27" and 43"
BenQ PD2700U 27 inch 4K IPS with 100% sRGB Rec. 709
Amazon Most color accurate monitor for Photo Editing
LG 27UK500 - 4K UHD Monitor
Amazon DCI-P3 98% Color Gamut + AMD FreeSync (best value)
Mount Pro Single Monitor Stand - Best for above LG monitor
Amazon Use to replace the existing LG monitor stand
43" 4K Hisense Television for use as your Monitor
Amazon IPS, low input lag, Chroma 4:4:4 subsampling
Dedicated 4K Graphics Cards - Single and Dual Slot
Warning (Nvidia Graphics cards are no longer supported in Monterey 12.x)
1. The SFF Dell Optiplex only takes low profile single slot graphics cards
AMD Radeon Pro WX 4100 LP 4GB (4 mini DP outs) 4K@60Hz
Amazon - Newegg
Nvidia Quadro NVS 510 2GB (4 mini DP outs) 4K@60Hz
Amazon - Newegg
Gigabyte GT 730 2GB GDDR5 4K@30Hz
Amazon - Newegg
Asus Geforce GT 710 2GB GDDR5 4K@30Hz (via HDMI)
Amazon - Newegg
Nvidia Quadro K420 2GB DDR3 4K@60Hz (via DP 1.2)
Amazon
2. Full Height Dual Slot Graphics Cards for the MT Dell Optiplex
Sapphire PULSE RX 6600 8GB (Mini-Tower only)*
Amazon - Newegg (only works with Monterey)
Gigabyte Radeon RX 580 8GB (Mini-Tower only)*
Amazon - Newegg
* The RX 6600/RX 580 will need a PSU upgrade - Newegg
Recommended Intel HD4600 Processors
Intel i7-4790 CPU
Amazon - Newegg
Intel i5-4690 CPU
Amazon - Newegg
Modify your Dell Mini-Tower and Use a Longer 10"+ Graphics Card
Video Demo - how to fit Longer Graphics Cards
PC Case Upgrade - Move your MT Dell OptiMac to a new Case
Lian Li 205M MicroATX PC case - Steel and Tempered Glass
Amazon Also available in ATX form factor (black or white)
Thermaltake S100 MicroATX Case - Top mesh for airflow
Amazon Available in Black or White with hinged glass side panel
7020/9020 MT only - Front Panel I/O + Power Switch Header Adapters
Ebay.com - Ships to USA, Canada, UK and EU countries + Australia
(not to Africa/Asia or South/Central American countries)
Power Switch Header only (no front panel I/O)
Ebay.com
Cables and Adapters
Mini DP to DP Cable for NVS 510 - Amazon
DisplayPort to HDMI 2.0 Adapter - Amazon 4K@60Hz
(Connect a dedicated card to a 4K television or Monitor w/HDMI 2.0)
DisplayPort Cable Nylon Braided - Amazon 4K@60Hz
RAM and SSD Upgrades
Hynix DDR3 1600 MHz 16GB (2 x 8GB)
Amazon - Newegg
Crucial 2.5" 500GB Sata SSD
Amazon - Newegg
WD Blue SN570 500 GB NVMe Drive
Amazon - Newegg
WD Black SN750 500 GB NVMe Drive
Amazon - Newegg
M.2 NVMe SSD to PCIe x4 Adapter Card
Amazon (No heatsink)
AVOID all Samsung NVMe drives. They have TRIM problems.
Natively Supported Wifi and Bluetooth
Fenvi FV-HB1200 Broadcom 94360CS2 Wifi/BT Adapter
Low Profile or Full height (Win10 driver attached below)
Amazon - Newegg
Fenvi FV-T919 Wifi/BT Adapter (Mini Tower Only)
Amazon - Newegg
USB Wifi Adapter (Needs drivers installed)
Newegg
USB Type-C PCIe Adapter (Asmedia 3142 Chipset)
Amazon
USB Microphone
Blue Yeti Nano Professional
Amazon
Power Supply Upgrade (Get at least a 550W for a 580/590)
EVGA 500 BQ 500W (Semi-Modular) Budget PSU
Newegg
EVGA SuperNOVA 550W G3 80+ Gold (Fully Modular)
Newegg
24 To 8 Pin Power Supply Adapter (Needed if you upgrade to an ATX PSU)
Amazon See this post for more info about the adapter
CR2032 Energizer CMOS Lithium Battery - 2 pack
Amazon
Rosewill 140mm 3 pin Case Fan
Amazon Economy 2 pack
Replacement CPU Cooler
CoolerMaster i70c 95W TDP LGA 1155 Intel Cooler
See this post for more info on this cooler and the 5 pin adapter needed.
Operating System
macOS High Sierra, Mojave or Catalina
See my gibMacOS guide for how to download older versions of macOS
macOS Big Sur
Download from the Mac App Store on an eligible Mac or Hackintosh
Installing Big Sur with OpenCore
There is a separate thread on this topic located in Big Sur Desktop Guides.
The Dell OptiMac Big Sur/OpenCore Thread - For 7020/9020 Optiplex Desktops
Dell Optiplex 7020/9020 Desktops macOS 11 Big Sur This is a separate "cousin" thread to the main Golden Build thread for the Dell Optiplex 7020/9020 desktops. That focuses primarily on macOS Mojave/Catalina. There is a massive amount of useful info in the Golden Build thread that applies to...
Links to Sections of this Golden Build Guide
0. Preliminary Steps - Hardware Prep
1. Create the USB Installer - USB Installer
2. BIOS Update and Configuration - BIOS Update
3. The Mojave Install Step - Install macOS Mojave
Shortcut to Attachments - Download Kexts and SSDTs
Dell Optiplex + iMac = The Dell OptiMac
This build is based on the Late 2014 5K iMac 15,1. That iMac model has an i5-4690 or i7-4790K, a maximum of 32GB of RAM and a Fusion drive. This was the first iMac with the 5K Retina monitor. It was a CTO (configure to order) model. See the full specifications here: Late 2014 Retina iMac 27"
If you are a video editing professional and need HEVC, H.265 encoding and decoding you'll be better off building a new Intel based system with an i7 or i9. The primary advantage of the Dell Optiplex 7020/9020 is that you'll get a lot of performance for a lot less money. All new ninth or tenth gen Intel based hardware will cost about 3x more. This build will not work for you if you'll need 6 to 8 cores and more than 32GB of ram for the work you do on a daily basis. I can highly recommend either of the Z390/Z490 Intel Guides right here in Golden Builds by moderator CaseySJ.
Frequently Asked Questions
The 9020 Optiplex SFF and MT PCs are not significantly different from the 7020s in respect to creating a CustoMac with them. The BIOS for the 9020s offers a Raid option that the 7020s don't. I suggest that you get either the 7020 or 9020 SFF/MT form factors as they give you the option for a maximum of 32GB of ram and have PCIe slot expansion. Prices are lower than the Micro/USFF versions too. Purchase one with at least an Intel Core i5 that has integrated HD4600 graphics. Always a good idea to have fully supported integrated graphics in any hackintosh.
Click here to compare them. Note that the 7020 models can accept a 32GB kit of ram.
Dell mistakenly says that they only support 16GB of ram.
Yes, though you'll need to follow this guide instead: 3020 SFF
If you've yet to puchase your Dell, opt for a 7020 or 9020 model. The 3020 uses a chipset (H81), that has fewer Sata ports and USB ports. You only get two onboard USB 3 ports in the back. There are only two memory slots that limit you to 16GB of ram. If you want the lowest possible cost hackintosh and only need integrated HD4600 graphics, you could buy the 3020 SFF with a core i5.
If you've yet to puchase your Dell, opt for a 7020 or 9020 model. The 3020 uses a chipset (H81), that has fewer Sata ports and USB ports. You only get two onboard USB 3 ports in the back. There are only two memory slots that limit you to 16GB of ram. If you want the lowest possible cost hackintosh and only need integrated HD4600 graphics, you could buy the 3020 SFF with a core i5.
The process of hackintoshing the 9020 AIO is completely different. This guide won't work completely for those. Search this site for the 9030 AIO guide. Buy one of those if you'd like and follow that excellent guide.
Any six year old iMac in good condition, that is fully functional, maintains a high resale value. A 27" Retina 5K iMac like the one mentioned previously can cost you a hefty sum of money. You can configure a Dell Optiplex MT with 32GB of ram, an i7-4790 and an AMD RX 580 8GB for about 1/3 of the price of an iMac with similar specs. The AMD Radeon RX580 is much better than the older R9 M290X that comes with the Late 2014 iMac. The Core i7 CPU will not thermal throttle as it does in the airflow restricted iMac. You get a lot more performance for a lot less money.
A 2014 5K iMac in good condition on Ebay will cost you from $600 to $700 currently. Fairly expensive even today.
The downside of any iMac is that it's an enclosed all in one that is difficult to repair or upgrade. When you buy a Dell Optiplex and install macOS, repairs and upgrades are easy and as low cost as possible. You can do them yourself in a matter of minutes whereas iMac parts, repairs and upgrades are expensive and time consuming. I recently purchased a like new Optiplex 9020 MT motherboard for fifteen USD shipped. Compare that to what the 2014 iMac board would cost and how difficult it is to install one. (Cost of a used/working 2014 iMac logic board would be well over 200 USD)
This OptiMac build includes your choice of either a Mini-tower Dell or a Small form factor Optiplex you can put on your desk. Optional 4K LG monitor, a separate NVMe drive and a 1TB mechanical hard drive not being combined as a Fusion drive. In the SFF version a 2.5" Sata SSD can be placed in the Optical drive bay once that is removed. It also gives you the option of using multiple (4) 4K monitors via the NVS 510. Dual 4K monitors via the 2 DP 1.2 outputs can also be utilized. This will require that you change the DVMT pre-allocation to 64MB. More on how to do that in a minute.
Here are the Optiplex CPU, Memory and Graphics specs from the Dell Owner's Manual.
Choosing DDR3 1600 MHz Ram Modules
Many of these Dell desktops will come with 8GB of ram pre-installed. Hopefully it is a 2 x 4GB kit. If it is a single 8GB DIMM then simply add a matching 8GB DIMM to make your system operate in dual channel mode. 16GB of ram should be enough for most users. If you will be editing photos/videos or recording audio then it's better to buy two 16GB ram kits to fill in all four DIMM slots on the board. Then you'll be set for years to come. The Samsung and Hynix ram is 100 % compatible with these Dell motherboards. Hynix also sells the Timetec branded ram. Buy the 1600 MHz variety.
Using Intel HD4600 Integrated Graphics
Every Intel i5 or i7 CPU that came pre-installed in these has the HD4600 graphics built in. These include the Haswell i5-4570, i5-4590, i5-4670 and i5-4690 etc. HD4600 is preferred because it has full support in macOS Mojave and Catalina. You can also use HD4600 exclusively with Big Sur, no dedicated graphics required. Just make sure to use SMBIOS iMac15,1 if you would like to eventually upgrade to Big Sur. If you want Monterey for the long term, then choose Mac mini 7,1 as that is the last Haswell based Mac that still has support in Monterey.
Complete list of Desktop CPUs with Intel HD4600 Graphics
I'd suggest that you use any of the following Intel CPUs in the chart. Any of the K variants such as the i5-4690K or i7-4790K can be used but cannot be overclocked. Dell never shipped these desktops with any K series CPUs. At first it will appear that they are not supported. Simply boot into BIOS then restart and they should be recognized.
Recommended Core i5 and i7 CPUs with HD4600 Graphics
i5 - 4570___i5 - 4570S* ___ i5 - 4690___i5 - 4690Ki5 - 4590___i5 - 4590S* ___ i7 - 4770___i7 - 4770S*
i5 - 4670___i5 - 4670S* ___ i7 - 4790___i7 - 4790K
* S CPUs are clocked lower by 300 MHz from the stock clock speed
The S Intel CPUs are often used in the USFF and SFF models because they have lower TDPs. The i3-4330, i3-4340, i3-4350 and i3-4360 are also compatible. All have HD4600 graphics but they only have 2 cores and 4 threads. You can certainly use the Core i3 versions which have the HD4600 iGPU. Avoid the HD4400 versions such as the i3-4150 and i3-4160. To learn more about which i3s will work see: Using an i3 CPU with your Dell OptiMac
Use a DisplayPort Connection to your Monitor
Apple has always preferred to use DP in Macs vs. HDMI or VGA. They stopped supporting analog VGA connections over ten years ago. Take home point: Do not try to use the VGA connection for the macOS install. It will end in failure.
To use three monitors or more, buy one of the graphics cards listed above in the components section other than the GT 710. Those have only two digital outputs. Get at least a Quadro NVS 510 or WX4100 graphics card for a three monitor setup. AMD RX 500 or 5000 series graphics cards are preferred if you want to utilize a 4K@60 Hz resolution monitor and edit 4K video in FCP X.
You can power a 4K/60Hz display with HD4600 graphics when running Windows 10 with no UEFI modification. When running macOS, scale the resolution to 2560 x 1440 for the best experience when using this guide for the Mojave install/post install.
Intel HD 4600 Graphics Specs

Why 4K via onboard DisplayPort does not work OOB
The dual DP 1.2 ports on these Dell Optiplex models are 4K/60Hz capable. With a maximum bitrate of 21.6 Gbps.Why 4K via onboard DisplayPort does not work OOB
Because there is no DVMT pre-allocation setting in the BIOS that can be increased, 4K via onboard graphics is not feasible without some changes to the UEFI. The first step is to remove the CFG lock and then increase DVMT to 64MB. You would need to do this after you've updated your BIOS as described in Step #2 below. Choose the newest BIOS version Dell offers for either your 7020 or 9020 Optiplex.
If you want to modify your Dell UEFI firmware to make 4K work with HD4600 graphics then read and post here:
 www.tonymacx86.com
You should unlock CFG at the same time as when you increase DVMT pre-allocation to 64MB. Required for Big Sur.
www.tonymacx86.com
You should unlock CFG at the same time as when you increase DVMT pre-allocation to 64MB. Required for Big Sur.
Note that you'll need to use a USB drive with an OC EFI folder in the EFI partition to boot to a GRUB shell. Changing the DVMT pre-allocation from 32MB to 64MB enables a 4K monitor to work via your onboard DisplayPort output.
If you want to modify your Dell UEFI firmware to make 4K work with HD4600 graphics then read and post here:
The Dell OptiMac Big Sur/OpenCore Thread - For 7020/9020 Optiplex Desktops
Dell Optiplex 7020/9020 Desktops macOS 11 Big Sur This is a separate "cousin" thread to the main Golden Build thread for the Dell Optiplex 7020/9020 desktops. That focuses primarily on macOS Mojave/Catalina. There is a massive amount of useful info in the Golden Build thread that applies to...
Note that you'll need to use a USB drive with an OC EFI folder in the EFI partition to boot to a GRUB shell. Changing the DVMT pre-allocation from 32MB to 64MB enables a 4K monitor to work via your onboard DisplayPort output.
- This is a completely optional step, you don't have to do this unless you have a 4K monitor
- If you are a hackintosh beginner, you can skip this step until you need 4K functionality
Choice of Dell Optiplex Form Factor
Choose the small form factor (SFF) for your OptiMac if you prefer the smaller size and don't need the more powerful RX 570/580 graphics for gaming/editing. I've got the 9020 MT with a Gigabyte Aorus RX 570 installed and a 7020 SFF that I've used in testing for this guide. Both perform splendidly with Mojave 10.14.6.
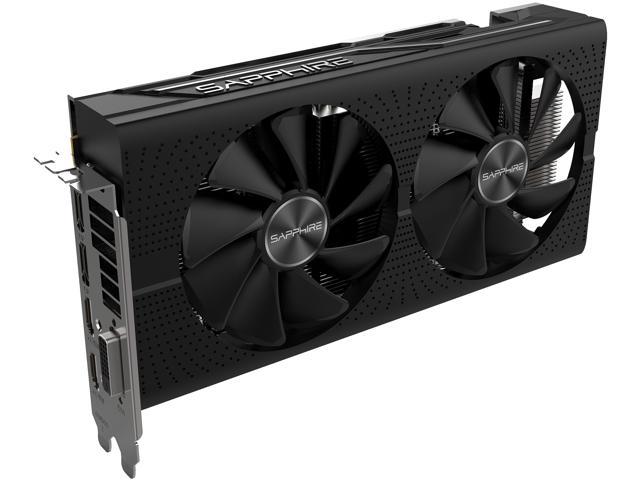
Install a Supported AMD Radeon Graphics Card
If you purchase the MT form factor, that will give you the option to use an RX 570 or 580. Dell redesigned the 7020/9020 MT motherboard to accommodate longer graphics cards. Up to 9.2 inches / 234 mm full length cards will not block Sata ports or the USB 3.0 header. Cards that are 10 inches in length or more will run into the hard drive cage.
The area in the blue rectangle below has no Sata ports or USB 3.0 headers there that will be hindered by a dual slot AMD graphics card. Most double wide graphics cards will block the use of your x1 PCIe slot next to the CMOS battery.
Amount of Room for a Full Size Graphics Card
_________
This 9020 SFF complete teardown video shows you how to take apart your Dell to make upgrades and to perform any maintenance such as replacing the thermal paste. Note that you don't have to fully remove the motherboard to do this.
1. Replace the Existing Thermal Paste on the CPU IHS (Integrated Heat Spreader)
Even if you bought your Dell from a professional refurbisher, it's highly unlikely that they took the time to replace the thermal compound between the CPU and heatsink. After four or five years, it needs to have the old compound removed and a fresh coat applied. Leave the CPU secured in it's socket, don't remove it. Use 99% isopropyl alcohol and some guaze pads to remove the old paste and wipe it clean. If you can't obtain the 99% IPA use the 70% version as a replacement. Then apply some new paste like the Arctic MX4 which is available on Amazon or Newegg. If you don't have experience doing this look for some online video tutorials that show you how. A new coat of thermal paste will help keep temps much lower when you are pushing your CPU during gaming or video/photo editing.
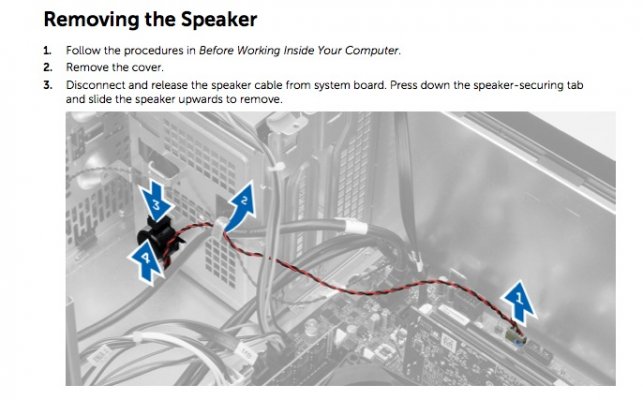
2. Replace the CMOS Battery
These Dell Optiplex PCs are about 5 years old and may have sat on a shelf for two years unplugged from power. When Lithium batteries stay in a fully discharged state for long periods it greatly reduces their ability to hold a charge. My 9020 MT model had a battery like this. I kept getting a black screen at boot up. Was not able to even access the BIOS until I removed the battery for a minute and reseated it. I had checked the battery with a multimeter and it read 3.0v. Should be good right ? Even if it reads 3.0 volts it still may not be able to provide adequate voltage under load. When I test new CR2032 batteries the reading is often from 3.4 to 3.5 volts. That's how a good battery should test out.

How to Replace the CMOS Battery
Information about why time may be lost or decreasing rapidly and how to replace your computer cmos battery.
3. Remove any Add in Cards
If your Dell has any kind of wireless adapter installed (USB, PCIe or Mini PCIe) remove it before attempting the installation of macOS. Use Ethernet until after you've got everything else working properly. Then you can work on Wifi function after that. If you have a supported Broadcom card like the Fenvi FV-HB1200 you can keep that in a PCIe Slot during initial install.
4. Check your Dell's Intel ME setting
If you will be using only HD4600 as your primary graphics, you must first check whether Intel ME is enabled or not. Open up the removable side panel and you'll find a white sticker attached there. It should display a large 1 (enabled).
If it is a 3 or a 6 then you need to return or replace your Dell. The iGPU won't work unless Intel ME is enabled.
Finally, If you are unfamiliar with any of the terminology used here, please consult the Hackintosh Four Letter Words post for a clear and concise definition of the various acronyms and hardware components mentioned in this guide.
To start with an install of Big Sur first, see the OC Guide for that: https://www.tonymacx86.com/threads/the-dell-optimac-big-sur-opencore-thread.302383/
Step 1. Create your Mojave or Catalina OpenCore Installer
Download Mojave/Catalina from the Mac App Store on a 2012 or newer iMac or Mac mini running Mojave or macOS Catalina. A Mac Pro should be 2010 or newer and eligible MacBooks should be 2015 or newer models. MacBook Airs and MacBook Pros should be from 2012 or newer. Here's the official Moajve/Catalina links from Apple.
https://apps.apple.com/us/app/macos-mojave/id1398502828?mt=12
https://apps.apple.com/us/app/macos-catalina/id1466841314?mt=12
When you click the above links you must be using the Safari browser or you will get an error message.
Firefox and Chrome or other browsers do not work with these two links.
A hackintosh must also be running Mojave or the Catalina edition of macOS and use one of the following minimum system definitions or newer.
MacBook 8,1 / Early 2015
MacBook Air 5,1 or 5,2 / Late 2012
MacBook Pro 9,1 or 9,2 / Mid 2012
Mac mini 6,1 or 6,2 / Late 2012
iMac 13,1 or 13,2 / Late 2012
iMac Pro 1,1 / Late 2017
Mac Pro 5,1 / Mid 2010/2012*
Mac Pro 6,1 / Late 2013
*The 2010/2012 Mac Pro would need a Metal 2 capable graphics card.
See: Mojave compatible graphics card choices
If you have a 2011 or older Intel based Mac and can only install High Sierra or older macOS versions see: https://www.tonymacx86.com/threads/gibmacos-tutorial-how-to-download-macos-catalina.295248/
If you don't have access to a Mac capable of making the OpenCore USB Installer
If you would rather create and use a Linux Live USB, there is a way described by Chris Titus Tech. His method also uses OpenCore bootloader. If you are familiar with Linux it's a viable alternative for those without access to a Mac.

Use a Windows 10 host OS to download macOS
There is now an option to download directly from Apple servers using gibMacOS on a PC. For those that don't have a Mac or working Hackintosh this is the best method to use to make an installer with Mojave or Catalina to get started.
Make an Online OpenCore USB installer in Windows 10
Introduction If you want to try out macOS for the first time and have no access to an Apple built, Mac Computer, it's the old Chicken and the Egg dilemma. You have no Mac so how do you create your macOS USB installer and install macOS without one ? If you use Windows 10 and install Python...
The older Snow Leopard DVD method can still be used but takes longer and requires that you buy the retail DVD.
1. Purchase the Snow Leopard 10.6.3 retail DVD-ROM Full Version. https://www.amazon.com/gp/product/B0095KAABA/?tag=tonymacx86com-20 Buy only the Apple made DVD. Some sellers burn a copy to DVD and try to sell you that. Those will probably not work for installing with this method. Don't throw your money away.
2. Use iBoot Haswell to install Snow Leopard. https://www.tonymacx86.com/resources/iboot-haswell-1-0-1.204/
Use only a CD disc to create the iBoot installer. A DVD disc will not work. Every Dell has an optical drive included.
3. Upgrade to 10.6.8 with the Combo Update from Apple. https://support.apple.com/kb/dl1399?locale=en_US
4. Download Yosemite and run that installer. https://www.tonymacx86.com/threads/...mg-files-to-upgrade-from-snow-leopard.287340/
5. Create a Yosemite USB installer with Chimera Bootloader and then boot from that to clean install Yosemite.
6. Download macOS Mojave, Catalina or Big Sur from Apple and then create your OpenCore USB installer.
May of 2021 Update - Using the OpenCore Bootloader
I've been using OpenCore on both of my Dell OptiMacs long enough now to know that it's clearly superior to Clover. Eventually we'll all be using OC as our bootloader. So if you are just starting out and want to skip using Clover and start with OpenCore (OC) that is what I recommend. OC can be used with either Mojave or Catalina. I'll be attaching a working EFI folder below (0.6.9 OC EFI) that you can place in the EFI partition of your USB installer. This means you'll have to use CreateInstallMedia method to make your installer, not Unibeast.
Important ! If you are just switching from Clover to OC and not performing a clean install you need to check whether any kexts you installed to /L/E (Library/Extensions) are still there from your original Mojave install. Those must all be removed before you switch to OC. Here's the only 10 (Apple) kexts that should be in the Mojave /L/E folder.
If you are using iMac 14,2 as per the original 2019 guide, you can keep using that with Mojave/Catalina. It will not work with Big Sur. Change the OC config.plist SMBIOS from iMac15,1 to 14,2 if you want to stay with that.
If you do switch to iMac 15,1 now, then you should generate a new system serial and SMUUID for iMac 15,1. Do the MLB (Board serial) as well. Use GenSMBIOS as per the video guide below in Step 5. Copy paste these into your OC config.plist with an editor like PlistEditPro. Put the edited OC EFI onto a USB installer and boot from it to see if it works first. Test that out on your system by clearing NVRAM from the OC boot menu. Then boot into macOS and see how things work on your system.
I'll leave the Unibeast instructions in this guide for those that still want to use Clover. Find those instructions under the spoiler below. After you create your OpenCore installer you'll still have to apply steps two and three below for the OC Mojave/Catalina install to work. In step five there is now a video that shows you how to generate unique serials. You can of course transfer your existing serials to the OC config.plist if you were using iMac15,1 smbios previously.
Create your OpenCore installer
Use a 16 or 32GB USB flash drive. USB 2.0 drives work best but some 3.0 drives will work as well. If you'd like to add more than one macOS version to your 32GB or larger USB drive then see the guide by pastrychef for instructions.
There is one critical step to remember when formatting your USB or other drives in Disk Utility. Always click View and then Show All Devices instead of leaving it at "Show Only Volumes" when using High Sierra, Mojave or Catalina as the host OS to make the installer. After you select the Parent name, click on the Erase tab and format the USB as Mac OS Extended (Journaled) and GUID Partition map. After this completes, do not eject your flash drive.
Mojave
Code:
sudo /Applications/Install\ macOS\ Mojave.app/Contents/Resources/createinstallmedia --volume /Volumes/USB
Code:
sudo /Applications/Install\ macOS\ Catalina.app/Contents/Resources/createinstallmedia --volume /Volumes/USBNext, you will download the OpenCore EFI and place it into the EFI partition of the USB installer you just made.
1. Use EFI agent or Hackintool to mount the USB's EFI partition. https://github.com/headkaze/EFI-Agent
2. Download 0.6.9 OC EFI zip file attached at the end of this post.
3. Drag and drop the EFI folder to the EFI partition of your USB drive that you mounted.
4. Do not try to update OpenCore to a newer version. If you are using Mojave/Catalina, there is no need for that.
Create your UniBeast installer by following the standard tonymacx86 guide. Use a 16 or 32GB USB flash drive. Anything larger than 32GB in size must be partitioned to less than 32GB. Use UniBeast for Mojave. Version 9.2.0. If installing Catalina instead, then use Unibeast 10.3.0 to create the USB installer.
Once creation of the UniBeast installer has completed, you will need to replace the UniBeast created config.plist with the custom one attached below. Do this before ejecting the UniBeast installer or you'll have to mount the EFI manually later. Now go to Finder -> Preferences and then select the "Show Hard Disks on the Desktop" option.
A. There will be an external drive on your desktop that represents the UniBeast USB's EFI partition
B. Double click that EFI drive icon to open it up and reveal the EFI folder on that partition
C. Now open the Clover folder inside of that EFI folder
D. Download the Custom Clover config.plist (zip file) Attached below
E. Delete the existing config.plist and then add in the new Custom one you just downloaded

F. Open up the kexts/other folder and drag and drop the release version USBInjectAll.kext into that folder
G. Download "SSDTs" zip file from the end of this post and place those files in the /Clover/ACPI/patched folder
H. Add the HFSPlus.efi driver to the Drivers64-UEFI folder. This is also attached below.
Install Kexts and the Clover Bootloader
We'll be using Multibeast 11.3 to install the Clover bootloader and some required kexts to the system drive's ESP.
 https://www.tonymacx86.com/resources/multibeast-11-3-0-mojave.430/
Make the following selections in Multibeast. Leave your SysDef at the default iMac 14,2 for now.

Next, click on the Install icon in the lower right corner and Multibeast takes care of the rest for you.
Now we will install three more kexts that are needed for working audio and graphics. Download Kextbeast from the tonymacx86 "Downloads" section. We will then get the three kexts, Lilu, WEG and AppleALC from Github.
Lilu, Whatevergreen and AppleALC. Download the RELEASE.zip file for each one of these.
You can also download these three below in the Lilu.WEG.ALC zip file attachment. At the end of this post.
Drag the 3 kexts to your desktop and then run Kextbeast. Select install to the /Library/Extensions folder.

After you have run Kextbeast and closed the app, make sure to run the Kext Utility app to repair permissions and rebuild caches. Let it run for a minute or more until it finishes. You'll see the "Quit" button appear when it's done.

Find the app attached below at the end of this post. Don't use Kext Utility to install kexts as it will put them in the wrong place, /S/L/E which is only to be used for official macOS, Apple signed kexts. All other 3rd party kexts for specific hardware are best installed to /Library/Extensions.
Next go to Finder -> Preferences and then select the "Show Hard Disks on the Desktop" option.
After you do that you'll see the EFI partition mounted on your desktop.


A. Download the Dell Optiplex SSDTs from the zip file at the bottom of this post.
B. Go to /EFI/Clover/ACPI/patched - copy and paste the files from that SSDT folder into the patched folder.
C. Once again, add the Custom Clover config.plist (attached below) to your Clover folder after deleting the existing one.
D. Add the HFSPlus.efi driver to the Drivers64-UEFI folder. This is also attached below.
Optional:To enable Filevault on your SSD see the following mini-guide for the drivers you will need to include for that. Click on this link to see the guide
Drag and drop or copy/paste the following kexts to your "other" folder from /Library/Extensions
E. Add the USBinjectall kext to your Clover/Kexts/other folder just as you did when making your USB installer.
F. Also add Lilu and WhateverGreen to your Clover/Kexts/other folder as well.
Here's how the kexts in the "other" folder should look after you have completed step 4.

Once creation of the UniBeast installer has completed, you will need to replace the UniBeast created config.plist with the custom one attached below. Do this before ejecting the UniBeast installer or you'll have to mount the EFI manually later. Now go to Finder -> Preferences and then select the "Show Hard Disks on the Desktop" option.
A. There will be an external drive on your desktop that represents the UniBeast USB's EFI partition
B. Double click that EFI drive icon to open it up and reveal the EFI folder on that partition
C. Now open the Clover folder inside of that EFI folder
D. Download the Custom Clover config.plist (zip file) Attached below
E. Delete the existing config.plist and then add in the new Custom one you just downloaded
F. Open up the kexts/other folder and drag and drop the release version USBInjectAll.kext into that folder
G. Download "SSDTs" zip file from the end of this post and place those files in the /Clover/ACPI/patched folder
H. Add the HFSPlus.efi driver to the Drivers64-UEFI folder. This is also attached below.
Install Kexts and the Clover Bootloader
We'll be using Multibeast 11.3 to install the Clover bootloader and some required kexts to the system drive's ESP.
Make the following selections in Multibeast. Leave your SysDef at the default iMac 14,2 for now.
Next, click on the Install icon in the lower right corner and Multibeast takes care of the rest for you.
Now we will install three more kexts that are needed for working audio and graphics. Download Kextbeast from the tonymacx86 "Downloads" section. We will then get the three kexts, Lilu, WEG and AppleALC from Github.
Lilu, Whatevergreen and AppleALC. Download the RELEASE.zip file for each one of these.
You can also download these three below in the Lilu.WEG.ALC zip file attachment. At the end of this post.
Drag the 3 kexts to your desktop and then run Kextbeast. Select install to the /Library/Extensions folder.
After you have run Kextbeast and closed the app, make sure to run the Kext Utility app to repair permissions and rebuild caches. Let it run for a minute or more until it finishes. You'll see the "Quit" button appear when it's done.
Find the app attached below at the end of this post. Don't use Kext Utility to install kexts as it will put them in the wrong place, /S/L/E which is only to be used for official macOS, Apple signed kexts. All other 3rd party kexts for specific hardware are best installed to /Library/Extensions.
Next go to Finder -> Preferences and then select the "Show Hard Disks on the Desktop" option.
After you do that you'll see the EFI partition mounted on your desktop.
A. Download the Dell Optiplex SSDTs from the zip file at the bottom of this post.
B. Go to /EFI/Clover/ACPI/patched - copy and paste the files from that SSDT folder into the patched folder.
C. Once again, add the Custom Clover config.plist (attached below) to your Clover folder after deleting the existing one.
D. Add the HFSPlus.efi driver to the Drivers64-UEFI folder. This is also attached below.
Optional:To enable Filevault on your SSD see the following mini-guide for the drivers you will need to include for that. Click on this link to see the guide
Drag and drop or copy/paste the following kexts to your "other" folder from /Library/Extensions
E. Add the USBinjectall kext to your Clover/Kexts/other folder just as you did when making your USB installer.
F. Also add Lilu and WhateverGreen to your Clover/Kexts/other folder as well.
Here's how the kexts in the "other" folder should look after you have completed step 4.
Step 2. Update your BIOS and Change the Settings
Download the latest, July 19, 2019 Optiplex 7020 BIOS A18 - Download the latest Optiplex 9020 BIOS A25
This is included as a mandatory step because the version that your Dell came with is likely much too old to work. Mine came with A05 from late 2015. For testing purposes, I tried the Mojave install and it worked. There were many USB related issues that could not be resolved until I later flashed to a newer 2018 BIOS. If yours is older than A18 or A25, you must do this to get a fully functional OptiMac. Especially if you want working USB 3.0 ports.
After you do flash to A18 or A25 you can still downgrade later to an older BIOS. That is an option you have. In my testing the A18/A25 BIOS versions with patches for the latest Intel CPU vulnerabilities don't slow down i5 or i7 CPUs. Get the latest version direct from Dell. You'll need to be on the latest BIOS for use with Big Sur/Monterey if you upgrade.
Flashing the BIOS to a Newer Revision
It's easiest by far to flash your Dell to a newer BIOS from the Windows Desktop. You simply update the BIOS from right within Windows by double clicking on the .exe file. This will initiate the flashing process. Make sure you have Internet Explorer or Edge set as your default browser. Let your Dell reboot automatically to complete the process.
If you don't have a Windows 7 8.1 or 10 install on the hard drive of your Dell you could download a Windows 10 iso from Microsoft and create an install USB but that is very time consuming and tedious. Dell offers a simple way to flash the BIOS. Create a FAT32 USB, drag and drop your BIOS .EXE file onto it. Now boot up your Dell and press the F12 key repeatedly until you see the following screen. Select BIOS Flash Update and follow the directions on screen.
Here's a 3rd option that takes much more time and effort. If you have a very old BIOS version it may be necessary to use this instead of the BIOS Flash Update method. Requires Windows to create the DDDP USB.
There is the Dell Diagnostics Deployment Package software (a free download from Dell) that you can use to make a bootable USB and then boot from that to flash the BIOS to a newer version. Follow the directions in this video.
Drag your BIOS executable file to the USB flash drive you just made. It should look something like this:

Run the BIOS update utility from a DOS environment in Legacy Boot Mode

Now boot from the USB and you'll get a Diag C:\> prompt.
Type in dir first, then press enter to see your BIOS executable file name.

Now type in all the letters and numbers of your BIOS file. It starts with the capital letter O as in Optiplex.

Enter (in this example) O9020A25 and press your return key. Make sure to type in the name of the file exactly for it to work. All of the Dell BIOS files start with the letter O. Follow onscreen directions after that. The next screen will look like this. Type in y and then enter to start the BIOS flash.

Run the BIOS update utility from a DOS environment in Legacy Boot Mode
Now boot from the USB and you'll get a Diag C:\> prompt.
Type in dir first, then press enter to see your BIOS executable file name.
Now type in all the letters and numbers of your BIOS file. It starts with the capital letter O as in Optiplex.
Enter (in this example) O9020A25 and press your return key. Make sure to type in the name of the file exactly for it to work. All of the Dell BIOS files start with the letter O. Follow onscreen directions after that. The next screen will look like this. Type in y and then enter to start the BIOS flash.
Setting up the Dell BIOS (Tap intermittently on the F2 key at boot up to access your BIOS)
Load Optimized Defaults after you've flashed the BIOS and before you make any other changes to it.
There is a "Load Defaults" tab in the lower central part of the window. Click on that and then click OK. Now exit and enter the BIOS again via the F2 key and make some changes to it.
Summary of BIOS Setting Changes
General
- Boot Sequence -> Boot List Option -> UEFI
- Advanced Boot Options -> Uncheck - Enable Legacy Option ROMs (For AMD graphics cards)
- Leave Legacy Option ROMs enabled if using the HD4600 iGPU only.
- UEFI Boot Path Security -> Set to Never
- Integrated NIC -> Enabled
- Serial Port -> Disabled
- Sata Operation -> AHCI
- Primary Display -> Auto (For HD4600)
- Primary Display -> Auto or AMD/Nvidia HD Graphics (if using a graphics card)
- Secure Boot Enable -> Disabled
- Deep Sleep Control -> Disabled
- VT for Direct I/O -> Disabled
January of 2022 Additional BIOS Setup Steps
Booting Directly from an NVMe drive
An optional step. See the following link to do this: https://www.tonymacx86.com/threads/...g-4k-ips-monitor.277811/page-226#post-2242718
Changing some Hidden BIOS/UEFI settings won't do any harm if you apply them correctly to your 7020/9020 USFF/SFF/MT Dell Optiplex. Other models from Dell could possibly be affected negatively if you were to apply these. Don't use them for the 3020(M) models or the 9020M Dell Micro PCs.
If you want to use OpenCore and Mojave/Catalina then make the following changes so that you can boot to the installer from your USB flash drive.
Shut down completely then boot into modGRUBShell.efi and we'll make changes to a few hidden BIOS settings.
Changing the Dell OptiPlex Hidden BIOS/UEFI Settings (Only use for the 7020/9020 USFF/SFF/MT)
1. Unlock CFG
2. Increase DVMT Pre-Allocation to 64MB
These two settings are not available through the Dell BIOS GUI so we'll use this alternate way to change them.
Disable CFG Lock
Code:
setup_var 0xDA2 0x0Here's what you'll see:
Increase DVMT pre-allocation to 64MB
Code:
setup_var 0x263 0x2Finally, make the following five changes to enable EHCI handoff and
set XHCI to enabled etc. using the setup_var command:
Code:
setup_var 0x2 0x1

setup_var 0x144 0x1

setup_var 0x15A 0x2

setup_var 0x146 0x0

setup_var 0x147 0x0Now type in reboot and then you can do the following:
Password protect Intel AMT as directed in the Optiplex 7010/9010 guide: Important Preliminary Steps Step #3. If you open the side panel and see a yellow or white sticker and a 1 on it then AMT is enabled. You need a password. This is important for security reasons. Having it password protected is a very good idea. If you see a 3 or 6 then it is disabled. No need for a password. See the info regarding the use of Intel HD graphics if your AMT is disabled.
Note about Primary Display Setting
On my 9020 system with an RX 570, I switched it back to Auto from "AMD HD Graphics" so that the Quick Look feature would work. I use that all the time with my Optiplex MT used for video editing. Here's an Apple tutorial on how to use it:
View and edit files with Quick Look on Mac
On your Mac, use Quick Look to view, rotate, mark up, or trim files without opening them.
support.apple.com
Advice Before Installing macOS
It took many long hours of testing and research to put this working guide together. It shouldn't take you more than 1-2 hours to complete the macOS install and post install. Don't be in any hurry to get this done. The guide works if you follow it exactly. If you're in a rush you'll miss things and it will end up taking longer. Haste makes waste as they say.
Step 3. Install macOS
If you have previously installed High Sierra, Mojave or Catalina on your 7020/9020 I highly suggest you perform a "clean" install. This means that in Disk Utility you will format (completely wipe clean) the hard drive you are installing macOS to.
A. First, disconnect the Sata data cables from any Windows or Linux drives you may have in your Dell.
B. Put your OpenCore installer into a front USB port. Use a USB 2.0 port as sometimes the USB 3.0 has problems.
C. Boot UEFI from the OC installer (tap on the F12 key at boot up)
Always boot in Verbose mode during the install. It enables you to see the exact place where a kernel panic may occur. If all you see is a progress bar, you'll have no idea.
The initial boot from your OC drive to the macOS installer is very slow. Even with the Samsung USB 3.1 drive I used that reads at 200 MB/s, it took 3 or more minutes. Be patient and let everything happen in it's own time. When you finally see the Utilities window on your desktop, select Disk Utility. Follow the standard advice for formatting the hard drive you will be installing on. Use GUID Partition Map and APFS file system as your choices in Disk Utility.
Some times you may need to select the hard drive you are installing to in the OC Boot menu each time it reboots. It should auto select the SSD you are installing to. If it stops at the "Install macOS Mojave" USB icon in the boot menu i.e. your USB drive, use your keyboard's arrow key to select the other drive.
If you've followed this guide verbatim up to this point, you should reach the "select country" screen part of the initial setup. Choose your region, your keyboard, etc. but do not sign in to iCloud at this time. Choose Setup Later instead. Signing into iCloud registers the serial number of the computer, this serial number will change in Post-Installation, which will then result in two new systems being registered in iCloud. So skip iCloud sign-in until post-installation is done and you've created your unique System and Board serial numbers and smUUID in step number 5.
After you've created your Admin account you will reach the macOS desktop.
D. Now open up Terminal and copy/paste this text into it and hit enter:
It's optional, but you can delete the sleepimage to save precious space on your SSD.
Enter each line one at a time and hit enter.
Code:
sudo rm /var/vm/sleepimage
sudo mkdir /var/vm/sleepimage
To disable other hibernation features
Code:
sudo pmset -a standby 0
sudo pmset -a autopoweroff 0
Verify the settings with
Code:
pmset -gCopy the finished OpenCore Custom EFI folder from the EFI partition of the USB installer you just created and paste it to the EFI partition of your HDD or SSD. You'll have to mount the hidden EFI partition of the USB first. I use EFI Agent app by the creator of Hackintool. https://github.com/headkaze/EFI-Agent/releases
If you haven't already placed your Serials into the config.plist of the USB installer you should do that now with GenSMBIOS. See the video on how to do that.
To complete step #3 you should eject your OpenCore installer. You won't need it in steps 4 through 6. Keep your installer handy if you ever need it for recovery. When your system won't boot you'll be able to easily boot to the desktop.
Step 4. Post Install Check
Now you can reboot your OptiMac and when you reach the desktop, test out your audio, ethernet and graphics.
Here's what you should see if you enabled audio correctly. Two Line in ports and all of these outputs. I'm using
HD4600 now so this shows HDMI audio working via DP. If your monitor doesn't output audio you won't see HDMI.
If you have an LG 4k (or other 4K monitor) and connect via DP input on your monitor, then under Type it should be showing as DisplayPort instead of HDMI.


NOTE: Only one of the onboard DP outputs can provide DP/HDMI audio. If you don't get DP/HDMI audio to show up in your sound preferences panel, switch to the other port. Then it will work normally.
Step 5. Generate Unique Serials & SMUUID
Use the GenSMBIOS app as shown in the following video. It's very easy to use and helps you generate unique iMac 15,1 serials so that you avoid conflicting numbers with other genuine iMac 15,1 Mac users.
Lately, Apple has been displaying a different message than previously. It now says we are unable to check coverage for this serial number. That means it's not valid as well. You can use that serial for your OptiMac hackintosh.
The iMac 14,1 14,2 and 14,3 sysdefs will not work with Big Sur. Choose iMac 15,1 for the option of upgrading to macOS 11 Big Sur and possibly macOS 12 in latter 2021. Apple has dropped official support for the mid 2014 iMac in Monterey. You may still be able to install and boot Monterey (macOS 12) using iMac 15,1. More on this later. Testing is required.
If you have a Haswell refresh i5-4690 or i7-4790 and AMD graphics such as the RX 570/580 then iMac 15,1 is your specific SMBIOS. It's the perfect match for the best CPU power management and graphics function.
Step 6. Install an NVMe SSD into the PCIe x4 slot (Optional Step)
You cannot boot directly from an NVMe drive on an Optiplex 7020/9020 unless you perform the NVMe driver BIOS modification mentioned previously. Even so, there is still a way to use a PCIe NVMe as your system drive where you install macOS Mojave or newer macOS versions. If you install the NVMe drive into it's adapter and then into the x4 slot you can install macOS Mojave to the drive the same way as you have in steps 1-4. The only difference is that you won't install the OpenCore bootloader to the EFI partition of the NVMe drive.
It's easiest to install to NVMe by simply cloning the Sata drive over to the NVMe with Carbon Copy Cloner. CCC should take care of the NVMe drive formatting. Here's the link to get the free trial of CCC. https://bombich.com/download
Now the last step is to add NvmExpressDxe.efi driver to the drivers folder inside the EFI/OC folder of the SSD or HDD you will initially boot from. After you've done this keep your Sata SSD or mechanical HDD connected and first in the BIOS boot order. You will also need to add the NVMe driver reference into your config.plist. It should look like this:
Use the PlistEdit Pro app to create the entry. https://fatcatsoftware.com/plisteditpro/
Choose your NVMe from the OC Boot Menu. You will see the NVMe drive as an option there. Booting from this NVMVE gives you blazing fast boot times and the ability to easily work with large 4K video and even larger photo files. I've attached the NvmExpressDxe.efi driver below so you can easily install it to your Sata SSD or HDD. If you cannot fit either a Sata or NVMe based SSD into your budget, the mechanical 3.5" HDD is stil usable as a boot drive. The APFS file system won't help speed things up on a mechanical 3.5" drive. Boot times are longer, apps open slowly etc.
Note: You can also install the NVMe drive to your x16 PCIe slot to get the fastest speeds. That is the newer revision 3.0 PCIe and the PCIe x4 slot is the older revision 2.0. If your are using only HD4600 graphics this will be quite easy to do.
Alternate Realtek Audio (ALC280) Layout IDs
The layout-id of 17 will enable all the inputs and outputs but you'll have to switch between them manually.
The default layout-id of 13 doesn't enable the internal speaker and works the best for me. If that does not work for your needs, there are others you can test out. Try 15,16 etc. and find the best configuration for you.
According to Acidanthera any of the following will work to enable different combos of mic, line out, headphones and internal speaker:
| layout 3, 4, 11, 13, 15, 16, 17, 21 |
For Video Editors and Graphic Designers
If you have a Metal 2 Capable graphics card and want to speed up renders in your video editing programs.
See this section of the iDiot's Guide to Lilu and it's Plugins - Headless Platform ID's
www.tonymacx86.com
Do this if you will be using Motion, Compressor, Davinci Resolve, Premiere Pro, iMovie or Final Cut Pro X on a regular basis. Enabling headless mode for your iGPU will help to speed up graphics rendering tasks by enabling the Quicksync capability of your Intel CPU. What you lose is the ability to run a monitor from the onboard DP outputs on your Optiplex. You can run in headless mode full time if you'd like, that's the way the Late 2013/2014 iMac functions.
Here's the change you'll need to make to your config.plist Devices/Properties section of your OC config.plist. Note that setting the ig-platform-id of 04001204 is the only change you make to the existing config.plist used in this guide. When running headless you can delete framebuffer entries. Headless framebuffers (where the dGPU is the display out) do not need framebuffer-patch-enable, framebuffer-stolenmem and framebuffer-fbmem.
Keep the other Device entry that is already in your config.plist. This enables your onboard Realtek audio.
PciRoot(0x0)/Pci(0x1b,0)
If you've set the correct ids for your Haswell/HD4600 CPU you should see this in the Hackintool System Info section: VDA Decoder - Fully Supported. If you see the following, "Decoder Failed" then Intel Quicksync is not enabled.

Also check what shows under Patch -> Connectors. You should see the headless icon and the four dummy connectors.

See this section of the iDiot's Guide to Lilu and it's Plugins - Headless Platform ID's
An iDiot's Guide To Lilu and its Plug-ins
An iDiot's Guide To Lilu and its Plug-in's Last Update: 22nd Jan 2021 (Add note about OpenCore config.plist modifications) About this Guide Note: This guide was written when Clover was the boot loader of choice as such the config.plist examples in this guide are mostley Clover specific ... if...
Do this if you will be using Motion, Compressor, Davinci Resolve, Premiere Pro, iMovie or Final Cut Pro X on a regular basis. Enabling headless mode for your iGPU will help to speed up graphics rendering tasks by enabling the Quicksync capability of your Intel CPU. What you lose is the ability to run a monitor from the onboard DP outputs on your Optiplex. You can run in headless mode full time if you'd like, that's the way the Late 2013/2014 iMac functions.
Here's the change you'll need to make to your config.plist Devices/Properties section of your OC config.plist. Note that setting the ig-platform-id of 04001204 is the only change you make to the existing config.plist used in this guide. When running headless you can delete framebuffer entries. Headless framebuffers (where the dGPU is the display out) do not need framebuffer-patch-enable, framebuffer-stolenmem and framebuffer-fbmem.
Keep the other Device entry that is already in your config.plist. This enables your onboard Realtek audio.
PciRoot(0x0)/Pci(0x1b,0)
If you've set the correct ids for your Haswell/HD4600 CPU you should see this in the Hackintool System Info section: VDA Decoder - Fully Supported. If you see the following, "Decoder Failed" then Intel Quicksync is not enabled.
Also check what shows under Patch -> Connectors. You should see the headless icon and the four dummy connectors.
For Better Security and Privacy while using your OptiMac
1. Download and install Malwarebytes for Mac: https://www.malwarebytes.com/mac/
You can use the paid version for real time protection. With the free version you can scan and check any software before installing it on your OptiMac.
2. Install the uBlock Origin browser extension (for Firefox and Chrome)
This is the best "adblocker" that I've used. Keeps annoying pop up ads out of your web browsing.
Releases · gorhill/uBlock
uBlock Origin - An efficient blocker for Chromium and Firefox. Fast and lean. - gorhill/uBlock
 github.com
Conclusion
Once you have everything working and all of your programs installed it's important to make a clone of your system drive.
You can easily make a bit for bit copy of this drive that is bootable by using Acronis True Image 2021. If you want to make a bootable Acronis USB to make the clone, choose the Windows version. Install the Mac version of Acronis to your HDD or SSD if you want to run the program from within macOS and clone your drive while running macOS.
Making a bootable clone for recovery purposes
Follow CaseySJ's complete CCC bootable clone guide. Step 11 of his Z690 Golden Build thread.
Asus Z690 ProArt Creator WiFi (Thunderbolt 4) + i7-12700K + AMD RX 6800 XT
CaseySJ's Intel Alder Lake i7-12700K: Asus Z690 ProArt Creator WiFi + Intel i7-12700K + AMD RX 6800 XT Please do not quote this guide in its entirety. Post a link instead. This build guide applies to Asus Z790 ProArt Creator as well, but BIOS parameters may need to be adjusted All P-cores...
Whether it's an NVMe drive or a Sata based drive, if you make a clone with CCC don't forget to see if the drive will boot on it's own. Keep your clone drive disconnected from your Dell and in a safe place. If anything ever does go wrong, you can install that and easily boot from it to be able to access your other Mojave/Catalina/Big Sur drives in your Dell Optiplex.Step 11: Open the spoiler below to make a full bootable backup. Components needed for this are listed at the top of this guide in the section Components: Bootable Backup.
I'm interested in hearing about your experiences with this guide and your Dell Optiplex system. Fill out your hardware profile and and also upload your problem reporting files if you want help with specific issues that come up. I'll do my best to help you sort them out.
Download Config.plist, Kexts and SSDTs
Note: The SSDT-USB.dsl file is only to be used for creating a custom SSDT-USB.aml. Edit the .dsl with MaciASL and then compile and save it as .aml. Do not place the .dsl file into EFI/Clover/Kexts/other folder. Only use the compiled .aml once you've created that. The .dsl version does not include HS13 which is the internal USB 2.0 header only present on the Mini-Tower Dell motherboards. If you have an SFF or USFF Dell you won't need to include HS13 in the SSDT.
See: The New Beginner's Guide to USB Port Configuration by UtterDisbelief for detailed info.
Attachments
-
USBInjectAll.kext.zip16.6 KB · Views: 2,189
-
Kext Utility.zip285.8 KB · Views: 1,900
-
HFSPlus.efi24.3 KB · Views: 2,247
-
BCM943602CS_Win_10_build_1903.zip13.9 MB · Views: 1,590
-
SSDT-USB.dsl.zip1.2 KB · Views: 1,622
-
Custom SSDTs.zip8.4 KB · Views: 2,276
-
Dell DDDP.zip3.6 MB · Views: 1,337
-
9020 MT manual.pdf.zip3.5 MB · Views: 867
-
9020 SFF manual.zip3.7 MB · Views: 798
-
0.6.9 OC EFI.zip13.2 MB · Views: 861
-
NvmExpressDxe.efi.zip14.3 KB · Views: 255
-
Clover config.plist.zip2.5 KB · Views: 341
-
OptiPlex Default UEFI Settings.zip28 KB · Views: 229
-
7020 9020 UEFI Settings.pdf.zip55.5 KB · Views: 276
Last edited:
")
