
- Joined
- Feb 16, 2012
- Messages
- 15
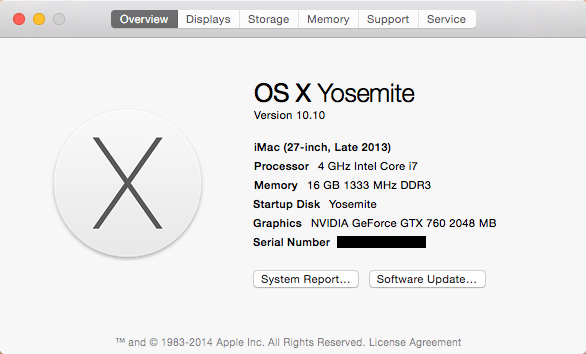
- Motherboard
- Gigabyte GA-Z97X-UD5H; 16GB Patriot Viper Xtreme Series DDR3-1866 (PC3-15000);
- CPU
- i7-4790k
- Graphics
- Gigabyte Windforce GTX 970
- Mobile Phone
[Success!] Snbd889's Video Editing Build: Core i7-4790k - GA-Z97X-UD5H - 16GB CORSAIR VENGENANCE RAM - EVGA GTX 760
Components
Intel Core i7-4790K
http://www.newegg.com/Product/Product.aspx?Item=N82E16819117369
Gigabyte GA-Z97X-UD5H
http://www.newegg.com/Product/Product.aspx?Item=N82E16813128707
16GB Patriot Viper Xtreme Series DDR3-1866 (PC3-15000)
http://www.newegg.com/Product/Product.aspx?Item=N82E16820220560
Corsair CX750M
http://www.newegg.com/Product/Product.aspx?Item=N82E16817139051
EVGA GEFORCE GTX 760
http://www.newegg.com/Product/Product.aspx?Item=N82E16814130949
Crucial MX100 512GB SSD
http://www.newegg.com/Product/Product.aspx?Item=N82E16820148821
LG BD-RW WH14NS40
http://www.newegg.com/Product/Product.aspx?Item=N82E16827136250
Comments
- I have attached all of the files I keep backed up on my flash drive, which will help with the install at the bottom of this post.
- I would say multiple USB flash drives are a must for installing/debugging a new system. I found having 2-3 allowed me to create one via the UniBeast / MultiBeast method, and then another for the Clover method. When in a pinch and I was not able to boot a particular install, or needed to re-create a drive, I could normally swap between the bootloaders, keeping in mind that Clover used UEFI option for my usb drive during boot, and Chimera used the legacy bios (P0 on my bootloader options). The F12 key was my friends during this process.
Installation of OS X Using MultiBeast
The easiest method of installing OS X on this hardware is to install via UniBeast / MultiBeast.
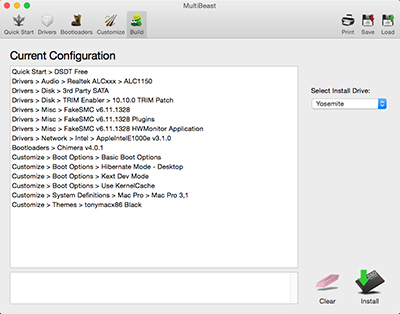
MultiBeast settings are minimal for this build, and you only need to select the following settings in the post install:
Quick Start > DSDT Free
Driver > Audio > Realtek ALCxxx > ALC1150
Driver > Disk > TRIM Enabler > 10.10.0 TRIM Patch
Driver > Misc > FakeSMC Plugins
Driver > Misc > FakeSMC HWMonitor Application
Driver > Network > Intel > AppleIntelE1000e
Here's the MultiBeast for Yosemite Build Configuration screen snapshot for this build. (Note: DSDT Free adds several default drivers/kexts; see page 3 of the MultiBeast for Yosemite Features document which comes with MultiBeast or at http://multibeast.com/.Driver > Audio > Realtek ALCxxx > ALC1150
Driver > Disk > TRIM Enabler > 10.10.0 TRIM Patch
Driver > Misc > FakeSMC Plugins
Driver > Misc > FakeSMC HWMonitor Application
Driver > Network > Intel > AppleIntelE1000e
*This method however limits the potential of the hackintosh based on how Chimera functions (from my semi-noob understanding).
To get the ideal system (and to try to get iMessage working most easily), I wanted to get this build working with Clover.
The message boards were certainly right, it is much more difficult to install using Clover than MultiBeast.
I would recommend you get your hardware to boot and work with the easier method, then create a second USB device with the Clover instructions outlined below
I would recommend you get your hardware to boot and work with the easier method, then create a second USB device with the Clover instructions outlined below
Installation of OS X Using Clover
I was able to install Clover via the great TonyMacx86 method outlined on this page with some minor changes to the steps for my particular hardware.
Since my system is UEFI, I decided to create the install media with this option as well so once it booted, I knew I would be able to simply copy over the settings and have a working PC.
Follow the directions in the link above, with exception to the steps outlined below:
STEP 2: Prepare Bootable USB Drive
Sub-step 17: the photo below will show the settings I used.
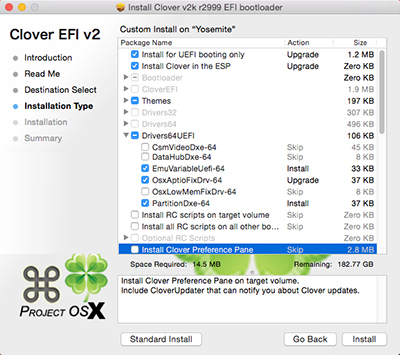
Sub-steps 20-26:
*The SSDT.aml is provided in the download zip. I moved the file out of the Extras folder and to my EFI partition. You can duplicate this process, or if you have the same motherboard and processor your welcome to try the attached file.
20. Navigate to /EFI/CLOVER/ and replace default config.plist with attached config.plist*
21. Navigate to /EFI/CLOVER/kexts/ and create a folder called 10.10
22. Navigate to /EFI/CLOVER/kexts/10.10/ and add FakeSMC.kext
23. Navigate to /EFI/CLOVER/kexts/10.10/ and add your ethernet kext
24. Navigate to /EFI/CLOVER/kexts/10.10/ and add NullCPUPowerManagement.kext
25. Navigate to /EFI/CLOVER/drivers64UEFI/ remove VBoxHfs-64.efi and add HFSPlus.efi
26. (Optional) Navigate to /EFI/CLOVER/ACPI/patched/ and add SSDT.aml*
*The SSDT.aml is provided in the download zip. I moved the file out of the Extras folder and to my EFI partition. You can duplicate this process, or if you have the same motherboard and processor your welcome to try the attached file.
STEP 3: Install OS X Yosemite
I was able to use a USB3.0 port which drastically shortened the install time
STEP 4: Post-Installation
Sub-step 5: the photo below will show the settings I used.

*I found that I did not need as many Drivers64UEFI options for the final boot, and thusly
opted to only copy over the essential files.
opted to only copy over the essential files.
Sub-steps 6-9:
*Used the same files from the USB installation in Step 2.
You can use Clover Configurator for further modification of config.plist, or to mount your EFI partition of your USB or internal hard drive.
I have provided 2 config.plist files at the bottom you are welcome to use, modify, and provide feedback.
-- config.plist_-v_10s : SSD TRIM Enabled; -v verbose mode ON; 10 second auto boot (great for debugging)
-- config.plist_FINAL : SSD TRIM Enabled; -v verbose mode OFF; 5 second auto boot (once you have stable reboots)
6. Navigate to /Volumes/EFI/EFI/CLOVER/ and edit config.plist
7. Navigate to /Volumes/EFI/EFI/CLOVER/kexts/ and create a folder called 10.10
7. Navigate to /Volumes/EFI/EFI/CLOVER/kexts/10.10/ and add FakeSMC.kext
8. Navigate to /Volumes/EFI/EFI/CLOVER/kexts/10.10/ and add your ethernet kext
9. (Optional) Navigate to /Volumes/EFI/CLOVER/ACPI/patched/ and add SSDT.aml*
*Used the same files from the USB installation in Step 2.
You can use Clover Configurator for further modification of config.plist, or to mount your EFI partition of your USB or internal hard drive.
I have provided 2 config.plist files at the bottom you are welcome to use, modify, and provide feedback.
-- config.plist_-v_10s : SSD TRIM Enabled; -v verbose mode ON; 10 second auto boot (great for debugging)
-- config.plist_FINAL : SSD TRIM Enabled; -v verbose mode OFF; 5 second auto boot (once you have stable reboots)
Clover Post-Installation
I decided to simply use MultiBeast for its simplicity to enable networking, and hardware monitoring.
EDIT: I realize this is a duplicate step from above for 2 of the .kext files, but it does not hurt the system by including them in MultiBeast. I recently re-installed my machine to see if the guide worked, and got some kernel panic errors after installing with multibeast. Since the 10.10 folder in the EFI partition has the network and fakeSMC files, you DO NOT NEED TO INSTALL TO S>L>E, and doing so may cause problems. I would make sure you only have each file only in one location.
Audio is currently not working per my installation. I have spend a day or two trying to get Toleda's ALC1150 injection method to work, but have had no success. It seems this chipset is not widely supported yet, so like many I opted to simply order a USB sound card with native Mac support and drivers. **I have not received this product to test yet, but will post my findings when I do**
Final Thoughts
After DAYS and DAYS of fighting this new build, I am pretty happy with it so far, and hope this can save someone the difficulties I had switching over to Clover. By no means am I an expert, so I welcome any suggestions/insights to allow me to modify this guide/build to enable it to run even better.
Good Luck and thanks for reading.
Additional Photos
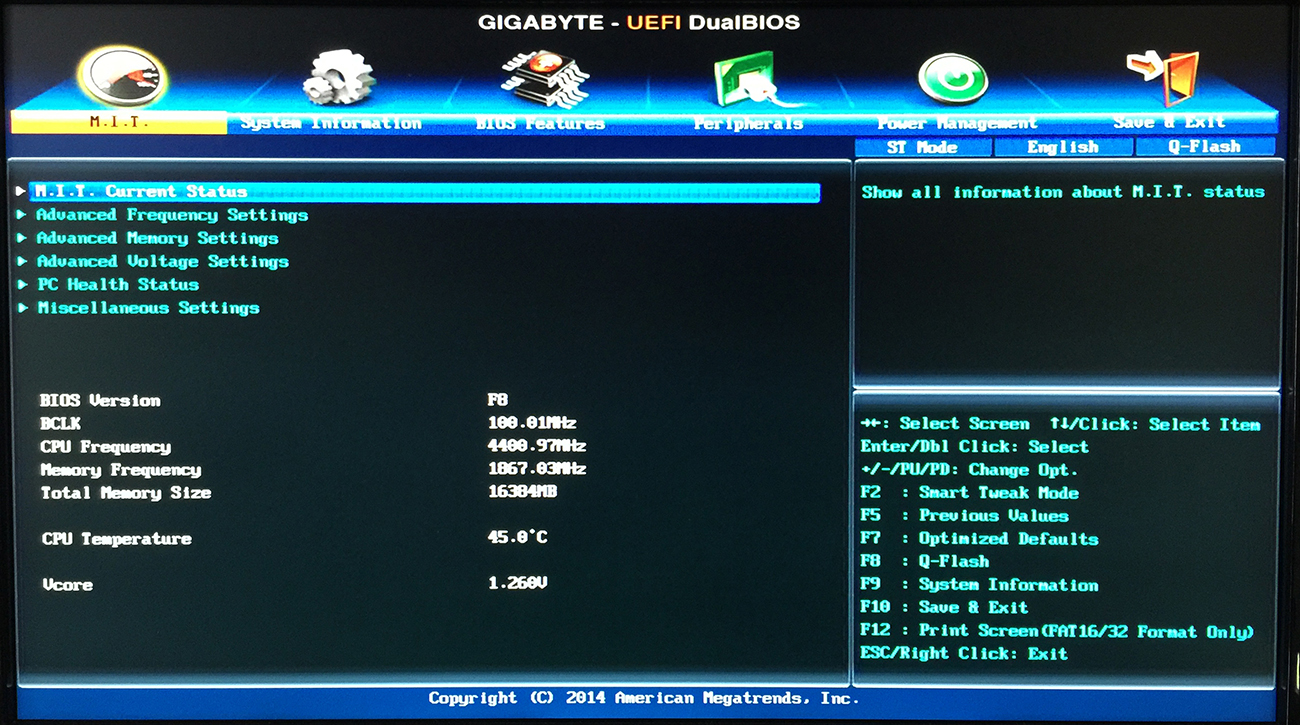
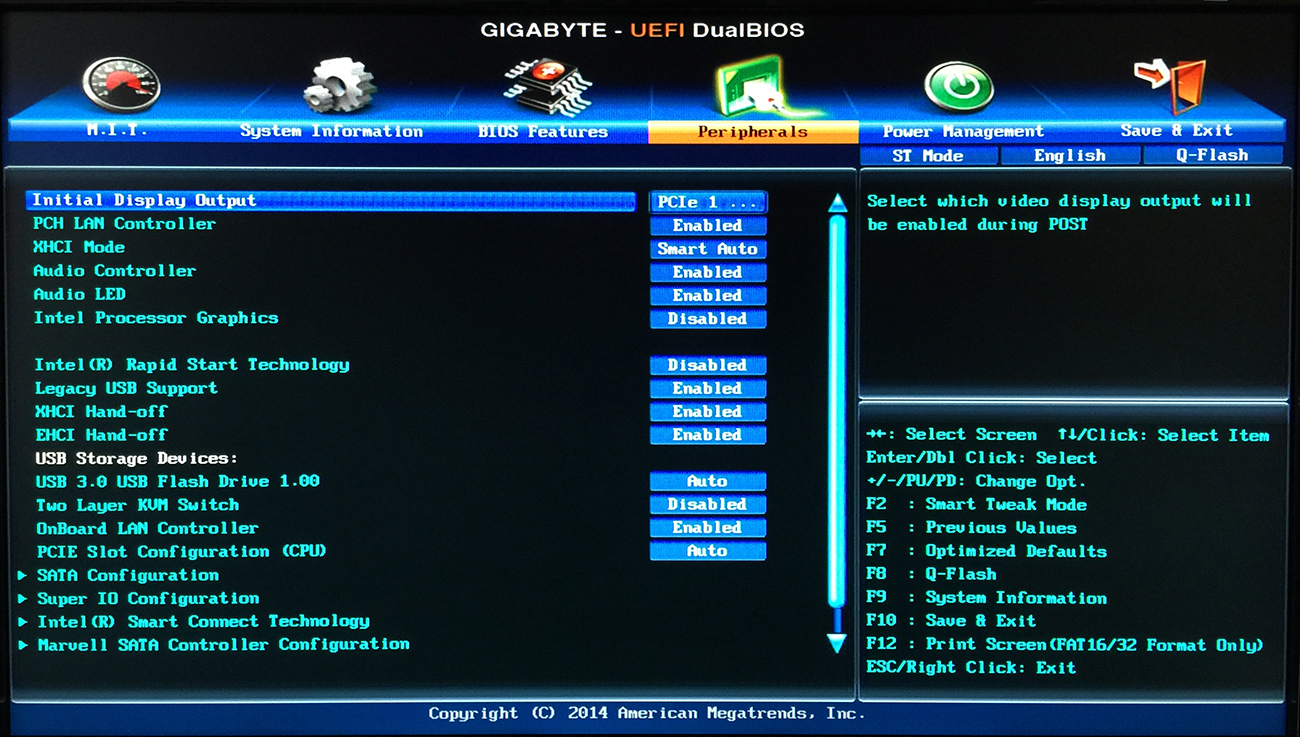
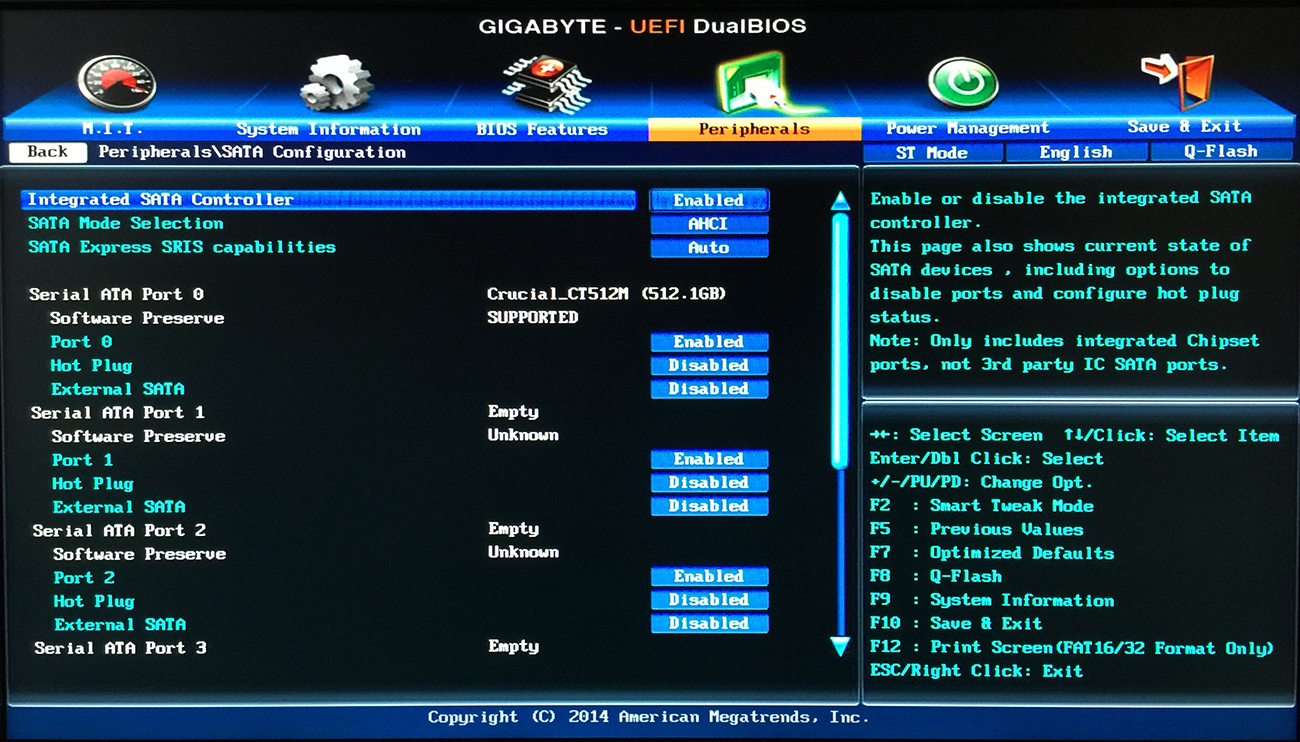
UEFI Settings


Benchmarks
Geekbench

Unigine Heaven

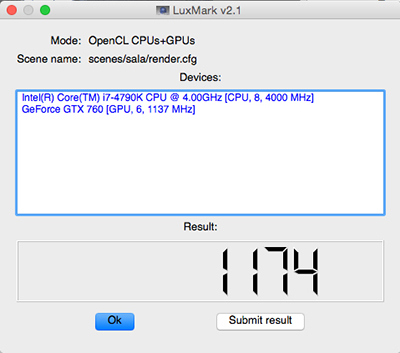
LuxMark v2
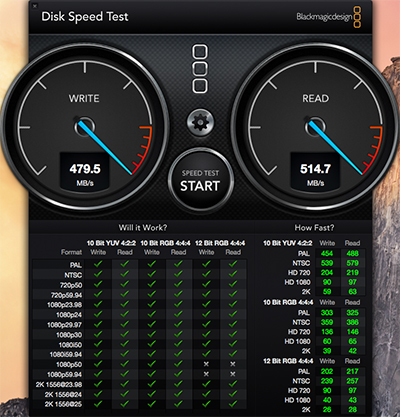
Blackmagic Speed Test
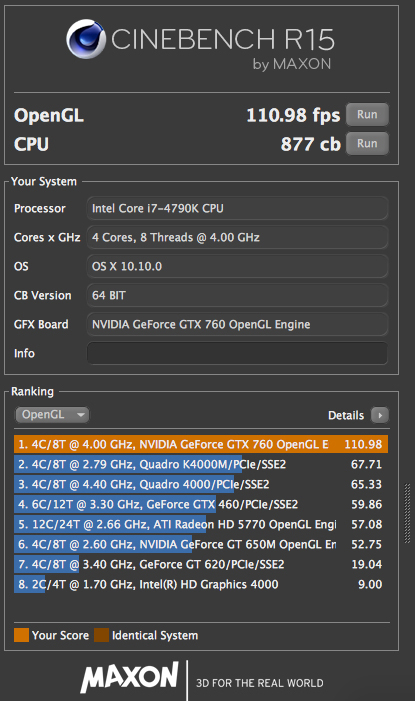
Cinebench
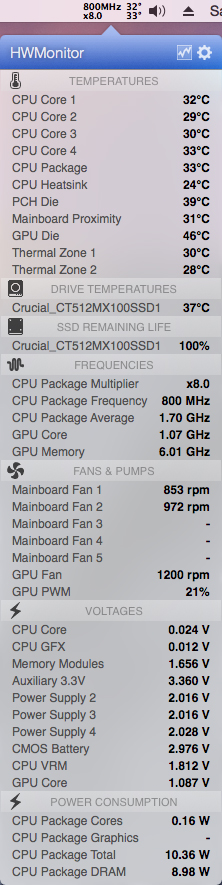
HWMonitor
Helpful Links
Useful Files
Attachments
Last edited by a moderator:

")