Contribute
Register

[SUCCESS] Gigabyte Designare Z390 (Thunderbolt 3) + i7-9700K + AMD RX 580

Although I haven't tried this myself, you could quickly try this:
  • At the Clover Boot Menu, select Options.
  • Then edit Boot Argumentsby adding this to the end:
    • -no_compat_check
I am not at my Hackintosh right now, but I do believe there is a way to modify SMBIOS from Clover Options. Look at all the choices there and see if you can figure it out...

I’ll give that a go when I get back home from work today! I did see a way to manually edit the SMBIOS from clover, but it wouldn’t auto populate every field based on the Mac device I choose. I wasn’t sure if it’d boot or potentially mess things up even more when I just try to boot after editing the name to Macmini 8,1 from iMac 19,1. I guess I’ll give that a go too if the first plan doesn’t work.

Thanks again!!!
 
There are several forks of Clover on GitHub. Because I have not used any of them, I suggest sticking with the standard version from either TonyMac website or SourceForge.

The latest SourceForge version is just a zipped text file that says to use the CloverHackyColor repo.
 
The procedure is rather straightforward as follows:

Preparation:
  • First clone the existing Mojave NVMe to a spare SSD. Make sure to create this backup of the original Mojave NVMe.
  • Test-boot from the clone to make sure it is okay and it is bootable.
  • Then disconnect and put the Mojave clone aside.
  • Now you will have 3 installations of macOS:
    • The original Mojave installation on NVMe
    • The clone of Mojave on spare SSD
    • The Catalina installation on SSD
Stage 1:
  • Now let's make sure that your (a) Mojave NVMe and (b) Catalina SSD are using the same SMBIOS and same serial numbers.
  • Mount EFI partitions of both of these drives and examine config.plist from both partitions. If SMBIOS name or serial numbers are not the same, copy the current values from Mojave to Catalina.
  • This ensures that iCloud, App Store, and all of your licensed applications will consider the Catalina system to be the same hardware as the Mojave system. This will allow you to use existing licenses on the Catalina system.
Stage 2:
  • Now you may clone the Catalina SSD to the NVMe drive.
  • Boot from the Catalina SSD.
    • Press F12 at BIOS Splash Screen and select the Catalina SSD.
    • At the Clover Boot Menu, choose Boot macOS from Catalina.
    • Login to Catalina.
  • Run Carbon Copy Cloner and select:
    • SOURCE = Catalina SSD
    • DESTINATION = Mojave NVMe
    • You do not have to use the EFIClone script. Just do everything manually for this particular case.
  • Double-check your configuration of Carbon Copy Cloner.
  • If everything looks okay, hit the Clone button.
Stage 3:
  • When Carbon Copy Cloner is done, mount the EFI partitions of both NVMe and Catalina SSD.
  • Rename the EFI folder on NVMe to EFI-old
  • Copy the entire EFI folder from Catalina SSD to EFI folder on NVMe.
  • Shutdown the system.
Stage 4:
  • With the system powered down, disconnect the Catalina SSD.
  • We are going to boot from the internal NVMe now.
  • Power the system back on and let it boot directly to Catalina from the NVMe SSD.
  • Login.
  • Look at About this Mac, make sure serial number is correct, check audio, check HEVC and H.264 acceleration, check Thunderbolt, check Ethernet, check Sidecar.
  • Login to iCloud, FaceTime, Messages.
    • Check that AppStore is okay.
    • Check that iTunes can play music and movies.
  • Check Sleep, Wake, Reboot, Shutdown.
  • Basically, check everything to make sure the system is good.
  • This is your baseline.
Stage 5:
  • Now begin to install your third-party applications.
  • You will need your license codes!
  • Because the system's serial numbers are the same, all existing license codes should work just fine.
  • Don't rush to reinstall all of your apps at once.
  • Install your apps over time. Install the most important ones first, of course. Then make sure system is still stable.
    • Some applications may not be compatible with Catalina so download latest builds.
  • Check Sleep, Wake, Reboot, Shutdown.
Stage 6:
  • Backup. Backup. Backup.
  • This is your next baseline where everything is working.
Stage 7:
  • Your transition is complete.

All seemed to work! Still testing...it sleeps

Thank you
 
The latest SourceForge version is just a zipped text file that says to use the CloverHackyColor repo.
Yes you're right!! Things are always changing...
 
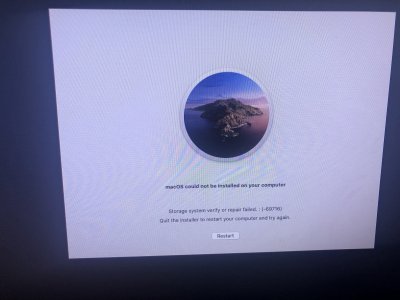
NO I not have backup.. but system not start to install. I start update direct from appstore. and 1 restart .. I boot install partition and give error msg , I try to repair partition direct from installation and give me this msg..
I don't know how to fix problem.. right now I boot back Mojave and work perfect.
have a look error
 

Attachments

  • IMG_3101.jpg
    IMG_3101.jpg
    9.1 MB · Views: 78
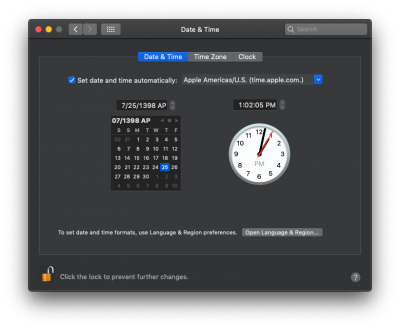
I just double checked the guide and did some preliminary Googling about this, but does anyone know how to address the issue demonstrated by the attached screenshot? The date displayed by the system appears as 7/25/1398 AP rather than the expected 10/17/2019?
 

Attachments

  • Hackintosh-Wonky-Calendar.png
    Hackintosh-Wonky-Calendar.png
    142.1 KB · Views: 83
After experiencing issues with TB3 after upgrading from 10.14.6 --> Catalina, I reverted back to 10.14.6. Thunderbolt 3 is working, but no hot swap.

Just to confirm, in the supplied `Post-Install Files.zip`, in the `Copy-to-ACPI-patched` folder there is the ACPI script named, "SSDT-Z390-DESIGNARE-TB3HP-V4". This is the only file in this subfolder that does not have the .aml extension. The screenshot that shows the contents of the Post-Install zip archive shows this file without the extension, but the guide then goes on to say,

"These are essential patches that... 6. SSDT-Z390-DESIGNARE-TB3HP-V4.aml"

Should I rename the file to include the file type extension? I gave it a try but I'm still lacking support for hot plugging my TB3 devices.

Thanks!
 
@CaseySJ,

I have an OT question. Did you get your X99's ASUS ThunderboltEX3 working? If so, did you post your installation in this thread or did you start another thread?

I ask because I can't get the ASUS ThunderboltEX3 working in MyHero build. TIA.
I have both the ThunderboltEX 2 and EX 3, and happy to say that both work, but unhappy to say that hotplug has not (yet) been successful on either.

I’ll install the EX 3 back into this system and work on hotplug once again. The EX 2 card has been continuously installed since it arrived. I can post BIOS screenshots and SSDTs for the EX 3.

I’ve also seen reports of some Thunderbolt eGPUs not working at all in Catalina. I can in fact confirm that my PowerColor Gaming Station X is not recognized in Catalina, but has no problem in Mojave (other than not being hot-pluggable). Apple has apparently been informed.
@Stork,

Just realized I posted my Asus X99 Deluxe II EFI folders from both (a) USB Install Disk and (b) Mojave SSD a little while ago here:

And screenshots of BIOS settings are located here:
 
Last edited:
I just double checked the guide and did some preliminary Googling about this, but does anyone know how to address the issue demonstrated by the attached screenshot? The date displayed by the system appears as 7/25/1398 AP rather than the expected 10/17/2019?
I wonder if that's due to Location Services being disabled. From System Preferences --> Security & Privacy, please check this:
Screen Shot 2019-10-17 at 12.43.07 PM.png
After experiencing issues with TB3 after upgrading from 10.14.6 --> Catalina, I reverted back to 10.14.6. Thunderbolt 3 is working, but no hot swap.
I will have to check this tonight. Apple is aware of a Thunderbolt problem in Catalina that prevents some eGPUs from connecting. Maybe there are even more problems...

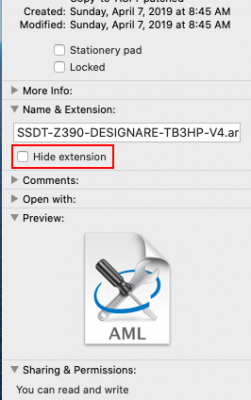
Just to confirm, in the supplied `Post-Install Files.zip`, in the `Copy-to-ACPI-patched` folder there is the ACPI script named, "SSDT-Z390-DESIGNARE-TB3HP-V4". This is the only file in this subfolder that does not have the .aml extension. The screenshot that shows the contents of the Post-Install zip archive shows this file without the extension, but the guide then goes on to say,

"These are essential patches that... 6. SSDT-Z390-DESIGNARE-TB3HP-V4.aml"

Should I rename the file to include the file type extension? I gave it a try but I'm still lacking support for hot plugging my TB3 devices.
No need to rename because it already has the right file extension. The extension is simply hidden. To unhide the extension, click on the file in Finder and choose Get Info. Then uncheck this box:

Screen Shot 2019-10-17 at 12.47.14 PM.png
 
Back
Top