
- Joined
- Mar 28, 2019
- Messages
- 131
- Motherboard
- Gigabyte X299X Designare 10G
- CPU
- i9-10980XE
- Graphics
- RX 580
- Mac
- Mobile Phone
Hey all, new guy here who just finished their first Hackintosh build using this guide as a reference.
Having never done this before, everything went incredibly smoothly and I ended up with a fully-functional system in a matter of hours, so massive props for all the effort that has gone into creating this very exhaustive and insanely helpful guide.
During the process I collected some notes on how things went and what my experiences were, which I'll share below in case anyone's interested. I also gathered some Gotcha's that I ran into and how I worked around them. Of course, lastly, I'll attach some performance measures so people can compare because who doesn't love a good numbers game")
The following is separated into sections and wrapped in spoilers because it's a lot of text and I didn't want to hit ya'll over the head with it.
First off though, my build configuration:
Name: Snøfall (mostly because I tried to stick with a white theme to everything as much as possible)
CPU: Intel Core i9 9900K
GPU: Sapphire RX580 Nitro+
RAM: Kingston HyperX Predator 3000MHz (64GB)
MOBO: Gigabyte Z390 Designare (who'd have guessed)
SSD: Corsair Force MP510 (1TB), 3 x Micron 1100 (1TB)
PSU: Corsair RMx850 (2018 Edition, white)
CPU Cooler: NZXT Kraken X72
Case: NZXT H700i (white)
WiFi: Broadcom card in x1 PCIe adapter + big-ass antenna
The following spoiler contains a very high-level set of notes taken chronologically from my installation experience:
I also specifically want to mention two things that I think are very nice and convenient and might be interesting for other people as well:
Now, a few words on hardware assembly and compatibility:
Alright, the section we've all been waiting for: Performance!
My Overclocking Experience:
Before I sign off, I wanted to leave you with some tips, tricks and lessons learned (mostly aimed at other soon-to-be system builders):
Overall time taken for the initial build, including hardware assembly and some very surface-level testing: ~5 hours.
Time taken for the overclock and thorough stability testing: ~1 week.
All in all, this was an extremely painless experience (except for the OC part, which I did to myself) and I learned a lot in the process, which is arguably the most valuable thing this whole adventure could have given me. Thank you again for this amazing guide and even more so for the countless hours of support you pour into this thread every week!
Having never done this before, everything went incredibly smoothly and I ended up with a fully-functional system in a matter of hours, so massive props for all the effort that has gone into creating this very exhaustive and insanely helpful guide.
During the process I collected some notes on how things went and what my experiences were, which I'll share below in case anyone's interested. I also gathered some Gotcha's that I ran into and how I worked around them. Of course, lastly, I'll attach some performance measures so people can compare because who doesn't love a good numbers game
The following is separated into sections and wrapped in spoilers because it's a lot of text and I didn't want to hit ya'll over the head with it.
First off though, my build configuration:
Name: Snøfall (mostly because I tried to stick with a white theme to everything as much as possible)
CPU: Intel Core i9 9900K
GPU: Sapphire RX580 Nitro+
RAM: Kingston HyperX Predator 3000MHz (64GB)
MOBO: Gigabyte Z390 Designare (who'd have guessed)
SSD: Corsair Force MP510 (1TB), 3 x Micron 1100 (1TB)
PSU: Corsair RMx850 (2018 Edition, white)
CPU Cooler: NZXT Kraken X72
Case: NZXT H700i (white)
WiFi: Broadcom card in x1 PCIe adapter + big-ass antenna
I went with the NZXT cooler and case combo specifically because the case contains a "Smart Device" (not actually that smart) that can be controlled via a Python library (thanks Casey for mentioning this in the build guide!), as can the Kraken itself. Overall, this combo gives me 12 controllable 4-pin PWM fan headers distributed over 4 channels (3 from the smart device, 1 from the Kraken). The best thing is that I can set fan speed (and even fan (and pump as well as lighting) profiles) directly from within the system with a few Terminal commands as well as monitor their current status without any sensor-kext tweaks whatsoever. No physical remotes, no five different programs for every single LED in the system, no Windows-only programs, it just works. The smart device itself as well as the case also came with a 20 LED strip each which are magnetic (no adhesive needed) and quite bright as well as having individually adressable LED's.
The 9900k was chosen over the 9700k because I actually run software that can utilitize all these cores (I'm a software developer by trade), otherwise I'd probably have gone for the 9700k. Same goes for the memory. Since Intel processors don't benefit from higher RAM frequencies as much as AMD's chips do, I opted for a safe 3000MHz as a nice middle ground between price and performance.
The 9900k was chosen over the 9700k because I actually run software that can utilitize all these cores (I'm a software developer by trade), otherwise I'd probably have gone for the 9700k. Same goes for the memory. Since Intel processors don't benefit from higher RAM frequencies as much as AMD's chips do, I opted for a safe 3000MHz as a nice middle ground between price and performance.
The following spoiler contains a very high-level set of notes taken chronologically from my installation experience:
- Started out from a Macbook Pro 15" Late 2014, planning to install 10.14.5
- USB must be formatted with macOS Extended and GUID partition scheme
- Was initially set to "MBR" in Disk Utility which does not work, it *must* be "GUID"
- UniBeast does not fail when the USB is formatted as "MBR" but creates the "EFI" folder on the "Install Mojave" partition
- BIOS was at F5 from the factory so an update was necessary, which went smoothly
- No EXC_CORPSE_NOTIFY errors during installation
- No second reboot in Phase 2 installation
- No EXC_CORPSE_NOTIFY errors here either
- WiFi and LAN were working correctly and speedily from within the installer
- Post Installation went without any complications whatsoever and was easy to follow
- All devices appear correctly in System Information, iCloud sign-in worked and everything else appears to work properly as well
- Messages works (can't test FaceTime since I have no camera available at the moment)
- I'm also getting the purple lines while booting but they appear to be harmless
After the main installation was complete, I set about doing some quality-of-life improvements, starting with getting display brightness adjustment to work. This also happens to be the one thing that I might need some help with, because while the actual brightness adjustment works, I can't control it via the keybindings defined in the application. I have applied the patch in CloverConfigurator, however I suspect I need a different set of replacement hashes. After some experimentation I found that adjustment via keybinds worked when I set them to "function as normal F-keys" in system preferences. However it stops working if this setting is toggled off, presumably because the hash issued by the key is now different from the patch in Clover. I assume the hex values there would need to be changed but I don't know how one would obtain the new ones to replace them, so if possible I'd like some help on that front (it's not a big issue though).
I also enlisted the help of some black electrical tape to tape off the LED's on the WiFi carrier board as well as the smart device because I don't like having lights on when the PC should be sleeping (as should I).
I also installed f.lux, which I'd recommend to anyone who uses their screen in the dark, as it automatically reduces blue light depending on your location and time of day.
Bluetooth connections and single-key-wake-from-sleep instantly worked. The only issue I encountered was that sometimes enabling bluetooth on my phone or my wireless headphones would wake my PC from sleep, which is not desireable. This can be prevented by disabling "Allow Bluetooth devices to wake this computer" in System Preferences -> Bluetooth -> Advanced. Keyboard and Trackpad wake-from-sleep will continue to work.
I also specifically want to mention two things that I think are very nice and convenient and might be interesting for other people as well:
- liquidctl
It's truly a magical library and it works flawlessly. Monitoring works out of the box, no USB connection issues, even the startup application of my custom fan curves works without fault. I'm very happy to report that because of this library I have a very configurable and quiet system at my disposal now.
- CarbonCopyCloner
While CCC does aim to create bootable backups, I wasn't content with having to manually back up my EFI partition because I can be 100% sure that I'll forget to do so before making breaking changes.
With a bit of research I found the script "EFICloner" which allows CCC to automatically copy my EFI partition to the backup disk, in turn creating a fully-automated backup solution that is bootable as a regular Hackintosh without any extra effort, literally a carbon copy of everything on my main system.
I had to modify the script a bit as the latest version in the original repository was broken, so if anyone's interested in a working version, they can find my fork here: https://github.com/kobaltcore/EFIClone
I'll try to maintain this script in the future, so if any issues pop up or you have suggestions for improvements, feel free to create an issue in the repository and I'll do my best to help you out.
Now, a few words on hardware assembly and compatibility:
- The NZXT Kraken X72 (and probably all other Krakens) will have a minor clearance problem with the RAM banks
The pump connectors for the tubes exhibit slight pressure on the first stick of my HyperX predator kit, however it is miniscule and won't harm the board- This only applies if the block is mounted with the tubes facing the RAM banks
- Internal USB Headers are very sparse on this motherboard, for example my setup requires 3 headers to connect the Kraken, the smart device and the front USB ports. I initially got the NZXT internal USB Hub, however that one only has two extra ports while I needed three. I ended up having to buy another internal 1-2 extender to daisy-chain into the NZXT Hub. The Hub has the advantage of being powered, so you can hook up devices with higher power draw, which might come in handy in the future.
Alright, the section we've all been waiting for: Performance!
I gotta admit, while I initially didn't want to overclock too much, fiddling around with all these settings was so much fun I got a little carried away.
I ended up with a stable system running at 5.2GHz at 1.37V, which is not that good voltage-wise but it's what my processor allows me to get away with. I also have an AVX offset of 1 because AVX loads would otherwise crash the system.
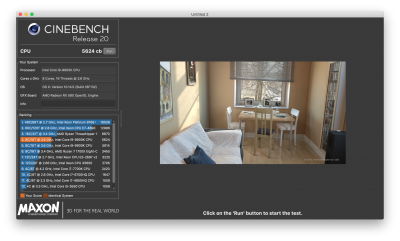
Stability testing was done using the CLI tool "stress" for non-AVX loads and Cinebench R20 for normal testing with a bit of AVX sprinkled in.
I've attached some screenshots (something something, pics or it didn't happen...), but here's a rundown of my results in text form:
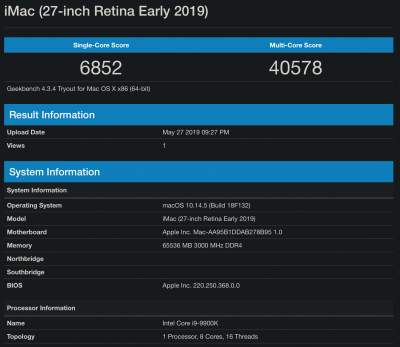
Geekbench:
CPU Singlecore: 6852
CPU Multicore: 40578
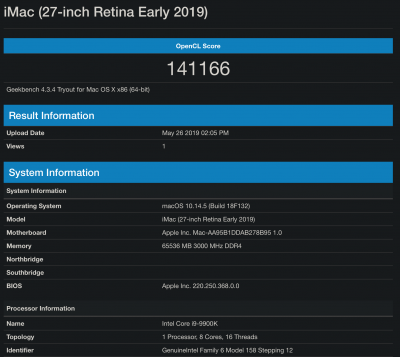
OpenCL RX580: 141166
OpenCL UHD630: 35508
Cinebench R20 Multicore: 5624
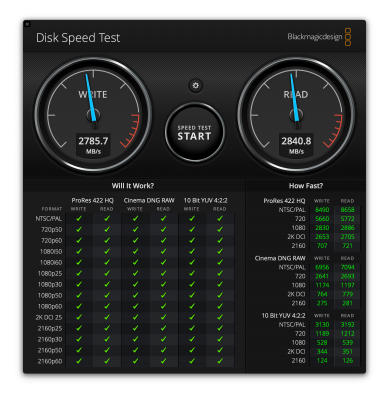
Blackmagic Disk Speed Test:
Read: 2785MB/s
Write: 2840MB/s
Not too shabby for my first time OC'ing, I think.
I ended up with a stable system running at 5.2GHz at 1.37V, which is not that good voltage-wise but it's what my processor allows me to get away with. I also have an AVX offset of 1 because AVX loads would otherwise crash the system.
Stability testing was done using the CLI tool "stress" for non-AVX loads and Cinebench R20 for normal testing with a bit of AVX sprinkled in.
I've attached some screenshots (something something, pics or it didn't happen...), but here's a rundown of my results in text form:
Geekbench:
CPU Singlecore: 6852
CPU Multicore: 40578
OpenCL RX580: 141166
OpenCL UHD630: 35508
Cinebench R20 Multicore: 5624
Blackmagic Disk Speed Test:
Read: 2785MB/s
Write: 2840MB/s
Not too shabby for my first time OC'ing, I think.
My Overclocking Experience:
I initially followed the Aorus OC Guide (which applies to most Gigabyte Motherboards as well, almost all of the settings are the same). I've attached the guide to this post if anyone is curious.
However, after some reboots in between tweaks I ran into a load of stability issues following this guide's instructions as it tells you to basically increase all of the settings until you're stable. **This did not work for me.**
After a lot of head-scratching and hard-freezes I stumbled across a forum post with a similar goal, which you can find here: https://forums.bit-tech.net/index.php?threads/9900k-5ghz-1-2v-guide-gigabyte-z390-master.353729
This guide actually does the complete opposite of most OC guides, which tell you to disable all the low-power states and run balls-to-the-wall-melt-everything settings to reach the desired frequencies. This is not a good idea.
What eventually led me to success was following this guide and going a bit further from there. I am in fact now running with most things set to Powersaving mode (i.e. Load Line Calibration) while the actual Vcore voltage is set to "Normal". This is the main thing that saved my bacon, because setting Vcore to normal unlocks the dynamic voltage scaling option, which, at least in my case, made everything stable almost instantly.
As such I'm now running with a base voltage of 1.2V at 5.2GHz and a dynamic voltage of +0.140V, which works out to about 1.37V at maxmium load, as far as I was able to determine. Most of the time however, the processor is in a lower-power state which allows it to clock down, volt down and run at very cool temperatures.
Additionally, I set the Uncore frequency (the clock speed of everything on the chip except the actual cores) to 4.8GHz, which doesn't do much for performance except for the IGPU, which I believe performs quite a bit better due to this tweak.
Now, I do have to mention that my CPU was delidded since I got a Der8auer-modified chip for cheap off of eBay, which of course helps with keeping such a high overclock without instantly combusting, but I believe this method would be applicable to "normal" chips as well, albeit with a less agressive OC.
As far as temperatures are concerned, at idle I'm seeing around 28-33°C while under load I'm hovering in the high 70's (76-79°C). These measurements were obtained by running Cinebench R20 loops for about 15 minutes and making several spot checks via iStat Menus monitoring CPU Core 1, which is as close as I can get to the Die.
Noise levels at idle are almost inaudible. I have pretty good hearing but I can barely hear anything at about 50cm away from the case. The loudest part might actually be the water pump of the Kraken X72.
Under full load the fans are certainly audible but not annoying, it's mostly the whooshing of air.
Using some extremely unscientific and unreliable measuring with my phone, noise levels appear to sit at ~43dB under full load and ~25dB at idle. Since the smart device in the case comes with a microphone built-in, I was also able to measure the interal sound pressure, the results of which are as follows (keep in mind this is literally 5cm away from the actual radiator fans):
- Idle: 52dB
- Load: 64dB
- Max: 81dB
As a small addendum: I have to mention that I'm not using the stock fans that came with the case (those appear to be NZXT AF12's) as they are airflow-optimized and I wanted something with higher static pressure for the radiator. During my testing I also found that they produced bearing noise (they use a rifle bearing) in addition to air noise, which is not acceptable to me, so I removed them from the case.
I also tested the AP12's which came with the Kraken X72 (using ball bearings) and those, surprisingly, actually were rather quiet. However, I had already gotten 3 Corsair ML 120 Pro's for my radiator and I have to say they are really quite nice. They are near inaudible below 50% while pushing a decent amount of air, but boy do they get loud at 100%. If you run these at full-tilt though you're probably trying to cool an erupting volcano. Even while running at full load I found I never had to exceed about 60% of the speed.
The AP12's are now my top exhaust fans (radiator is front-mounted), which works quite well.
Before I sign off, I wanted to leave you with some tips, tricks and lessons learned (mostly aimed at other soon-to-be system builders):
- Before you do *anything*, read the guide. Several times, on different days.
- This will help you with not falling into known traps, such as the 970 Evo Plus, which until the recent firmware update didn't work on macOS (it does now!)
- It will also familiarize you with the process before you actually start, which is always helpful
- When selecting components, check their hardware compatibility lists
- This one is very important to me personally because I've had several experiences where things were simply incompatible on the hardware level, which is disappointing and will cost you time and, in the worst case, money if you can't exchange or return the incompatible part
- This mostly happens with RAM but it can also happen that for example a motherboard is shipped with a BIOS that doesn't support the processor you want to use, or the specific NVME SSD you have
- Motherboard manufacturers commonly have compatibility lists for RAM, SATA and NVME SSD's and sometimes GPU's on their website
- If something is not mentioned on any of these lists it doesn't mean it won't work but you loose the guarantee of it definitely working
- After everything appears to be setup and working correctly, immediately make a backup of this "fresh" state as the chances of screwing up are the highest right after a successful installation, when the feeling of security starts setting in
- If something doesn't work first-try, don't panic. Re-do the process at half the speed and read the instructions out loud to catch any errors you might have made while reading
- Create a folder where you download and store the manuals and other information materials of all the components you plan on using. This will serve as a repository of knowledge while building the system and can be helpful when stuff isn't working and you need to look something up as it saves you a ton of googling.
Overall time taken for the initial build, including hardware assembly and some very surface-level testing: ~5 hours.
Time taken for the overclock and thorough stability testing: ~1 week.
All in all, this was an extremely painless experience (except for the OC part, which I did to myself) and I learned a lot in the process, which is arguably the most valuable thing this whole adventure could have given me. Thank you again for this amazing guide and even more so for the countless hours of support you pour into this thread every week!
Attachments

Last edited:
