
Leesureone
Moderator
- Joined
- Feb 21, 2010
- Messages
- 3,883
- Motherboard
- Asus Z790 Maximus Hero
- CPU
- i9-13900K
- Graphics
- RX 6950 XT
- Mac
- Mobile Phone
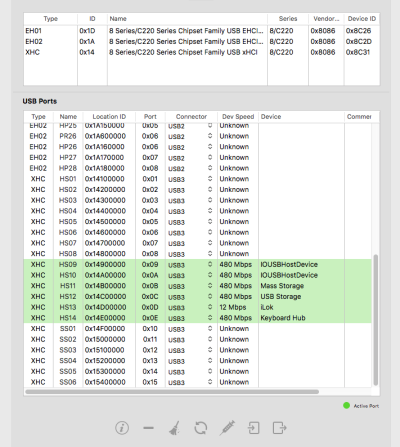
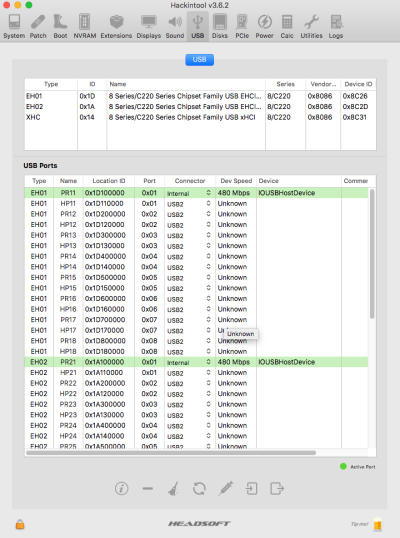
I've been using the USB Map Tool from CorpNewt described in the Dortania Install Guide, its definitely more complex but gets around needing the XHCI Port Limit Quirk.The XHCI port limit quirk stopped working after 11.3.2 so you'd have to use an older Big Sur version or use Catalina to make your USB ports kext.
USB Mapping | OpenCore Post-Install
dortania.github.io
I plagiarized the instructions below being they helped me understand better how the tool works. In the end I still needed to tweak the final kext using a plist editor, some of my internal ports were listed as USB3. It's a useful tool but no where near as easy as Hackintool.
List of Commands
| Command | Notes |
| D | Used to Discover Ports |
| P | Used to Edit and create USBMap.kext You must discover the ports first. |
| R | Reset all detected ports. |
| H | Generate ACPI to reset RHUBs |
| Q | Quit the script. |
2. Type: R to Reset all the discovered ports. This might be useful, if you have used the script earlier.
3. Type: D to discover the ports. To discover the ports, follow the steps below.
4. Connect the USB Drives in each of the available ports one by one and wait for the drives to show up.
5. Once all the ports are discovered, press Q to quit the ports discovery and then press P to edit the plist.
USB Types
| Type | Connector Info | Notes |
| 0 | USB 2.0 Type-A connector | |
| 3 | USB 3.0 Type-A connector | |
| 8 | Type C connector, USB 2.0 only | |
| 9 | Type C connector, with USB 2.0 and USB 3.0 switch | |
| 10 | Type C connector - USB 2.0 and USB 3.0 without Switch | |
| 255 | Proprietary connector | For Internal USB Ports such as Bluetooth. macOS always expects Bluetooth as Internal. |
Now, use T:x, x:3. Where,
- x represents your discovered port.
- 3 represents the connector type.
Code:
T:x:255
The x is the Bluetooth Controller and it has to be internal.
6. Press K to build the USBMap.kext.
7. Press M to go to Main Menu.
8. If it has an option to reset RHUBs, press A/H or both to create an SSDT.
9. Press Q to quit.
Notes:
- The kext and the RHUB SSDT is located at Yourusername>USBMap>Results.
- Do NOT use SSDT-UIAC or USBInjectAll.kext along with USBMap.kext.
- If your system needs XHCI-unsupported.kext along with USBMap.kext, you can use it.
- If a port is not detected/discovered, it will be skipped and the respective ports will not work.
Now, as you've the kext ready, you'll need to install it to enable the mapping.
Mount your ESP.
For Clover:
If you're using Clover, copy the kext to EFI/Clover/Kext/Others
For OpenCore:
If you're using OpenCore, copy the kext to EFI/OC/Kexts. You'll also need to add the kexts entries in Kernel section of your config.plist
Notes:
- If there's a conflicting controller and SSDTs has been generated, copy the SSDTs to EFI/OC/ACPI. You'll also need to add the kext entry in ACPI>Add section of your config.plist.
- In case, if you're using Clover, the directory to place the SSDT will be EFI/Clover/ACPI/patched.
After performing all the above steps, restart your system for the applied changes to take effect.
You can run the USBMap command and verify the ports mapped. You'll only see the discovered/mapped ports in list.
") that allows dragging the entry to a new position.
that allows dragging the entry to a new position.