
- Joined
- Oct 19, 2013
- Messages
- 52
- Motherboard
- Asus Prime Z270-A-0906 - OpenCore 0.63 - Big Sur 11.1
- CPU
- i7-7700K
- Graphics
- XFX Radeon RX 580 8GB GTX Core GDDR5 HDMI DP
- Mac
- Mobile Phone
margate's Build: ASUS Prime Z270-A - i7-7700K 4.2Ghz - 64GB - XFX Radeon RX 580 8 GB
Components
ASUS Prime Z270-A Motherboard BIOS 0906
Product Link Amazon Newegg
2 * Corsair 32GB (2-KIT) DDR4 2800MHz Vengeance LPX Memory Kit
Intel Core i7 7700K - 4.2 GHz - 4 cores
Product Link Amazon Newegg
Cooler Master MasterLiquid PRO 120 CPU Cooler
Product Link Amazon Newegg
Product Link Amazon
XFX Radeon RX 580 8GB GTX Core GDDR5 HDMI DP (RX-580P8DFD6)
WD Blue PC SSD WDS100T1B0A - Solid State Drive - 1 TB - SATA 6Gb/s
Product Link Amazon Newegg
Corsair RMx Series™ RM1000x — 1000 Watt 80 PLUS Power Supply
Product Link Amazon Newegg
2 * Samsung UD590 Series U28E590D - 28″ 1ms Monitors
Product Link Amazon Newegg
Apple Broadcom BCM94360CD 802.11ac WiFi Bluetooth 4.0 Mini PCI-E WLAN Card New
Ebay
Mini BCM4352 867Mbps + Bluetooth BT 4.0 802.11AC/BGN Desktop PCI-E Adapter New
Ebay
2 * Universal Internal Antenna for Wireless Mini PCI PCI-E Laptop Desktop Computer
Ebay
Please see further down for WIFI/BT, Continuity and handoff Support
SAMSUNG 970 EVO M.2 2280 1TB PCIe Gen3. X4, NVMe 1.3 64L V-NAND 3-bit MLC Internal Solid State Drive (SSD)
InstallationBefore using jktaurus8s guide below, there is a few notes, if Pascal Graphics Cards will be used.
Nvidia Graphics card was not installed doing initial install, see Additional Installs section.
My BIOS Changes on ASUS Prime Z270-A Motherboard
Hold DEL boing Boot
Load Defaults F5 + F10 to save
Hold DEL again doing Boot
Advanced\CPU Configuration
Intel Virtualisation Technology=Enabled (Required for VMware Fusion)
Advanced\/System Agent (SA) Configuration\Graphics Configuration
Primary Display=PEG
Advanced\Onboard Devices Configuration
RGB LED Lighting=Off
Advanced\Onboard Devices Configuration\Serial Port Configuration
Serial Port=off
Advanced\USB Configuration
XHCI Hand-off=Enabled
Boot
boot logo display=Disabled
Boot\Secure Boot
Secure boot state disabled (How to Disable or Enable Secure Boot for ASUS Motherboard)
OS Type=Other OS
Choose iMac14,2 as System Profile
My Gigabyte GeForce® GTX 1060 connected Displays wasn't detected with iMac 17,1 system definition; I got blank screen after boot and no displays shown in System Report/HW/Graphics/Displays/NVIDIA GeForce...
Tip: iMac 17,1 System def's works fine, if Only onboard HD630 is used.
Remove FakeSMC_GPUsensors.kext after Multibeast Install from /L/E
FakeSMC_GPUsensors.kext cause Panic on boot
As Storm pointed out; Pascal Graphics Cards are not yet supported with the version in current MultiBeast; however there seems to some news here
When asked about Audio in guide below, select ALC1220A
Step 3 = Drivers–> Audio–> Check both ALC1220A (ASUS ROC STRI Only) and 100/200 Series Audio.
Follow jktaurus8s Guide
Note: Make sure Input/Output are selected in System Preferences / Sound
Status after Post Install
- Intel HD Graphics 630 - Working (HDMI Port)
- Onboard Ethernet - Working
- USB 3.1 - Not tested
- USB-C - Not Tested
- USB 3.0 - Working (tested with USB2 and USB3 devices)
- Intel High Definition Audio - Works as expected
- iMessage - Working used An iDiot’s Guide to iMessage
Additional Installs
NvidiaWeb 378.05.05.05f01 installed, upgraded to 378.05.05.05f02 before adding card
Physical added GigaByte GeForce® GTX 1060 Xtreme Gaming 6G Graphics Card
Unpacked RehabMan-CodecCommander-2017-0501.zip and copied CodecCommander.kext to Desktop and ran KextBeast to install it.
Status after Additional Changes
- GigaByte GeForce® GTX 1060 Xtreme Gaming 6G - Working on 2 Displays (Intel HD630 not used)
- Sleep/Wake
- Monitoring FakeSMC_GPUSensors.kext thread's
What Works
- iCloud
- Messages
- AppStore
- Graphics HD630 (Not Used)
- Graphics GeForce® GTX 1060
- All USB ports
- Audio
- Green
- Black
- Orange
- Audio automatically shift to headphones if plugged in on front
- Network
- Sleep
- VMware Fusion 8.5.6
What doesn't Work
- Onboard HD630 DisplayPort
- FakeSMC_GPUSensors.kext (Panic)
- Samsung UD590 Series U28E590D warns about not using 3840x2160 when connected to HD630/HDMI (A reboot solve this, but I don't intend to use HD630 for now)
What isn't Tested
- USB-C
- USB 3.1
- Audio Digital Out
- Audio Microphone
Update after week 1
Overall no issues with software I'm using, Multiple instances of VM's in Fusion ( Windows, CentOS etc ) , MS Office 2016, Aperture, Luminar, Aurora HDR 2017, various Garmin stuff and all Apple SW i tested works fine.
I found a few issues and made some changes
- If only 1 display was powered on doing boot and display 2 was turned on afterwards; it was not recognised (Both are connected to GeForce card)
- Logitech unified receiver did not go well with USB3 ports as mouse movements jumped and caused sporadic panic’s/reboots; I moved unified receiver to an old USB2 hub
- BIOS: Enabled ErP S4+S5 in order to turn off displays on system shutdown (USB controlled power strip)
- Added Logitech Webcam C615, works fine with FaceTime and Skype.
Update after week 2
- BIOS: Disabled ErP S4-S5 and used a "Master plug Power strip" instead; "USB power strip" was unreliable in regards to powering off displays (Might be that the MB doesn't remove power from USB ports; sometimes it worked?)
- Got a single BSOD in Windows 7 VM, no RC for the moment.
Update after week 3
- BSOD continued, Fixed by fsck in VM
Update after week 4
- Updated from 10.12.4 to 10.12.5; reminder to myself? check that an NvidiaWeb driver is available for new MacOS release before upgrade.
Change - Added GPU Monitoring for Pascal cards
- Remove FakeSMC*.kext from /Library/Extensions (Incl FakeSMC.kext)
- Download the following package and copy all *.kext files to Desktop and HWmonitor to /Applications
- Execute KextBeast to install the *.kext files on Desktop
- Verify the 5 files are present in /Library/Extensions
- Reboot
Note: One of the Fans jumped to Max RPM after Kextbeast; just reboot to solve
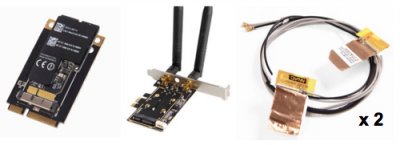
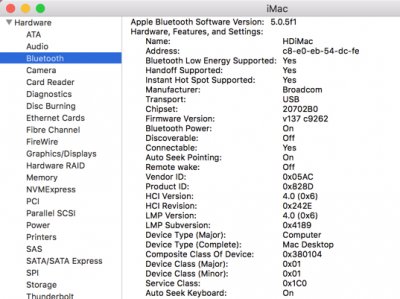
Change - Added WIFI and Bluetooth
Updated to MacOS Sierra 10.12.6
Originally I bought the PCI-E adapter with a BMC94322MC which did not provide BT; so I dished BMC94322MC and the 2 antennas and bought BCM94360CD with PCI-E adapter and 2 packages of Internal antennas
What Works
- Handoff
- Universal Clipboard
- Cellular Calls
- SMS and MMS
- Instant Hotspot - OK but slow
- Auto Unlock - Not Tested
Speeds measured using http://beta.speedtest.net
- WIFI - 30/18,5 Mbps
- WIFI via iPhone hotspot / 4G - 51/12 Mbps
- LAN - 89/18,4 Mbps
- Instant Hotspot via 4G - not useful, but works!!
Note: ADSL subscription - 100/20 Mbit
Change - Upgrade to High Sierra 10.13
Downloaded following packages for later use
Followed Guide Update Directly to macOS High Sierra (APFS)
After upgrade completed, I did the following
Upgraded Nvidia Web Driver with downloaded version above.
Copied downloaded AppleALC.kext to EFI/Clover/kexts/Other
Copied downloaded Lilu.kext to EFI/Clover/kexts/Other
Last I opened EFI/Clover/config.plist with Clover Configurator, clicked Devices and Checked ResetHDA
Rebooted
Change - Upgrade to High Sierra 10.13.1
Downloaded following packages for later use
Updated MacOS from App store
Installed new Nvidia Web Driver
Change - Upgrade to High Sierra 10.13.2
CCC backup of all volumes
Notes:
Current version of FakeSMC in /Volumes/EFI/EFI/CLOVER/kexts/Other is 6.26.1440 which came with https://github.com/kozlek/HWSensors/releases; so I skipped update of FakeSMC
I decided to upgrade all my *.kext in /Volumes/EFI/EFI/CLOVER/kexts/Other
Downloaded the following and copied to /Volumes/EFI/EFI/CLOVER/drivers64UEFI/
Downloaded the following and copied to /Volumes/EFI/EFI/CLOVER/kexts/Other
Upgraded to 13.10.2 from App Store
After reboot I was prompted to Upgrade Nvidia Web Driver and did so!! Another reboot and all Worked as expected
Change - Upgrade to High Sierra 10.13.5
Downloaded the following
Copied the following to /Volumes/EFI/EFI/CLOVER/kexts/Other
Lilu.kext
AppleALC.kext
Shiki.kext
FameSMC.kext from HWSensors
NvidiaGraphicsFixup.kext
Copied the following to Desktop and ran KextBeast
ACPIMonitor.kext
FakeSMC.kext
GeforceSensor.kext
IntelCPUMonitor.kext
W836x.kext
Copied the following to Applications
HWMonitorSMC
HWMonitorSMC2
Haven't decided which one to use!!!
Updated MacOS from App store
Change - Upgrade to High Sierra 10.13.6
Downloaded following packages for later use
Updated MacOS from App store
Installed new Nvidia Web Driver
Change - Upgraded Clover to version 4658
Change - Added new Samsung 1TB M.2 Sep/18
I ran into trouble with the Samsung drive and boot. First time I did a APFS drive format and copied my existing EFI to NVME drive, played around with boot options in BIOS - no luck - old SSD was chosen, if I removed all other drives in BIOS Boot config, except for NVME drive, BIOS was shown. I added back by SSD drive to Boot options and booted into High Sierra.
My SSD drive has been APFS since upgrade to High Sierra, so kind of followed High Sierra upgrade steps, witch do a conversion to APFS.
- Created external CCC backup of old SSD
- Create Mac OS Extended (Journaled) partition on NVME
- Converted Mac OS Extended (Journaled) partition on NVME to APFS
- copied EFI from old SSD drive to NVME drive
- Checked that I was able to boot into Clover on NVME drive
- Booted High Sierra from old SSD drive
- Did a CCC copy from old SSD drive to NVME drive.
Change - Upgrade to Catelina 10.15.2 from Mojave Dec/19
Below steps cover step 1 & 2 in https://www.tonymacx86.com/threads/update-directly-to-macos-catalina.284463/
Downloads:
SSDT-EC.alm from balazs631 post
On Mojave in installed clover by dragging Clover App to /Applications and launced the app (approving in Security & Privacy).
From Menu bar I opened clover and mounted EFI partion on boot drive, then updated below kexts in /EFI/CLOVER/kexts/other
AppleALC.kext 1.4.4 AppleALC-1.4.4-RELEASE.zip
FakeSMC.kext 3.5.2 HWSensors-3_r240.dmg
IntelCPUMonitor.kext 1.2.3 in HWSensors
RadeonMonitor.kext 1.3.4 In HWSensors
W836x.kext 1.3.4 In HWSensors
IntelMausiEthernet.kext 2.4.1d1 No Action
Lilu.kext 1.4.0 Lilu-1.4.0-RELEASE.zip
NoVPAJpeg.kext 1.0.0 NoVPAJpeg-v1.0.0-built-with-Lilu-1.2.8-RELEASE.zip
USBInjectAll.kext 0.7.1 RehabMan-USBInjectAll-2018-1108.zip
WhateverGreen.kext 1.3.5 WhateverGreen-1.3.5-RELEASE.zip
copied SSDT-EC.alm to /EFI/CLOVER/ACPI/patched
Rebooted to verify that updates worked as expected.
Relaunched clover from Menu bar and clicked “Install Clover 5101”
Selected boot drive in “Select a disk..”
In the now filled lists of efi choices, the following was selected
- ApfsDriverLoader.efi
- DataHubDxe.efi
- PartitionDxe.efi
- AptioMemoryFix.efi
- EmuVariableUefi.efi
- SMCHelper.efi
- AudioDxe.efi
- FSInject.efi
- VBoxHfs.efi
Clicked Install (EFI partition will unmount)
Continued with step 3 in https://www.tonymacx86.com/threads/update-directly-to-macos-catalina.284463/
Change - Upgrade to Catelina 10.15.4 from Catelina 10.15.3 Mar/20
For some time one of my plans was to eliminate the use of USBInjectAll.kext because my keyboard/mouse has been unstable from time to Time, mostly after upgrades. Before upgrading to 10.15.4 I followed RehabMan's
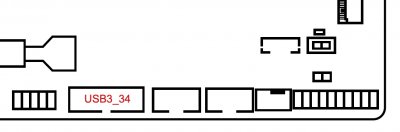
On Rear Panel there are 4 * USB 3.0 ports, on the Motherboard there are 2 USB 3.0 connectors (USB3_34) going to Front Panel, additionally 1 port are used by Bluetooth USB Host Controller (BRCM20702)
Using RehabMan's guide I made below mappings for dsl file. HS03 and HS04 are found on the motherboard on connector USB3_34 there connects to frontend connectors. HS01,HS02,HS03 and HS04 positions are shown on image below. SS* ports are used by corresponding HS* ports when a USB 3.0 device are plugged in. ISRegistryExplorer shows that HS14 connects to Bluetooth.
I attached SSDT-USB-trimmed.dsl and compiled SSDT-USB.aml for my Motherboard
Last I
- copied SSDT-USB.alm to EFI/CLOVER/ACPI/patched/SSDT-USB.alm
- removed EFI/CLOVER/kexts/Other/USBInjectAll.kext
- rebooted and tested ports
Finally I upgraded to 10.15.4 from System Preferences/Software Update
Note: When system reboots doing upgrade, several times I choosed "Boot macOS Install from System - Data", but upgrade didn't work, so i tried to power of doing reboot - then powered on and selected same volume again, which upgraded successfully.
Change - Upgrade to Catelina 10.15.5 from Catelina 10.15.4 Jun/20
This morning I upgraded to 10.15.5, however I ran to an issue where by "System - Data" did not show in Clover Boot Screen as an Option
With reference to Anotherdust, I did the following
- Started Install from System Preferences / Software Update
- When Clover shows i Pressed both F11 and Option F11 (system did not hang) selected Exit in Clover and system hung at this point, powered off
- Back in Clover "System Data" now showed as an option and I booted from it, however version remained 10.15.4 after reboot; so repeated Step 1
- When Clover shows I selected "System - Data"
- Back online version remained 10.15.4; At this point a did a normal shutdown
- Powered on and when Clover shows I selected "System - Data", now update displayed a normal update with "Estimated time ...." and finish with an reboot
- Back online I was prompted for iCloud password and version showed 10.15.5
Change - Updated my system definition to 18.3 in order to support Big Sur Sep/20
- Logged out of iCould
- Used Clover Configurator / SMBIOS to change to iMac18.3 while checking coverage - hit in first try
- Saved config and unmounted EFI, then rebooted
- Logged into iCloud and configured iCloud options to previous settings (record options next time)
- I wait with OpenCore
Change - Changed to OpenCore 6.3 Nov/20
- Followed https://dortania.github.io/OpenCore-Install-Guide/
- In Platforminfo I used my original settings back from September
- Created USB installer with Big Sur
- Installed Big Sur on separate SSD disk, did not connect to ICloud
- Copied EFI from USB to separate SSD and booted from it - selecting Big Sur
- Booted once more from separate SSD and selected my current Catalina NVME
- Made a backup of EFI on Catalina NVME and copied over EFI from separate SSD
- Last I booted from NVME Catalina, tested VMware Fusion, iCloud, iMessages, Handoff etc...
- I wait and test a while before making last jump to Big Sur on by NVME drive
Change - Changed to OpenCore 6.3 Dec/20
Upgraded to Big Sur 11.0.1 from "Settings/Software update" today, and it was very clean and strait procedure, it rebooted 3-4 times and ended with login screen.
There might be an issue with VMware fusion 12 as an Windows 10 client seems sluggish
I got an acceptable Windows Guest performance by disable "Accelerate 3D Graphics", "Enable hypervisor applications in the virtual machine" and use Hardware Version 16 and adding below parameters to vmx file.
ulm.disableMitigations= "TRUE"
mks.enableMTLRenderer= 1
#mks.enableGLRenderer= 0
sched.mem.pshare.enable = "FALSE"
MemAllowAutoScaleDown = “FALSE”
mainMem.backing = "swap"
MemTrimRate = "0"
ethernet0.virtualDev = "vmxnet3"
Update - Changed to OpenCore 6.3 Dec/20
Ran into another issue where ASMedia 2142 devices are not detected
In config.plist locate Kernel section and insert below code and save
<dict>
<key>Comment</key>
<string>ASMedia Patch</string>
<key>MaxKernel</key>
<string></string>
<key>PlistPath</key>
<string>Contents/Info.plist</string>
<key>Enabled</key>
<true/>
<key>MinKernel</key>
<string></string>
<key>ExecutablePath</key>
<string></string>
<key>Arch</key>
<string>x86_64</string>
<key>BundlePath</key>
<string>ASMedia.kext</string>
</dict>
Also copy ASMedia.kext to EFI/OC/Kexts on your boot drive.
Thanks to @apfelnico for providing ASMedia.kext
Update - Upgraded to Big Sur 15.1 Dec/20
Upgraded to Big Sur 11.1 from "Settings/Software update" today, and it was very clean and strait procedure, it rebooted 3-4 times and ended with login screen.
Attachments
-
 Info.jpg2.3 MB · Views: 2,712
 -
 WIFIParts.jpg69.8 KB · Views: 35,431
 -
 SI-WIFI.jpg211.3 KB · Views: 34,674
 -
 SI-Bluetooth.jpg226.4 KB · Views: 34,440
 -
 Back.jpg182.9 KB · Views: 3,224
 -
 USB3_34.jpg60.4 KB · Views: 308
 -
SSDT-USB-Template.dsl1.1 KB · Views: 211
-
SSDT-USB.aml621 bytes · Views: 341
-
ASMedia.kext.zip2.2 KB · Views: 187
Last edited:
")