Contribute
Register

**Success* i7-4770k - MSI Z87-GD65 - 2 x GTX 660 - 16GB RAM - TRI-Boot - OS X 10.9.4 - Windows 8.1 P

Status
Not open for further replies.
Joined
Jan 6, 2014
Messages
17
Motherboard
MSI Z87-GD65
CPU
i7-4770K
Graphics
GTX Titan X (Maxwell)
Mobile Phone
  1. Android
epmasters's Build: i7-4770k - MSI Z87-GD65 - 2 x GTX 660 - 16GB RAM - TRI-Boot - OS X 10.9.4 - Windows 8.1 Pro - SteamOS​


Components


Motherboard: MSI Z87-GD65 Gaming Edition

Processor: Haswell 4th Gen i7-4770k

Memory (RAM): G.SKILL Ripjaws X Series 16GB (4 x 4GB)

Video Card (x2): EVGA SuperClocked GeForce GTX 660

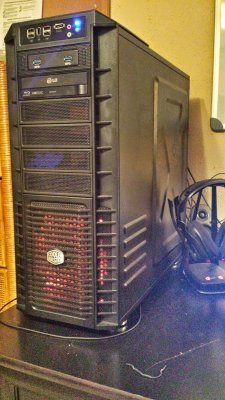
Case: COOLER MASTER HAF X RC-942

Blu-Ray Drive: LG Black 16x Blu-Ray BDXL

Hard Drives:

Liquid Cooling: Cooler Master Eisberg 240L Prestige

Power Supply: CORSAIR AX series AX760 760W ATX12V

Keyboard: Razer BlackWidow Ultimate Elite Mechanical Gaming Keyboard

Mouse: M325 Wireless Mouse (Black) - Logitech

Monitor: LG 22EN33S Monitor - 21.5" Full HD LED *I think, I may be off on the model*


Comments

So, after a few months of doing some digging around here on tutorials and watching video after video I figured I would go ahead and give this hackintosh thing a go. Did not really know anything off hand of what it was going to take but I figured I would give it a shot. Luckily, the only thing that cost me was time; perhaps an additional hard drive as well.

Where to begin, oh yes. As noted in the title I have 3 OS's running on 3 separate hard drives in the hackintosh. They are:

1. OS X Mavericks (10.9.4) - 500 GB
2. Windows 8.1 Pro - 1TB
3. Steam OS - 1TB

OS X Mavericks and SteamOS were a free download and Windows 8.1 Pro was at a really great price with my student discount as I was graduating college this past May I could not pass it up.

Now let's get into the good stuff: Hardware

I did the build last summer in 2013 just after the Haswell processors were announced and figured it was a good thing I had waited to build myself a PC.


Steps / Procedures:
Okay, so originally I had just Windows 8.1 and OS X installed before even thinking about having SteamOS. Little did I know you could seriously screw up your whole system if you have no idea what you are doing whenever it comes with SteamOS....so, what did I do? Screw everything up :). So then, I had erased everything on all my HDD's and decided to start over. First, I picked one of my two 1 TB HDD and installed SteamOS on it nice and easy. That's done. Let's move on to Windows 8.1 Pro.

Choosing my second 1TB drive I re-downloaded my copy from the Windows Store (legitimate) and was able to reinstall it back over a copy of Windows 7 I put on there. So then that was done, which leaves me to my last HDD and last OS.

OS X Mavericks installed fairly simple on my 500GB. I chose a smaller hard drive for this one just in case things did not go in my favor therefore would not be out of too much money. Anyhow, these were the steps I took in order for me to get this up and going:

1. I used the very well written guide posted here I was able to create my UniBeast Drive with ease! *This was before UniBeast 4.0's release. I recently just made myself a new boot drive using OS X 10.9.4 & UniBeast 4.0.*

2. Using pmpatch I patched the latest BIOS file that was out for my particular motherboard. So, at the time I actually did this it was 1.8. Since then version 1.9 and 1.A have been released. My motherboard now has been patched to 1.A using UEFIPatch. From here I loaded the patched BIOS file to an empty flash drive.

3. I shut off the PC, disconnected all my HDD's (BIOS flashing has been a pain for me for some reason, then I read somewhere that unplugging your HDD's solves the issue, so it did!) and flashed my motherboard from 1.1 to 1.8. Flashed with no issues. Then proceeded with a shut down.

4. I reconnected my hard drive I had chosen for the OS X installation, 500 GB, and plugged my MAVBOOT drive via USB and booted into my MAVBOOT drive.

5. Using NO boot flags whatsoever, installation was cake from here on out. Once I was able to make it past installation I used the EasyBeast settings in MultiBeast (pics included) as well the ALC1150 option to get my audio to work with my Logitech speakers.

6. I had noticed that I was unable to actually boot into Mavericks without the help of the USB drive. (boot0 issue, etc) So, after following this helpful tutorial I was able to fix that issue.

7. Once that was done I was pretty much finished! I shut down the PC, reconnected my HDD's and from Chimera I was able to choose between Mavericks and Windows. Still works to this day and I'm very fortunate for all this website has provided for me.

Overall, the process took about a week to do. My internet is so poor where I live that downloading these things literally took hours. To give you an idea, its about 3mbps down and 1mbps up on a good day. My WISP is sometimes helpful then again sometimes it isn't. (Rural area FTW)

Updates are a breeze to deal with. Just have to reinstall the audio drivers and I am good to go.

*If anyone would know where to start with adding my SteamOS to Chimera boot loader upon start that would be awesome. I know that's the complete opposite direction of what this website does and operates so I can completely understand if having guidance with that issue cannot be discussed.*

Hopefully you all can see the pictures pretty well. All were taken with Snagit on my Mac and my S4.

20140709_190401.jpg 20140709_190503_Richtone(HDR).jpg MSIBiosUpdate1A.jpg Multibeast EasyBeast Configurations.jpg Patched AppleIntelCPUPowerManage.jpg
 
That's awesome! I hate to ask, but I was wondering if you might be able to assist me. My rig is very similar to yours.
 
That's awesome! I hate to ask, but I was wondering if you might be able to assist me. My rig is very similar to yours.

Sure! Ask away and I will do my best to answer. I will warn you my response times will be sluggish. Work consumes most of my day so I really only answer at night like this.
 
Here's my build:

Motherboard: http://www.newegg.com/Product/Product.aspx?Item=N82E16813130768

CPU: http://www.newegg.com/Product/Product.aspx?Item=N82E16819116901

Memory: http://www.newegg.com/Product/Product.aspx?Item=N82E16820231416[

HardDrive: http://www.newegg.com/Product/Product.aspx?Item=N82E16822236447

Graphics: http://www.newegg.com/Product/Product.aspx?Item=N82E16814487028

The issue is that upon starting the UniBeast installer usb I get the white apple screen flash and reboot. I will be updating my BIOS to the most current update in the next few hours. I've tried taking out my graphics card because there is a forum post saying it is not supported. I've tried Several boot flags such as: -x, GraphicsEnabler=Yes, PCIRootUID=1, PCIRootUID=0, and npci=0x3000, that are listed in the installation guide.

Any suggestions?

Thanks for you time.

Updating your BIOS would be a good start. You may need to patch your BIOS using the UEFIPatch Utility. That flash and reboot? Totally had that same issue whenever I finished with my build but once I patched my BIOS it booted with zero issues. No bootlflags. If you need assistance I can probably do so for you and send it to you!

Keep me updated.
 
Well, just updating the BIOS was not good enough. I'll look into the UEFIPatch Utility. Did you have to use this?

Thanks!
 
Well, just updating the BIOS was not good enough. I'll look into the UEFIPatch Utility. Did you have to use this?

Thanks!

I did! Basically once you have it downloaded have that, the BIOS update, then your patches.txt all in the same folder somewhere where you can easily work with. Then simple drag your BIOS file on top of the UEFIPatch program and it should patch it for you. Then flash your BIOS again with the patched file then give your USB Loader another go.
 
I'm not quite sure what to download when it comes to the UEFIPatch Utility. And then what to do with it. haha I was looking at this post: http://www.tonymacx86.com/ssdt/92024-pmpatch-uefi-patching-utility-7.html

Edit: Managed to find PmPatch.exe, however, it will not patch correctly. I've tried on different BIOS versions. I've acquired pmpatch 5.12. Did you use this version of Pmpatch?
 
Did a lot of digging and I was able to come up with pmpatch 5.14. I did it's thing and now i've got a "patched BIOS" file, but I feel like it is not correct. Here is what I've got:
PmPatch.png
The Powermanagement modules were not found (I feel like this is what i'm trying to patch)
However, PowermgmtDxe/Powermanagement2.efi module at 00248e8 was patched.

Thanks for your time!
 
Did a lot of digging and I was able to come up with pmpatch 5.14. I did it's thing and now i've got a "patched BIOS" file, but I feel like it is not correct. Here is what I've got:
View attachment 99089
The Powermanagement modules were not found (I feel like this is what i'm trying to patch)
However, PowermgmtDxe/Powermanagement2.efi module at 00248e8 was patched.

Thanks for your time!

That's about what mine looked honestly. It did not make a lot of changes to mine. I would give that a shot and see where you land. If not I was going to use UEFIPatch and patch the latest version for you and post it for you to use if that does not work. Let me know!

*Edit* I went ahead and followed the link of your specific motherboard from Newegg and downloaded the latest BIOS file and patched it with UEFIPatch Utility. It is a zip file so extra it to the root of your USB drive and flash it with this if you are unsuccessful with your pmpatch BIOS. Which if I read correctly he no longer supports pmpatch. You can download your BIOS file following my dropbox link:

https://dl.dropboxusercontent.com/u/109941135/E7916IMS.140.zip
 
Status
Not open for further replies.
Back
Top