Ultrapatch. I have the same board and cpu. Here are my install notes:
Intel Cube Build - October 2012
- Intel Core i3 2125 Dual Core LGA1155 3.3Ghz Sandy Bridge - $140 NCIX
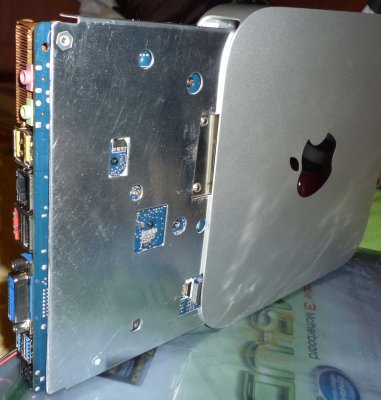
- Intel DH61AG H61 Express chipset - $120 NCIX
- 2x4GB Kingston DDR3-1333 204pin SODIMM - $38 NCIX
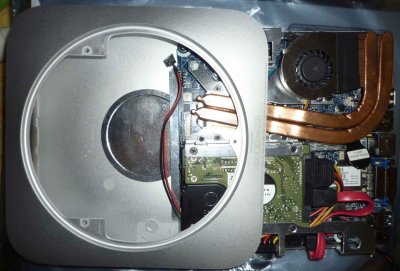
- GELID Slim Silence Iplus Heatpipe CPU Cooler Heatsink - $25 NCIX
- DELL PA-19 230Watt 19.5VDC Power Supply - $35 Amazon [[Could probably substitute a PA-15]]
- Seagate Momentus 320GB 5400RPM 2.5" SATA SSD - $45 NCIX
- Kingston 128GB SSDNOW 200 2.5" SATA HDD - $85 NCIX
- PowerMac G4 Cube used - $61 ebay
- Novus Polish 8oz - $36
http://www.novuspolish.com
- Scythe 2.5 Twin Mounter 2X2.5IN HDD/SSD 3.5IN Drive Bay Mounting Kit - $10 NCIX
- Broadcom BCM94322 4322 half mini PCI wireless wifi card
Instructions to install Max OSX
-------------------------------
1) Flashed bios to 0.43 The board came with 0.23. Needed to create bootable USB with DOS.
2) Used "Install OS X Mountain Lion.app" v10.8.2 and built a UniBeast USB Installer on a 16GB USB Flash Drive
You will need UniBeast - Mountain Lion to create the USB Installer.
Building the UinBeast installer took about 15 minutes.
3) Enter PC Bios and Load Defaults, then ensure SATA mode is set to AHCI
BIOS settings:
Main -> All Default Settings
Configuration/Onboard Devices
Enhanced Consumer ID -> Disable
Audio -> Enable
Front Panel Audio -> Auto
HDMI/DisplayPort Audio -> Enable
Internal SPDIF/DMIC header -> SPDIF Out
LAN -> Enable
USB -> All Enabled
Num Lock -> On
SATA Drives
Chipset SATA -> Enable
Chipset SATA Mode -> AHCI
eSATA Ports -> Enable
S.M.A.R.T. -> Enable
SATA Port 0 -> HDD
SATA Port 1 -> SSD
eSATA Port -> Not Installed
mSATA Port -> Not Installed
Hot Plug Capability -> Disable (Both 0 and 1)
eSATA Port Hot Plug Capability -> Enable
mSATA Port Hot Plug Capability -> Disable
Hard Disk Pre-Delay -> 5s
Video
Integrated Graphics Device -> Always Enable
IGD DVMT Memory -> Maximum DVMT
Primary Video Adaptor -> Int Graphics (IGD)
IDG Primary Video Port -> Auto
No Video Detected Error Beeps -> Enable
All-in-One Chassis -> None
IGD Flat Panel -> Disable
Fans
CPU Fan -> CPU, Auto, 250, 30, 100
SYSTEM Fan -> System, Auto, 250, 20, 100
Performance -> All Defaults
Security -> All Defaults
Power
Enhanced Intel SpeedStep Technology -> Enable
Processor C States -> Enable
System Power Options
After Power Failure -> Stay Off
Wake On LAN from S4/S5 -> Stay Off
Deep S4/S5 -> Disable
S3 State Indicator -> Blink
Wake System from S5 -> Disable
PCIe ASPM Support -> Enable
Flash Update Sleep Delay -> Disable
Boot
Boot Menu Type -> Advanced
Boot Drive Order -> P4, P1
Boot to Optical Devices -> Disable
Boot to Removable Devices -> Disable
Boot to Network -> Disable
USB Boot -> Disable
Boot USB Devices First -> Disable
UEFI Boot -> Enable
BIOS Setup Auto Entry -> Disable
Fast Boot
General Optimization -> Disable
USB Optimization -> Disable
Video Optimization -> Disable
Boot Display Options -> All Defaults
4) Insert the USB stick into a USB 2.0 port and boot and install onto PC
Making a large HD (greater than 1TB) bootable (not needed if HD is 1TB or less)
[ I did not do this as my drives were under 1TB ]
---------------------------------------------
5) If installing onto a HD that is over 1TB, do the following:
XX) Reboot the USB stick, and choose to boot into the Lion installation.
XX) Open up System Profiler and determine the install drive's BSD Name.
1) Reboot the USB stick and choose USB
2) Run Disk Utility and unmount the drive you installed OS Lion on.
3) Get the drive device name of your target volume from Disk Utility by selecting the volume and clicking Info.
*** Make VERY certain that you are looking at the correct volume ***
4) Launch Terminal and execute the following command:
dd if=/Volumes/USB/usr/standalone/i386/boot1h of=/dev/disk0s2
NOTE: (replace "USB" with your actual volume name of your UniBeast volume)
(replace "disk0s2" with your unix drive name... looked up in System Profiler/Serial-ATA...BSD Name)
NOTE: If you get a "Resource Busy" error, you forgot step 4 (Unmount!)
5) Quit Terminal
---------------------------------------------
6) Reboot the USB stick, and choose to boot into the Mountain Lion Installation.
8) Using Safari on the install, Download and Run MultiBeast (or have it ready on the USB stick)
Use MultiBeast 5.0.2 to install the following
- EasyBeast (installs Chimera 1.11
EvOReboot.kext
FakeSMC.kext
LegacyAppleRTC.kext
AppleRTC.kext
JMicron36xATA.kext
JMicronATA.kext
ACHI3rdParty.kext
NullCPUPowerManagement.kext
- Kexts & Enablers/Network/hnak's Apple1000eEthernet
- System Profile Mac Mini
- Hardware temp monitors
- Realtek ALC8XX/Without DSDT/ALC892
*** if system hangs, then reboot using -v GraphicsEnabler=No and install the System Profile Mac Mini. (Press down arrow at boot time)
9) Reboot, Set Boot order in BIOS
Software Installed
------------------
- Trim Enabler
- Temperature Monitor
- TextWrangler
- GeekBench
Tuning
-------
- I had to add the following lines to /Extra/org.chameleon.Boot.plist to fix resolution at startup
<key>Graphics Mode</key>
<string>1280x1024x32@60</string>
- To solve Auto Restart after Shut Down
I set Power/Wake From LAN to Stay Off in the BIOS
- Installed Realtek ALC8XX/Without DSDT/ALC892 to get audio working.
Hooked amp to green output jack
Selected "Internal Speakers" as output device in Sound control panel
Working So Far
---------------
Sleep/Wake - No (cycle power switch to wake?)
Shutdown/Restart - Yes
Networking - Ethernet - Yes
Sound - Yes
Graphics - HD3000 - Yes
Mac App Store - Yes
iCloud - Yes
USB 3.0 - Not Tested
USB Cube Speakers - Low volume
Networking - WiFi - Yes
Bluetooth - Yes
Geekbench 64 : 7686 (max temp = 45C)