- Joined
- Nov 16, 2017
- Messages
- 39
- Motherboard
- MSI MPG Z390 Gaming Pro Carbon AC
- CPU
- i9-9900K
- Graphics
- GTX 1070 Ti
- Mac
- Mobile Phone
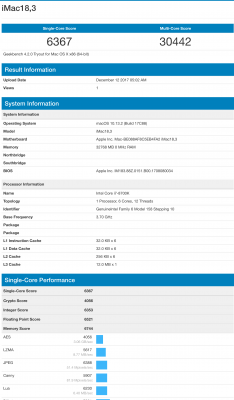
Here it is:
I found another person online who is also using the 8700K CPU but a different Z370 mobo very similar to mine, just not exactly the same. Anyway. He was kind enough to post his EFI folder. I tried it out and everything worked immediately. Ethernet. Sleep cycle. Sound. iMessage and iChat. all works perfectly.
His post is on another website. If you search online for the following "Gigabyte Z370 AORUS Gaming 7 Hackintosh Build Guide" you will find his post. Basically here is what I did.
0) ADDED NOTE: Due to all the failure I was having I decided to update the BIOS on the motherboard to the latest [EDIT] Gigabyte (is wrong, MSI is the brand, sorry for the typo) for my motherboard. I believe this played a pretty significant part in the final stable build of the station. Obviously you will have to decide if this step is necessary for your build.
1) Erase a spare SSD USB drive.
2) Partition the drive so that there is a 16gb partition. The remainder is fine to format whatever size is left over.
3) Use unibeast to create a bootable drive on the 16gb partition and have it install the EFI boot loader on there along with High Sierra.
4) Connect the USB installer to the new station.
5) Boot off of the usb drive ( this requires you to have already setup the bios for your mobo as best as you can ).
For my mobo ( MSI Z370 Gaming Pro Carbon AC ) the settings are:
7) When the system reboots you have to pick the remaining partition that you just installed the OS onto.
This may happen a few times. Just keep picking that partition until the install completes.
Another note is you may need to mess around with clover boot flags to get this to finish.
For my mobo "-v dart=0" works sometimes. Other times "npci=0x2000" did the job.
Other times still no boot flags at all. It literally depended on the "mood" of the system.
It was real finaky and made me want to pull my hair out because there was no rhyme or reason for the changes in boot flags required.
8) Once you have a full OS High Sierra installed on the USB media.
You will need a second bootable drive if something goes wrong. Trust me you will need it.
Format the main drive you intend to boot from to:
10) Once installed go through the same process of getting the OS to finish installing on your main Hackintosh drive as you did to get it on the USB remaining partition.
11) Once the main drive is bootable, mount the EFI partition of the drive onto your desktop.
11) put a copy of that EFI folder onto a new folder on your USB OS High Sierra drive somewhere you will find it.
12) use multibeast to install EFI boot loader, ALC1220 audio driver, and the default iMac 14,2 identity on the the main drive of your hackintosh.
13) Install the NVidia drivers for High Sierra.
14) Once it finishes it wants you to restart.DO NOT RESTART YET.. Force quit the installer.
13) Now this is where that EFI folder from the guide above comes into play.
14) once you have a bootable main drive on your hackintosh, mount the EFI for that drive onto your desktop.
15) Erase the EFI folder of your EFI drive. YES. Erase it and empty trash.
16) Copy the EFI folder you downloaded from the guide above your EFI partition.
17) Quit every thing. Eject all folders and EFI partitions. Shut down the computer.
18) When it's all shut down, disconnect the USB drive. Then boot up again.
19 ) Pick the newly installed main drive and remove all boot arguments.
20) If everything worked out, your system will boot with every feature active!!!!
21) CELEBRATE!!!!
22) CELEBRATE!!!!!!!!!
23) Remount the EFI partition of your new Hackintosh.
24) Open text editor. Go into preferences for text edit.
25) Change the settings to:
27) Edit the config.plist file in the following EFI/Clover/config.plist with text editor.
28) Do a find for the following string "boot".
29) Look for:
<key>Arguments</key>
<string>dart=0 nv_disable=1</string>
30) Change it to:
<key>Arguments</key>
<string></string>
31) Look for:
<key>DefaultVolume</key>
<string>HighSierra</string>
32) Change it to:
<key>DefaultVolume</key>
<string>NAME OF THE DRIVE YOU CREATED FOR YOUR HACINTOSH</string>
33) Quit everything. Eject the EFI partition. Reboot
34) if everything worked your station should be good to go!
35) CELEBRATE SOME MORE!!!!
36) CELEBRATE SOME MORE!!!!!!!!!
I found another person online who is also using the 8700K CPU but a different Z370 mobo very similar to mine, just not exactly the same. Anyway. He was kind enough to post his EFI folder. I tried it out and everything worked immediately. Ethernet. Sleep cycle. Sound. iMessage and iChat. all works perfectly.
His post is on another website. If you search online for the following "Gigabyte Z370 AORUS Gaming 7 Hackintosh Build Guide" you will find his post. Basically here is what I did.
0) ADDED NOTE: Due to all the failure I was having I decided to update the BIOS on the motherboard to the latest [EDIT] Gigabyte (is wrong, MSI is the brand, sorry for the typo) for my motherboard. I believe this played a pretty significant part in the final stable build of the station. Obviously you will have to decide if this step is necessary for your build.
1) Erase a spare SSD USB drive.
2) Partition the drive so that there is a 16gb partition. The remainder is fine to format whatever size is left over.
3) Use unibeast to create a bootable drive on the 16gb partition and have it install the EFI boot loader on there along with High Sierra.
4) Connect the USB installer to the new station.
5) Boot off of the usb drive ( this requires you to have already setup the bios for your mobo as best as you can ).
For my mobo ( MSI Z370 Gaming Pro Carbon AC ) the settings are:
- Save & Exit → Load Optimized Defaults
- M.I.T. → Advanced Memory Settings Extreme Memory Profile(X.M.P.) : Enabled
- BIOS → Any Fast Boot Opions: Disabled
- (BIOS → Windows 7/10 Compatability : Disable all OS options
- (BIOS → LAN PXE Boot Option ROM : Disabled) My mobo doesn't have this option.
- BIOS → Storage Boot Option Control : UEFI
- (Peripherals → Super IO Configuration → Serial Port : Disabled) My mobo does not have any settings for Serial Ports in it. But I'm leaving this in because it was in the instructions I followed.
- Peripherals → Network Stack Configuration → Network Stack : Disabled
- Peripherals → USB Configuration → XHCI Hand-off : Enabled
- Chipset → Vt-d : Disabled
- Chipset → Integrated Graphics : Disabled
7) When the system reboots you have to pick the remaining partition that you just installed the OS onto.
This may happen a few times. Just keep picking that partition until the install completes.
Another note is you may need to mess around with clover boot flags to get this to finish.
For my mobo "-v dart=0" works sometimes. Other times "npci=0x2000" did the job.
Other times still no boot flags at all. It literally depended on the "mood" of the system.
It was real finaky and made me want to pull my hair out because there was no rhyme or reason for the changes in boot flags required.
8) Once you have a full OS High Sierra installed on the USB media.
You will need a second bootable drive if something goes wrong. Trust me you will need it.
Format the main drive you intend to boot from to:
- OS X Extended (Journaled)
- GUID Partition Map
10) Once installed go through the same process of getting the OS to finish installing on your main Hackintosh drive as you did to get it on the USB remaining partition.
11) Once the main drive is bootable, mount the EFI partition of the drive onto your desktop.
11) put a copy of that EFI folder onto a new folder on your USB OS High Sierra drive somewhere you will find it.
12) use multibeast to install EFI boot loader, ALC1220 audio driver, and the default iMac 14,2 identity on the the main drive of your hackintosh.
13) Install the NVidia drivers for High Sierra.
14) Once it finishes it wants you to restart.DO NOT RESTART YET.. Force quit the installer.
13) Now this is where that EFI folder from the guide above comes into play.
14) once you have a bootable main drive on your hackintosh, mount the EFI for that drive onto your desktop.
15) Erase the EFI folder of your EFI drive. YES. Erase it and empty trash.
16) Copy the EFI folder you downloaded from the guide above your EFI partition.
17) Quit every thing. Eject all folders and EFI partitions. Shut down the computer.
18) When it's all shut down, disconnect the USB drive. Then boot up again.
19 ) Pick the newly installed main drive and remove all boot arguments.
20) If everything worked out, your system will boot with every feature active!!!!
21) CELEBRATE!!!!
22) CELEBRATE!!!!!!!!!
23) Remount the EFI partition of your new Hackintosh.
24) Open text editor. Go into preferences for text edit.
25) Change the settings to:
- New File -> Format: Plain Text
- Open and Save -> When saving a file: Uncheck Add ".txt" to plain text files
- Open and Save -> When Saving a File -> Opening Files: Unicode (UTF-8)
- Open and Save -> When Saving a File -> Saving Files: Unicode (UTF-8)
27) Edit the config.plist file in the following EFI/Clover/config.plist with text editor.
28) Do a find for the following string "boot".
29) Look for:
<key>Arguments</key>
<string>dart=0 nv_disable=1</string>
30) Change it to:
<key>Arguments</key>
<string></string>
31) Look for:
<key>DefaultVolume</key>
<string>HighSierra</string>
32) Change it to:
<key>DefaultVolume</key>
<string>NAME OF THE DRIVE YOU CREATED FOR YOUR HACINTOSH</string>
33) Quit everything. Eject the EFI partition. Reboot
34) if everything worked your station should be good to go!
35) CELEBRATE SOME MORE!!!!
36) CELEBRATE SOME MORE!!!!!!!!!
Attachments

Last edited:

") (especially for Premiere)
(especially for Premiere)