Contribute
Register

How to build your own iMac Pro [Successful Build/Extended Guide]

Status
Not open for further replies.
@Skap

Since you say you are a beginner, I just want to underscore what @kgp said. Using legacy mode (BIOS mode instead of UEFI) only leads to unnecessary pain & suffering ;-) Errors will appear in situations you are not expecting, and it will take you days to find out it was actually because of using BIOS instead of UEFI to boot. I know, because this has happened to me with other builds. If you can have a GPT disk for Windows, then simply disable CFM in the UEFI and always boot in pure UEFI mode.

@Paultex, thanks for your additional comments and the important reminder .

@Skap !

Disable CSM at any cost and strictly apply all other BIOS settings suggested in my guide before any window installation!!!

If you apply my BIOS settings subsequently for OSX, the original Windows Installation will not for work sure!

Same BIOS settings are essential for any dual Boot configuration, like OSX and Windows.
 
New Section E.12) - Native Display Brightness Control / Native NightShift Functionality for Monitors with DCC/IC Support

1.) Native Display Brightness Control

Many of you might miss the ability to control the display brightness with the F1/F2 keys on original Apple Keyboards, or with FN&F1/FN&F2 on non-Apple keyboards.

@bensge wrote a small but genius application to do just that on any Hackintosh System and to show the native OSX brightness system UI.

NativeDisplayBrightness-UI.png


2.) Native NightShift Functionality for Monitors with DDC/IC Support

Nightshift.png


Native NightShift works so far for the 38" LG 38UC99. NightShift should also work for the Acer 38" and Dell 38" Monitors. Yet @Ramalama misses the respective EDIDs. Any body with e.g. the Acer XR382CQK should immediately upload the requested information and contact @Ramalama by posting in this thread! Many thanks in advance!

Many thanks to user @Ramalama for providing both Native Display Brightness Control and Native NightShift Functionality for Monitors with DDC/IC Support also to our community and this thread.

For further details and instructions see new Section E.12) of the guide in the originating post of this thread.

@Ramalama , I also added your request for EDIDs for the Acer 38" and Dell 38" Monitors in new Section E.12.1). Please also let me know if yet we miss any reference concerning the Native NightShift implementation. In my opinion, the references for the Native Display Brightness Control implementation should be complete and fully covered.

Enjoy and have fun :thumbup:

kgp.png
 
Last edited:
New Section E.12) - Native Display Brightness Control / Native NightShift Functionality for Monitors with DCC/IC Support
...
I think almost everyone have a ddc capable monitor this thime.

The displayoverride file is just a "beta" which will only work on 38uc99... Dell users can send me their edid, to do the same.

And you forgot the clover f1/f2 patch... For users with windows keyboards:)

Thank you kgp:)))
Cheers:)
 
I think almost everyone have a ddc capable monitor this thime.

The displayoverride file is just a "beta" which will only work on 38uc99... Dell users can send me their edid, to do the same.

And you forgot the clover f1/f2 patch... For users with windows keyboards:)

Thank you kgp:)))
Cheers:)

The clover f1/f2 patch is implemented in Section E.12). Isn't it?
 
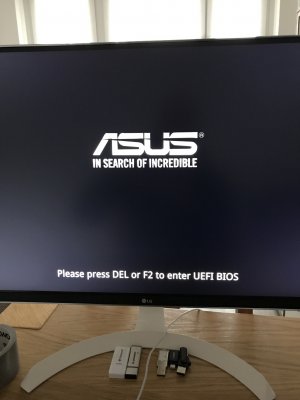
New Guide Section E.11) - ASUS Boot Splash Screen Cosmetics

Based on the ideas and instructions of @Matthew82 from InsanelyMac, I achieved an iMacPro ASUS BIOS Boot Splash Screen implementation

View attachment 308722

which hopefully will further motivate you in patching your ASUS BIOS Firmware. ;) New Section E.11) contains all necessary details.

Note that the new iMac Pro Splash Screen Image is already part of the patched 1102 ASUS Prime X299 Deluxe Firmware X299D.CAP, newly implemented in and attached to the guide in the originating post of this thread. I once more attach this patched BIOS also here below.

Enjoy and have fun :thumbup:

View attachment 308723

I did it, but now i have a wonderfull big white text without a wonderfull iMac Pro Image...oh dear, what´s wrong? :)

EDIT:
tried again with the already patched 1102 firmware, attached on the guide...but with this file i can´t save the image file.

***EDIT*** Ahhh, damn...the attached 1102 firmware is also already patched with the new iMacPro Image...now it works, thanks
 

Attachments

  • IMG_2401.JPG
    IMG_2401.JPG
    731.2 KB · Views: 138
  • Bildschirmfoto 2018-01-27 um 11.28.00.png
    Bildschirmfoto 2018-01-27 um 11.28.00.png
    312.3 KB · Views: 141
Last edited:
  • Like
Reactions: kgp
I highly suspect that it was a system freeze. Any chances you can leave it on for at least 24h and monitor if it freezes please?

24 Hrs and counting...

Note I set settings to stay powered on (display doesn't sleep, computer never shuts down)

I experienced the panic awaking from a sleep state and the screen never woke...computer did though. After hard reset, that's when I was addressed with the panic notation. Could have been a one time deal, could have been something wrong with my configuration/build at the time but I will keep monitoring.
 
About replacing the logo in the UEFI: if you have a different BIOS, the place might be different. Here's how to find your own section to replace:

* Search for FFD8FF
Screen Shot 2018-01-27 at 11.01.19.png

* In the Messages window, select only results with the offset 0h. Start from the top, the image is usually in the beginning.
Screen Shot 2018-01-27 at 11.02.38.png
Double click.

* In the structure window, check above the selected line for some text that shows it is an image:
Screen Shot 2018-01-27 at 11.02.27.png

In my case, it says Logo.bmp

* Extract body it to make sure it is the right one:
Screen Shot 2018-01-27 at 11.05.16.png


* Change the extension to jpg and double click. If it shows your boot image, you found it. Now it is the time to check the size, and make sure the new image has the same size. In my case, I reduced KGP's image to 1024x768.

* Proceed with section E.11)
 
Last edited:
Now it is the time to check the size, and make sure the new image has the same size. In my case, I reduced KGP's image to 1024x768.

If u resize the image, then the font becomes also smaller again? (Please press DEL....)
 
If u resize the image, then the font becomes also smaller again? (Please press DEL....)
In my BIOS, the image contains the text. So when I replace the image, I am also replacing the text. If the image has the text, then yes, reducing the image size reduces the text size so it fits in the screen.

For example, this is my original BIOS image:
logo.jpg

As you can see, it contains the text. If I want to have the text, I have to add it to my new image too.
 
About replacing the logo in the UEFI: if you have a different BIOS, the place might be different. Here's how to find your own section to replace:

* Search for FFD8FF
View attachment 308844

* In the Messages window, select only results with the offset 0h. Start from the top, the image is usually in the beginning.
View attachment 308845
Double click.

* In the structure window, check above the selected line for some text that shows it is an image:
View attachment 308847
In my case, it says Logo.bmp

* Extract body it to make sure it is the right one:
View attachment 308848

* Change the extension to jpg and double click. If it shows your boot image, you found it. Now it is the time to check the size, and make sure the new image has the same size. In my case, I reduced KGP's image to 1024x768.

* Proceed with section E.11)

Search with FFD8FF does not work at all with the ASUS Prime Deluxe BIOS Firmware..

There are no results with body-offset 0h and there is a huge list with locations, but just the location with the boot image is not part of that listing.

I would rather suggest a "GUID" search of "7BB28B99-61BB-11D5-9A5D-0090273FC14D" with "Header only"...

Screen Shot 2018-01-27 at 14.48.46.png


and then to search for the accompanied "Raw section" to that entry, which indeed is the Boot Image, which you can verify by extracting the raw section body to your desktop and subsequently opening the extracted raw-file directly with Apple's "Preview.app".

Does this approach work with the BIOS Firmware of all ASUS mainboards or even with the BIOS Firmware of mainboards of different brands?

We need you user feedback!

Thanks in advance!
 
Last edited:
Status
Not open for further replies.
Back
Top