- Joined
- Jul 27, 2011
- Messages
- 220
- Motherboard
- Asus P8Z77-I Deluxe
- CPU
- Intel Core i7 3770K
- Graphics
- NVIDIA GeForce GTX 1080 Ti
- Mac
- Mobile Phone
GUIDE: GA-Z68MA-D2H-B3 UEFI BIOS - WORKING, DSDT not required!
Using this method of installation I have a hackintosh that boots in about 15 seconds (including UEFI POST!) and provides full hardware support with, so far, no issues.
Status
[WORKING]
[WORKING WITH FURTHER MODS]
My Hardware
Preparation
Installation
Multibeast Configuration
After the installation of Mountain Lion completes and while at the desktop for the first boot:
Important Notes
PLEASE CAN I ASK THAT ANY QUESTIONS ARE POSTED IN THIS THREAD RATHER THAN BY PM TO ME. THIS IS TO ENSURE THAT OTHERS MAY BENEFIT FROM ANY DISCOURSE THAT MAY FOLLOW. THANKS!
Using this method of installation I have a hackintosh that boots in about 15 seconds (including UEFI POST!) and provides full hardware support with, so far, no issues.
Status
[WORKING]
+ UEFI BIOS: Speedier boot times. Native power management. No DSDT required.
+ Graphics: Intel HD3000 (perfect, no glitches/artefacts)
+ Networking: Realtek RTL8111E Gigabit Ethernet
+ Audio: Realtek ALC899
+ SATA3
+ USB3 (tentative)
+ Trim support for SSDs
+ Dual-monitor support (DVI & HDMI)
+ Power Management (Sleep, restart and shutdown)
+ P-States
+ Single-click wake from sleep
+ No BIOS reset from sleep
+ Motherboard sensors (FakeSMC)
+ AirPlay (including Display Mirroring)
+ App Store + iCloud
+ SATA Optical drives
+ Bluetooth
+ Hot-swapping of SATA disks (thanks to quandd)
+ Overclocking
[WORKING WITH FURTHER MODS]
+ HDMI audio (method here, thanks to savestheday)
My Hardware
+ Gigabyte Z68MA-D2H-B3 Motherboard - UEFI BIOS version U1b
+ Intel Core i7 2600k CPU
+ 16GB RAM
+ Corsair Force 3 120GB SSD
+ Corsair H60 Cooler (push/pull config)
+ Fractal Design Core 1000 chassis
+ Nexus Value 430 PSU
+ 2x 22" Monitors (dual-screen) attached via DVI and HDMI
+ Apple Keyboard (wired aluminium)
+ Apple Trackpad and Mouse
+ Broadcom Bluetooth USB
Preparation
1.) Upgrade your BIOS to UEFI BIOS version U1b, instructions on how to do this in Windows here (thanks to ttb1263) and also on OSX here
2.) Remove any add-in graphics cards for the install process, this significantly reduces the risk of installation problems. The card can be re-added post-install. Most supported cards (check the various HCL's about the web) work with just GraphicsEnabler set to Yes or No (in /Extra/org.chameleon.Boot.plist), although some require additional changes.
3.) For the install attach your display to the on-board (HD3000) DVI connector. You can use HDMI when installation is complete, this is because HDMI doesn't get a desktop until after the MacMini system definition is installed during the MultiBeast install phase.
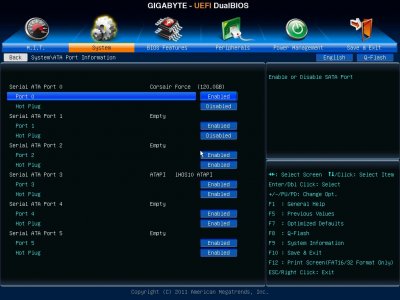
4.) BIOS Settings - As default except:
- Set "Internal Graphics Memory Size" to 512MB.
- Set SATA mode to AHCI.
- Set SATA mode to AHCI.
- In System\ATA Port Information you can enable Hot-Swap for each for each disk it is required (not necessary for system disks, see note below).
5.) On another machine running OSX and with the Mountain Lion installer downloaded, create a UniBeast Mountain Lion USB install key (USB key capacity 8GB minimum).
6.) Download the latest MultiBeast 5.x and place on the UniBeast USB key.
6.) Download the latest MultiBeast 5.x and place on the UniBeast USB key.
Installation
1.) Insert UniBeast USB key.
2.) Turn on the PC, at the UEFI/BIOS screen press F12 to enter the boot menu. Specify the UniBeast USB key as boot device, you will see it listed twice, select the one that doesn't start with UEFI.
3.) Install OSX Mountain Lion (note: install partition should be <= 1TB otherwise you may have boot loader problems).
4.) After installation completes, for the first boot or until the Chimera boot loader is installed (i.e.: by MultiBeast) you need to boot to the UniBeast USB key again. This time, at the Chimera boot menu select the Mountain Lion installation disk and NOT the UniBeast installer.
5.) OSX Mountain Lion should now boot successfully.
Multibeast Configuration
After the installation of Mountain Lion completes and while at the desktop for the first boot:
1.) Copy MultiBeast from the USB key to the desktop
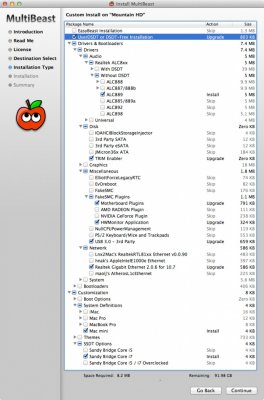
2.) Install Multibeast 5.x with the options specified below:
2.) Install Multibeast 5.x with the options specified below:
Important Notes
+ In the screenshot above I have specified the Core i7 SSDT, you may instead want to select the Core i5 or the Core i5/i7 Overclocked SSDT depending on your requirements. I have written a simple guide for enabling overclocking in this post, also for increased overclocks (>4.2ghz) check my post here.
+ Enabling Hot-Swap for your internal disks will make them appear with the external disk icon in OSX. It's not a problem, but if you want your system disk to appear with the correct icon you can just disable Hot-Swap for that disk, it's not as if you're going to be hot-swapping the system disk anyway...!
+ Enabling Hot-Swap for your internal disks will make them appear with the external disk icon in OSX. It's not a problem, but if you want your system disk to appear with the correct icon you can just disable Hot-Swap for that disk, it's not as if you're going to be hot-swapping the system disk anyway...!


