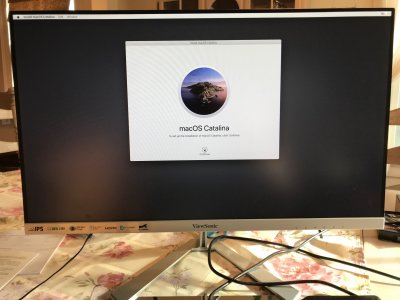
Hey, just wanted to extend a HUGE thanks to pastrychef for the excellent build guide and the EFI. I came from work this afternoon at 1 PM and started with a bunch of parts that had just arrived from Amazon - by 5 PM I had a fully functioning macOS Catalina Hackintosh!
How do I say thanks enough...
Here are the details:
Parts list:
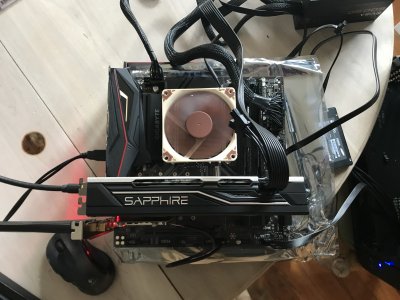
MB - Gigabyte Z390 Gaming M, rev 1.0
CPU - Intel Core i5-9660K
GPU - Sapphire Pulse Radeon RX 580
WiFI/BT - Fenvi T919
STORAGE - Samsung 850 EVO 250 GB SSD
Other Bits...
RAM - HyperX 16 GB (2x 8Gb) 3200 MHz DDR4
CPU Cooler - Noctua NH-L9x65 low-profile
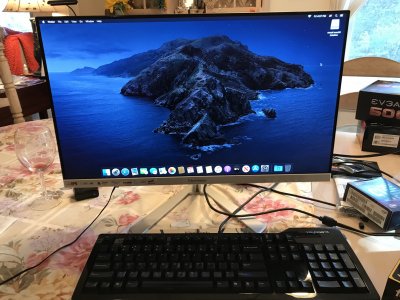
I've temporarily got this hooked up to a ViewSonic 1080p monitor via DP.
Build Notes:
- I followed pastrychef's recommendations and flashed the BIOS to one of the Beta versions (F9j) - this has the explicit stanza for 'CFG Lock' - I used Q-Flash and everything went without a hitch. My last full PC build was nearly 7 years ago and I am seriously impressed at how much easier things are now. The BIOS is nicely laid out and easy to navigate. As a style point - I used the INS key to tag all of the options that needed to be customized so all of them show up in the Favorites (F11) section. Sweet.
- I used my trusty old MacBook Pro 2012 to download the latest installation for Catalina (10.15.7) and create the USB boot stick from that
- I used a couple of the Opencore tools - MountEFI, ProperTree, and GenSMBIOS - to handle mounting the EFI partition and editing the config.plist
- I made no changes to the EFI contents or config.plist - the system booted the first time and installation went without a hitch
- Post-install, I used GenSMBIOS to create entries for the usual things and then looked up my actual Ethernet MAC address to fill in the ROM stanza in config.plist
What Works:
Well... pretty much everything I need:
- Ethernet
- WIFI
- Bluetooth 4.0
- Audio
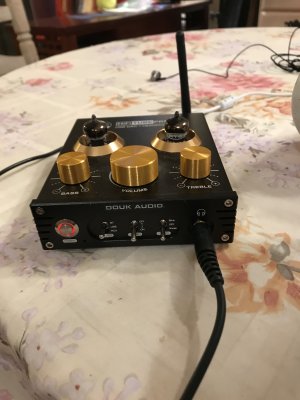
Once I got the post-installation items taken care of, I logged into my iCloud account and the App Store. To my great joy, Air Drop worked flawlessly as did audio - I was able to plug my cheapo, but fun, tube headphone preamp into a free USB port and it was recognized and worked OOB.
Total sweetness.
The only thing that I haven't tried is iMessage, which - honestly - I'm not planning to use with this rig. That's what my iPhone is for...
So, right now, all of the guts of the system are sitting on top of the Gigabyte MB box on my dining room table - much to the chagrin of my (long-suffering) wife. My plan is to install everything into the mATX case - I've got one of those little ThermalTake cubes that will house everything for the time being.
My plan is to install an NVMe drive and see if I can clone the boot disk onto it and boot off of it - the Samsung was a drive left over from a prior project.
Longer term, if the system remains stable, I'll consider upgrading the CPU to add a bit of horsepower and bump the RAM up to 32 GB. I'm not sure that I'll need much more than that, but the board will handle up to 128 GB in case I want it. I may also consider upgrading the GPU - but since I don't really play video games, I'm not sure that this is as much of a priority right now.
Usage:
I do a fair bit of semi-professional photography and use Adobe PS, LR, ACR, and Bridge pretty heavily. I am hoping to do some videography with FCPX. I play in a band and use MainStage3 for live performance and a mix of FL Studio 20, Ableton Live 10 Suite, and Logic Pro X for odds and ends messing around.
So - once again - HUGE thanks to pastrychef and the many posters on this hugely helpful thread!
I've attached a couple iPhone of this afternoon's build.
Cheers, J