Contribute
Register

GA-Z170M-D3H Perfect Configuration for El Capitan (Success)

Status
Not open for further replies.
After running Multibeast I rebooted and all worked. I installed VOODOOHDA package but haven't gone through and set the various controls. I had to take a break and when I returned the computer wouldn't wake from sleep. I restarted and all seems OK. I will have to deal whith the VOODOO settings tomorrow but I would like to fix the not waking up from sleep. Any hints?
 
Summary:
This is a success report for correct configuration of the Gigabyte Z170M-D3H on with a i7 Skylake with working Network, Audio, Wifi. The main configuration is done with Multibeast, additional configuration is done manually to achieve working audio. Lastly I've achieved tipple monitor using an Asus Nvidia 780, If you lack a video card, this configuration adds the video card last, and is stable using the Intel's onboard HD 530 provided with the i7 Skylake.

Focused Attention

Follow creation of El Capitan USB
http://www.tonymacx86.com/threads/u...pitan-on-any-supported-intel-based-pc.172672/

Equipment:
  1. Processor: i7 6700K, Skylake 4GHz (BX80662I76700K)
  2. Motherboard: Gigabyte Z170M-D3H (GIGABYTE GA-Z170M-D3H (rev. 1.0) LGA 1151 Intel Z170 HDM)
  3. Motherboard Audio Chipset: Realtek 892
  4. Motherboard Ethernet Chipset:
  5. Ram: G.SKILL Ripjaws V Series 16GB (2 x 8GB) 288-Pin DDR4 SDRAM DDR4 2400 (PC4 19200) Intel Z170 Platform / Intel X99 Platform Desktop Memory Model F4-2400C15D-16GVR. With 15-15-15-35 timing CAS timings.
  6. Wifi: TP-LINK TL-WDN4800 Dual Band Wireless N900 PCI Express Adapter,
  7. Onboard Video: Intel 530
  8. PCI-E Video: Nvidia GTX 780
  9. PSU: CORSAIR CSM Series CS550M 550W ATX12V v2.4 and EPS 2.92 80 PLUS GOLD
  10. Case: x Thermaltake Core V21 Black Extreme Micro ATX Cube Chassis CA-1D5-00S1WN-00
  11. Cooler: Cooler Master Hyper 212 EVO
  12. Hard drive: x SAMSUNG 850 EVO 2.5" 500GB SATA III 3-D Vertical Internal Solid State Drive (SSD) MZ-75E500B/AM
  13. 16GB USB Flash Drive
  14. Separate Macintosh to download El Capitan and make UniBeast Clover El Capitan Installer

Step 0)
  1. Flash my Bios to F7 (Z170MD3H.F7), upgraded from F3. Place file on Fat32 USB. Boot to BIOS, Save old. then Load New.
  2. BIOS Settings
    1. Press DEL during boot to access BIOS
    2. In BIOS Features:
    3. Fast Boot: Disabled
    4. VT-d: Disabled
    5. Windows 8/10 Features: Other OS
    6. LAN PXE Boot Option ROM: Disabled
    7. Storage Boot Option Contro: UEFI Only
    8. Network Stack: Disabled
    9. In Peripherals:
    10. Initial Display Output: PCIe 1 Slot (if graphics card installed) or IGFX (otherwise)
    11. XHCI Hand-off: Enabled
    12. In Chipset:
    13. VT-d: Disabled


Step 1)
  1. Make El Capitan Installer USB http://www.tonymacx86.com/threads/u...pitan-on-any-supported-intel-based-pc.172672/
  2. Make UEFI
  3. Select Intel 530
  4. Make sure install disk is empty. I used Gparted to make a new partition table. WARNING: This destroys all data. Also make sure only 1 HD is installed.

Step 2)
  1. Ensure no PCI-E video card is installed / Remove Nvidia Video Card.

Step 3)
  1. Use Boot Menu to boot from USB (Mash F12 at boot)
  2. Use Disk Utility from Menu to Erace Internal Hard Drive. Name El Capitan using Format: OS X Extended Journaled, using GUID Partition Map. Click Done. Close Disk Utility Window.

Step 4)
  1. At Install OS X screen, Click the Hard drive: El Capitan. Click Continue to begin install. Wait 10 minutes during install. On reboot. Boot from HFS Mac OS X from EL Capitan.

Step 5)
  1. Select Language.
  2. Enter Wifi Password. Success WIFI works!
  3. Proceed with OS installation

Step 6)
  1. From HFS Extended USB or HD run Multibeast 8.2.2 (1)
  2. Click Quick Start. Select UEFI Boot Mode.
  3. Click Drivers. Click Audio. Check Realtek ALC892. Check 100 Series Audio
  4. Click Network. Check AppleIntelE1000e 3.3.1
  5. Click USB. Check Increase Max Port Limit.
  6. Click Customize. Click Graphics. Check Intel HD 530
  7. Click System Definitions. Check Mac Pro 3,1
  8. Click Build.
  9. Review: UEFI Boot Made, Realtek ALC892, Realtek 100 Series, Fake SMC v6.10-313-g671f31c.1707. AppleIntelE1000e v3.3.1, Increase Max Port. Clover v.2.3k.r3423 UEFI. Mac Pro 3,1. Intel HD 530.
  10. Click Install.
  11. Restart
  12. Remove USB

Step 7)
  1. If screen is black. make sure only one monitor cable is plugged in. I was getting black screens when DVI and HDMI were plugged in at the same time
  2. Verify Working ethernet by going to Settings: Network. Observe Ethernet Device. (SUCCESS)
  3. Verify Working Memory speed: About this Mac: System Report: Memory: 2133 MHz (SUCCESS)
  4. Verify Working USB 3.0: About this Mac: System Report: USB. View USB 3.0 Bus (SUCCESS)

Step 8)
  1. Download https://sourceforge.net/projects/voodoohda/
  2. Install VOODOOHDA288 Package, Ctrl-Click the package, select open. Allow open.
  3. Set the input gain from the microphone to zero. Find the file in /System/Library/Extensoins/VoodooHDA.kext. Look for the value iGain and iMix. Seto them to zero. Personally. I just went to terminal and did: sudo nano /System/Library/Extensions/VoodooHDA.kext/Contents/Info.plist
  4. then I pressed Control-W to search for iGain. I changed the xml to be the integer value to be 0 under the key of iGain and iMix.
  5. Also search for VoodooHDAEnableVolumeChangeFix and look at the line under, change the <false/> to <true/>
  6. Press Ctrol-X, y , enter. to save.
  7. Restart
  8. Verify Working sound by going to Settings: Sound. (SUCCESS)
  9. Verify Detected Sound. About this Mac: System Report: Audio. Observie Intel High Defination Audio Line Out.
First of all thanks for sharing this. Some questions... I will install 1HD and 2 ssd's, one for osx and other one for windows, all of them are completely clean, there's no OS at all. In this case I will have some issue? Cause you say "Also make sure only 1 HD is installed." Other question, Is next step really necessary?
"Step 2)
  1. Ensure no PCI-E video card is installed / Remove Nvidia Video Card."
Can I only disable it in bios? Or I have to remove it fisically? Thanks!
 
image.jpeg
Summary:
This is a success report for correct configuration of the Gigabyte Z170M-D3H on with a i7 Skylake with working Network, Audio, Wifi. The main configuration is done with Multibeast, additional configuration is done manually to achieve working audio. Lastly I've achieved tipple monitor using an Asus Nvidia 780, If you lack a video card, this configuration adds the video card last, and is stable using the Intel's onboard HD 530 provided with the i7 Skylake.

Focused Attention

Follow creation of El Capitan USB
http://www.tonymacx86.com/threads/u...pitan-on-any-supported-intel-based-pc.172672/

Equipment:
  1. Processor: i7 6700K, Skylake 4GHz (BX80662I76700K)
  2. Motherboard: Gigabyte Z170M-D3H (GIGABYTE GA-Z170M-D3H (rev. 1.0) LGA 1151 Intel Z170 HDM)
  3. Motherboard Audio Chipset: Realtek 892
  4. Motherboard Ethernet Chipset:
  5. Ram: G.SKILL Ripjaws V Series 16GB (2 x 8GB) 288-Pin DDR4 SDRAM DDR4 2400 (PC4 19200) Intel Z170 Platform / Intel X99 Platform Desktop Memory Model F4-2400C15D-16GVR. With 15-15-15-35 timing CAS timings.
  6. Wifi: TP-LINK TL-WDN4800 Dual Band Wireless N900 PCI Express Adapter,
  7. Onboard Video: Intel 530
  8. PCI-E Video: Nvidia GTX 780
  9. PSU: CORSAIR CSM Series CS550M 550W ATX12V v2.4 and EPS 2.92 80 PLUS GOLD
  10. Case: x Thermaltake Core V21 Black Extreme Micro ATX Cube Chassis CA-1D5-00S1WN-00
  11. Cooler: Cooler Master Hyper 212 EVO
  12. Hard drive: x SAMSUNG 850 EVO 2.5" 500GB SATA III 3-D Vertical Internal Solid State Drive (SSD) MZ-75E500B/AM
  13. 16GB USB Flash Drive
  14. Separate Macintosh to download El Capitan and make UniBeast Clover El Capitan Installer

Step 0)
  1. Flash my Bios to F7 (Z170MD3H.F7), upgraded from F3. Place file on Fat32 USB. Boot to BIOS, Save old. then Load New.
  2. BIOS Settings
    1. Press DEL during boot to access BIOS
    2. In BIOS Features:
    3. Fast Boot: Disabled
    4. VT-d: Disabled
    5. Windows 8/10 Features: Other OS
    6. LAN PXE Boot Option ROM: Disabled
    7. Storage Boot Option Contro: UEFI Only
    8. Network Stack: Disabled
    9. In Peripherals:
    10. Initial Display Output: PCIe 1 Slot (if graphics card installed) or IGFX (otherwise)
    11. XHCI Hand-off: Enabled
    12. In Chipset:
    13. VT-d: Disabled


Step 1)
  1. Make El Capitan Installer USB http://www.tonymacx86.com/threads/u...pitan-on-any-supported-intel-based-pc.172672/
  2. Make UEFI
  3. Select Intel 530
  4. Make sure install disk is empty. I used Gparted to make a new partition table. WARNING: This destroys all data. Also make sure only 1 HD is installed.

Step 2)
  1. Ensure no PCI-E video card is installed / Remove Nvidia Video Card.

Step 3)
  1. Use Boot Menu to boot from USB (Mash F12 at boot)
  2. Use Disk Utility from Menu to Erace Internal Hard Drive. Name El Capitan using Format: OS X Extended Journaled, using GUID Partition Map. Click Done. Close Disk Utility Window.

Step 4)
  1. At Install OS X screen, Click the Hard drive: El Capitan. Click Continue to begin install. Wait 10 minutes during install. On reboot. Boot from HFS Mac OS X from EL Capitan.

Step 5)
  1. Select Language.
  2. Enter Wifi Password. Success WIFI works!
  3. Proceed with OS installation

Step 6)
  1. From HFS Extended USB or HD run Multibeast 8.2.2 (1)
  2. Click Quick Start. Select UEFI Boot Mode.
  3. Click Drivers. Click Audio. Check Realtek ALC892. Check 100 Series Audio
  4. Click Network. Check AppleIntelE1000e 3.3.1
  5. Click USB. Check Increase Max Port Limit.
  6. Click Customize. Click Graphics. Check Intel HD 530
  7. Click System Definitions. Check Mac Pro 3,1
  8. Click Build.
  9. Review: UEFI Boot Made, Realtek ALC892, Realtek 100 Series, Fake SMC v6.10-313-g671f31c.1707. AppleIntelE1000e v3.3.1, Increase Max Port. Clover v.2.3k.r3423 UEFI. Mac Pro 3,1. Intel HD 530.
  10. Click Install.
  11. Restart
  12. Remove USB

Step 7)
  1. If screen is black. make sure only one monitor cable is plugged in. I was getting black screens when DVI and HDMI were plugged in at the same time
  2. Verify Working ethernet by going to Settings: Network. Observe Ethernet Device. (SUCCESS)
  3. Verify Working Memory speed: About this Mac: System Report: Memory: 2133 MHz (SUCCESS)
  4. Verify Working USB 3.0: About this Mac: System Report: USB. View USB 3.0 Bus (SUCCESS)

Step 8)
  1. Download https://sourceforge.net/projects/voodoohda/
  2. Install VOODOOHDA288 Package, Ctrl-Click the package, select open. Allow open.
  3. Set the input gain from the microphone to zero. Find the file in /System/Library/Extensoins/VoodooHDA.kext. Look for the value iGain and iMix. Seto them to zero. Personally. I just went to terminal and did: sudo nano /System/Library/Extensions/VoodooHDA.kext/Contents/Info.plist
  4. then I pressed Control-W to search for iGain. I changed the xml to be the integer value to be 0 under the key of iGain and iMix.
  5. Also search for VoodooHDAEnableVolumeChangeFix and look at the line under, change the <false/> to <true/>
  6. Press Ctrol-X, y , enter. to save.
  7. Restart
  8. Verify Working sound by going to Settings: Sound. (SUCCESS)
  9. Verify Detected Sound. About this Mac: System Report: Audio. Observie Intel High Defination Audio Line Out.
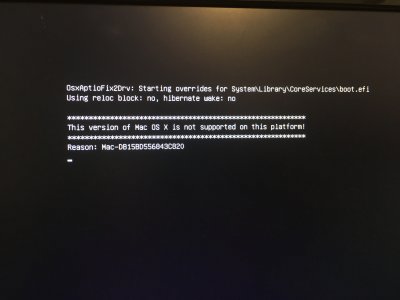
I have the same motherboard and processor and followed all your steps but I can't get past the clover screen. Whenever I try to boot OS X from the USB I get the prohibited sign. I've tried safe mode and verbose mode but I get this screen
 
View attachment 210516 I have the same motherboard and processor and followed all your steps but I can't get past the clover screen. Whenever I try to boot OS X from the USB I get the prohibited sign. I've tried safe mode and verbose mode but I get this screen
I have the same issue as yours. Last night, I changed my mind to try to install the MacOS Sierra and everything went smoothly. Maybe you can have a try too.
 
I have the same issue as yours. Last night, I changed my mind to try to install the MacOS Sierra and everything went smoothly. Maybe you can have a try too.
I finally got it working on El Capitan. Turns out I had a corrupt installer.
 
I have the same issue as yours. Last night, I changed my mind to try to install the MacOS Sierra and everything went smoothly. Maybe you can have a try too.

I have the same hardware, get the same "hardware not supported" message as well, but with my Sierra install.

Going to try El Cap to see if that's any different.

I suppose I should also re-download the sierra installer?

EDIT: I think my key stumbling block was not wiping the target drive. In case that helps anyone. It becomes a little tricky to do this if you don't have a working hackintosh to use for drive wiping or an external enclosure you can connect to a real mac. I managed to get it done by booting into safe mode with one drive and wiping the other drive.

EDIT2: Thank you OP so much, network working, audio working, about to try video, running Sierra. Only 2 problems left:
1. Can't figure out how to get the UEFI partition to stick for restarts, stuck picking it every time even though I've attempted to set boot order in the bios and save
2. Heavy static on audio out, not sure why, will try to troubleshoot, both front panel headphone jack and rear.

EDIT3: Fixed the boot problem by deleting all the entries I didn't care about.

EDIT4: Tried installing nvidia drivers but seems to stick with "OSX Default" driver instead of allowing me to switch to "Nvidia Web Driver". Fairly severe flickering when typing this. That's my biggest problem. Also can't seem to get 2nd monitor visible in system preferences.

EDIT5: Fixed flicker due by finally getting NVIDIA Web Driver working by following problem 6 here:
https://www.tonymacx86.com/threads/solving-nvidia-driver-install-loading-problems.161256/
** I had to check both EmuVariableUefi-64 and Install RC scripts on target volume to get it working **

Currently audio static is the only remaining issue.
 
Last edited:
I have same setup, last day installed Sierra.

Had some issues:

1. Lost LAN after sleep and wake. Fixed with change driver to IntelMausiEthernet v2.2.0 - Topic
2. Some artifacts with onboard graphics. Don't want to fix, just switched to Nvidia graphics. Possible fixes - one and two
3. White noise on audio - want fix but cannot to. Also onboard analog audio works only in stereo mode, no 5.1!
4. smcFanControl don't work, fans controlled only by motherboard.

Worked, tested:
- Sleep and wake
- USB 3
- SATA 3
- HDMI (with audio), DVI and VGA

Don't tested:
- Thunderbolt
- Onboard digital sound
- COM and LPT
 
I have the same hardware, get the same "hardware not supported" message as well, but with my Sierra install.

Going to try El Cap to see if that's any different.

I suppose I should also re-download the sierra installer?

EDIT: I think my key stumbling block was not wiping the target drive. In case that helps anyone. It becomes a little tricky to do this if you don't have a working hackintosh to use for drive wiping or an external enclosure you can connect to a real mac. I managed to get it done by booting into safe mode with one drive and wiping the other drive.

EDIT2: Thank you OP so much, network working, audio working, about to try video, running Sierra. Only 2 problems left:
1. Can't figure out how to get the UEFI partition to stick for restarts, stuck picking it every time even though I've attempted to set boot order in the bios and save
2. Heavy static on audio out, not sure why, will try to troubleshoot, both front panel headphone jack and rear.

EDIT3: Fixed the boot problem by deleting all the entries I didn't care about.

EDIT4: Tried installing nvidia drivers but seems to stick with "OSX Default" driver instead of allowing me to switch to "Nvidia Web Driver". Fairly severe flickering when typing this. That's my biggest problem. Also can't seem to get 2nd monitor visible in system preferences.

EDIT5: Fixed flicker due by finally getting NVIDIA Web Driver working by following problem 6 here:
https://www.tonymacx86.com/threads/solving-nvidia-driver-install-loading-problems.161256/
** I had to check both EmuVariableUefi-64 and Install RC scripts on target volume to get it working **

Currently audio static is the only remaining issue.

Concerning the audio problem, I think you can have a try with AppleHDA patcher. Google and enjoy it!
 
Unfortunally, I don't understand, how to make it works, I did this:
1. Download HDAPatcher from GitHub
2. Drag ALC892 to app, it create archive with AppleHDA.kext on my desktop
3. Inject audio = 7 with Clover Configurator
4. Remove installed VoodooHDA.kext (kextunload, then move from /S/L/E)
5. Install patched AppleHDA.kext with Kext Utility

Result: no sound if I removed VoodooHDA, sound with noise if I leaved it.
 
I have the same motherboard, but sleep not work, when I click sleep the computer shutdown after 2 min. but it will power on by itself. and the screen keeps black I need to power it off manually
 
Status
Not open for further replies.
Back
Top