- Joined
- Apr 28, 2011
- Messages
- 186
- Motherboard
- Asus Z170 VIII Maximus Gene
- CPU
- i7-6700K
- Graphics
- GTX 1070
- Mobile Phone
Hi forum
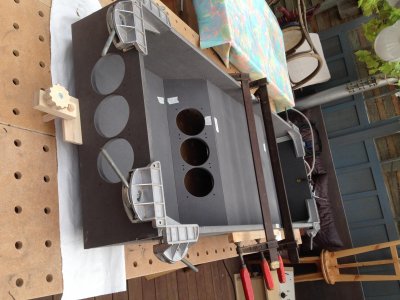
After seeing this awesome piece of custom modding (http://www.techpowerup.com/forums/threads/desk-pc-unity-desk.188588/), I literally shat bricks!
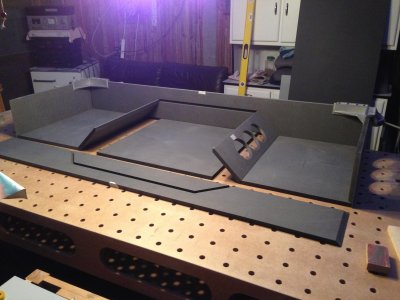
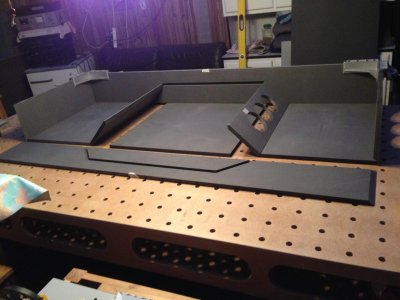
Just everything about the build is beautiful! I contacted the maker and asked him if he wanted to share his sketchup designs, which he didn't. So I just decided to basically start building the same thing, but this time OS X style.
This build will probably be the most challenging one I've ever done!
As always, I first looked in my current build what I could re-use:
* Intel Core i7-3770K
* Western Digital Caviar Green 1TB (My Time Machine)
* Western Digital Caviar Green 2TB
* Samsung EVO 250GB SSD @ 6GBps
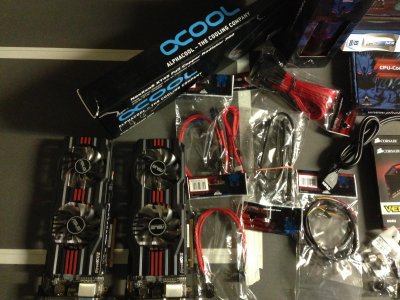
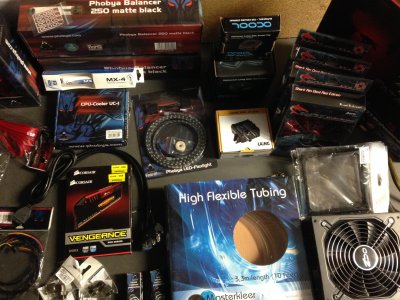
Then came the list of things I would need. I need to stress that I want every piece of hardware to be either black, red or both. That's why I chose these parts:
* Corsair Vengeance 2400MHZ 16GB DDR3 RAM
* Asrock Fatality Professional-m Z77
* 2x Asus Radeon HD 7850 2GB DDR5 in crossfire
For the custom watercooling, I chose aquatuning.nl and I ordered all my cables and accessories as well. I'll go for red Aerocool Shark fans to cool the 360mm radiator. I also ordered red sleeved cables, anti-vandal switches etc.
Update
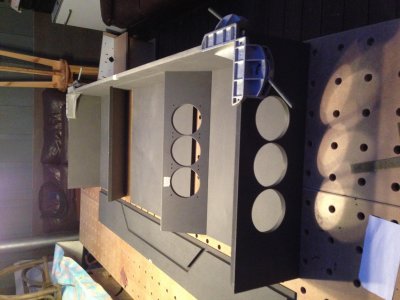
Finally managed to take some pictures of the parts I'm using :')
Yosemite 10.10.1 Installation Guide
A. Pre-install
1. Getting a stable overclock
In order to obtain a stable overclock on this board, I used the following guide :
http://www.overclock.net/t/1198504/...-guide-sandy-bridge-ivy-bridge-asrock-edition
Note: in the guide it says: “To get "Max", type in 10000 and press Enter”. On this mobo, max value is 500.
2. Creating a Unibeast USB drive with Clover
Note: in my case, I installed Clover in the ESP on my USB drive. Because that means that it is 100% UEFI.
3. Clover Settings
I started off with the standard config.plist Tony provided. In my case I had to add the following flag: “ig-platform-id=01620007”. What this does is disable the intel GFX card and forces the system to use my AMD Radeon HD 7xxx cards.
Source:
http://www.tonymacx86.com/graphics/...ary-display-airplay-mirroring.html#post721605
4. DSDT finetuning
Source:
http://www.tonymacx86.com/graphics/...ary-display-airplay-mirroring.html#post721605
B. Install
Reboot and choose the new option "install OS X" by typing the spacebar
and selecting "with injected kexts".
In my case it just went straight to installing and rebooted when succesful.
This time boot back to your SSD/HDD with "injected kexts".
C. Post-install
1. Kexts
Replace inside the file in this kext: IOPlatformPluginFamily.kext ▸ Contents ▸ PlugIns ▸ X86PlatformPlugin.kext ▸ Contents ▸ Resources ▸ Mac-FC02E91DDD3FA6A4.plist. If you don’t the multiplier stays stuck on 0x8.
http://www.tonymacx86.com/customization/78216-new-imac13-2-smbios-plist-print.html
http://www.insanelymac.com/forum/to...-locked-msrs-and-hp-envy-15-j063cl-i7-4700mq/
Multibeast --> ALC898 without DSDT
On this particular motherboard, there are 4 Intel USB ports and 2 Asmedia 1042 ports. The intel ones work OOTB, the Asmedia don’t. That’s why I used a Generic Kext for USB 3.0, which handles all ports. However, in order to make it work completely on our z77 board, we need to add a bootflag to Clover “gux_defer_usb2”.
Source:
http://www.insanelymac.com/forum/topic/286860-genericusbxhci-usb-30-driver-for-os-x-with-source/
2. Clover Settings
Now that we’ve installed some patched kexts, we need to fine tune our Clover config.plist. I added the following flags; “XCPM”, “gux_defer_usb2”, “dev-kext-mode=1”, …
Also, under SSDT --> “DropOEM=YES”
3. Native Power Management
Create an SSDT using the following guide:
http://www.tonymacx86.com/mavericks...vericks-native-cpu-igpu-power-management.html
In my case I had to type “-w 3 –f 45” --> I have an i7-3770K and its frequency is overclocked to 4,5 GHz.
Reboot and be happy!!
Note
I added my own DSDT, IOPlatformPluginFamily.kext, SSDT and config.plist --> Do not use these unless you have exactly the same mobo as I do, with a Core i7 3770K overclocked at 4,5GHz
Thanks to the devs for their hard and dedicated work!
Grtz
Metalcored00d
After seeing this awesome piece of custom modding (http://www.techpowerup.com/forums/threads/desk-pc-unity-desk.188588/), I literally shat bricks!
Just everything about the build is beautiful! I contacted the maker and asked him if he wanted to share his sketchup designs, which he didn't. So I just decided to basically start building the same thing, but this time OS X style.
This build will probably be the most challenging one I've ever done!
As always, I first looked in my current build what I could re-use:
* Intel Core i7-3770K
* Western Digital Caviar Green 1TB (My Time Machine)
* Western Digital Caviar Green 2TB
* Samsung EVO 250GB SSD @ 6GBps
Then came the list of things I would need. I need to stress that I want every piece of hardware to be either black, red or both. That's why I chose these parts:
* Corsair Vengeance 2400MHZ 16GB DDR3 RAM
* Asrock Fatality Professional-m Z77
* 2x Asus Radeon HD 7850 2GB DDR5 in crossfire
For the custom watercooling, I chose aquatuning.nl and I ordered all my cables and accessories as well. I'll go for red Aerocool Shark fans to cool the 360mm radiator. I also ordered red sleeved cables, anti-vandal switches etc.
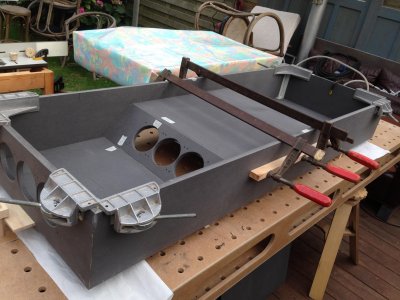
Update
Finally managed to take some pictures of the parts I'm using :')
Yosemite 10.10.1 Installation Guide
A. Pre-install
1. Getting a stable overclock
In order to obtain a stable overclock on this board, I used the following guide :
http://www.overclock.net/t/1198504/...-guide-sandy-bridge-ivy-bridge-asrock-edition
Note: in the guide it says: “To get "Max", type in 10000 and press Enter”. On this mobo, max value is 500.
2. Creating a Unibeast USB drive with Clover
A. Use Tony’s guide:
http://www.tonymacx86.com/yosemite-desktop-guides/144426-how-install-os-x-yosemite-using-clover.html
Note: in my case, I installed Clover in the ESP on my USB drive. Because that means that it is 100% UEFI.
B. This UEFI method requires a small tweak in our BIOS; Advanced ACPI CSM Disabled.
3. Clover Settings
I started off with the standard config.plist Tony provided. In my case I had to add the following flag: “ig-platform-id=01620007”. What this does is disable the intel GFX card and forces the system to use my AMD Radeon HD 7xxx cards.
Source:
http://www.tonymacx86.com/graphics/...ary-display-airplay-mirroring.html#post721605
4. DSDT finetuning
A. Edit dsdt/IGPU/"AAPL,ig-platform-id"
“0x07, 0x00, 0x62, 0x01”
Source:
http://www.tonymacx86.com/graphics/...ary-display-airplay-mirroring.html#post721605
B. Install
Reboot and choose the new option "install OS X" by typing the spacebar
and selecting "with injected kexts".
In my case it just went straight to installing and rebooted when succesful.
This time boot back to your SSD/HDD with "injected kexts".
C. Post-install
1. Kexts
A. Network
B. CPU --> modified IOPlatformFamily --> needed for SSDT, created in “native power management”
Replace inside the file in this kext: IOPlatformPluginFamily.kext ▸ Contents ▸ PlugIns ▸ X86PlatformPlugin.kext ▸ Contents ▸ Resources ▸ Mac-FC02E91DDD3FA6A4.plist. If you don’t the multiplier stays stuck on 0x8.
http://www.tonymacx86.com/customization/78216-new-imac13-2-smbios-plist-print.html
http://www.insanelymac.com/forum/to...-locked-msrs-and-hp-envy-15-j063cl-i7-4700mq/
C. Audio
Multibeast --> ALC898 without DSDT
D. USB 3.0
On this particular motherboard, there are 4 Intel USB ports and 2 Asmedia 1042 ports. The intel ones work OOTB, the Asmedia don’t. That’s why I used a Generic Kext for USB 3.0, which handles all ports. However, in order to make it work completely on our z77 board, we need to add a bootflag to Clover “gux_defer_usb2”.
Source:
http://www.insanelymac.com/forum/topic/286860-genericusbxhci-usb-30-driver-for-os-x-with-source/
2. Clover Settings
Now that we’ve installed some patched kexts, we need to fine tune our Clover config.plist. I added the following flags; “XCPM”, “gux_defer_usb2”, “dev-kext-mode=1”, …
Also, under SSDT --> “DropOEM=YES”
3. Native Power Management
Create an SSDT using the following guide:
http://www.tonymacx86.com/mavericks...vericks-native-cpu-igpu-power-management.html
In my case I had to type “-w 3 –f 45” --> I have an i7-3770K and its frequency is overclocked to 4,5 GHz.
Reboot and be happy!!
Note
I added my own DSDT, IOPlatformPluginFamily.kext, SSDT and config.plist --> Do not use these unless you have exactly the same mobo as I do, with a Core i7 3770K overclocked at 4,5GHz
Thanks to the devs for their hard and dedicated work!
Grtz
Metalcored00d

") . Since I'm not the only one taking pictures I can't access most of them, yet
. Since I'm not the only one taking pictures I can't access most of them, yet