Contribute
Register

[SUCCESS] Gigabyte Designare Z390 (Thunderbolt 3) + i7-9700K + AMD RX 580

Hey Casey,

Things have been working great ever since I unlocked accelerated graphics on my build.

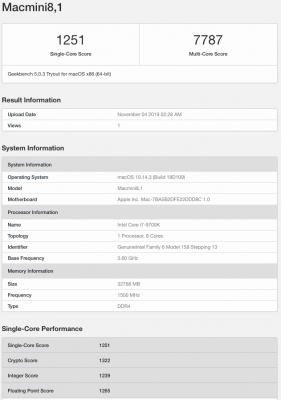
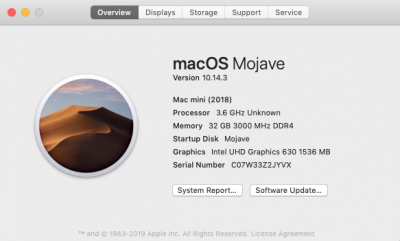
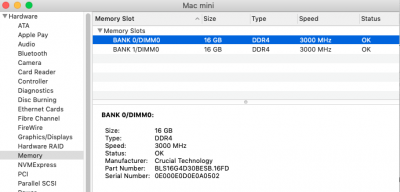
Ran some benchmark tests and wanted to share to scores to get your opinion. Attaching my Geekbench 5 results. One thing I'm curious about is that it shows my RAM rated @1500Mhz in Geekbench but I bought RAM @3000Mhz. I'm seeing my memory showing @3000Mhz in the system report when clicking "About This Mac" (attaching screen grabs as well)

Would love to get your thoughts once you get a moment!

Thanks!
 

Attachments

  • Screen Shot 2019-11-03 at 10.02.20 PM.png
    Screen Shot 2019-11-03 at 10.02.20 PM.png
    84.3 KB · Views: 80
  • Screen Shot 2019-11-03 at 9.53.44 PM.png
    Screen Shot 2019-11-03 at 9.53.44 PM.png
    85.5 KB · Views: 104
  • Screen Shot 2019-11-03 at 10.07.41 PM.png
    Screen Shot 2019-11-03 at 10.07.41 PM.png
    75.1 KB · Views: 84
  • Screen Shot 2019-11-03 at 10.13.40 PM.png
    Screen Shot 2019-11-03 at 10.13.40 PM.png
    52.5 KB · Views: 102
Please update Clover to v4961 or newer. Then see the following post which applies to both 10.14.5 and 10.14.6:

Hi Casey. First thanks for the reply and the incredible guide. It's the only reason I have a working Hackintosh, for sure.

The upgrade isn't working. Here is what I've done:

1, original install was 10.14.3 (because that's what was out when I built). It hasn't changed.
2, I upgrade clover to latest version.
3, I downloaded USBInjectAll.kext v.0.7.3 (I had 0.7.1) and used KextBeast to install.
4, I used MultiBeast to remove the USB port limit patch (see photo).
5, I erased the macOS Install Data folder on the root of Mojave (boot drive) and re-ran the software update. It started the install as it should and restarted.
6, I selected "Boot from Install macOS Mojave" and it restarted.
7, It went to a blank screen...and just stayed there. I left it for about 5 minutes and then I turned the machine off and on, and booted from Mojave and it boots normally. It did not update anything.

So, I'm stuck. Any suggestions would be hugely helpful.

Paul
 

Attachments

  • Screen Shot 2019-11-03 at 10.58.53 PM.png
    Screen Shot 2019-11-03 at 10.58.53 PM.png
    280.7 KB · Views: 78
Hi, I'm thinking to get this motherboard instead of the one I now have, because of the excellent step-by-step guide.
Now I will use a RX590 for the system, is it hard to change the SSDT for this one ?

I will use a 9900KF CPU.
 
I'm back again trying to figure out with my Caldigit drive utility isn't working.

-My CalDigit T4 drives mount no problem and work in RAID5 flawlessly

however when I try to access them using the caldigit drive utility I get nothing:
-device list shows nothing
-disk utility [inside the CalDigit software] shows nothing either.

When I go to:

System report in macOS, under Thunderbolt devices- "no drivers loaded"

-Could that be the root of my problem?
-How do I get thunderbolt devices to show up in system report?
-Is it a BIOS setting?

Huge thanks if anyone has an idea.
 
Stage 1: Boot a working copy of macOS like this:
  • Do you have a bootable backup?
    • If so, please boot from the backup disk.
  • If you do not have a working bootable backup:
    • Reinstall macOS from scratch on a new SSD.
    • You can use a cheap SATA SSD mounted inside a USB 3 enclosure.
    • Then boot the new installation of macOS.
Stage 2: Run Terminal and "cd" to the correct "usr/bin" folder like this:
  • After booting from a working copy of macOS, we are ready to try and remove ACL entries from your /usr/bin folder.
  • Open Terminal.
  • cd to the original (bad) macOS drive.
    • Example:
      • If the original macOS drive is called MacHD then type this:
      • cd /Volumes/macHD/usr/bin
Stage 3: Remove ACL entries:
  • Now that you are in the correct "usr/bin" directory, type this:
    • sudo chmod -N sudo
  • If there are no errors, type this:
    • sudo chmod -N *
Stage 4: Verify result:
  • Now let's make sure ACL entries are gone. Type:
    • ls -l
  • There should not be a "+" sign after the set of file permissions on the left.
  • Here's an example:
    Code:
    -rwxr-xr-x 1 root wheel 70288 Sep 29 13:28 AssetCacheLocatorUtil
    -rwxr-xr-x 1 root wheel 67360 Sep 29 13:28 AssetCacheManagerUtil
    -rwxr-xr-x 1 root wheel 57792 Sep 29 13:28 AssetCacheTetheratorUtil
    -rwxr-xr-x 1 root wheel 31488 Sep 29 13:28 BuildStrings
    -rwxr-xr-x 1 root wheel 31456 Sep 29 13:28 CpMac
  • Note that there is no "+" after "-rwxr-xr-x".

Hi!
I'm back and I tried what you advised me to do. Unfortunately, I couldn't go very far because I came up against a mistake in the Terminal. I've tried various tricks, like changing lower-case/middle case, name attached or separated by a space, nothing works. I put below the answers from the Terminal. I would like to point out that I started well on my backup.

Code:
Last login: Mon Nov  4 10:16:31 on ttys000
etiennes-mac:~ etienne$ cd /Volumes/hackintoshssd/usr/bin
-bash: cd: /Volumes/hackintoshssd/usr/bin: No such file or directory
etiennes-mac:~ etienne$ cd /Volumes/hackintosh ssd/usr/bin
-bash: cd: /Volumes/hackintosh: No such file or directory
etiennes-mac:~ etienne$ cd /Volumes/hackintosh SSD/usr/bin
-bash: cd: /Volumes/hackintosh: No such file or directory
etiennes-mac:~ etienne$ cd /Volumes/hackintoshSSD/usr/bin
-bash: cd: /Volumes/hackintoshSSD/usr/bin: No such file or directory
etiennes-mac:~ etienne$ cd /Volumes/HackintoshSSD/usr/bin
-bash: cd: /Volumes/HackintoshSSD/usr/bin: No such file or directory
etiennes-mac:~ etienne$ cd /Volumes/Hackintosh SSD/usr/bin
-bash: cd: /Volumes/Hackintosh: No such file or directory
etiennes-mac:~ etienne$ diskutil list
/dev/disk0 (internal):
   #:                       TYPE NAME                    SIZE       IDENTIFIER
   0:      GUID_partition_scheme                         2.0 TB     disk0
   1:                        EFI EFI                     209.7 MB   disk0s1
   2:                 Apple_APFS Container disk1         2.0 TB     disk0s2

/dev/disk1 (synthesized):
   #:                       TYPE NAME                    SIZE       IDENTIFIER
   0:      APFS Container Scheme -                      +2.0 TB     disk1
                                 Physical Store disk0s2
   1:                APFS Volume Hackintosh SSD          344.6 GB   disk1s1
   2:                APFS Volume Preboot                 45.3 MB    disk1s2
   3:                APFS Volume Recovery                510.4 MB   disk1s3
   4:                APFS Volume VM                      2.1 GB     disk1s4

/dev/disk2 (internal, physical):
   #:                       TYPE NAME                    SIZE       IDENTIFIER
   0:      GUID_partition_scheme                        *6.0 TB     disk2
   1:                        EFI EFI                     209.7 MB   disk2s1
   2:                  Apple_HFS Stockage                6.0 TB     disk2s2

/dev/disk3 (internal, physical):
   #:                       TYPE NAME                    SIZE       IDENTIFIER
   0:      GUID_partition_scheme                        *8.0 TB     disk3
   1:                        EFI EFI                     209.7 MB   disk3s1
   2:                  Apple_HFS Applications            8.0 TB     disk3s2

/dev/disk4 (external, physical):
   #:                       TYPE NAME                    SIZE       IDENTIFIER
   0:      GUID_partition_scheme                        *3.0 TB     disk4
   1:                        EFI EFI                     209.7 MB   disk4s1
   2:                  Apple_HFS Sauvegarde              3.0 TB     disk4s2

/dev/disk5 (external, physical):
   #:                       TYPE NAME                    SIZE       IDENTIFIER
   0:      GUID_partition_scheme                        *4.0 TB     disk5
   1:                        EFI EFI                     209.7 MB   disk5s1
   2:                  Apple_HFS Hackintosh SSD Local... 4.0 TB     disk5s2

/dev/disk6 (external, physical):
   #:                       TYPE NAME                    SIZE       IDENTIFIER
   0:      GUID_partition_scheme                        *4.0 TB     disk6
   1:                        EFI EFI                     209.7 MB   disk6s1
 
Can anyone help in this wifi question?
I don't think you'll have much luck in a P.C. shop. I had to order my TP Link card on Amazon in the UK
 
Hey Casey.
Well... I'm back with another issue.
So after taking care of my kext file mismatch problems my system has been up and running pretty stably with the exception of the digital audio out port no longer appearing.
Now I have been trying to work on some mid-range 2D compositing and my system will lock up and then restart. On one occasion the fans in one of my gfx cards went batshit, so I have a feeling there is some issue with the drivers/compatibility.

i9900K
64GB RAM
Dual Vega64 (one 16GB, one 8GB)
I can supply whatever you think might help diagnose the issue.
 
Alright! I've finally pulled the trigger and I'll cross fingers that I'm able to make it run correctly. Here's the components

- Motherboard: Asus Prime Z370-A II (because I need the Thunderbolt 3 header)
- CPU: i9-9900k
- RAM: 2x16GB 3200mhz HyperX Predator
- GPU: Sapphire RX 5700 8GB GDDR6
- SSD: 2x Sabrent Rocket 1TB (one for backup)
- Cooler: Bequiet Dark Rock 4 Pro
- Thunderbolt: Gigabyte Titan Ridge

Thanks so much for all the help and knowledge @CaseySJ and many other users share. Did you created by any chance a mini-guide on how to do your own SSDT (or DSDT?) to enable hot-plug on the Titan Ridge?. I'm not entirely sure how I can do it once I got it installed on my motherboard.
Good components! I know @pastrychef is a staunch proponent of the Z370 -- and for good reasons. So hopefully your build will go smoothly.

Enabling hot plug on GC-Titan Ridge should be pretty easy. Once you have installed the card then do the following:
  • At the Clover Boot Menu, press F4 to dump the original ACPI tables. They will be in the CLOVER/ACPI/origin folder.
  • Boot into macOS.
  • Download and run IORegistryExplorer and select File --> Save As... then upload that file.
  • Mount EFI partition of macOS SSD, navigate to the EFI/CLOVER/ACPI/origin folder and upload the DSDT.aml.
Then I can either modify the hot plug SSDT for you or give you instructions for doing it yourself.
 
Back
Top