Contribute
Register

[SUCCESS] Gigabyte Designare Z390 (Thunderbolt 3) + i7-9700K + AMD RX 580

Hi CaseySJ,

First off thanks for the awesome post about installing Mojave on Z390. I followed the instructions to the T and was able to successfully install Mojave. Everything works as expected. My problem starts if I try to do in-place Catalina upgrade. After downloading Catalina from App Store, the computer asks for reboot. After the reboot, I select Install macOS from XXX, it starts booting up but then gets stuck. I wait 5 minutes and the purple lines appear (a normal occurrence), then it tries to enter graphics mode and that point my monitor blanks out saying no signal detected. I am not sure what's going on.

I've attached the boot messages before screen blanks out. EFI folder also attached

EDIT1: I had left the system in blanked out state for >1 hour while I went outside to mow my front lawn :p Came back and forcefully shutdown the system. Then turned on again, at the Clover menu now I see that Clover no longer shows "Install macOS from XXX" but shows normal options. I select my boot drive and then boot process starts until screen blanks out again. I have a feeling that something is up with display resolution. I might try to go back to iGPU and report back

EDIT2: Catalina was indeed successfully installed. However, it appears that it won't show anything on the screen with dGPU. I disconnected dGPU, enabled IGPU in BIOS and booted via Mojave Installer USB. At the boot menu, selected the internal drive. Catalina showed up. However, the resolution is very low. So I still have work to do but for now it confirms that Catalina was installed successfully even though screen blackouts occurred

EDIT3: So confirmed that Catalina is not liking dGPU (RX 590) which is surprising since it was plug n play with Mojave. I'm writing this edit from within Catalina. I booted via Mojave USB Installer and selected internal drive. I'm using iGPU with low resolution.

EDIT4: ISSUE RESOLVED: Here's what I did: I downloaded the latest versions of Lilu, Whatevergreen and AppleALC. Copied those to /L/E and Clover/kexts/Other folders. Then ran Kext Utility. Shutdown the computer. Connected dGPU. Removed HDMI cable from iGPU, and connected back DP cable to DP port on dGPU. Started the computer and booted directly from the internal drive. No screen blackouts and full resolution!!

EDIT:
@randompurplehippo I'm at the same stage as you (everything works with my RX 480) but I want to use my iGPU also ...

To make it worked, I have to set IntelGFX to 0x12345678 (of course no accelerated video). 0x3E928086 or 0x0 doesn't work.

@CaseySJ any suggestions ?
 
Last edited:
What’s going on with Clover. What v. should we be using?
 
@CaseySJ

FINALLY took your advice...used your wonderful Mojave guide, made a new USB installer and installed a clean Mojave to a new ssd. I was very careful and it worked a treat. Mojave lives again. Upgraded Lilu, WEG etc. From there I downloaded the Catalina installer and ran it. It smoothly did everything it should. I now have a perfectly functioning Catalina...sound, blue-tooth, wifi, and sleep!
Now how do I proceed to get it to my Mojave NVMe. Clone it? There is that clone problem?
Then migrate from b-u?
Sounds dangerous.

Thanks again.
The procedure is rather straightforward as follows:

Preparation:
  • First clone the existing Mojave NVMe to a spare SSD. Make sure to create this backup of the original Mojave NVMe.
  • Test-boot from the clone to make sure it is okay and it is bootable.
  • Then disconnect and put the Mojave clone aside.
  • Now you will have 3 installations of macOS:
    • The original Mojave installation on NVMe
    • The clone of Mojave on spare SSD
    • The Catalina installation on SSD
Stage 1:
  • Now let's make sure that your (a) Mojave NVMe and (b) Catalina SSD are using the same SMBIOS and same serial numbers.
  • Mount EFI partitions of both of these drives and examine config.plist from both partitions. If SMBIOS name or serial numbers are not the same, copy the current values from Mojave to Catalina.
  • This ensures that iCloud, App Store, and all of your licensed applications will consider the Catalina system to be the same hardware as the Mojave system. This will allow you to use existing licenses on the Catalina system.
Stage 2:
  • Now you may clone the Catalina SSD to the NVMe drive.
  • Boot from the Catalina SSD.
    • Press F12 at BIOS Splash Screen and select the Catalina SSD.
    • At the Clover Boot Menu, choose Boot macOS from Catalina.
    • Login to Catalina.
  • Run Carbon Copy Cloner and select:
    • SOURCE = Catalina SSD
    • DESTINATION = Mojave NVMe
    • You do not have to use the EFIClone script. Just do everything manually for this particular case.
  • Double-check your configuration of Carbon Copy Cloner.
  • If everything looks okay, hit the Clone button.
Stage 3:
  • When Carbon Copy Cloner is done, mount the EFI partitions of both NVMe and Catalina SSD.
  • Rename the EFI folder on NVMe to EFI-old
  • Copy the entire EFI folder from Catalina SSD to EFI folder on NVMe.
  • Shutdown the system.
Stage 4:
  • With the system powered down, disconnect the Catalina SSD.
  • We are going to boot from the internal NVMe now.
  • Power the system back on and let it boot directly to Catalina from the NVMe SSD.
  • Login.
  • Look at About this Mac, make sure serial number is correct, check audio, check HEVC and H.264 acceleration, check Thunderbolt, check Ethernet, check Sidecar.
  • Login to iCloud, FaceTime, Messages.
    • Check that AppStore is okay.
    • Check that iTunes can play music and movies.
  • Check Sleep, Wake, Reboot, Shutdown.
  • Basically, check everything to make sure the system is good.
  • This is your baseline.
Stage 5:
  • Now begin to install your third-party applications.
  • You will need your license codes!
  • Because the system's serial numbers are the same, all existing license codes should work just fine.
  • Don't rush to reinstall all of your apps at once.
  • Install your apps over time. Install the most important ones first, of course. Then make sure system is still stable.
    • Some applications may not be compatible with Catalina so download latest builds.
  • Check Sleep, Wake, Reboot, Shutdown.
Stage 6:
  • Backup. Backup. Backup.
  • This is your next baseline where everything is working.
Stage 7:
  • Your transition is complete.
 
I followed the guide and running catalina with out any major issues so far. the only issues i have are waking up from sleep. the computer goes to sleep and everything turns off, except the the RAM RGB and when i press a key to wake up i am not getting anything on my monitor, same thing when my monitor turns off after set amount of time and i try to use the pc.

darkwake is set to 0, i deleted the power management files in Library/Preference, i disconnected the corsair usb from mobo header.

video card is MSI rx580

any suggestions?
  • Is this a brand new build with Designare motherboard?
    • If so, you installed Catalina directly (not an upgrade from Mojave)?
  • If this is not a brand new build with Designare, was it running Mojave 10.14.6 previously?
    • If so, were you able to wake from sleep?
  • What is the make and model of your monitor?
  • Are you using DisplayPort or HDMI cable?
  • Other than Corsair (PSU or AIO?) connected to internal USB header, what other devices are connected to internal USB header?
    • (Yes I realize you unplugged the Corsair device.)
    • The purpose of this question is to determine whether the USB SSDT needs to be modified.
UPDATE: Just verified that Sleep and Wake are working fine on my system with Catalina (w/Supplemental Update).
 
Last edited:
Planning on a New Hackintosh Build with these parts:
Gigabyte Designare Z390
Intel i5-9600K
BE QUIET! Dark Rock 4
Asus ROG-STRIX-RX560-4G-GAMING , maybe it works OOB!?
Samsung 500GB 2,5" SATA3 860
BitFenix Formula 550W Gold (BP-FM550ULAG-9R)
TP-LINK Archer T9E AC1900

and 32GB RAM kit, 16x2 GB. Maybe: G.SKILL Ripjaws V 32GB (2x16GB) DDR4 3200MHz F4-3200C16D-32GVK
does anyone use this memory? I can't see this memory on motherboard QVL list, just like that: F4-3200C16D-16GVKB This is an 2x8GB modell.
I got an information about RAM.
We can just Kingston RAM order.

Are there any working Kingston HyperX memory with this Motherboard?

My second question: Can i search just in this thread? If i can, how? :)
 
@CaseySJ

After buying a 2nd TB3 dock (Promise Technology dock) and my Promise Pegasus TB1 RAID drive not working, I am at a loss. Some TB1 drives work and some simply do not. Is there anything I can add to my Designare Hackintosh like a TB1 PCI-E card to get all TB1 devices to work? Even if it is costly I would consider it. Thank you.
Unfortunately Thunderbolt PCIe cards will most likely not work on this motherboard. You said that you're willing to buy a TB1 PCIe card even if it is costly. So if you are willing to spend money, I would strongly recommend buying a new Thunderbolt 3 external drive enclosure instead. You should be able to move existing hard drives into the new enclosure.

If in doubt, please tell us:
  • What make/model hard drives are you using?
  • What is the make/model of the external Thunderbolt hard drive enclosure?
  • Are they in RAID mode?
    • If so, RAID 5?
    • Are you using software RAID or the external enclosure has its own RAID controller?
  • How many total hard drives would need to be moved to the new enclosure?
 
I checked it out, it's the disk0s1. In fact, none of the EFI partitions accept to mount, could it be a permissions problem?
This will sound very basic, but let's start with the very basics:
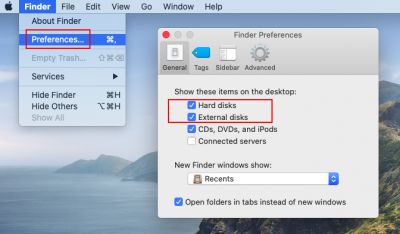
  • First, do this in Finder:
    Screen Shot 2019-10-17 at 8.45.07 AM.png
  • Then look at the hard drives that are already mounted. In my case only my main Catalina drive is mounted:
    Screen Shot 2019-10-17 at 8.49.14 AM.png
  • Then run Clover Configurator.
  • Click Mount EFI on the left side then choose one of your drives from the bottom part of the list. See the two red boxes.
  • After choosing one of the drives to mount, click Mount Partition (see blue box).
    Screen Shot 2019-10-17 at 8.48.20 AM.png
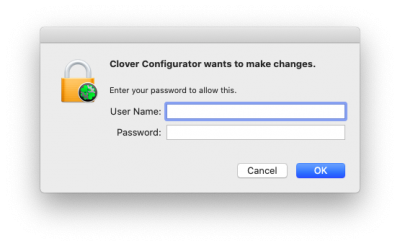
  • You will be asked to enter your name and password:
    Screen Shot 2019-10-17 at 8.49.59 AM.png
  • Now take another look at your desktop. You should see a new EFI disk icon like this:
    Screen Shot 2019-10-17 at 8.49.37 AM.png
  • If you see this, then it means the EFI partition has been mounted from the disk you selected in Clover Configurator.
  • You should be able to mount all of your EFI partitions by repeating this procedure.
 
I installed 10.14.4 using this guide - everything works great, no problems at all. Now I would like to update to 10.14.6, but I got some questions: I used "Mac Mini 8,1" as system when in installed, but it seems that I have to change this to "iMac 19,1" in order to update to 10.14.6, right?
This is not necessary, but if you want to use Sidecar with a supported iPad then iMac19,1 is necessary. But if you switch SMBIOS name the "proper" way, you will have to relicense your third-party applications.
I also wanted to update Clover - my version is 4920, but this is not possible via the Clover Configurator 5.6.1.0. Can I just download the latest Clover (looks like v2.5k-5096 is the latest) and install it? Clover has moved to https://github.com/CloverHackyColor/CloverBootloader/releases ?
Thanks a lot!
As far as I know, the CloverHackyColor fork of Clover is primarily used by AMD-based Hackintoshes. I would suggest downloading Clover from these 2 places:
  1. TonyMac website. You can just download this file.
  2. SourceForge.

UPDATE: The CloverHackyColor site on GitHub is now the correct location for Clover boot loader builds.
 
Last edited:
A update to this question; still haven't done a CMOS reset (probably not valid, but I find this a bit scary), but found something else. I've unchecked 'Debug' in Clover Boot Section. Now a cold boot till desktop takes 52 seconds, much faster (it skips the testing section)! What does this tell you, is it still CMOS related or does this point in another direction? And what are the drawbacks of not using 'Debug'?
Debug should only be used if you are having problems with Clover. It can significantly increase the boot time. See the Debug tooltip:

Screen Shot 2019-10-17 at 9.10.56 AM.png


Not related to above question, but something I discovered testing above. As mentioned I have 2 identical MX500 SSD's, first in line is MacOS, second is the MacOS Backup. Without using CCC the nvram.plist on both discs are identical and have the same timestamps. So even though only one OS is loaded, MacOS keeps both nvram.plist up-to-date? Does this matter?
  • Do both MX500 SSDs have the same disk names as well?
  • In my own experience with two or more cloned drives connected to the system, the nvram.plist on each one remains completely independent. Independent timestamps and contents.
 
Planning on a New Hackintosh Build with these parts:

Gigabyte Designare Z390
Intel i5-9600K
BE QUIET! Dark Rock 4
Asus ROG-STRIX-RX560-4G-GAMING , maybe it works OOB!?
Samsung 500GB 2,5" SATA3 860
BitFenix Formula 550W Gold (BP-FM550ULAG-9R)
TP-LINK Archer T9E AC1900

and 32GB RAM kit, 16x2 GB. Maybe: G.SKILL Ripjaws V 32GB (2x16GB) DDR4 3200MHz F4-3200C16D-32GVK

Does anyone use this memory? I can't see this memory on motherboard QVL list. Just like that: F4-3200C16D-16GVKB This is an 2x8GB model.
As long as you use DDR4 DIMMs (4GB, 8GB, 16GB modules) that are XMP 2.0 certified, you will be okay. I would not advise using 32GB DIMM modules (this means 1 module with 32GB on it).

Also, I would recommend 650W power supply minimum.

The rest of your components look good to me. The Asus Strix RX560 should work OOB.
 
Back
Top