- Joined
- Aug 1, 2014
- Messages
- 66
- Motherboard
- Gigabyte Designare Z390
- CPU
- i9-9900K
- Graphics
- RTX 2080 TI
- Mac
- Mobile Phone
luchazo's X99 Mini-ITX Build: ASRock X99E-ITX/ac - SSD SM951 - 6 core 5820K - 32GB - GTX970
Components
ASRock X99E-ITX/AC Motherboard
http://www.amazon.com/dp/B00VTFA2QM/
Intel 6-core i7-5820K Processor
http://www.amazon.com/dp/B00MMLXIKY/
Dynatron R24 Processor Cooler - it comes with the motherboard
http://www.amazon.com/dp/B00CA742OG/
Kingston 32GB DDR4 2133MHz ECC
http://www.amazon.com/dp/B00NLZANBC/
Samsung SM951 512GB AHCI MZHPV512HDGL-00000 M.2 80mm PCIe 3.0 x4 SSD
http://www.amazon.com/dp/B00VELDBJ6/
Gigabyte Nvidia GTX 970 mini OC Graphics Card
http://www.amazon.com/dp/B00OQUMGM0/
SilverStone Technology 450W SFX Form Factor 80 PLUS GOLD Full Modular Power Supply with +12V single rail, Active PFC (ST45SF-G)
http://www.amazon.com/dp/B008VQ2Y4K/
Noctua NF-S12A PWM 120mm Case Fan
http://www.amazon.com/dp/B00BEZZBFO/
Comments
OK Guys, good news.
(edit: to see the step by step guide on the installation of 10.10.4, see post #3 below)
I presented every component in a spare case and was able to get Yosemite 10.10.3 running, so this mobo X99E-ITX/ac is definitely compatible with Mac.
As you may recall, my plan is to put this inside a G4 Cube.
I have a separate topic for that part (while I'll keep this one for the specifics on making this little motherboard work with OS X).
Installation
With all these steps, that I did 3 or 4 times, so I'm pretty sure I didn't forget anything, I was able to have my asrockX99 X99E-ITX/ac motherboard working with:
- regular 2.5"SSD drivers or the newest and fastest PCIE SSD m.2 Samsung SM951. WOW it flies: almost 2000MB/s WOW 2GBps of read speed, WOW!!! and 1500MB of write speed!
I also got 5GHZ Ac wifi working (using channel 161 in my country). If you don't get ac wifis, try selecting alternate channels from the router.
So, here the steps:
1) Using another mac, create a installation USB for 10.10.4 following steps 1 and 2 on this guide (http://www.tonymacx86.com/yosemite-...-x-yosemite-any-supported-intel-based-pc.html)
2) Using another mac, customize the USB Install for the X99 platform following steps 1, 2 and 3 on this guide (http://www.tonymacx86.com/yosemite-...motherboard-temporary-guide-os-x-10-10-a.html)
3) In my case, I have a Nvidia Gigabyte GTX 970 mini, that fits on my G4 Cube. But I had no way, and I tried many many times, of making it work with the out-of-the-box drivers in the USB install disk I created in step 1 and 2.
Therefore, the best and easiest way is to use another graphics card like GT 430 that I bought for 30 usd (remember that X99 has no integrated graphics on the processor). I recommend you do the same if you have trouble making the GTX 970/980 work with the USB. If you find a way, please let me know!
So, step 3 is to install the compatible video card, in my case again, GeForce GT 430.
We need to use this card, until we are able to boot into the new Yosemite system in the SSD/HHD and install nvidia web drivers.
4) Perform the installation following steps 3 and 4 on the general guide (http://www.tonymacx86.com/yosemite-...-x-yosemite-any-supported-intel-based-pc.html)
5) Here, please don’t follow the generic Yosemite guide. Here, we need to follow steps 4, 5, 6 and 7 from the specific X99 guide http://www.tonymacx86.com/yosemite-...motherboard-temporary-guide-os-x-10-10-a.html
We basically need to reboot from the initial installation and AGAIN boot in the USB stick (not the installation YOSEMITE, since we need to patch the kernel before starting)
We still have the GT 430 compatible card in the system.
So, again we use -v as the only flag to boot into the install USB again
Once there, we do the following command in terminal, which copies the kernel, already patched from the USB to the YOSEMITE installation.
Now, we need to reboot again and this time start from the USB boot loader, and then select YOSEMITE, see below
6) This is the POST INSTALLATION STEP:
Steps 8, 9 and 10 on the specific guide (http://www.tonymacx86.com/yosemite-...motherboard-temporary-guide-os-x-10-10-a.html)
and the step 5 on the general guide (http://www.tonymacx86.com/yosemite-...-x-yosemite-any-supported-intel-based-pc.html)
Select the USB, not the HDD.
Then select YOSEMITE as the OS to start at the chimera boot screen.
Here, I just need to use the following flags: npci=0x2000 -v
Note that here we need to use npci=0x2000 atoo, because we still didn’t add it on the YOSEMITE installation flags file /Extra/org.chameleon.Boot.plist
Here I did steps 8, 9 and 10 first on the specific X99 guide:
http://www.tonymacx86.com/yosemite-...motherboard-temporary-guide-os-x-10-10-a.html
Using the latest version of Multibeast I just selected the following options on this first time:
- DSDT Free
- IGPEnabler=No
- GraphicsEnabler=No
- VoodoTSync 6 Core
- Note that I left Mac Pro 3,1 in here, instead of selecting 6,1 as suggested in the guide. I think this is very important for the X99E-ITX/ac.
Here, we also must add npci=0x2000 to your /Extra/org.chameleon.Boot.plist on the SSD/HDD installation of Yosemite.
As you can see, I didn’t installed any drivers for the wifi or audio at this stage. I left that for the end, once I’ll have the final GTX 970 installed on it.
At this step, I also installed the latest drivers for NVIDIA for Yosemite 10.10.4
Just download the drivers here, and click on the file
http://www.nvidia.com/download/driverResults.aspx/87193
7) Now, we still have the compatible video card GT 430. So be reboot.
8) This time we don’t need to select USB, we can select the HDD/SDD at the motherboard boot selection screen, and then select YOSEMITE in the chimera boot screen. We shouldn’t use any boot flags at this stage. It should just boot quickly to Yosemite. This step is just to check that we still boot fine into Yosemite with the video card drivers installed and the old video card installed.
9) Shutdown the computer, and remove the compatible video card, and insert the GTX 970 (or 980, etc), remember that these new video card require the special power connector from the PSU.
10) Reboot again selecting the HDD/SDD and the YOSEMITE in the chimera screen
Here, we need to use a specific flag to trigger the new nvidia drivers. So we select the HDD/SDD and the YOSEMITE in the chimera boot screen with the flag: nvda_drv=1 just this flag is needed to trigger the new nvidia drivers.
It’s important here to have done the step 6 above with the GraphicsEnabler=No option. Since the GTX 970 won’t boot if you don’t have GraphicsEnabler=No on the file /Extra/org.chameleon.Boot.plist.
So, if it fails to boot, you may want to use the following flags just to be sure:
-v GraphicsEnabler=No IGPEnabler=No nvda_drv=1
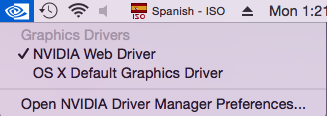
11) Once in Yosemite, go to the nvidia app on the top right, and select the option: web driver, instead of the other OS X Default option below.
View attachment 145244
This will make the nvda_drv=1 in the /Extra/org.chameleon.Boot.plist . Please check you find it there, if it’s not there, just add it manually, but it should be there.
12) So now, we should be able again to boot to SSD/HDD and Yosemite in the chimera boot screen without any flags, really fast.
And this is my current /Extra/org.chameleon.Boot.plist file:
Note that it already has nvda_drv=1 meaning that I´m running my GTX 970 with it.
So, GTX970 works fine using the latest nVidia Web Drivers for 10.10.3 (rev4)
I still need to check the following:
Wifi and BT:
I need to check the Wifi and Bluetooth, since the mobo comes with a AzureWave Broadcom BCM94352HMB 802.11/ac/867Mbps WLAN + BT4.0 Half Mini PCI-E card, and this is my first boig deal hackintosh build, so I still haven't figured it out how to enable it.
Audio:
It has ALC1150. So it should work fine as in other ASRocks mobos. Still need to check it.
I'll prepare a guide soon on the install process so it helps others.
But I was surprised on how few boot flags I needed to used (once I knew what to do of course)
I reinstalled it many times (around 5) so I pretty much have every single flag that needs to be used on this process.
A quick status:
It boots directly from the SSD without -x flag (In fact, I never needed it to make this work, so I'm very pleased with the ongoing status)
OK, I'll continue with the WiFi/BT PCIe card, to see if it works!
Components
ASRock X99E-ITX/AC Motherboard
http://www.amazon.com/dp/B00VTFA2QM/
Intel 6-core i7-5820K Processor
http://www.amazon.com/dp/B00MMLXIKY/
Dynatron R24 Processor Cooler - it comes with the motherboard
http://www.amazon.com/dp/B00CA742OG/
Kingston 32GB DDR4 2133MHz ECC
http://www.amazon.com/dp/B00NLZANBC/
Samsung SM951 512GB AHCI MZHPV512HDGL-00000 M.2 80mm PCIe 3.0 x4 SSD
http://www.amazon.com/dp/B00VELDBJ6/
Gigabyte Nvidia GTX 970 mini OC Graphics Card
http://www.amazon.com/dp/B00OQUMGM0/
SilverStone Technology 450W SFX Form Factor 80 PLUS GOLD Full Modular Power Supply with +12V single rail, Active PFC (ST45SF-G)
http://www.amazon.com/dp/B008VQ2Y4K/
Noctua NF-S12A PWM 120mm Case Fan
http://www.amazon.com/dp/B00BEZZBFO/
Comments
OK Guys, good news.
(edit: to see the step by step guide on the installation of 10.10.4, see post #3 below)
I presented every component in a spare case and was able to get Yosemite 10.10.3 running, so this mobo X99E-ITX/ac is definitely compatible with Mac.
As you may recall, my plan is to put this inside a G4 Cube.
I have a separate topic for that part (while I'll keep this one for the specifics on making this little motherboard work with OS X).
Installation
With all these steps, that I did 3 or 4 times, so I'm pretty sure I didn't forget anything, I was able to have my asrockX99 X99E-ITX/ac motherboard working with:
- regular 2.5"SSD drivers or the newest and fastest PCIE SSD m.2 Samsung SM951. WOW it flies: almost 2000MB/s WOW 2GBps of read speed, WOW!!! and 1500MB of write speed!
I also got 5GHZ Ac wifi working (using channel 161 in my country). If you don't get ac wifis, try selecting alternate channels from the router.
So, here the steps:
1) Using another mac, create a installation USB for 10.10.4 following steps 1 and 2 on this guide (http://www.tonymacx86.com/yosemite-...-x-yosemite-any-supported-intel-based-pc.html)
2) Using another mac, customize the USB Install for the X99 platform following steps 1, 2 and 3 on this guide (http://www.tonymacx86.com/yosemite-...motherboard-temporary-guide-os-x-10-10-a.html)
2.1 Add VoodooTSCSync.kext (6 core for my Intel 5280K 6-core processor) as the guide above shows.
2.2 Add npci=0x2000 to your /Extra/org.chameleon.Boot.plist on the USB install
2.3 Perform this code in terminal to patch the kernel
2.2 Add npci=0x2000 to your /Extra/org.chameleon.Boot.plist on the USB install
2.3 Perform this code in terminal to patch the kernel
Code:
sudo perl -pi -e 's|\x74\x11\x83\xF8\x3C|\x74\x11\x83\xF8\x3F|g' /Volumes/USB/System/Library/Kernels/kernel3) In my case, I have a Nvidia Gigabyte GTX 970 mini, that fits on my G4 Cube. But I had no way, and I tried many many times, of making it work with the out-of-the-box drivers in the USB install disk I created in step 1 and 2.
Therefore, the best and easiest way is to use another graphics card like GT 430 that I bought for 30 usd (remember that X99 has no integrated graphics on the processor). I recommend you do the same if you have trouble making the GTX 970/980 work with the USB. If you find a way, please let me know!
So, step 3 is to install the compatible video card, in my case again, GeForce GT 430.
We need to use this card, until we are able to boot into the new Yosemite system in the SSD/HHD and install nvidia web drivers.
4) Perform the installation following steps 3 and 4 on the general guide (http://www.tonymacx86.com/yosemite-...-x-yosemite-any-supported-intel-based-pc.html)
4.3 bios settings: I disabled VT-d and Secure boot mode, but VT-d was disabled already by default.
4.4 In order to boot from the USB stick, I just needed to use the following flags: -v
Because We already added npci=0x2000 on the step 2.2 above
PLEASE, don’t overkill with the flags, you’ll think you need more than -v and npci=0x2000, when in fact, you don’t.
4.4 In order to boot from the USB stick, I just needed to use the following flags: -v
Because We already added npci=0x2000 on the step 2.2 above
PLEASE, don’t overkill with the flags, you’ll think you need more than -v and npci=0x2000, when in fact, you don’t.
A strange behaviour when booting with the stick in my build was that I needed to perform the same process 1, 2 or even 3 times in order for the installation to show up. I think it’s related to an issue with my graphics card. That’s why I tell you not to bother using many flags. If it fails, keep using JUST the flag -v a couple of extra times, and it will work.
5) Here, please don’t follow the generic Yosemite guide. Here, we need to follow steps 4, 5, 6 and 7 from the specific X99 guide http://www.tonymacx86.com/yosemite-...motherboard-temporary-guide-os-x-10-10-a.html
We basically need to reboot from the initial installation and AGAIN boot in the USB stick (not the installation YOSEMITE, since we need to patch the kernel before starting)
We still have the GT 430 compatible card in the system.
So, again we use -v as the only flag to boot into the install USB again
Once there, we do the following command in terminal, which copies the kernel, already patched from the USB to the YOSEMITE installation.
Code:
cp -R /Volumes/USB/System/Library/Kernels/kernel /Volumes/Yosemite/System/Library/Kernels/kernelNow, we need to reboot again and this time start from the USB boot loader, and then select YOSEMITE, see below
6) This is the POST INSTALLATION STEP:
Steps 8, 9 and 10 on the specific guide (http://www.tonymacx86.com/yosemite-...motherboard-temporary-guide-os-x-10-10-a.html)
and the step 5 on the general guide (http://www.tonymacx86.com/yosemite-...-x-yosemite-any-supported-intel-based-pc.html)
Select the USB, not the HDD.
Then select YOSEMITE as the OS to start at the chimera boot screen.
Here, I just need to use the following flags: npci=0x2000 -v
Note that here we need to use npci=0x2000 atoo, because we still didn’t add it on the YOSEMITE installation flags file /Extra/org.chameleon.Boot.plist
Here I did steps 8, 9 and 10 first on the specific X99 guide:
http://www.tonymacx86.com/yosemite-...motherboard-temporary-guide-os-x-10-10-a.html
Using the latest version of Multibeast I just selected the following options on this first time:
- DSDT Free
- IGPEnabler=No
- GraphicsEnabler=No
- VoodoTSync 6 Core
- Note that I left Mac Pro 3,1 in here, instead of selecting 6,1 as suggested in the guide. I think this is very important for the X99E-ITX/ac.
Here, we also must add npci=0x2000 to your /Extra/org.chameleon.Boot.plist on the SSD/HDD installation of Yosemite.
As you can see, I didn’t installed any drivers for the wifi or audio at this stage. I left that for the end, once I’ll have the final GTX 970 installed on it.
At this step, I also installed the latest drivers for NVIDIA for Yosemite 10.10.4
Just download the drivers here, and click on the file
http://www.nvidia.com/download/driverResults.aspx/87193
7) Now, we still have the compatible video card GT 430. So be reboot.
8) This time we don’t need to select USB, we can select the HDD/SDD at the motherboard boot selection screen, and then select YOSEMITE in the chimera boot screen. We shouldn’t use any boot flags at this stage. It should just boot quickly to Yosemite. This step is just to check that we still boot fine into Yosemite with the video card drivers installed and the old video card installed.
9) Shutdown the computer, and remove the compatible video card, and insert the GTX 970 (or 980, etc), remember that these new video card require the special power connector from the PSU.
10) Reboot again selecting the HDD/SDD and the YOSEMITE in the chimera screen
Here, we need to use a specific flag to trigger the new nvidia drivers. So we select the HDD/SDD and the YOSEMITE in the chimera boot screen with the flag: nvda_drv=1 just this flag is needed to trigger the new nvidia drivers.
It’s important here to have done the step 6 above with the GraphicsEnabler=No option. Since the GTX 970 won’t boot if you don’t have GraphicsEnabler=No on the file /Extra/org.chameleon.Boot.plist.
So, if it fails to boot, you may want to use the following flags just to be sure:
-v GraphicsEnabler=No IGPEnabler=No nvda_drv=1
11) Once in Yosemite, go to the nvidia app on the top right, and select the option: web driver, instead of the other OS X Default option below.
View attachment 145244
This will make the nvda_drv=1 in the /Extra/org.chameleon.Boot.plist . Please check you find it there, if it’s not there, just add it manually, but it should be there.
12) So now, we should be able again to boot to SSD/HDD and Yosemite in the chimera boot screen without any flags, really fast.
And this is my current /Extra/org.chameleon.Boot.plist file:
Note that it already has nvda_drv=1 meaning that I´m running my GTX 970 with it.
Code:
<?xml version="1.0" encoding="UTF-8"?>
<!DOCTYPE plist PUBLIC "-//Apple//DTD PLIST 1.0//EN" "http://www.apple.com/DTDs/PropertyList-1.0.dtd">
<plist version="1.0">
<dict>
	<key>EthernetBuiltIn</key>
	<string>Yes</string>
	<key>GenerateCStates</key>
	<string>Yes</string>
	<key>GeneratePStates</key>
	<string>Yes</string>
	<key>GraphicsEnabler</key>
	<string>No</string>
	<key>IGPEnabler</key>
	<string>No</string>
	<key>Kernel Flags</key>
	<string>kext-dev-mode=1 npci=0x2000 nvda_drv=1</string>
	<key>Legacy Logo</key>
	<string>Yes</string>
	<key>Timeout</key>
	<string>2</string>
	<key>UseKernelCache</key>
	<string>Yes</string>
</dict>
</plist>
So, GTX970 works fine using the latest nVidia Web Drivers for 10.10.3 (rev4)
I still need to check the following:
Wifi and BT:
I need to check the Wifi and Bluetooth, since the mobo comes with a AzureWave Broadcom BCM94352HMB 802.11/ac/867Mbps WLAN + BT4.0 Half Mini PCI-E card, and this is my first boig deal hackintosh build, so I still haven't figured it out how to enable it.
Audio:
It has ALC1150. So it should work fine as in other ASRocks mobos. Still need to check it.
I'll prepare a guide soon on the install process so it helps others.
But I was surprised on how few boot flags I needed to used (once I knew what to do of course)
I reinstalled it many times (around 5) so I pretty much have every single flag that needs to be used on this process.
A quick status:
It boots directly from the SSD without -x flag (In fact, I never needed it to make this work, so I'm very pleased with the ongoing status)
OK, I'll continue with the WiFi/BT PCIe card, to see if it works!
Last edited by a moderator: