
- Joined
- Jul 18, 2011
- Messages
- 297
- Motherboard
- Z77X-UP5 TH
- CPU
- 3570K
- Graphics
- R9 270X
- Mac
- Classic Mac
- Mobile Phone
I've spent a bit of time mapping the switch PCB. Some components are yet to be identified but the ones known are provided below with their data sheets. 0Ω resistors have been omitted.
Schematic:

Q100: 3 pin NPN SOT23 - Standard layout, no data sheet required. Pin IDs are in the main schematic
U1: TI HA14 - No such part in TI's database. Closest match is DFP HC14 hex inverting Schmitt trigger. Turns out it is an inverting Schmitt-trigger, the HC14 is just a publicly available version.
U2: Philips 87LPC762 - GP microcontroller
http://www.keil.com/dd/docs/datashts/philips/p87lpc762_ds.pdf
U10: IR 431L - LV shunt regulator (5 pin SOT23 layout)
http://media.digikey.com/pdf/Data Sheets/International Rectifier PDFs/IRU431L,AL Rev1.3.pdf
U11: No clue but it appears to be polarised
U200: NS LM7101 - LV Rail-Rail OP-AMP
http://www.smd.ru/images/upload/ru/1395/lmc7101.pdf
I also did some quick readings on the scope.


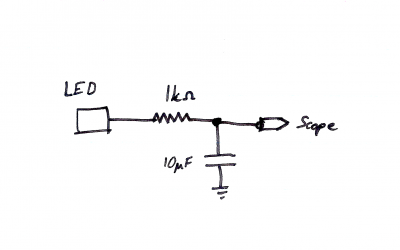
When pins 3 and 4 on the connector J1 are left open and the analog ground is left unconnected, the system goes into a sort of "idle" mode where every 8.82 seconds, the microcontroller emits a 170µs square pulse from pins 11 and 12 (shorted together).

When pins 3 and 4 are shorted, this behaviour is suppressed and instead a square wave with a 98.35% duty cycle is output when the sensor is triggered. The duty cycle gradually drops to zero when finger is removed. These two pins are therefore assumed to be configured as a PWM.
View attachment 71521
The HA14 Schmitt-trigger has the same pin configuration as the HC14 shown above. Unused inputs need to be grounded, which is why so many pins on U1 are connected to analog ground.


The HA14 here has the negative rail connected to ground, which for our purposes is 0V. Therefore, the low threshold for the Schmitt-trigger is also 0V. Out of the six units on the flatpack, only three are used. The first two create the square wave and the last stage buffers and inverts it back to the correct phase before outputting it to the microcontroller's (U2) external counter pin (pin 13). The resistors and capacitor on the first stage (R1,R10,C1) set the frequency of the square wave generated. I didn't bother measuring this because the added capacitance from the test equipment would change it. I have however provided the voltage across C1 over time along with the square wave the op-amp generates from it. Notice the two thresholds at work. Once the voltage across C1 is 0V, the output becomes 3.08V and only when the capacitor is charged to 2.04V does it switch back to 0V.

The next stage in layman's terms, isolates the first stage from any interference that could come in from the microcontroller. However these are inverting Schmitt-triggers; notice how the output from the second stage (Cyan waveform) is flipped. To flip this back, we just need to pass it through another stage.

Much better. Great so what now? We have a constant square wave being pumped into the micro controller, what does this have to do with the sensor? The mentioned earlier that the frequency of oscillation was set by R1, R10 and C1. While this is true, it's mostly C1 that's the determining factor. We established that the op-amp only switches when the capacitor hits the threshold voltage. And the speed with which it reaches this threshold is determined by its capacitance (the funny value with the unit farads). It makes sense that increasing the capacitance will increase the amount of time it takes to charge to the threshold voltage. Increased time means decreased frequency.
Now consider this. Everything around you, including yourself, has some degree of capacitance. Humans make fairly good capacitors, which is probably why this circuit works as well as it does. Regardless of what electrical circuit you touch, if it's powered you will always in some way affect its function by introducing additional capacitance. This why it's recommended that you wear some sort of insulator before handling delicate components. The same thing applies to our sensor. Notice in the main schematic, the sensor ring is connected in parallel with the C1. When you bring your finger close to this ring, you in fact become a capacitor to ground; a part of the circuit. With your body added, the equivalent capacitance seen by the Schmitt-trigger increases, and therefore C1 takes longer to charge. A longer charge time entails a lower frequency. If you look at the waveform across C1 on the scope while bringing a foreign object close to the sensor ring, you'll notice frequency change inversely to its distance from the sensor.
I'm yet to determine how this frequency affects the LED, but if I was to guess, I'd say that the microcontroller looks for a certain frequency on the T1 pin (pin 13). When the signal entering is less than a threshold frequency, it triggers the light.
Updates
28/10 - Fixed stupidly placed L5 connection
29/10 - Added U1 scope probes
Schematic:
Q100: 3 pin NPN SOT23 - Standard layout, no data sheet required. Pin IDs are in the main schematic
U1: TI HA14 - No such part in TI's database. Closest match is DFP HC14 hex inverting Schmitt trigger. Turns out it is an inverting Schmitt-trigger, the HC14 is just a publicly available version.
U2: Philips 87LPC762 - GP microcontroller
http://www.keil.com/dd/docs/datashts/philips/p87lpc762_ds.pdf
U10: IR 431L - LV shunt regulator (5 pin SOT23 layout)
http://media.digikey.com/pdf/Data Sheets/International Rectifier PDFs/IRU431L,AL Rev1.3.pdf
U11: No clue but it appears to be polarised
U200: NS LM7101 - LV Rail-Rail OP-AMP
http://www.smd.ru/images/upload/ru/1395/lmc7101.pdf
I also did some quick readings on the scope.
When pins 3 and 4 on the connector J1 are left open and the analog ground is left unconnected, the system goes into a sort of "idle" mode where every 8.82 seconds, the microcontroller emits a 170µs square pulse from pins 11 and 12 (shorted together).
When pins 3 and 4 are shorted, this behaviour is suppressed and instead a square wave with a 98.35% duty cycle is output when the sensor is triggered. The duty cycle gradually drops to zero when finger is removed. These two pins are therefore assumed to be configured as a PWM.
View attachment 71521
The HA14 Schmitt-trigger has the same pin configuration as the HC14 shown above. Unused inputs need to be grounded, which is why so many pins on U1 are connected to analog ground.
The HA14 here has the negative rail connected to ground, which for our purposes is 0V. Therefore, the low threshold for the Schmitt-trigger is also 0V. Out of the six units on the flatpack, only three are used. The first two create the square wave and the last stage buffers and inverts it back to the correct phase before outputting it to the microcontroller's (U2) external counter pin (pin 13). The resistors and capacitor on the first stage (R1,R10,C1) set the frequency of the square wave generated. I didn't bother measuring this because the added capacitance from the test equipment would change it. I have however provided the voltage across C1 over time along with the square wave the op-amp generates from it. Notice the two thresholds at work. Once the voltage across C1 is 0V, the output becomes 3.08V and only when the capacitor is charged to 2.04V does it switch back to 0V.
The next stage in layman's terms, isolates the first stage from any interference that could come in from the microcontroller. However these are inverting Schmitt-triggers; notice how the output from the second stage (Cyan waveform) is flipped. To flip this back, we just need to pass it through another stage.
Much better. Great so what now? We have a constant square wave being pumped into the micro controller, what does this have to do with the sensor? The mentioned earlier that the frequency of oscillation was set by R1, R10 and C1. While this is true, it's mostly C1 that's the determining factor. We established that the op-amp only switches when the capacitor hits the threshold voltage. And the speed with which it reaches this threshold is determined by its capacitance (the funny value with the unit farads). It makes sense that increasing the capacitance will increase the amount of time it takes to charge to the threshold voltage. Increased time means decreased frequency.
Now consider this. Everything around you, including yourself, has some degree of capacitance. Humans make fairly good capacitors, which is probably why this circuit works as well as it does. Regardless of what electrical circuit you touch, if it's powered you will always in some way affect its function by introducing additional capacitance. This why it's recommended that you wear some sort of insulator before handling delicate components. The same thing applies to our sensor. Notice in the main schematic, the sensor ring is connected in parallel with the C1. When you bring your finger close to this ring, you in fact become a capacitor to ground; a part of the circuit. With your body added, the equivalent capacitance seen by the Schmitt-trigger increases, and therefore C1 takes longer to charge. A longer charge time entails a lower frequency. If you look at the waveform across C1 on the scope while bringing a foreign object close to the sensor ring, you'll notice frequency change inversely to its distance from the sensor.
I'm yet to determine how this frequency affects the LED, but if I was to guess, I'd say that the microcontroller looks for a certain frequency on the T1 pin (pin 13). When the signal entering is less than a threshold frequency, it triggers the light.
Updates
28/10 - Fixed stupidly placed L5 connection
29/10 - Added U1 scope probes


 (I'm an Aeronautical/Astronautical engineer.)


