
- Joined
- May 27, 2012
- Messages
- 759
- Motherboard
- DQ77KB
- CPU
- i7-3770S
- Graphics
- HD4000
- Mac
- Mobile Phone
Introduction
I have finally completed my first powermac G4 Cube build, so thought would give it a bit of a writeup. If you would like to see the build log, have a look at this thread
http://www.tonymacx86.com/powermac-g4-cube/99442-building-g4-cube-australia.html
This build that uses the Intel DQ77KB (Ivy Bridge) motherboard that has been well tested in these builds. My main goal was to package a fast processor (i7-3770s), with a full complement of other desktop grade components including
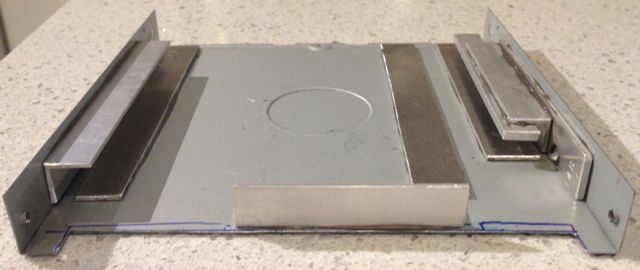
DVD conversion
For the DVD drive I used the top of the existing DVD Drive as normally done, I created a frame that allows the drive to be removed and replaced
After cutting away all the excess at the bottom, I glued stops of metal and L brackets on the sides and bottom, to create a slot that holds the dvd drive from all sides.
Photos from bottom/back with drive removed
And drive installed
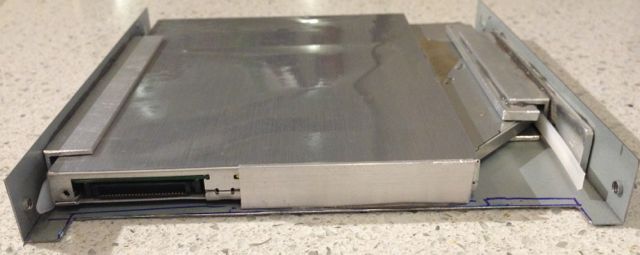
It was reasonably easy to do, just cut the metal strips to size, apply glue, then assemble everything (including the drive) and wait for glue to dry. I used cable ties on the sides of the drive to hold it perfectly in place.
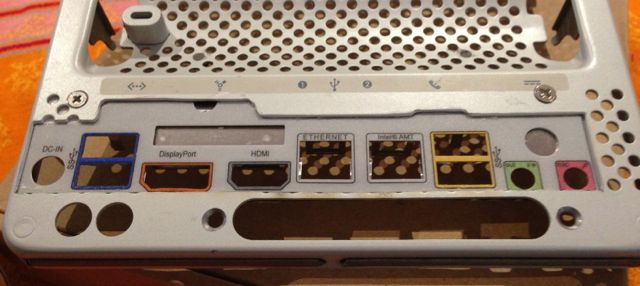
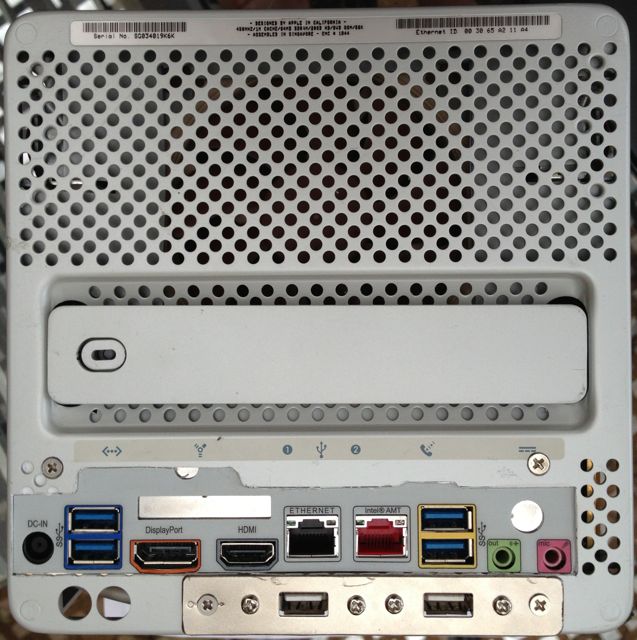
Bottom IO Ports
I took the approach of doing away with a press fit into a standard ATX square hole. I cut down the full height IO panel to make essentially a flat panel which sits between the chassis and the motherboard
Picture showing final fitted result. Not a total disaster
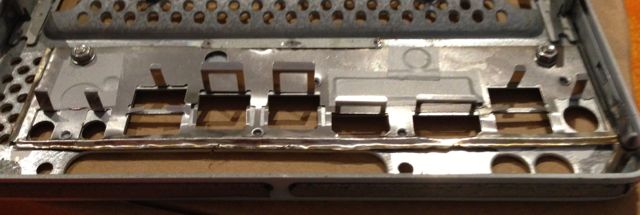
And from the rear, not so pretty.
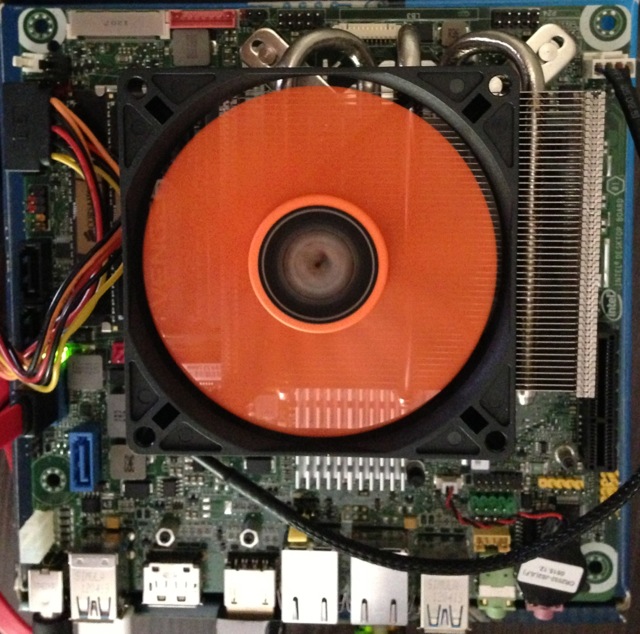
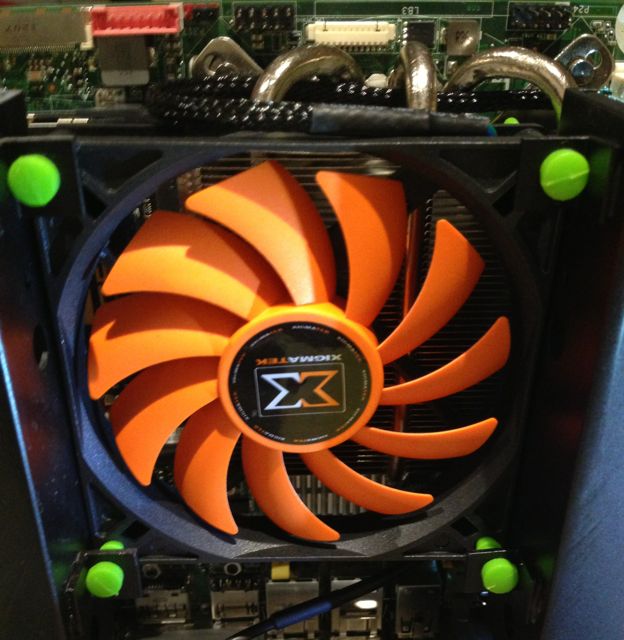
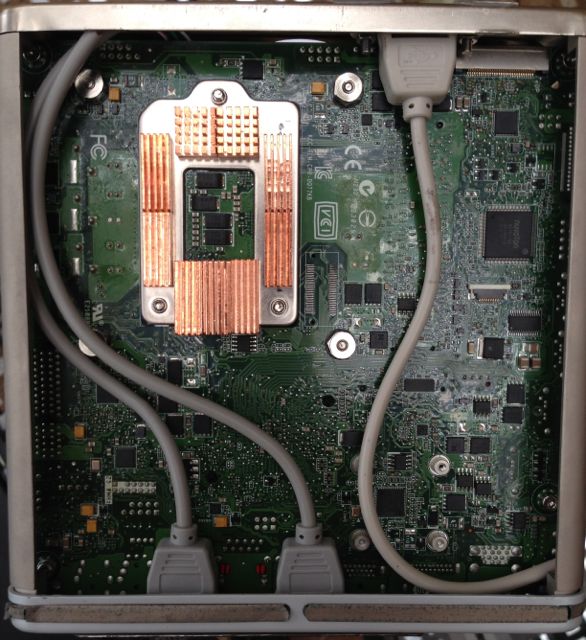
CPU Heatsink Mounting
I used the Xigmatek - Praeton LD963 CPU Cooler in this build. It is rated to support 115 watt of power, it is bigger than the Slim Silence used lot in i3 Cube builds.

The heatsink is mounted as shown with the heat pipes toward the top of the motherboard
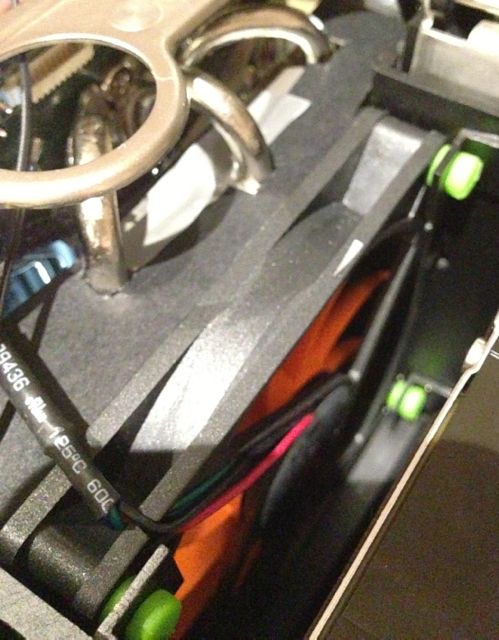
I used 40mm standoffs for the motherboard you can see that there is a quite a gap to the latching mechanism
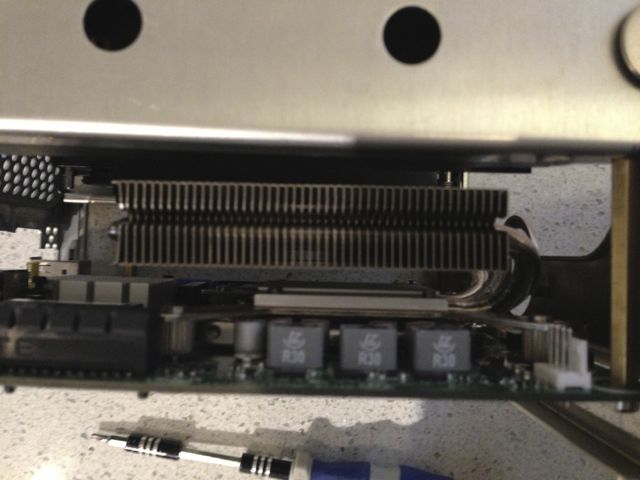
Another view showing the gap
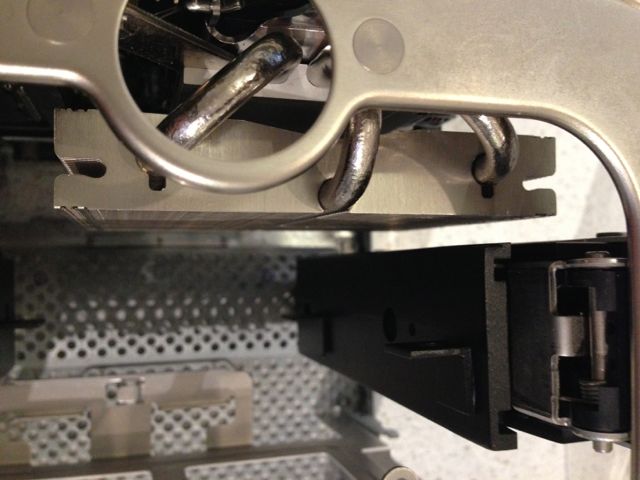
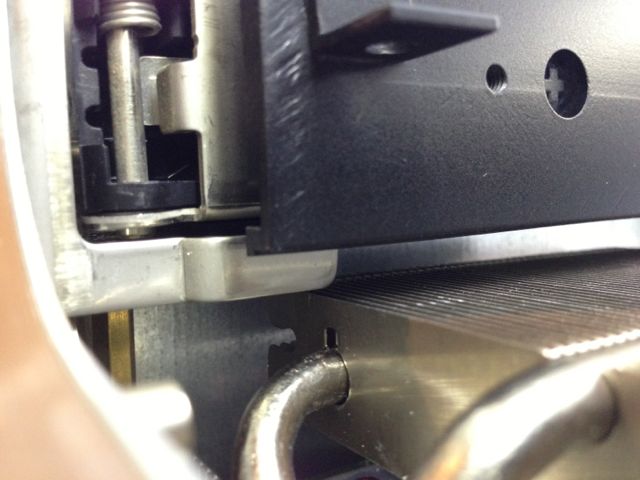
There is just enough clearance with the frame that the latching mechanism engages with.
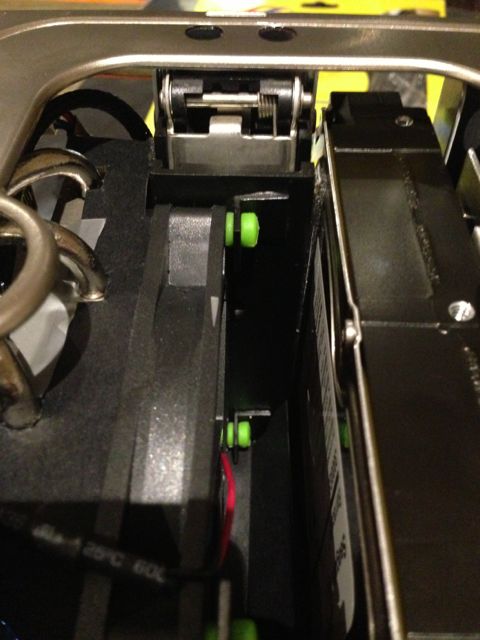
Picture taken through top grill with Cube assembled
The top mounted fan (90mm) fits snugly in between the latching mechanism.
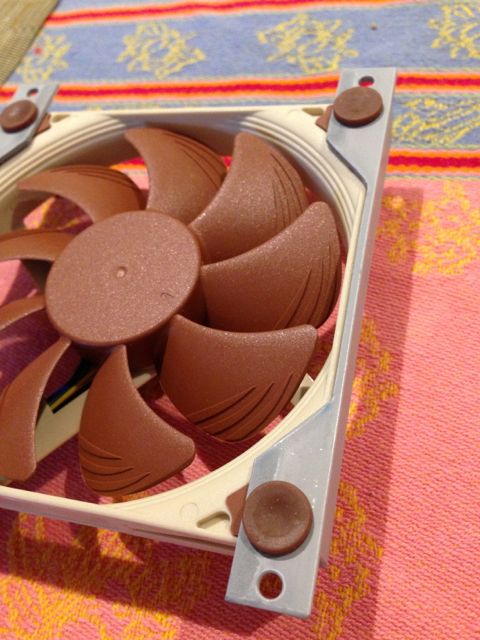
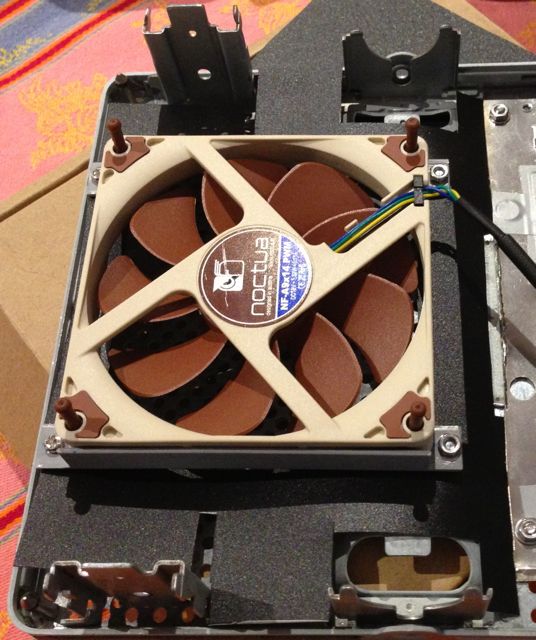
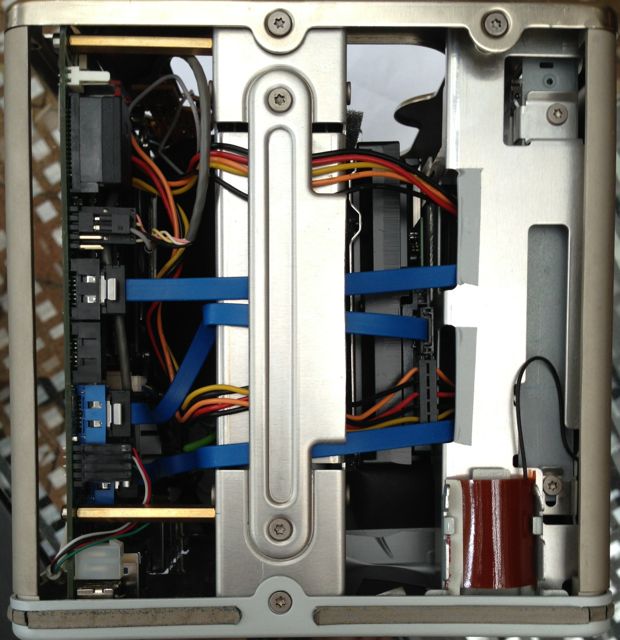
Chassis Fan Mounting
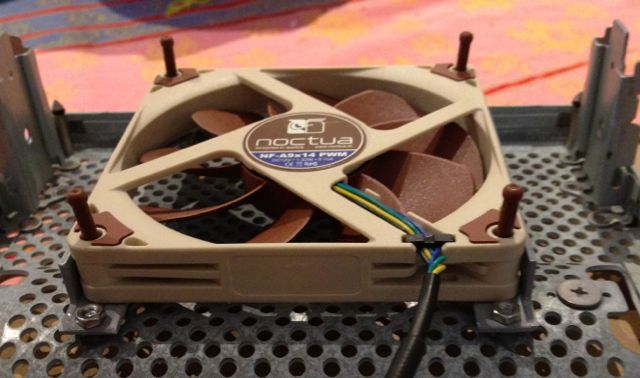
I mounted a case fan underneath the drive bays, to provide air intake from the bottom of the cube. I used a "Noctua NF-A9x14" 92mm PWM fan It is 14mm thick
I made up two brackets to hold the fan
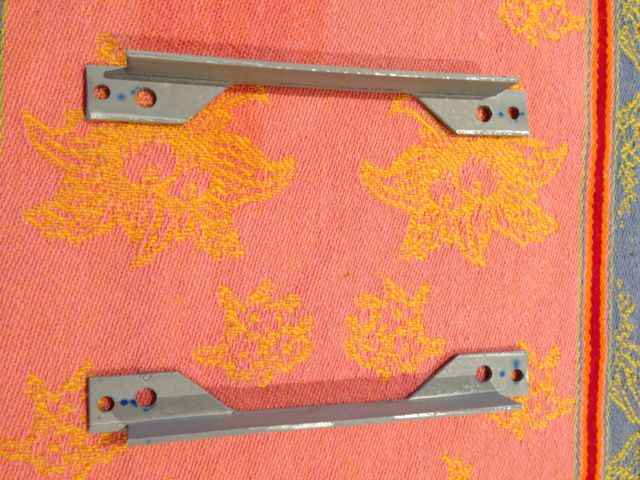
Here is the underside of the brackets with the fan attached
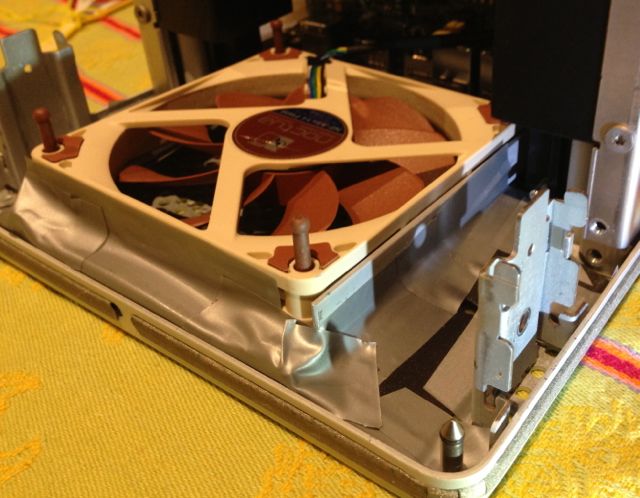
Then I glued two standoffs to the side of the case
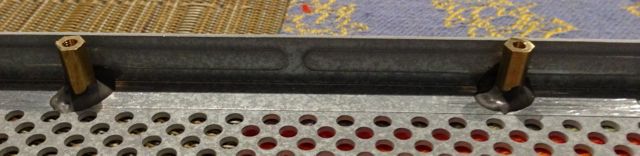
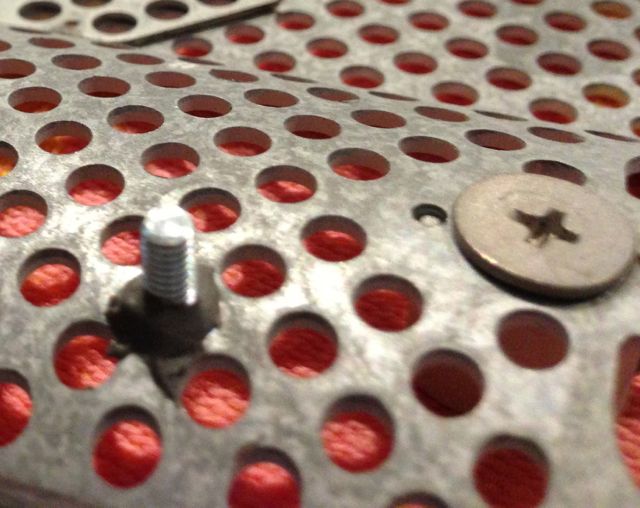
I glued some bolts (with heads chopped off) into holes under the handle
Here is a picture showing the fan mounted
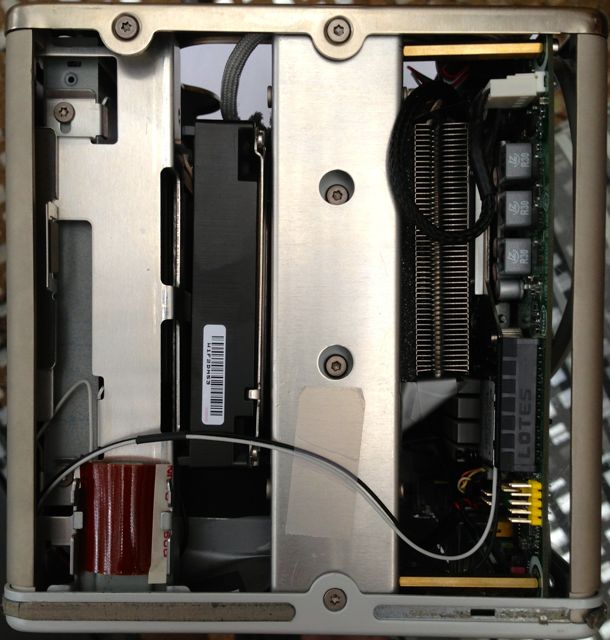
NEW Cooling Approach
My approach is to treat the Cube like a sealed unit and specifically direct airflow through the computer following certain paths. Here is how it works:
I - Lower Chassis Fan
Air drawn in the bottom through case fan (described above).
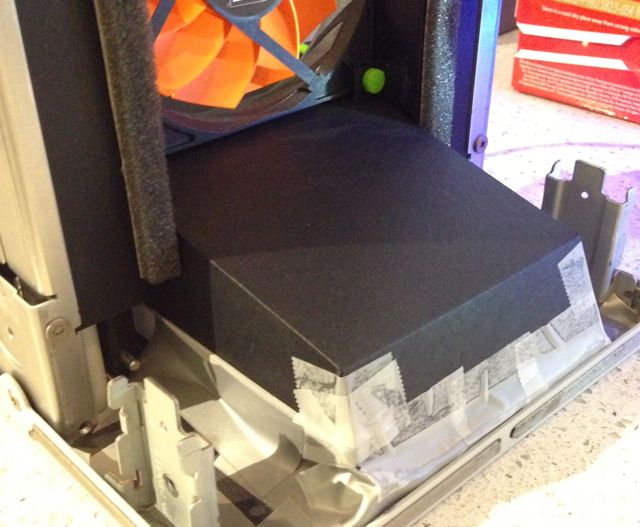
II - Improve Chassis Fan Efficiency
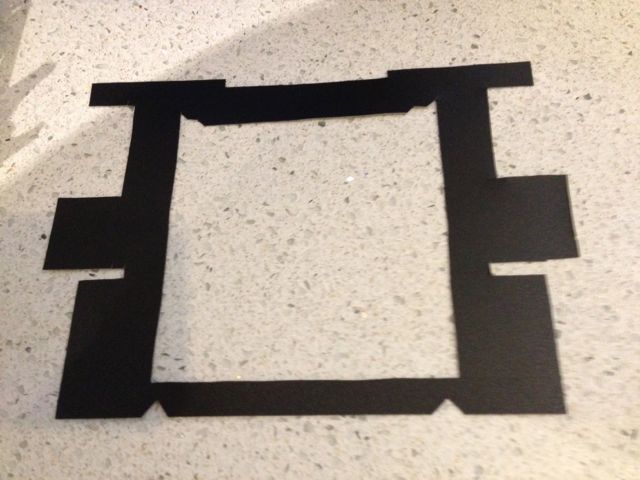
I built a seal around the fan to isolate the air intake to the bottom of the case. This should ensure most air sucked into the fan comes from outside the case, and can only be expelled from the top.
Here is the cutout made from thin flexible sheet plastic
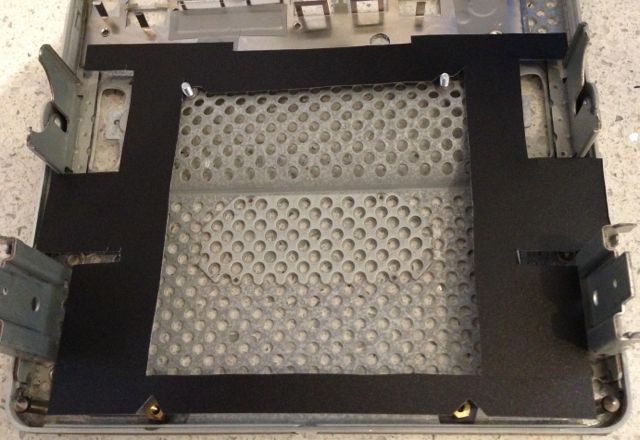
The cowling sits around the fan mounts in the bottom of the case
With the fan screwed on top, it looks like this
Then adding thick tape, to provide a good seal looks ugly, but does the job
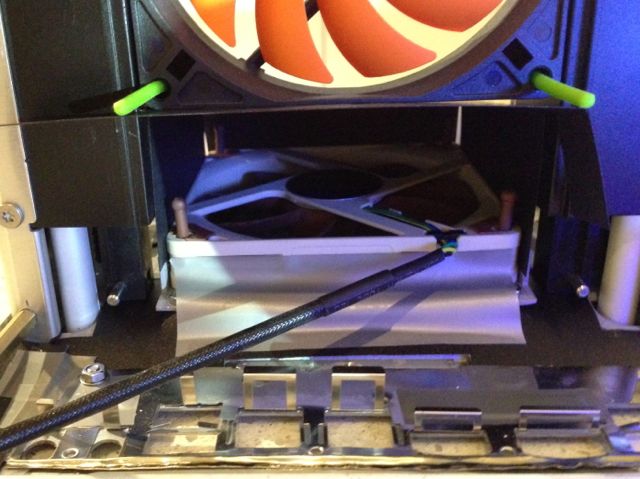
III - Horizontal Directed Airflow
A cowling covering the chassis fan directs airflow from the fan horizontally through the latching mechanism.
This air emerges at the bottom of the motherboard, providing cooling for the motherboard chipset
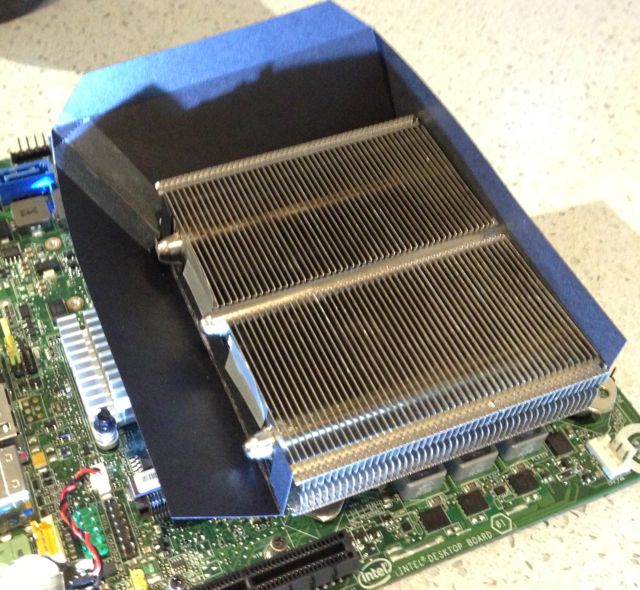
IV - CPU Heatsink Seal
I created a cowling that solves the issue of the gap and offset between the Heatsink and the fan. The cowling creates a seal between the fan and the Heatsink.
Here is the cowling
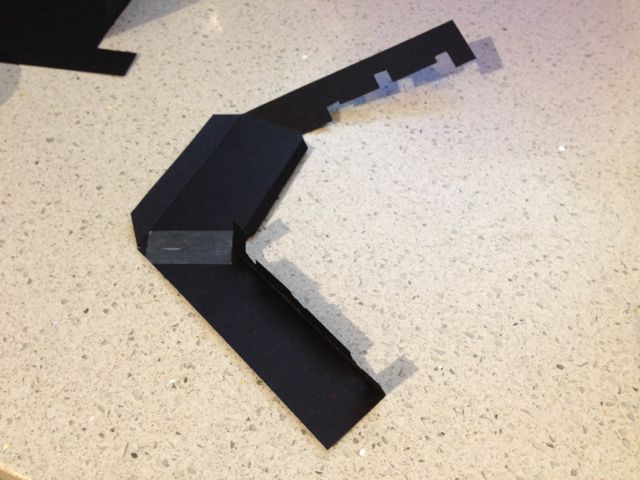
Attached to heatsink
V - CPU Fan Sucks Air
The CPU fan is reversed to suck air through the CPU heatsink, rather than blow air as is normally the case. Air that has been forced into the base of the motherboard is then drawn through the heatsink, through the fan, exhausting towards the hard drive bay.
VI - Air Exits Top
Air exiting the CPU fan hits the HDD (installed in normal location) and is forced upward and out of the top vent. I was careful to seal this compartment at the bottom by the cowling from #3 above, and by the main HDD to ensure no heated air can leak back into the case itself.
Cooling Results and Conclusions
This build was all about effective cooling of the 65w i7-3770s. Using two 92mm low profile fans. I have achieved temps (under load) in the low 70's, with fans running below 100%. Noise levels are acceptable, and almost silent when CPU is throttled back. My design also accommodates a full complement of Optical, 2.5" SSD, and 3.5" HDD
Here are the temps after running CPU Test Enormous test for 20-30 minutes
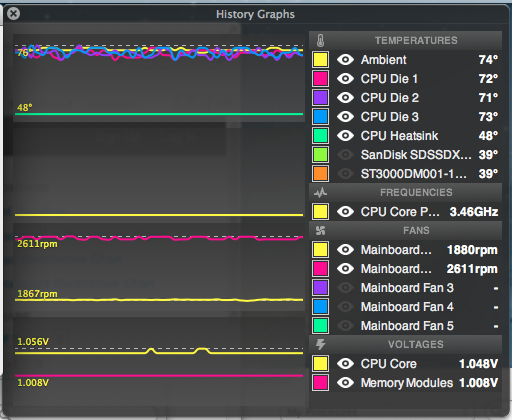
Geekbench Results

Yes I think it was a success.
One of the critical successes (my opinion) was reversal of the CPU fan so it sucks air into a sealed cavity between the latching mechanism, forcing it up and out of the case through the top vent. This means there is little re-circulation of heated air in the case.
At maximum RPM I can detect (using strips of tissue paper) air movement up to 1.5 meters above the case.
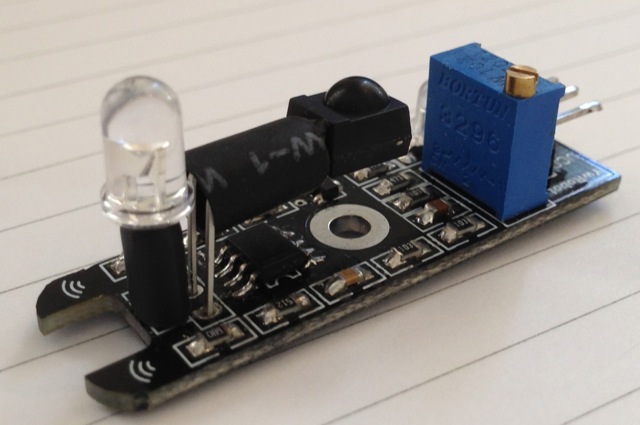
Infrared Cube Switch
After getting my main components installed in my cube, I quickly found (as others have) mounting the original cube switch is hard as the MB is too close. The Edison solution seemed obvious but I wanted to try something different.
I decided on infrared detection through the top vent of the case. The goal is to be able to turn the cube on by waving to it, i.e. passing your hand over the top vent.
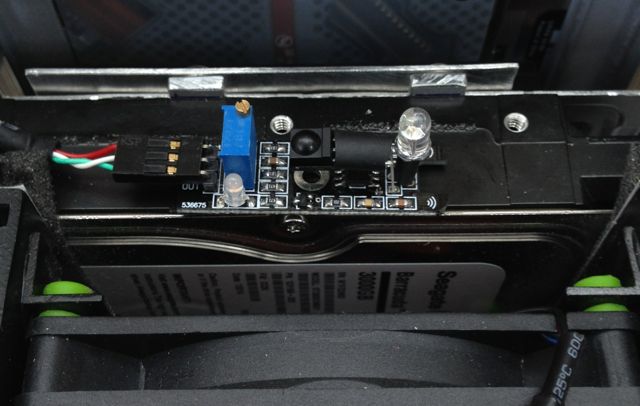
The module (purchased off eBay and modified) sits on top of the HDD and shine up through the grille. The sensor has an IR LED that generates an infrared signal, and an IR Detector which detects reflected light from an object (hand) passing above it. The board has adjustable sensitivity up to 20cm.
The LED is on the left, and the detector in the middle.
I sat the sensor below the grille on to of the hard drive. The led and sensor are spaced so the poke up through different parts of the grille.
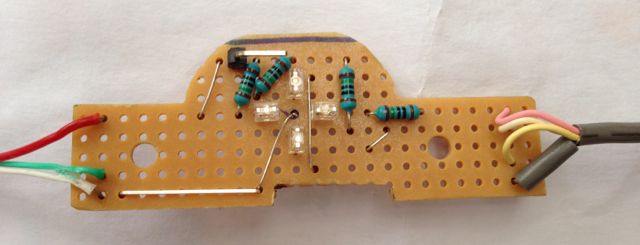
LED Lighting
Then I added some lighting to the top of the case, where the power switch would normally be located. I added four small LED's. One for
Screwed into original mounts
From above
And here is what it looks like when assembled and working
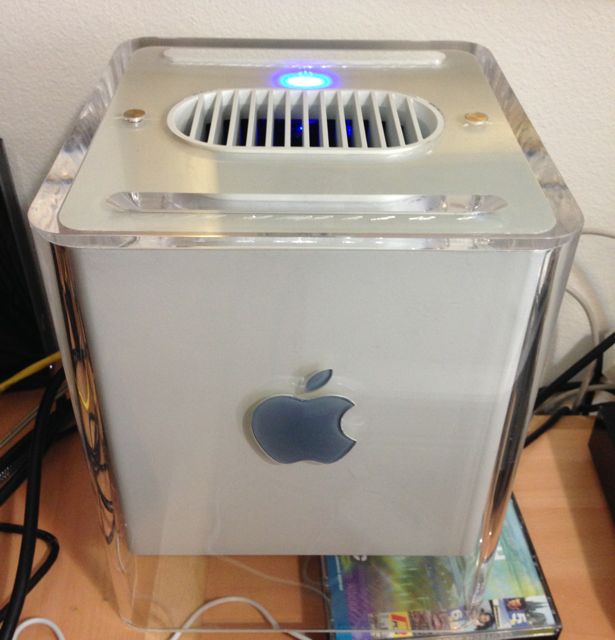
Some Final pics
From Top
One Side
Bottom of Motherboard
Other Side near
Bottom
Fully assemble bed and running
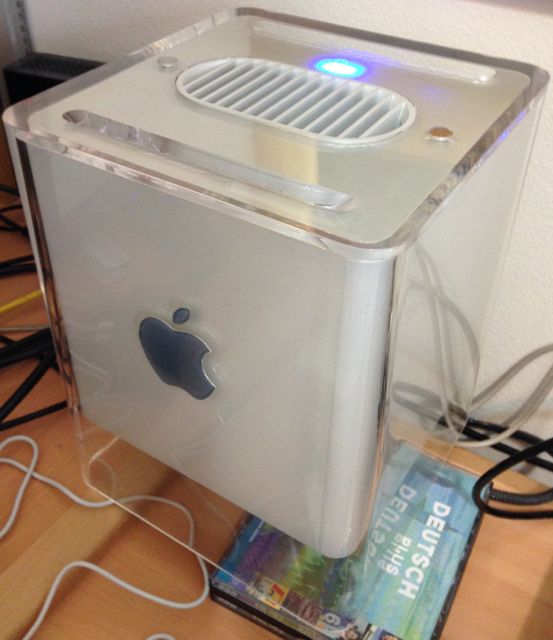
Sorry about the messy desk, its not mine
PS Special thanks to the work of chaos, ersterhernd, minihack, rossi, mactester, sleppek, for pushing the envelope and making this all possible.
Kiwi
I have finally completed my first powermac G4 Cube build, so thought would give it a bit of a writeup. If you would like to see the build log, have a look at this thread
http://www.tonymacx86.com/powermac-g4-cube/99442-building-g4-cube-australia.html
This build that uses the Intel DQ77KB (Ivy Bridge) motherboard that has been well tested in these builds. My main goal was to package a fast processor (i7-3770s), with a full complement of other desktop grade components including
- 3TB 3.5” HDD - mounted in original location
- 256GB 2.5 SSD (SATA III) - mounted between HDD and optical drive.
- DVD Optical Drive
DVD conversion
For the DVD drive I used the top of the existing DVD Drive as normally done, I created a frame that allows the drive to be removed and replaced
After cutting away all the excess at the bottom, I glued stops of metal and L brackets on the sides and bottom, to create a slot that holds the dvd drive from all sides.
Photos from bottom/back with drive removed
And drive installed
It was reasonably easy to do, just cut the metal strips to size, apply glue, then assemble everything (including the drive) and wait for glue to dry. I used cable ties on the sides of the drive to hold it perfectly in place.
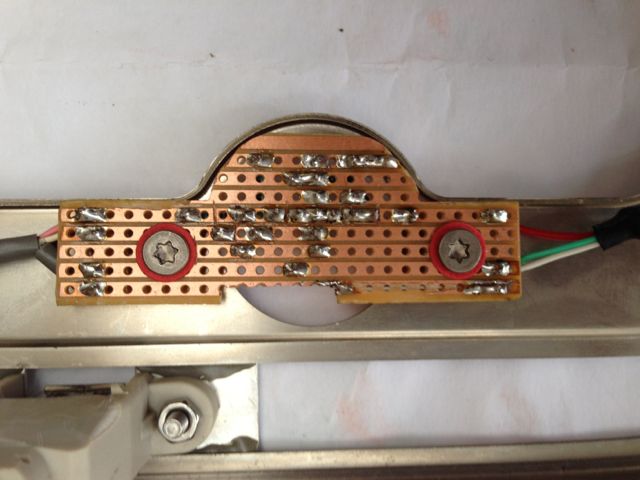
Bottom IO Ports
I took the approach of doing away with a press fit into a standard ATX square hole. I cut down the full height IO panel to make essentially a flat panel which sits between the chassis and the motherboard
Picture showing final fitted result. Not a total disaster
And from the rear, not so pretty.
CPU Heatsink Mounting
I used the Xigmatek - Praeton LD963 CPU Cooler in this build. It is rated to support 115 watt of power, it is bigger than the Slim Silence used lot in i3 Cube builds.
The heatsink is mounted as shown with the heat pipes toward the top of the motherboard
I used 40mm standoffs for the motherboard you can see that there is a quite a gap to the latching mechanism
Another view showing the gap
There is just enough clearance with the frame that the latching mechanism engages with.
Picture taken through top grill with Cube assembled
The top mounted fan (90mm) fits snugly in between the latching mechanism.
Chassis Fan Mounting
I mounted a case fan underneath the drive bays, to provide air intake from the bottom of the cube. I used a "Noctua NF-A9x14" 92mm PWM fan It is 14mm thick
I made up two brackets to hold the fan
Here is the underside of the brackets with the fan attached
Then I glued two standoffs to the side of the case
I glued some bolts (with heads chopped off) into holes under the handle
Here is a picture showing the fan mounted
NEW Cooling Approach
My approach is to treat the Cube like a sealed unit and specifically direct airflow through the computer following certain paths. Here is how it works:
I - Lower Chassis Fan
Air drawn in the bottom through case fan (described above).
II - Improve Chassis Fan Efficiency
I built a seal around the fan to isolate the air intake to the bottom of the case. This should ensure most air sucked into the fan comes from outside the case, and can only be expelled from the top.
Here is the cutout made from thin flexible sheet plastic
The cowling sits around the fan mounts in the bottom of the case
With the fan screwed on top, it looks like this
Then adding thick tape, to provide a good seal looks ugly, but does the job
III - Horizontal Directed Airflow
A cowling covering the chassis fan directs airflow from the fan horizontally through the latching mechanism.
This air emerges at the bottom of the motherboard, providing cooling for the motherboard chipset
IV - CPU Heatsink Seal
I created a cowling that solves the issue of the gap and offset between the Heatsink and the fan. The cowling creates a seal between the fan and the Heatsink.
Here is the cowling
Attached to heatsink
V - CPU Fan Sucks Air
The CPU fan is reversed to suck air through the CPU heatsink, rather than blow air as is normally the case. Air that has been forced into the base of the motherboard is then drawn through the heatsink, through the fan, exhausting towards the hard drive bay.
VI - Air Exits Top
Air exiting the CPU fan hits the HDD (installed in normal location) and is forced upward and out of the top vent. I was careful to seal this compartment at the bottom by the cowling from #3 above, and by the main HDD to ensure no heated air can leak back into the case itself.
Cooling Results and Conclusions
This build was all about effective cooling of the 65w i7-3770s. Using two 92mm low profile fans. I have achieved temps (under load) in the low 70's, with fans running below 100%. Noise levels are acceptable, and almost silent when CPU is throttled back. My design also accommodates a full complement of Optical, 2.5" SSD, and 3.5" HDD
Here are the temps after running CPU Test Enormous test for 20-30 minutes
Geekbench Results
Yes I think it was a success.
One of the critical successes (my opinion) was reversal of the CPU fan so it sucks air into a sealed cavity between the latching mechanism, forcing it up and out of the case through the top vent. This means there is little re-circulation of heated air in the case.
At maximum RPM I can detect (using strips of tissue paper) air movement up to 1.5 meters above the case.
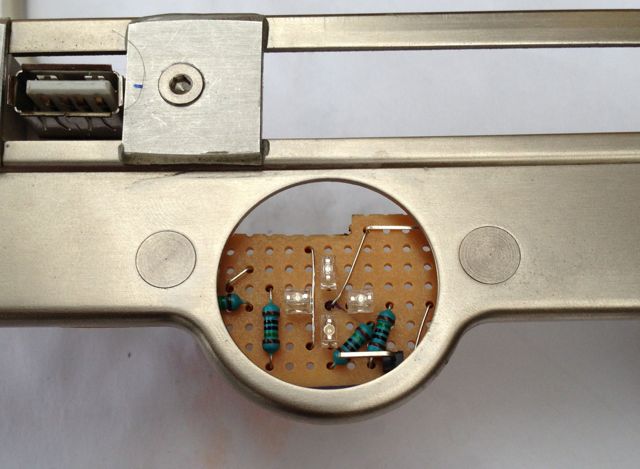
Infrared Cube Switch
After getting my main components installed in my cube, I quickly found (as others have) mounting the original cube switch is hard as the MB is too close. The Edison solution seemed obvious but I wanted to try something different.
I decided on infrared detection through the top vent of the case. The goal is to be able to turn the cube on by waving to it, i.e. passing your hand over the top vent.
The module (purchased off eBay and modified) sits on top of the HDD and shine up through the grille. The sensor has an IR LED that generates an infrared signal, and an IR Detector which detects reflected light from an object (hand) passing above it. The board has adjustable sensitivity up to 20cm.
The LED is on the left, and the detector in the middle.
I sat the sensor below the grille on to of the hard drive. The led and sensor are spaced so the poke up through different parts of the grille.
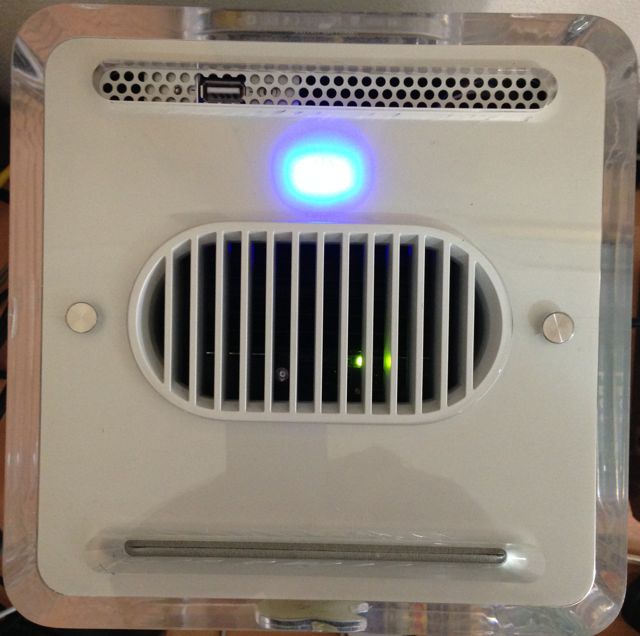
LED Lighting
Then I added some lighting to the top of the case, where the power switch would normally be located. I added four small LED's. One for
- Standby Power
- Power Switch Operation (same as original cube)
- Main Power
- HDD Activity
Screwed into original mounts
From above
And here is what it looks like when assembled and working
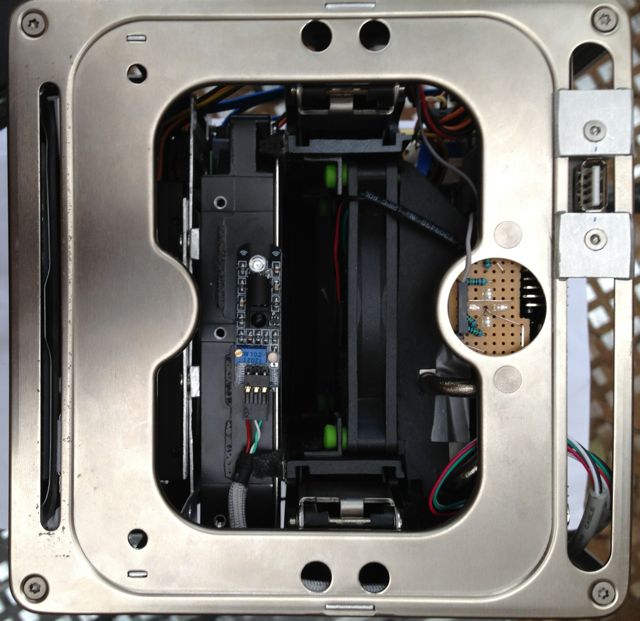
Some Final pics
From Top
One Side
Bottom of Motherboard
Other Side near
Bottom
Fully assemble bed and running
Sorry about the messy desk, its not mine
PS Special thanks to the work of chaos, ersterhernd, minihack, rossi, mactester, sleppek, for pushing the envelope and making this all possible.
Kiwi
Last edited by a moderator:
")