
- Joined
- Dec 28, 2016
- Messages
- 9
- Motherboard
- Gigabyte Z170X-UD5-TH
- CPU
- Intel i6700K
- Graphics
- Gigabyte GTX 980Ti OC Edition
- Mac
- Mobile Phone
t6t's Darkintosh Build:
GA-Z170X-UD5-TH - i7-6700K - GTX 980Ti
GA-Z170X-UD5-TH - i7-6700K - GTX 980Ti
Contents
Components
Motherboard: Gigabyte GA-Z170X-UD5 TH (rev 1.0), Chipset Intel Z170, Socket 1151, 4xDDR4 memory slots, Thunderbolt 3, USB 3.1
amazon.com: https://www.amazon.com/dp/B012N6EW6G/?tag=tonymacx86com-20
amazon.fr: https://www.amazon.fr/dp/B019NFPM5A/?tag=tonymacx8607-21
amazon.fr: https://www.amazon.fr/dp/B019NFPM5A/?tag=tonymacx8607-21
Processor: Intel Core i7 6700K 4.00 GHz Unlocked Quad Core Skylake Desktop Processor, Socket LGA 1151
amazon.com: https://www.amazon.com/dp/B012M8LXQW/?tag=tonymacx86com-20
amazon.fr: https://www.amazon.fr/gp/product/B010T6DQTQ/?tag=tonymacx8607-21
newegg: https://www.newegg.com/Product/Product.aspx?Item=N82E16819117559
Graphic Card: Gigabyte GTX 980Ti OC Editionamazon.fr: https://www.amazon.fr/gp/product/B010T6DQTQ/?tag=tonymacx8607-21
newegg: https://www.newegg.com/Product/Product.aspx?Item=N82E16819117559
amazon.com: https://www.amazon.com/dp/B00YEU8SXI/?tag=tonymacx86com-20
amazon.fr: https://www.amazon.fr/dp/B013J7SGV0/?tag=tonymacx8607-21
amazon.fr: https://www.amazon.fr/dp/B013J7SGV0/?tag=tonymacx8607-21
Memory: 32GB total, with 2x8GB Corsair Vengeance LPX DDR4 2133Mhz + 2x8GB Crucial Ballistix Sport DDR4 2400Mhz
Corsair Vengeance DDR4 2133Mhz:
amazon.com: https://www.amazon.com/dp/B0123ZCD36/?tag=tonymacx86com-20
amazon.fr: https://www.amazon.fr/gp/product/B0123ZCD36/?tag=tonymacx8607-21
newegg: https://www.newegg.com/Product/Product.aspx?Item=N82E16820233831
Crucial Ballistix DDR4 2400MHz:amazon.fr: https://www.amazon.fr/gp/product/B0123ZCD36/?tag=tonymacx8607-21
newegg: https://www.newegg.com/Product/Product.aspx?Item=N82E16820233831
amazon.com: https://www.amazon.com/dp/B01EIDY1EK/?tag=tonymacx86com-20
amazon.fr: https://www.amazon.fr/gp/product/B01DPSQPZW/?tag=tonymacx8607-21
newegg: https://www.newegg.com/Product/Product.aspx?Item=N82E16820156112
amazon.fr: https://www.amazon.fr/gp/product/B01DPSQPZW/?tag=tonymacx8607-21
newegg: https://www.newegg.com/Product/Product.aspx?Item=N82E16820156112
CPU Cooler: Be quiet! Dark Rock 3
amazon.com: https://www.amazon.com/dp/B00HPX7IKU/?tag=tonymacx86com-20
amazon.fr: https://www.amazon.fr/gp/product/B00HPX7IKU/?tag=tonymacx8607-21
newegg: https://www.newegg.com/Product/Product.aspx?Item=9SIA68V21E0632
amazon.fr: https://www.amazon.fr/gp/product/B00HPX7IKU/?tag=tonymacx8607-21
newegg: https://www.newegg.com/Product/Product.aspx?Item=9SIA68V21E0632
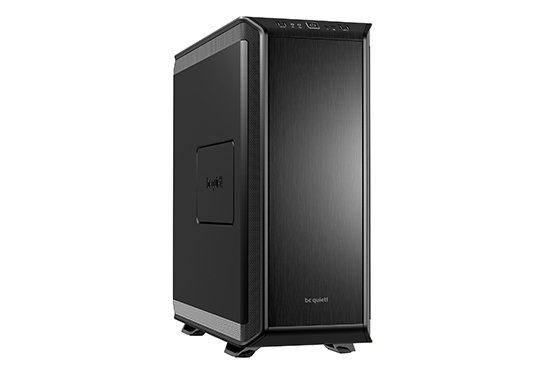
Computer Case: Be quiet! Dark Base 900, black, ATX
amazon.com: https://www.amazon.com/dp/B01H6JQAJ2/?tag=tonymacx86com-20
amazon.fr: https://www.amazon.fr/gp/product/B01H6JQAJ2/?tag=tonymacx8607-21
newegg: https://www.newegg.com/Product/Product.aspx?Item=9SIA68V45G2220
amazon.fr: https://www.amazon.fr/gp/product/B01H6JQAJ2/?tag=tonymacx8607-21
newegg: https://www.newegg.com/Product/Product.aspx?Item=9SIA68V45G2220
Power Supply: Be quiet! Dark Power Pro 11 750W
amazon.fr: https://www.amazon.fr/gp/product/B014QT9J0M/?tag=tonymacx8607-21
newegg: https://www.newegg.com/Product/Product.aspx?Item=9SIA68V39G8679
newegg: https://www.newegg.com/Product/Product.aspx?Item=9SIA68V39G8679
SSD: Samsung EVO 850 500GB Internal SATA III
amazon.com: https://www.amazon.com/dp/B00OBRE5UE/?tag=tonymacx86com-20
amazon.fr: https://www.amazon.fr/gp/product/B00P73B1E4/?tag=tonymacx8607-21
newegg: https://www.newegg.com/Product/Product.aspx?Item=9SIA2W05718017
amazon.fr: https://www.amazon.fr/gp/product/B00P73B1E4/?tag=tonymacx8607-21
newegg: https://www.newegg.com/Product/Product.aspx?Item=9SIA2W05718017
HDD: Western Digital Black 2TB 7200 RPM SATA 6Gb/s 64MB Cache
amazon.com: https://www.amazon.com/dp/B00FJRS628/?tag=tonymacx86com-20
amazon.fr: https://www.amazon.fr/dp/B004CSIG1G/?tag=tonymacx8607-21
newegg: https://www.newegg.com/Product/Product.aspx?Item=9SIA9HJ3JJ4494
amazon.fr: https://www.amazon.fr/dp/B004CSIG1G/?tag=tonymacx8607-21
newegg: https://www.newegg.com/Product/Product.aspx?Item=9SIA9HJ3JJ4494
Monitor: Dell P2715Q IPS 27-Inch Ultra HD 4K
amazon.com: https://www.amazon.com/dp/B00PC9HFO8/?tag=tonymacx86com-20
amazon.fr: https://www.amazon.fr/gp/product/B00R420U8O/?tag=tonymacx8607-21
newegg: https://www.newegg.com/Product/Product.aspx?Item=9SIA6BM4124190
amazon.fr: https://www.amazon.fr/gp/product/B00R420U8O/?tag=tonymacx8607-21
newegg: https://www.newegg.com/Product/Product.aspx?Item=9SIA6BM4124190
USB Key: Samsung 32GB BAR (METAL) USB 3.0
amazon.com: https://www.amazon.com/dp/B013CCTM2E/?tag=tonymacx86com-20
amazon.fr: https://www.amazon.fr/gp/product/B0133GIWB6/?tag=tonymacx8607-21
amazon.fr: https://www.amazon.fr/gp/product/B0133GIWB6/?tag=tonymacx8607-21
Keyboard: Das Keyboard 4 Professional Soft Tactile MX Brown
amazon.com: https://www.amazon.com/dp/B00JG01QTY/?tag=tonymacx86com-20
amazon.fr: https://www.amazon.fr/dp/B00JG01QTY/?tag=tonymacx8607-21
newegg: https://www.newegg.com/Product/Product.aspx?Item=N82E16823830012&cm_re=das_keyboard_4-_-23-830-012-_-Product
amazon.fr: https://www.amazon.fr/dp/B00JG01QTY/?tag=tonymacx8607-21
newegg: https://www.newegg.com/Product/Product.aspx?Item=N82E16823830012&cm_re=das_keyboard_4-_-23-830-012-_-Product
Already Owned
Keyboard: Apple USB Keyboard with Numeric Keypad
amazon.com: https://www.amazon.com/dp/B005DPF08E/?tag=tonymacx86com-20
amazon.fr: https://www.amazon.fr/dp/B006LKOPW2/?tag=tonymacx8607-21
newegg: https://www.newegg.com/Product/Product.aspx?Item=9SIA37820R9880
amazon.fr: https://www.amazon.fr/dp/B006LKOPW2/?tag=tonymacx8607-21
newegg: https://www.newegg.com/Product/Product.aspx?Item=9SIA37820R9880
Mouse: Razer Imperator
amazon.com: https://www.amazon.com/dp/B0054JGGFK/?tag=tonymacx86com-20
newegg: https://www.newegg.com/Product/Product.aspx?Item=9SIA8HF3EJ6402
newegg: https://www.newegg.com/Product/Product.aspx?Item=9SIA8HF3EJ6402
BD Writer: Samsung SE-506BB USB2.0 External Slim Blu-ray Writer Drive
amazon.com: https://www.amazon.com/dp/B00AO1XFM0/?tag=tonymacx86com-20
newegg: https://www.newegg.com/Product/Product.aspx?Item=9SIA6UM3WG4996&cm_re=Samsung_SE-506BB-_-9SIA6UM3WG4996-_-Product
newegg: https://www.newegg.com/Product/Product.aspx?Item=9SIA6UM3WG4996&cm_re=Samsung_SE-506BB-_-9SIA6UM3WG4996-_-Product
Audio Interface: Focusrite Scarlett 6i6 USB (1st gen)
amazon.com: https://www.amazon.com/dp/B00CP4IIJY/?tag=tonymacx86com-20
newegg: https://www.newegg.com/Product/Product.aspx?Item=9SIA4P02MA1723
newegg: https://www.newegg.com/Product/Product.aspx?Item=9SIA4P02MA1723
Comments
Who & Why
I've been a happy Apple customer & user for ~13 years now, owning many different models of iMacs, Macbooks, iPhones, iPads, iPods, Time Capsule(s), you name it. Before, I used to own and build my own "Gamer PCs". Today, I work as a developer, where I use macOS, Linux and Windows machines. At home, I never had a Mac Pro nor a Mac Mini, even though I would have preferred that kind of solution, but Apple always made either oversized & overpriced machines (Mac Pros) or under powered machines (the Minis), at least from my stand point.
My last and now decommissioned Apple desktop is a high-end iMac 27 "late 2009", running El Capitan. I never wanted to upgrade it besides adding memory. It's been a wonderful computer overall, besides the design flaw that allowed dust to get behind the screen glass and stay visible as dirty gray marks. Then its graphic card somehow died (I was able to disable it and keep basic stuff working though) . The internal HDD and boot time became really annoying too, not to mention the array of external hard drives I had to add over time.
So in late 2016, I was hoping and waiting for an iMac refresh, or even may be a new headless Mac desktop? Well... We got overpriced Macbooks with touchbars (yay!), and no desktop love. Meanwhile, mostly thanks to the tonymacx86.com forum and various youtube videos, I realized that the "Hackintosh" path was becoming viable and reliable... So sorry Apple, I've decided to take the plunge!
The Build
This is my first Hackintosh build ever, started and completed in Dec 2016/Jan 2017. The only experience I had with assembling PCs is ~13 years old, when PC cases were beige and when "Silent Gamer PC" was a oxymoron.
My main requirements for this build:
- Versatility: this is my main home computer, so it must be powerful and versatile enough to fulfil all my needs... and more!. This includes:
- Basic personal computer apps: photo management, home videos, watching bluray or digital movies, internet/browser based apps, etc.
- Home studio: I'm a guitar hobbyist, I use a digital rig (Kemper) for my guitars, and this rig is connected to a USB audio interface that's the hub of my home studio, including my computer. All my audio output goes through studio monitors or headphones. I use garage band and other home studio related apps.
- Video conversion and editing: need CPU power for that
- Gaming: my iMac was struggling when gaming, even with BootCamp. I now want a computer that can handle current games with "good enough" settings. No need for VR yet, but my computer should allow me to upgrade when necessary.
- Silence: even though I now have enough room to hide a PC case under my desk, I still want my computer to be as silent as possible, especially when doing basic tasks.
- Ease of setup & stability: because this is my first Hackintosh build, I favor ease of setup and stability over raw power. I want a "no worries" build.
- Upgradability: that's the main problem with iMacs, and I don't want to have this constraint anymore. I want a computer that's easy to service and upgrade, so that I can easily add a new drive, upgrade the graphic card, etc.
- To achieve ease of setup & stability, while enabling versatility & raw power, I made specific choices for the most sensible components for a Hackintosh build: the motherboard, the CPU, and the graphic card. For these components, I first selected the best supported hardware for building a Hackintosh (e.g. as described on tonymacx86), and then I chose powerful components among this supported hardware. In Dec 2016, this meant Intel Slylake i7 6700K, Z170 motherboard (either Gigabyte or Asus), and a GTX 9xx series graphic card since the GTX 10xx drivers were not yet available. Buying the graphic card was quite a challenge, at least here in France, since almost no one was selling this generation anymore. I was lucky enough to find one in a local shop, for a very good price on top of that...
- To achieve silence and upgradability, I decided not to go cheap for components that are supposed to last and stay with you for years even when upgrades happen. That's why I got a couple of components from Be Quiet!: the (huge) PC case, the power supply, and the CPU cooler, which are all designed and built with silence and (German) quality in mind.
Installation Notes
Note: This was originally written with 10.12.2. The upgrade to 10.12.3, 10.12.4, etc. is described in the Extra Steps section.
This is supposedly the most daunting and potentially complex part of this whole story. And actually... OMG, no worries at all! Almost too easy to be true. This is what I did, which can be summarized as "just follow the instructions" (or RTFM):
- Secure a "last" and full backup of my iMac (running El Capitan) with Time Machine.
- Download the nVidia drivers for my new graphic card, to be used with Sierra, as described on tonymacx86.com.
- Download macOS Sierra and the tonymacx86 tools and prepared the USB key as described on tonymacx86.com.
- Strictly follow the "macOS Sierra installation" guide provided by tonymacx86.com.
- For the BIOS configuration, follow the Gigabyte UEFI guide available on tonymacx86.com.
- Finally, after macOS Sierra is OK on the new computer and everything seems to be working correctly, restore my previous macOS configuration (users & documents, network settings, applications) using Time Machine. This last step took some time, but it worked flawlessly as well.
Post-installation concerns:
- I was getting an automatic restart when shutting down the computer from macOS, but I finally solved this problem by plugging in the Dell Monitor USB hub cable to a different USB port. Looks like USB can wake my computer very easily... but now the problem is gone.
- Update 2017-02-19: The auto-restart problem reappeared when I changed the keyboard and used a different USB port. I finally managed to fix it. See Extra Steps.
Extra Steps
I'll be listing here all the extra steps I went through after I originally posted this story. See Updates.
- TRIM mode for SSD: open terminal, run "sudo trimforce enable". After reboot, check SATA/SATA Express settings in System Report.
- Update from 10.12.2 to 10.12.3: no issue at all. Steps:
- Download and install the Sierra update from the App Store
- After rebooting, the graphic drivers won't be used anymore and you'll get the default "low res" display settings
- Open the nVidia Driver Manager, open the Update tab, and start the update process.
- After another reboot, everything is back to normal
- Enjoy!
- Fix the auto-restart happening after a shutdown:
- Problem to solve: when shutting down the machine from macOS, the machine would:
- automatically restart after 2-3 secs,
- and it could start as soon as a key stroke or a mouse action happened.
- Initially, I though this was a hardware or BIOS issue. It's not.
- In order to get a definitive shutdown, without the ability to restart the machine with a a keystroke or a mouse click, I had to:
- Update the CLOVER config (edit the CLOVER/config.plist file), in order to add USB/Inject and USB/AddClockID. This avoids the auto-restart.
- In the BIOS, enable ErP. This avoids the machine from starting with a keystroke or mouse click.
- Problem to solve: when shutting down the machine from macOS, the machine would:
- Update from 10.12.3 to 10.12.4: no issue at all. Steps:
- Download and install the Sierra update from the App Store
- After rebooting, the graphic drivers won't be used anymore and you'll get the default "low res" display settings
- After logging in, the nVidia Driver Manager asked for updating the driver. Cool! Anyway, in case it doesn't ask you: Open the nVidia Driver Manager, open the Update tab, and start the update process.
- After another reboot, everything is back to normal
- Enjoy!
- Update from 10.12.4 to 10.12.5: no issue at all. Same as before. Enjoy!
Summary
Overall, I'm surprised by how smooth and effortless this experience has been, at least so far. Retrospectively:
- the longest part was choosing the right hardware and watching many reviews on youtube before making my final choices;
- the most intimidating step was installing the CPU on the motherboard and then the CPU cooler;
- the most annoying part was the cable management within the case (and I'm lucky, since this is a very good and large case), and then that strange motherboard/memory incompatibility.
What Works
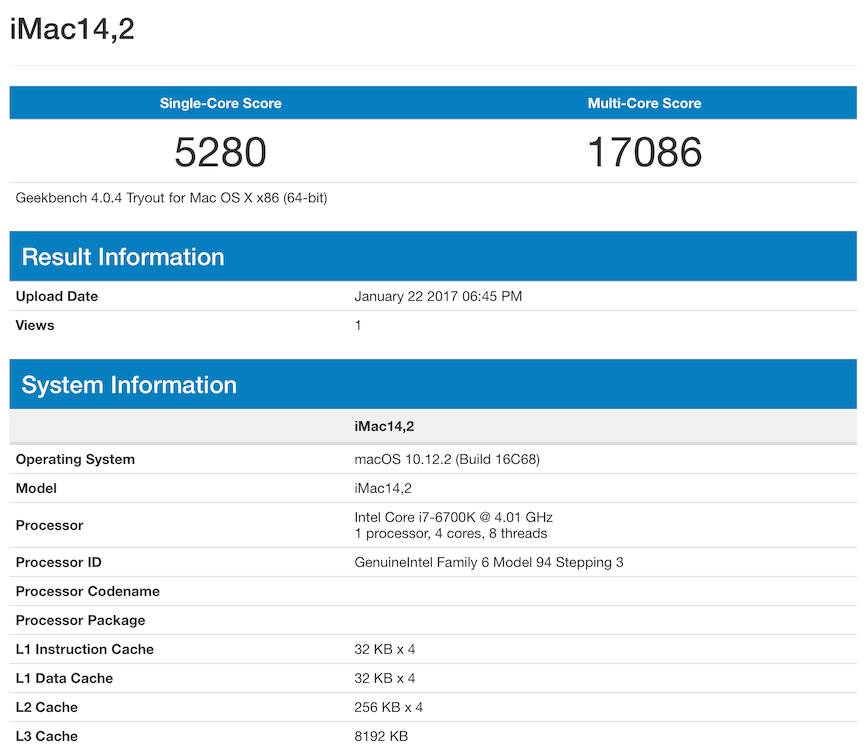
- macOS Sierra 10.12.4 (updated from 10.12.3, updated from 10.12.2), with Core i7 4GHz CPU, 32GB RAM, and GTX 980Ti. No crash or unexpected behavior so far. The computer is configured as a iMac 14,2.

- 4k Display, 3840x2160, 60Hz, through mDP connection

- All the fans (CPU, graphic card, PC case) have their speed automatically adjusted depending on the load. Fan speeds and temperatures of various components (CPU, GPU, HDD, etc.) seem to be correctly reported in iStat Menus. Overall, quite a silent machine under regular load, I'm happy! When pushing the GPU and CPU though... it makes as much noise as my previous iMac under 100% CPU load.
- Audio works as expected, at least through the USB audio interface.
- USB 3 and USB 2 ports, on the back and on the front.
- Apple Keyboard, or Das Keyboard, with some special keys working: mission control, dashboard, iTunes controls.
- Ethernet connection
- Apple software: Time Machine, iCloud, Photos, iTunes
- Non-Apple software: audio interface configuration with Focusrite tools, video playback with VLC, Bluray Disk playback 3rd party player, network monitoring with Little Snitch, system monitoring with iStat Menus, 1Password, etc.
- iBooks: displays an empty frame for non-PDF books. I don't use iBooks on the Mac, I use it on the iPad only. Still, I'll try to fix that.
- Some special keys on the Apple or Das keyboards: brigthness, volume, eject. Not working, but that's expected.
Not Tested
- Audio through the motherboard audio chip and audio ports
- Thunderbolt 3 ports.
- USB 3.1 speeds
- Sleep & Wake-up
- Bluetooth and WIFI networks. I will probably buy a dedicated bluetooth & WIFI card soon, since I have an Apple ecosystem at home, and I could leverage the Continuity features. I'll update this guide accordingly.
Geekbench 4.0.4 - CPU Benchmark
- Single-Core Score: 5280
- Multi-Core Score: 17086
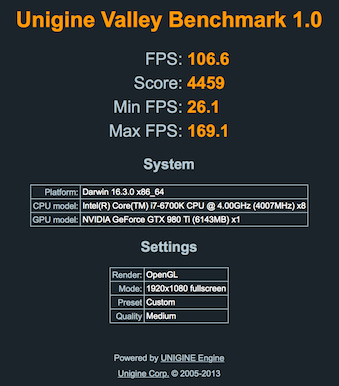
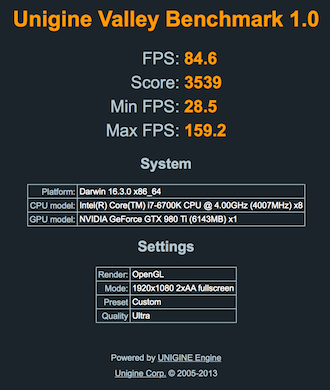
Unigine - Valley Benchmark
- 1920x1080, Medium Quality, AA off: FPS 106.6 - Score 4459
- 1920x1080, Ultra Quality, AA x2: FPS 84.6 - Score 3539
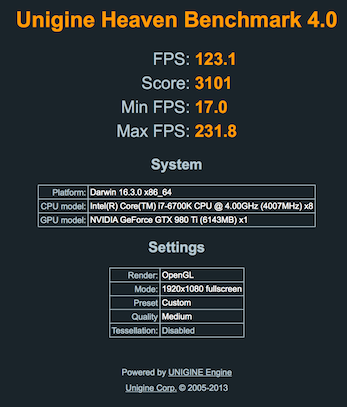
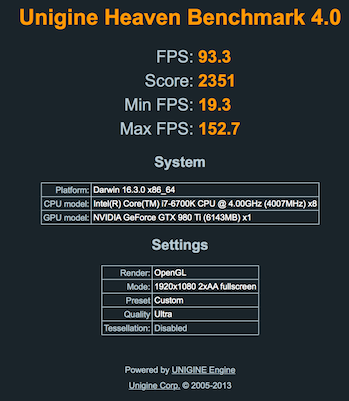
Unigine - Heaven Benchmark
- 1920x1080, Medium Quality, AA off: FPS 123.1 - Score 3101
- 1920x1080, Ultra Quality, AA x2: FPS 93.3 - Score 2351
Updates
- 2017-05-26: Update to Sierra 10.12.5. nVidia update to 378.05.05.15f01. All done through the normal update mechanisms. See Extra Steps
- 2017-04-14: Update to Sierra 10.12.4. nVidia update to 378.05.05.05f01. All done through the normal update mechanisms. See Extra Steps
- 2017-02-19:
- Changed keyboard, from Apple wired keyboard to Das Keyboard 4 Pro
- Fixed the auto-restart issue after shutdown, and the hit-a-key-to-start issue. See Extra Steps
- 2017-02-04: Update to Sierra 10.12.3. nVidia update to 367.15.10.35f01. All done through the normal update mechanisms. See Extra Steps
- 2017-01-29: TRIM enabled on the SSD. See Extra Steps
- 2017-01-22: Initial Post, with Sierra 10.12.2 setup
Last edited:
") I enjoyed reading the details.
I enjoyed reading the details.