Contribute
Register

[Solved] Want to Install Sierra but first RAM slot is defective

Status
Not open for further replies.
Joined
Sep 27, 2015
Messages
10
Motherboard
ASRock h110 - ASRock Deskmini 110W Intel Socket LGA1151 Intel H110
CPU
Intel Core i7 7700
Graphics
Intel® HD Graphics 630
Mac
  1. Mac mini
Mobile Phone
  1. iOS
I have another computer that I recently installed Sierra on and it is working well (less HDMI audio - I have yet to get that working). I tried to install Sierra with same installation USB stick (32 GB) on another of my computers but after Clover tries to run the install from the stick it stops working. I used the -v option and it was trying to load into the first slot of RAM and fails. I discovered that I had damaged the first slot for Ram on the Asus motherboard and I installed 8GB stick in the second slot. This works fine with Windows 10 but not with the USB stick created with UNIBEAST.
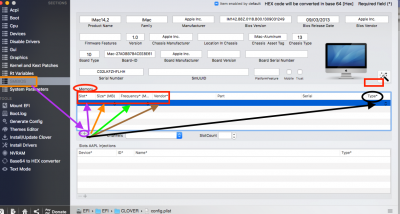
I think that I just have to change the config SMBIOS to have it select the second RAM but I do not know how.
The information on the RAM is:
Total memory slots 2
DDR3 8192 MBytes
DRAM Frequency 798.1 MHz
CAS# Latency (CL) 11 clocks
RAS# to CAS# Delay (tRCD) 11 clocks
RAS# Precharge (tRP) 11 clocks
Cycle Time (tRAS) 28 clocks
Command Rate (CR) 1T
Physical Memory 7.87 GB

DRAM Manufacturer is Samsung
Part number is M471B1G73EB0-YK0
Serial number is 15AEE793
Timings : 800 MHz 11.0-11-11-28​
Many thank in advance for any help.
 
@daniel417, please update your profile (personal details) with your build (Motherboard or Model, CPU and Graphics Card).
The Rules said:
Profiles need to contain at least your primary system to assist others with helping you.

I used the -v option and it was trying to load into the first slot of RAM and fails.
Boot your system in Verbose Mode and post a picture of your screen when it freezes/hangs.
At Clover Boot Screen press space bar and select Verbose (-v)
 
I updated my profile to include the hardware for this build. Since I am using the system with Windows 10, I had to resent the BIOS for the install. I used the both with and without the Verbose (-v). Attached are the two screens I took with my iPhone.
 

Attachments

  • IMG_0221.JPG
    IMG_0221.JPG
    2.1 MB · Views: 563
  • IMG_0220.JPG
    IMG_0220.JPG
    2.1 MB · Views: 453
I updated my profile to include the hardware for this build. Since I am using the system with Windows 10, I had to resent the BIOS for the install. I used the both with and without the Verbose (-v). Attached are the two screens I took with my iPhone.
In the initial post you stated
I discovered that I had damaged the first slot for Ram on the Asus motherboard and I installed 8GB stick in the second slot
How did you "damage" the slot without damaging the RAM module? Did you switch the RAM and confirm it's not the RAM module but actually the Socket that is damaged?

Can you upload a good picture of both slots together and the suspected slot both in normal distance and closeup view?

I don't know if Clover EFI bootloader will skip Socket #1 and check the "Good RAM in socket #2" and continue booting if config.plist is edited.

I can upload images of Memory editing of config, plist >SMBIOS using Clover Configurator. I have not attempted to bypass socket 1 to see if that will work. You may try and report.
First, find the Specifications of RAM as you can read from the module or Sales inventory [see uploaded image and check items in asterisks (*) for required items]
  • Insert USB Installer in the USB port of the Computer it was created.
  • Download and launch Clover Configurator-Vibrant Edition(CC-V):http://mackie100projects.altervista.org/download-mac.php?version=vibrant in that system
  • "Mount EFI" from the Left panel of CC-V window.
  • Locate your "Sierra USB installer" in the bottom half of CC-V window and click "Mount Partition" button from its Right end
  • Locate the EFI partion mounted on the desktop
  • Navigate to /EFI/EFI/CLOVER/config.plist and open with CC-V
  • Go to "SMBIOS " menu on the Left Panel and click it open .
  • Locate Memory section. (see image)
  • Click the + (plus sign ) and type the RAM socket and RAM module information you have noted from your Motherboard
 

Attachments

  • SMBIOS_Memory _editing.png
    SMBIOS_Memory _editing.png
    322 KB · Views: 784
I updated my profile to include the hardware for this build. Since I am using the system with Windows 10, I had to resent the BIOS for the install. I used the both with and without the Verbose (-v). Attached are the two screens I took with my iPhone.
  • I reproduced the exact same error message by removing one 8GB module of RAM from Socket #1 (RAM socket closest to CPU) on my system running macOS Sierra 10.12.5 ( in multi-disk-multi-boot with Windows 10 + Ubuntu Studio)
  • MoBo:GA-H61M-HD2+CPU:Intel Celeron G1610+Graphics card ATI Radeon 5450
  • Before removing the 8GB module from the system I had taken an image of Apple>System Report...>Hardware>Memory which is uploaded . It shows the 8GB Crucial DDR3 1600MHZ RAM in Socket 1 and socket 2.
  • When I booted the computer without any RAM in socket 1 , using a MacOSSierra 10.12.4 USB installer with only 1 SATA HDD connected to the System and selected the USB installer from F12 boot screen, there was an immediate kernel panic with Identical error message . ( i did not take a screen shot - my camera was not within my reach at that time.)
  • I shut down the computer.
  • Reinserted the removed RAM module and connected all my drives and booted into Hackintosh sierra.
  • I ran CC_V and mounted the EFI of my Sierra 10.12.4. USB installer disk and opened its config.plist in CC-V
  • In SMBIOS I edited the Memory section with details of RAM module shown in System Report...>Hardware>Memory (see images)
  • I shut down and Removed the RAM again from Slot #1 with single 8GB RAM in socket #2.
  • I rebooted with the edited Sierra 10.12.4 USB installer
  • This time it booted all the way to Installation screen without any kernel Panic
Conclusion:

  • Absence of RAM in socket #1 either because of damage to RAM , improperly inserted RAM or damage to # 1 socket can cause the KP with "Zone_init:kmem_suballocat failed....
"can't perform kext scan : no kext summary " and failure to boot in Hackintosh with Clover EFI
  • Editing the SMBIO>Memory section with omission of socket #1 and adding RAM details in other socket can solve the KP and allow booting to installation screen
I expect the OP to successfully reach installation screen with the SMBIO editing
 

Attachments

  • Installed RAM .png
    Installed RAM .png
    71.6 KB · Views: 869
  • config.plist>CCV_SMBIOS_Memory Edited.png
    config.plist>CCV_SMBIOS_Memory Edited.png
    279.3 KB · Views: 713
Thank you very much. I will try this tomorrow. I have to take care of my elderly parents today.
 
Thank you very much. I will try this tomorrow. I have to take care of my elderly parents today.
I tried the changes that you suggested and I used the -v option. It went as far as the Apple logo with the progress bar beneath it but nothing happened on the progress bar after 45 minutes so I simply turn off the computer. I never got the panic but after 45 minutes with the Apple logo and no change on progress bar I figured something must be wrong.
 
I tried the changes that you suggested and I used the -v option. It went as far as the Apple logo with the progress bar beneath it but nothing happened on the progress bar after 45 minutes so I simply turn off the computer. I never got the panic but after 45 minutes with the Apple logo and no change on progress bar I figured something must be wrong.
The previous troubleshoot was only to bypass the first empty RAM slot causing the KP and reach Clover Bootloader or installation screen . Problems for the second stage of Installer booting starting from Clover Boot Manager to Installation Screen to launch the Disk Utility may depend on other parts of CLOVER and kext files in the macOSSiera Installer USB Flash disk.

  • If you can upload the CLOVER folder without its "themes" sub folder as a compressed file to the Forum, someone can take a look at its contents and possibly suggest the next best step

  • To get the CLOVER folder of your USB installer, you have to first 'mount' the EFI partition of the USB installer Disk on the desktop and navigate /EFI/EFI/CLOVER
  • With CC-V, mount the EFI partition of the USB installer on the Desktop.
  • Navigate to EFI/EFI/CLOVER/themes and temporarily save a copy of "themes" to Desktop and then Trash "themes" folder from CLOVER so that CLOVER will be a smaller file for the upload.
  • Right click "CLOVER" >Compress CLOVER
  • Upload the Compressed CLOVER file to the Forum
Attached is the archived Clover from the USB installation drive. Thank you in advance for all the excellent advice.
 

Attachments

  • Archive.zip
    1.2 MB · Views: 128
Attached is the archived Clover from the USB installation drive. Thank you in advance for all the excellent advice.

I don't have your Motherboard , therefore my suggestions regarding BIOS options changes may not be EXACTLY Specific word for word, but generic, that you need to modify for your Asus MoBO
  • Since you have Intel HD 4600 Graphics : I hope you have already made the BIOS Setup options as:" "primary display from iGPU"
  • "System memory allocated to DVMT": 64M
  • In your Config.plist I have edited and added ig-platform-id for Intel HD 4600 as
    ig-platform-id [0x0D220003] in the "Graphics" section of the config.plist
  • I have noted the following on your config.plist:
    • "Boot" section: nv_diasable=1 [ This is not needed; but I don't think will be the cause of your current issue]
    • Gui section: Legacy =Yes (True) is chosen . If you don't have a system in Legacy mode this is not necessary.
    • Rt Variables : I edited CsrActiveConfig from 0X3 to 0x67 fully disable to facilitate kext installation.
  • I am uploading the edited CLOVER as zipped file for you to download and save.
  • Keep a copy of your Original Clover somewhere just in case my edited file does not help and you want to restore the original.
  • Then Unzip and copy the edited CLOVER to replace the existing one and try to boot with it.
  • Hope it will solve your problem
 
Status
Not open for further replies.
Back
Top