Contribute
Register

My Hackintosh Pro

Status
Not open for further replies.
Build Update:

So, I got almost all of my components, including the motherboard tray, I/O Cable, and internals in this week. I got started on the build tonight, but got cut short by my wife when the dremel was making too much noise while the baby was sleeping. Anyways, take a look below:

Here's everything all laid out before I started assembly, but after the teardown of the interior of the G5.

IMG_1283.jpg

The shelf fits PERFECTLY over the Corsair PSU. It was really really really close, so I'm very pleased.

IMG_1286.jpg

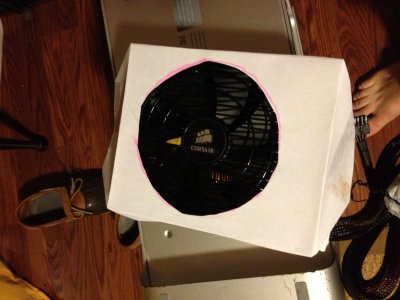
Making a guide to the spot where the fan is.

IMG_1290.jpg

Cutting it out.

IMG_1292.jpg

After cutting the circle out of the shelf with a dremel.

IMG_1293.jpg

Here's the PSU mounted in the case with the fan exposed by the cut hole.

IMG_1295.jpg

Here's what it looks like from the side. Obviously the case is upside down in this picture.

IMG_1296.jpg

As I said, I got stopped by my Wife this time around, but our daughter is sleeping over at Grandma and Grandpa's tomorrow, so I'm hoping to get farther in the process tomorrow night.
 
Lol, damn dude. that looks the opposite of "mini". We'll see, I'm not sure what I'll end up doing yet.

Well, if you really haven't decided, let me throw in some confusion since you are "essentially" making the machine I would be making if I hadn't gotten old and unemployed. Take another look at my Mac-Mini. Now look at this: http://www.macmall.com/p/7032217 And follow this link to the MountainMods side panel http://www.mountainmods.com/525-opti...age-p-540.html

What I've been thinking of doing was to put a stack of those in the wasted space of the G5 case. (i.e. between the ATX and the front.) Remember, I plan on using that four inch by one and a half inch tall by ten inches long 700 Watt 1U Power Supply hidden inside the case that used to contain the original Power Supply. I'll still have two disc drives above the top shelf (and those are NOT flimsy drive holders, they are actually quite elegant.) So those two, and MacMall just sent out an Ad for a 500 gigabyte Solid State Drive for about $70.00. And the new 4 Terabyte drive that is coming tomorrow in the mail, and a bunch of 1T and 2T drives should make that box sing!

But we were talking about what I thought might be nice. Those IStarUSA drive enclosures are fantastic! They are solid extruded aluminum and they suck the heat away from the drives. There is an optional 40mm fan available for the back which has a non-standard connector and is wired backwards, but that is trivial, and the engineering on the rest of it is stupendous. What I thought I might do is to stack 6 or 8 of them in the unused space and wire them with the SATA cables with 8 connectors that Amazon sells. It isn't clear whether they need cooling, but inside a sealed case they probably need a little. But believe me it is fantastic to have all the drives in these Hot-Swap Enclosures.

There is one other tiny thing about this. The clear Plastic Cover needs to have the bubble cut out. But again, that's trivial and it means that you can change the drives without opening the cover.
 
Honestly, I doubt I'll use the clear plastic at all. I don't really see any advantage to it. Good luck with your build though, you seem to know exactly what you want to do with it.
 
Build Update...

More cutting this evening.

Laying out the corner cut on the mountain mods back panel.

IMG_1298.jpg

Another angle further back of where the cut will be on the corner. I drilled out the corner to get the curve.

IMG_1299.jpg

Post cutout with a little bit of filing to smooth the edges down a bit.

IMG_1300.jpg

Where i'll be cutting. The Pink was the outline of the plate itself and the pencil is where I planned on cutting.

IMG_1301.jpg

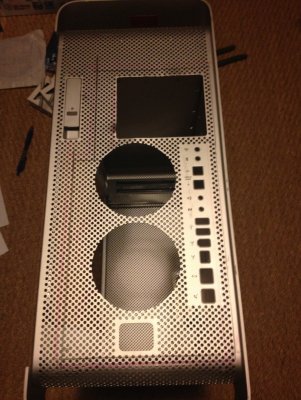
Here is the mobo tray attached to the I/O backplate resting inside the case. It barely fits underneath the shelf. If you look closely you can see that I've mounted 3 support standoffs on the left.

IMG_1302.jpg

View from behind with I/O panel mounted.

IMG_1305.jpg

I JB Welded the 3 mounts inside the case. The PSU is holding the I/O plate and Mobo tray "all the way in" aka Flush with the back of the case. I piled everything else from the build including the HDD's, Mobo, and also an Xbox inside the case to hold the standoffs down into the JB weld.

IMG_1307.jpg

My plan is to butter around the standoffs tomorrow morning and let them set up. I also realized that I accidentally cut out slightly too much of the back case when I was getting ready to mount the rear I/O panel. I'm hoping that I'll be able to get something like this to lock it cleanly into the rear of the case:

http://www.fiatplus.com/product.php?mode=vote&productid=297407&vote=&js=n

The other option I can think of is to solder/JB weld the I/O panel directly into the case, but that will make it essentially impossible to ever get my PSU and/or optical drive out, so that's sort of a last resort. If you have any suggestions, let me know! Hope you like what you see so far.
 
Cool Stuff, Nergin.
 
Nice mounting of the motherboard ersterhernd,

But ... why not use the double sided tape they use for carpet ?
It's ultra thin and super strong (if the aluminum is cleaned well)

The great advantage is you can immediately go further and if something is not exactly in the right place it's still
replaceable (not easy do, but it's possible)
 
Build Update...

In order to give my PSU a bit firmer hold in the case, I added some L brackets. I JB Welded them to my top shelf.

IMG_1308.jpg

Another shot of the bracket. They're actually "mirror hooks".

IMG_1309.jpg

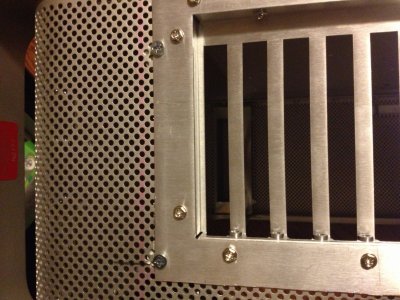
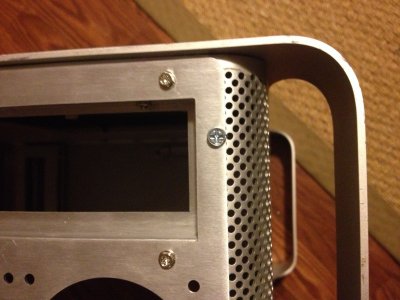
As I said, my hole was slightly bigger than it should have been in order to use the holes. I ended up using some spare washers I had from another project and it locked the rear plate into place perfectly. I couldn't be more pleased with how it fit.

IMG_1311.jpg

What it looks like from the outside.

IMG_1312.jpg

The bottom.

IMG_1313.jpg

From the inside.

IMG_1315.jpg

When I mounted the tray in there and got everything settled, I was tugging at the mobo tray and one of the standoffs popped off. In response I reseated it where it had been and then buttered around all 3 of the standoffs that I JB Welded to the tray. It got messy.

IMG_1318.jpg

Second standoff...

IMG_1319.jpg

Case with buttered JB Weld. I have to say, everything put together has been pretty cool looking until I accidentally popped off one of those stands. It seems to me like it'll look good when it's all said and done.

IMG_1320.jpg

Next steps:

Because of the tight fit between the mobo tray and the top shelf, I have to have the top shelf installed prior to installing the tray, which means I need to get my C14 socket and 90 degree plug to fit the PSU in it's spot. I also realized that my case didn't come with any of the optical drive mounting screws, so I hopped on ebay and ordered a set for the blueray drive that I bought. Although that can be installed later on in the build process, I'm a little bit frustrated that I can't take care of it right now.

Once I have the top tray finished with the PSU in place, I'll be able to reconnect the rear I/O and mobo tray and begin actually mounting components to the tray. I did go through and mount two of the fans on the rear panel, so that They're good to go when I start hooking things up. I also went through and mounted my fans to the heatsink, so they'll be push/pulling through the heat sink.

At this point, I've got the front I/O cable, so as soon as I can get everything sorted out with the PSU and the top shelf, this build will really start moving quickly. All of my cutting of the case is done at this point except the PSU socket, so that's a good feeling. At this point, I can't wait to get my stupid socket so that I can finish off the top shelf and start reassembly the case in a more meaningful way. Good progress this weekend, but the case kept throwing up roadblocks that I hadn't planned for. Oh well, let me know if you have any thoughts.
 

Attachments

  • IMG_1317.jpg
    IMG_1317.jpg
    1.1 MB · Views: 195
imitationbonsai, sorry that I didn't answered you messages. I changed my notification setting and see now if you wrote me ;)
But you can also ask me here or in my thread.
 
Haha, no worries. I didn't want to clog up the thread with questions. I'm just sort of torn on deciding how to mount the fans/hdds, otherwise I think I've got a roadmap. I'm just torn on the HDD/front fan mounts and the prices. I like how you did yours, but I can't see how you mounted that bottom fan, you have the double in the front...

I got one of my bosses to cut me out some fan mounts with his router, but I'm not sure how to mount those to the cage, or even if I want to purchase a cage that needs external mounts, etc.
 
Status
Not open for further replies.
Back
Top