Contribute
Register

My Hackintosh Pro

Status
Not open for further replies.
I wouldn't mount the back panel first, just position it.
It's important to cut the back first, so that the MB tray can be placed to very end of the case / over the edge of the cutted back!!

So it is:
1. cut the back
2. mark and drill holes for the MB tray
3. mark and drill holes for the back panel
 
I was using my own tray that I cut out an old ATX case (actually chopped into 2 pcs) to match up to the existing 4 PCI slots in the G5 Case. I suppose you could do the same with the MM tray. The method I used permanently and securely attaches the tray to the back wall of the case.

I adjusted the height off the back of the G5 with numerous small wafers of aluminum plating (less than 1/16" thick). This allowed me to test by installing PCI-E cards for proper height fitment. Then when I had the right height, I JB Welded several stacks of the pieces to the rear of the motherboard tray and let it harden for a day.

IMG_3105.JPG


When installing the tray into the case, I attached the motherboard to the tray, then JB Welded the wafers to the case, installing the PCI-E cards at the same time for an absolutely guaranteed fit while the JB hardened. With MB and PCI-E cards in place, I place heavy weights onto the assembly while it hardened to the case wall. I left it for 24 hours.

IMG_3106.JPG


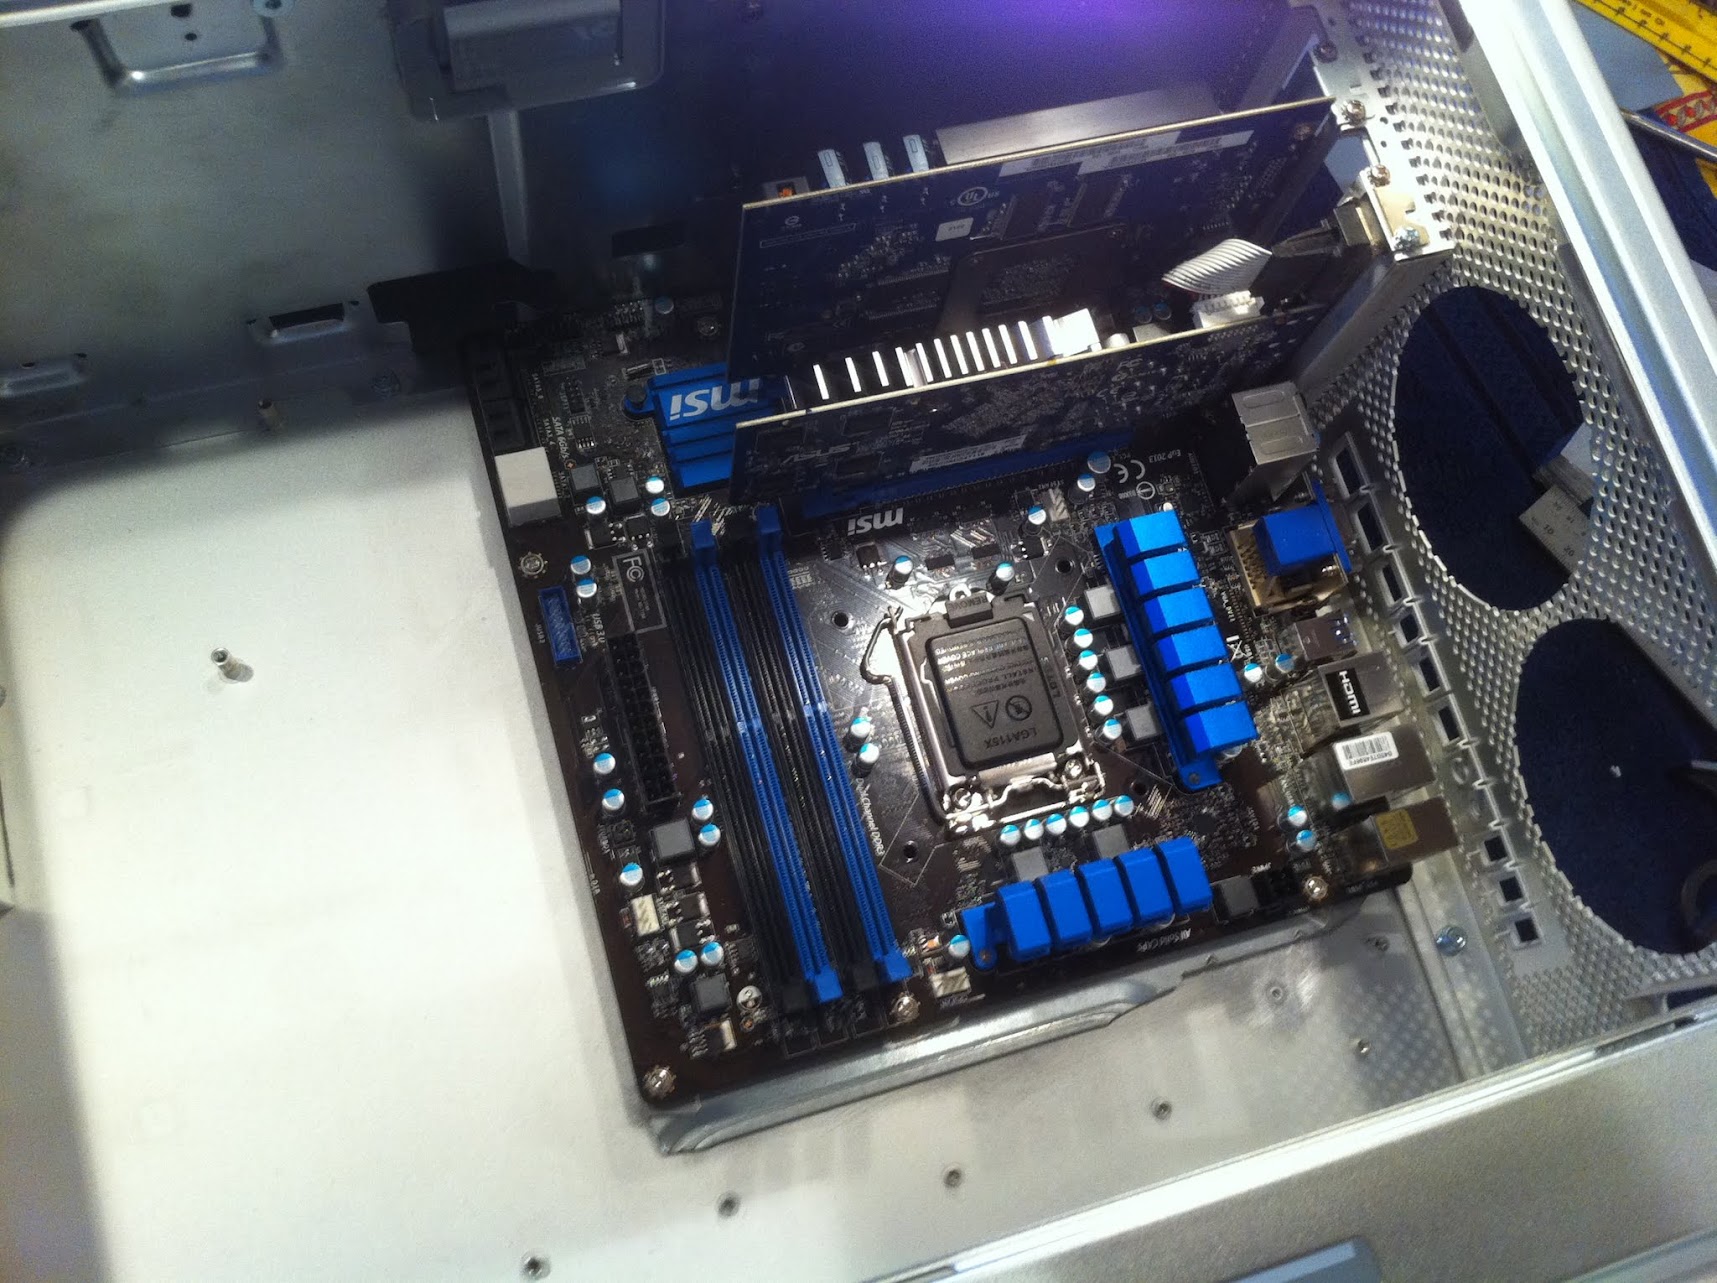
After it hardened and I removed the hardware, the result was a perfectly aligned motherboard tray at exactly the correct height to match up with the PCI slots. Its not elegant, but would later be completely concealed by other plating and the MB. You can see in the pic the 8 required brass standoffs in perfect and permanent position for my micro atx board. Oh, and the best part was it was free!

IMG_3119.JPG


View with Motherboard and PCI-E cards intsalled...

IMG_3103.JPG


Something like this method might work for your MM tray, I'm not sure. One thing for sure, its not gonna move once its in...
 
Thanks for the thoughts guys. My MM assembly is supposed to be here by Friday. Even though I ordered it a few weeks ago, they were milling more pieces when I ordered, so they only just shipped it out on last Friday. The rest of the parts should be here by Wednesday, so I get to be impatient until the weekend basically :banghead:. I just hate the :beachball:.

I think it'll be clearer once I get my hands on everything. The way that Erster did it was what I was thinking in my head I would have to do with the MM assembly. I just want it to be clean and perfect. I'm not terribly worried about being able to take it back out of the case.The way that Dschjin explained it makes sense, I'm just nervous about cutting and ruining the case that I've already spent a bunch of money on between the MM tray, the case itself, and the front i/o cable. If it doesn't work out I'll probably just end up bolting it into a case from Newegg for ATX cases, but for now I'm a mix of what is probably hopeful and overconfident in my skills.
 
Do you guys have any thoughts on this as an HDD rack?

http://www.newegg.com/Product/Product.aspx?Item=N82E16816111045

I found one of the Lian Li ones, which have been discontinued on Newegg, on Amazon but it's about 80 bucks which is more than I want to spend for a drive caddy, which is essentially all it is to me. I like the cleanliness of the hot swapping option because you can hide the SATA cables pretty well, but I don't like it 80 dollars worth.

I wish there were some other option, but I have yet to see one that's reasonably priced. I'd probably want to move the fan around to the side of the rack as my plan is to pull air from the front and exhaust it out the back.
 
Whoa. Was cruising through G5 builds just looking around and someone linked this:

http://www.thelaserhive.com/products/hot-swap-disk-drive-enclosure/

It's basically exactly what I was looking for. Unfortunately it's a little pricey. At the end of the day, I think this is probably what I'll end up going with just because it looks so clean and it'd be easy to push/pull fans on either side of it to add to the case cooling.
 
I decided to try my hand at finding/fabbing my own simply due to the price and overseas nature of the laser hive version. Minihack used one that was black and really nice looking in one of his builds apparently, so I sent him a PM to see if he remembered where he got the cage.

I ordered the Corsair 6 gb/s Backplane that other people have used. Should make everything nice and clean!

http://www.corsair.com/us/pc-cases/...idian-series-800d-sata-6gbps-upgrade-kit.html
 
I ordered the Corsair 6 gb/s Backplane that other people have used. Should make everything nice and clean!

http://www.corsair.com/us/pc-cases/...idian-series-800d-sata-6gbps-upgrade-kit.html

At this point you might want to go back to Mountain Mods to buy the side panels they sell. (let me find my links and I'll modify this post to show you what I mean.

This is my Mac Mini with its nine and a half Terabytes attached. There is a stack of five hard drive trays joined together by side panels from Mountain Mods.

http://www.mountainmods.com/525-optical-drive-cage-p-540.html
 

Attachments

  • IMGP1610.jpg
    IMGP1610.jpg
    1.1 MB · Views: 1,664
Lol, damn dude. that looks the opposite of "mini". We'll see, I'm not sure what I'll end up doing yet.
 
Status
Not open for further replies.
Back
Top