- Joined
- Jan 18, 2013
- Messages
- 50
- Motherboard
- GA-Z77X-UP5 TH
- CPU
- Intel Core i7-3770K
- Graphics
- nVidia GeForce GTX 660 Ti
- Mac
- Classic Mac
- Mobile Phone
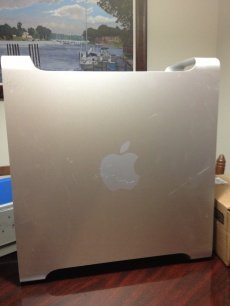
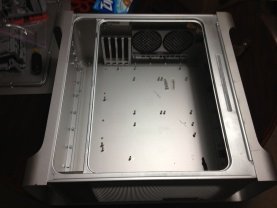
Well, after doing A LOT of reading, I've decided to get started. I got a G5 case online from ebay for 20 bucks. The majority of it was stripped already, which basically just saved me a bunch of time. Once it arrived I thought it was funny to find that they had missed one sticker, apparently my G5 used to be a RISD owned computer. Will grab a picture if I get a chance.
I haven't decided exactly what my plan is as far as how I want to style the case, but I've got emails in with several powder coating companies around the state. I'm thinking a Navy and White Color Scheme could be pretty cool. Obviously, I'll plan on doing some cable management with the final build.
Here's my parts list so far:
GIGABYTE GA-Z77X-UP5 TH LGA 1155 Intel Z77 HDMI SATA 6Gb/s USB 3.0 ATX Intel Motherboard with Dual Thunderbolt
I knew I wanted the Thunderbolt and it was pretty reasonably priced. Moreover, it was even recommended as one of the more compatible OS X boards here on Tonymac.
Intel Core i7-3770K Ivy Bridge 3.5GHz (3.9GHz Turbo) LGA 1155 77W Quad-Core Desktop Processor Intel HD Graphics 4000 BX80637I73770K
Pretty straightforward. Currently ranked 30th overall I believe.
EVGA 02G-P4-3660-KR GeForce GTX 660 Ti 2GB 192-bit GDDR5 PCI Express 3.0 x16 HDCP Ready SLI Support Video Card
I decided to only do one for now, but it's SLI ready and has the best bang for the buck in my opinion.
G.SKILL Ripjaws X Series 32GB (4 x 8GB) 240-Pin DDR3 SDRAM DDR3 1600 (PC3 12800) Desktop Memory Model F3-1600C9Q-32GXM
Straight forward. Unfortunately, my mobo only supported ram up to 1600, which is substantially below the current max, but w/e.
LG Black 12X Blu-ray Combo Drive SATA Model UH12NS29 - OEM
Straightforward.
Two * Seagate Barracuda ST31000524AS 1TB 7200 RPM SATA 6.0Gb/s 3.5" Internal Hard Drive -Bare Drive
One for Windows and one for OS X. I prefer not to partition. I will likely upgrade to SSD's eventually, but at this point they're too expensive to give me the space and bang for buck value I was looking for.
COOLER MASTER Hyper 212 Plus RR-B10-212P-G1 "Heatpipe Direct Contact" Long Life Sleeve 120mm CPU Cooler Compatible with Intel ...
Heatsink had great reviews and I don't really plan on doing much OC'ing if any.
Two AeroCool Shark Fan 12cm White Edition 120mm White LED Case Fan
I got two of these so that I could replace the stock fan on the heatsink and could add the second one to do a push pull setup. I'm not a huge fan of the LED's but it looked like the best bang for the buck and I wanted to keep all of the fans white because I'm OCD about random things.
Two GELID Solutions FN-TX08-20 80mm Case cooler
For the rear of the case to go with the Mountain Mods Mobo-Tray and Rear Panel.
Mountain Mods Modular Removable Motherboard Tray
This one looked ideal to me as I wanted to have full functionality from my ATX Mobo.
Front I/O Panel Cable so that I didn't have to pin one out myself.
From Alohacab over at InsanelyMac.
TP-LINK TL-WDN4800 Dual Band Wireless N900 PCI Express Adapter, 2.4GHz 450Mbps/5GHz 450Mbps, IEEE 802.1a/b/g/n, WEP/WPA/WPA2
Should be natively recognized as an Airport Wifi Card.
Bluetooth
I also bought an Apple Bluetooth card off of ebay in case the onboard bluetooth that the mobo offers can't get working correctly. I found a walk through of how to install it here:
View attachment How_To_Add_an_Apple_Bluetooth_module_to_your_PC.pdf
Pre-Teardown Pictures...


Here's the pic following removal of all of the guts except the standoffs. I figure I'll get to them once I have the mobo tray in which should arrive sometime this week.

I will do my best to continue to document the build as it goes. Thanks for looking.
I haven't decided exactly what my plan is as far as how I want to style the case, but I've got emails in with several powder coating companies around the state. I'm thinking a Navy and White Color Scheme could be pretty cool. Obviously, I'll plan on doing some cable management with the final build.
Here's my parts list so far:
GIGABYTE GA-Z77X-UP5 TH LGA 1155 Intel Z77 HDMI SATA 6Gb/s USB 3.0 ATX Intel Motherboard with Dual Thunderbolt
I knew I wanted the Thunderbolt and it was pretty reasonably priced. Moreover, it was even recommended as one of the more compatible OS X boards here on Tonymac.
Intel Core i7-3770K Ivy Bridge 3.5GHz (3.9GHz Turbo) LGA 1155 77W Quad-Core Desktop Processor Intel HD Graphics 4000 BX80637I73770K
Pretty straightforward. Currently ranked 30th overall I believe.
EVGA 02G-P4-3660-KR GeForce GTX 660 Ti 2GB 192-bit GDDR5 PCI Express 3.0 x16 HDCP Ready SLI Support Video Card
I decided to only do one for now, but it's SLI ready and has the best bang for the buck in my opinion.
G.SKILL Ripjaws X Series 32GB (4 x 8GB) 240-Pin DDR3 SDRAM DDR3 1600 (PC3 12800) Desktop Memory Model F3-1600C9Q-32GXM
Straight forward. Unfortunately, my mobo only supported ram up to 1600, which is substantially below the current max, but w/e.
LG Black 12X Blu-ray Combo Drive SATA Model UH12NS29 - OEM
Straightforward.
Two * Seagate Barracuda ST31000524AS 1TB 7200 RPM SATA 6.0Gb/s 3.5" Internal Hard Drive -Bare Drive
One for Windows and one for OS X. I prefer not to partition. I will likely upgrade to SSD's eventually, but at this point they're too expensive to give me the space and bang for buck value I was looking for.
COOLER MASTER Hyper 212 Plus RR-B10-212P-G1 "Heatpipe Direct Contact" Long Life Sleeve 120mm CPU Cooler Compatible with Intel ...
Heatsink had great reviews and I don't really plan on doing much OC'ing if any.
Two AeroCool Shark Fan 12cm White Edition 120mm White LED Case Fan
I got two of these so that I could replace the stock fan on the heatsink and could add the second one to do a push pull setup. I'm not a huge fan of the LED's but it looked like the best bang for the buck and I wanted to keep all of the fans white because I'm OCD about random things.
Two GELID Solutions FN-TX08-20 80mm Case cooler
For the rear of the case to go with the Mountain Mods Mobo-Tray and Rear Panel.
Mountain Mods Modular Removable Motherboard Tray
This one looked ideal to me as I wanted to have full functionality from my ATX Mobo.
Front I/O Panel Cable so that I didn't have to pin one out myself.
From Alohacab over at InsanelyMac.
TP-LINK TL-WDN4800 Dual Band Wireless N900 PCI Express Adapter, 2.4GHz 450Mbps/5GHz 450Mbps, IEEE 802.1a/b/g/n, WEP/WPA/WPA2
Should be natively recognized as an Airport Wifi Card.
Bluetooth
I also bought an Apple Bluetooth card off of ebay in case the onboard bluetooth that the mobo offers can't get working correctly. I found a walk through of how to install it here:
View attachment How_To_Add_an_Apple_Bluetooth_module_to_your_PC.pdf
Pre-Teardown Pictures...


Here's the pic following removal of all of the guts except the standoffs. I figure I'll get to them once I have the mobo tray in which should arrive sometime this week.

I will do my best to continue to document the build as it goes. Thanks for looking.


