
You are using an out of date browser. It may not display this or other websites correctly.
You should upgrade or use an alternative browser.
You should upgrade or use an alternative browser.
Mac G5 Conversion - Noob attempt
- Thread starter janyon
- Start date
-
- Tags
- mac g5 mod
- Status
- Not open for further replies.
- Joined
- Dec 24, 2012
- Messages
- 143
- Motherboard
- H81M-H
- CPU
- i7-4770
- Graphics
- HD7950
- Mac
- Mobile Phone
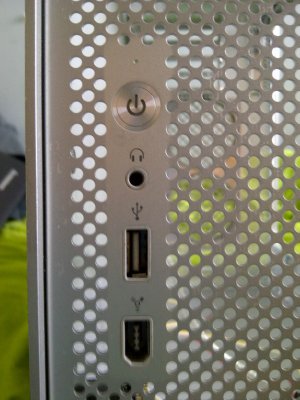
So today I've rewired the switch, LED and USB port, using route arounds.


This is what I did what with the USB port... I tore out the old one and epoxied this one in place, I plan to buy a USB header with a USB port prewired, this will be wired out of site somehow.


Because I tore out the USB port I had to wire up the power button and LED, wasnt hard really. I'll do a diagram soon for anyone who might need it") .
.
I'll be painting the rest a little later on.
This is what I did what with the USB port... I tore out the old one and epoxied this one in place, I plan to buy a USB header with a USB port prewired, this will be wired out of site somehow.
Because I tore out the USB port I had to wire up the power button and LED, wasnt hard really. I'll do a diagram soon for anyone who might need it
. I'll be painting the rest a little later on.
- Joined
- Dec 24, 2012
- Messages
- 143
- Motherboard
- H81M-H
- CPU
- i7-4770
- Graphics
- HD7950
- Mac
- Mobile Phone
So I've just painted the rest of the case, it's downstairs drying now
 Before...
 Drying...
Anyway, heres that wiring diagram for the front switch and LED:

I've read that -PW and -LED are interchangeable, but don't quote me on that
More tomorrow
Before...Drying...Anyway, heres that wiring diagram for the front switch and LED:
I've read that -PW and -LED are interchangeable, but don't quote me on that
More tomorrow
- Joined
- Dec 24, 2012
- Messages
- 143
- Motherboard
- H81M-H
- CPU
- i7-4770
- Graphics
- HD7950
- Mac
- Mobile Phone
Case is all dry now, the finish isn't too bad. I also put the power button and front IO back in place as I expect my dremel stuff soon.

 As you can see, it's not terrible, if I get unhappy with it I still have some of the dark grey left over so no worries there .

 I also put the small silver 'shield box' over the back and cut out a section for the USB port.
I might put my PC inside of there and wire it up just to test it all out - if I can find a USB header somewhere....
As you can see, it's not terrible, if I get unhappy with it I still have some of the dark grey left over so no worries there .I also put the small silver 'shield box' over the back and cut out a section for the USB port. I might put my PC inside of there and wire it up just to test it all out - if I can find a USB header somewhere....
- Joined
- Dec 24, 2012
- Messages
- 143
- Motherboard
- H81M-H
- CPU
- i7-4770
- Graphics
- HD7950
- Mac
- Mobile Phone
Okay, so yesterday I fitted the PC in temporarily again, I failed to find a working USB header so I'm gonna buy one of these from Amazon:
http://www.amazon.co.uk/dp/B00H52Y7JG/?tag=tonymacx86-21
That'll sit out of site and the cables will be ran behind the mobo and over the top, plugging in.
I did manage to find some pretty cool blue cathodes, and a 3.5mm audio jack. This has been glued in exactly like the USB port was.
 I plan to plug that jack into the front header, as well as the USB port. Power button also functions as well as the LED.


 The blue cathodes add a very cool looking effect, it can be seen on camera but it's quite 'trippy' and overwhelming. I also tape a fan in place until my dremel stuff arrives - then I can fit the middle shelf again for the fan.
Check back soon !!
http://www.amazon.co.uk/dp/B00H52Y7JG/?tag=tonymacx86-21
That'll sit out of site and the cables will be ran behind the mobo and over the top, plugging in.
I did manage to find some pretty cool blue cathodes, and a 3.5mm audio jack. This has been glued in exactly like the USB port was.
I plan to plug that jack into the front header, as well as the USB port. Power button also functions as well as the LED. The blue cathodes add a very cool looking effect, it can be seen on camera but it's quite 'trippy' and overwhelming. I also tape a fan in place until my dremel stuff arrives - then I can fit the middle shelf again for the fan. Check back soon !!
Attachments

- Joined
- Dec 24, 2012
- Messages
- 143
- Motherboard
- H81M-H
- CPU
- i7-4770
- Graphics
- HD7950
- Mac
- Mobile Phone
Well, to my amazement, the new mandrels arrived today . Tonight and tomorrow will be the cutting time. I need to cut the mid shelf, then epoxy it down, followed by the rear of the case, I'm going to only cut into the metal, not through it. Then I'll bend the metal forth and back until it snaps, hopefully, this wont push the mandrels too much.
10 mandrels for about £3, so I might get through 5 over the coming days :/. Wish me luck all !!
. Tonight and tomorrow will be the cutting time. I need to cut the mid shelf, then epoxy it down, followed by the rear of the case, I'm going to only cut into the metal, not through it. Then I'll bend the metal forth and back until it snaps, hopefully, this wont push the mandrels too much. 10 mandrels for about £3, so I might get through 5 over the coming days :/. Wish me luck all !!
- Joined
- Dec 12, 2011
- Messages
- 346
- Motherboard
- Gigabyte GA-Z68MA-D2H-B3
- CPU
- i5-2550K
- Graphics
- GTX 670
- Mac
- Mobile Phone
Thanks! I hope so, I need to make a better stencil though... Thanks for the interest!
If you can find a local sign shop they should be able to make you a nice cut vinyl stencil (or the logo itself) for probably $6 or less each.
- Joined
- Dec 24, 2012
- Messages
- 143
- Motherboard
- H81M-H
- CPU
- i7-4770
- Graphics
- HD7950
- Mac
- Mobile Phone
Thanks for the tip , I believe theres one my town, so I'll go and have a look on Monday .
Update:
Today has been hectic...
I've spending most of last night and today attempting to get Yosemite installed on my laptop - but I know I'm not allowed to talk about that so I'll shutup now before I get in trouble...
Also, I've been cutting out the back of that case for about 3 hours...


Tomorrow I just need to neaten up the edges and cut down the back panel to fit the latch and power port. I also need to cut out that mid shelf, purely for aesthetics, I just want that CPU fan back in place really.
Tomorrow is gonna be busy...
I also need to make some sort of riser for the motherboard tray as it sits nearly 1.5cm above where it should. I might use the original risers for it, we'll see...
Check back later tomorrow all.
Looking forward to Yosemite
, I believe theres one my town, so I'll go and have a look on Monday . Update:
Today has been hectic...
I've spending most of last night and today attempting to get Yosemite installed on my laptop - but I know I'm not allowed to talk about that so I'll shutup now before I get in trouble...
Also, I've been cutting out the back of that case for about 3 hours...
Tomorrow I just need to neaten up the edges and cut down the back panel to fit the latch and power port. I also need to cut out that mid shelf, purely for aesthetics, I just want that CPU fan back in place really.
Tomorrow is gonna be busy...
I also need to make some sort of riser for the motherboard tray as it sits nearly 1.5cm above where it should. I might use the original risers for it, we'll see...
Check back later tomorrow all
. Looking forward to Yosemite
- Joined
- Dec 24, 2012
- Messages
- 143
- Motherboard
- H81M-H
- CPU
- i7-4770
- Graphics
- HD7950
- Mac
- Mobile Phone
Well the spectacular British weather lived up to its name today... It pi**ed it down... So I couldn't go outside and cut the remainder of things.
I also discovered that the back panel sits just over a cm higher from the inside of the case:

 As you can see here... Also might be able to catch a glimpse of Yosemite in the background the second image .
So I decided that I needed to raise the motherboard tray up by enough, after much brainstorming I found some foam board. For those who might not know, foam board is 6mm thick foamy cardboard. I cut 2 of these down to a size slightly smaller than the tray and epoxied them down:


As you can see it'll be risen by just over a cm, giving a snug fit for the rear IO.
 This picture was not staged... I promise
So today has been semi productive, new OS, new motherboard tray ish....
Check back tomorrow all
I also discovered that the back panel sits just over a cm higher from the inside of the case:
As you can see here... Also might be able to catch a glimpse of Yosemite in the background the second image . So I decided that I needed to raise the motherboard tray up by enough, after much brainstorming I found some foam board. For those who might not know, foam board is 6mm thick foamy cardboard. I cut 2 of these down to a size slightly smaller than the tray and epoxied them down:
As you can see it'll be risen by just over a cm, giving a snug fit for the rear IO.
This picture was not staged... I promise So today has been semi productive, new OS, new motherboard tray ish....
Check back tomorrow all
- Joined
- Dec 24, 2012
- Messages
- 143
- Motherboard
- H81M-H
- CPU
- i7-4770
- Graphics
- HD7950
- Mac
- Mobile Phone
Good evening all, today I didn't have chance to do much, I discovered that the mid shelf is very difficult for the dremel to cut through, so instead I remade it using some old PVC Plastic I had laying around. I also wired up the internal fan to an RCA cable, in mono and plugged it into my logitech amp, I then set my amp to play out of that RCA jack, and hey presto, internal sound .
Check back for pictures tomorrow folks....
.Check back for pictures tomorrow folks....
- Status
- Not open for further replies.
Copyright © 2010 - 2024 tonymacx86 LLC