- Joined
- Dec 9, 2011
- Messages
- 91
- Mac
- Classic Mac
- Mobile Phone
All right, so for the benefit of everyone I'll put a simple explanation of how to set up Clover on the NUC.
For anyone that doesn't know, Clover aims to provide UEFI booting to UEFI capable boards and UEFI booting through emulation on older boards. Plus many other features..
Before starting, big credit to WonkeyDonkey for his NUC guide using Chameleon! It was very helpful for me to create my build and later this guide.
The files necessary for the installation (DSDT, SSDT) are on his post here: http://www.tonymacx86.com/mavericks...uide-intel-haswell-nuc-core-i5-d54250wyk.html
Clover Installation
First, you can get Clover installer from the sourceforge page here: http://sourceforge.net/projects/cloverefiboot/
Running the installer, whether you are installing Clover to a USB or to the SSD/HDD on the NUC, you should set the following options:
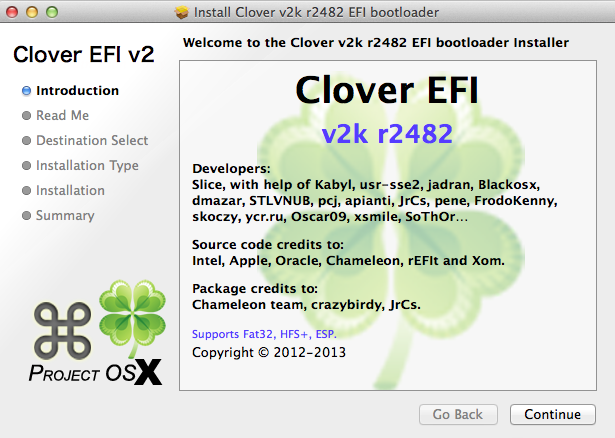

All the selections are required in order to boot OS X successfully!
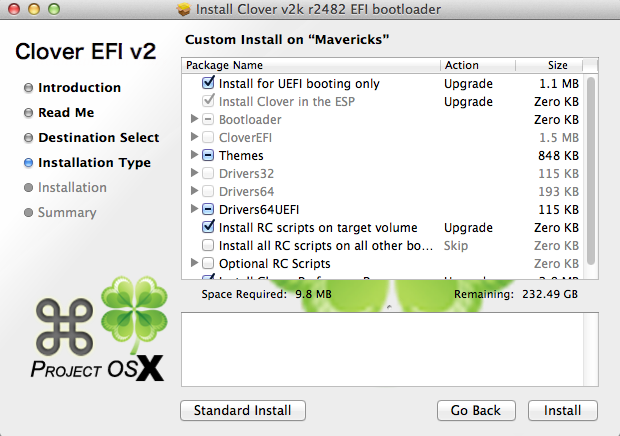
UEFI only booting, since our board supports UEFI. This will install Clover to the EFI partition by default.
The CSMVideoDXE driver helps us to have correct resolutions while on Clover boot menu and while OS X is booting.
The EmuVariableUEFI driver allows OS X to use NVRAM variables.
The OSxAptioFix driver fixes memory issues in UEFI firmware.
Install RC scripts on target volume records an rc.shutdown script required by Clover to work. (Deselect this option if you are installing to a USB)
The Clover preference pane is a easy way to do Clover maintenance. (Also deselect this option if installing Clover to a USB).
Clover Configuration
Once Clover is installed, we must do a few steps to set it up nicely.
First, the DSDT and SSDT files must be placed in the location EFI/CLOVER/ACPI/Patched, in order for Clover to pick up their configurations at boot time.
Additionaly, a config.plist file must be defined. I have uploaded in this post a config.plist file with all the necessary configurations for the NUC; you have to copy that file to the location EFI/CLOVER/
We will be using the Clover Configurator app, which let's us easily modify our config.plist through a GUI.
Get the latest version from the developer page located here: http://mackie100.webwacemaster.altervista.org/
After we have the app, it's time to load our config file. If your EFI partition is not mount, use Command+E to mount it, like this:
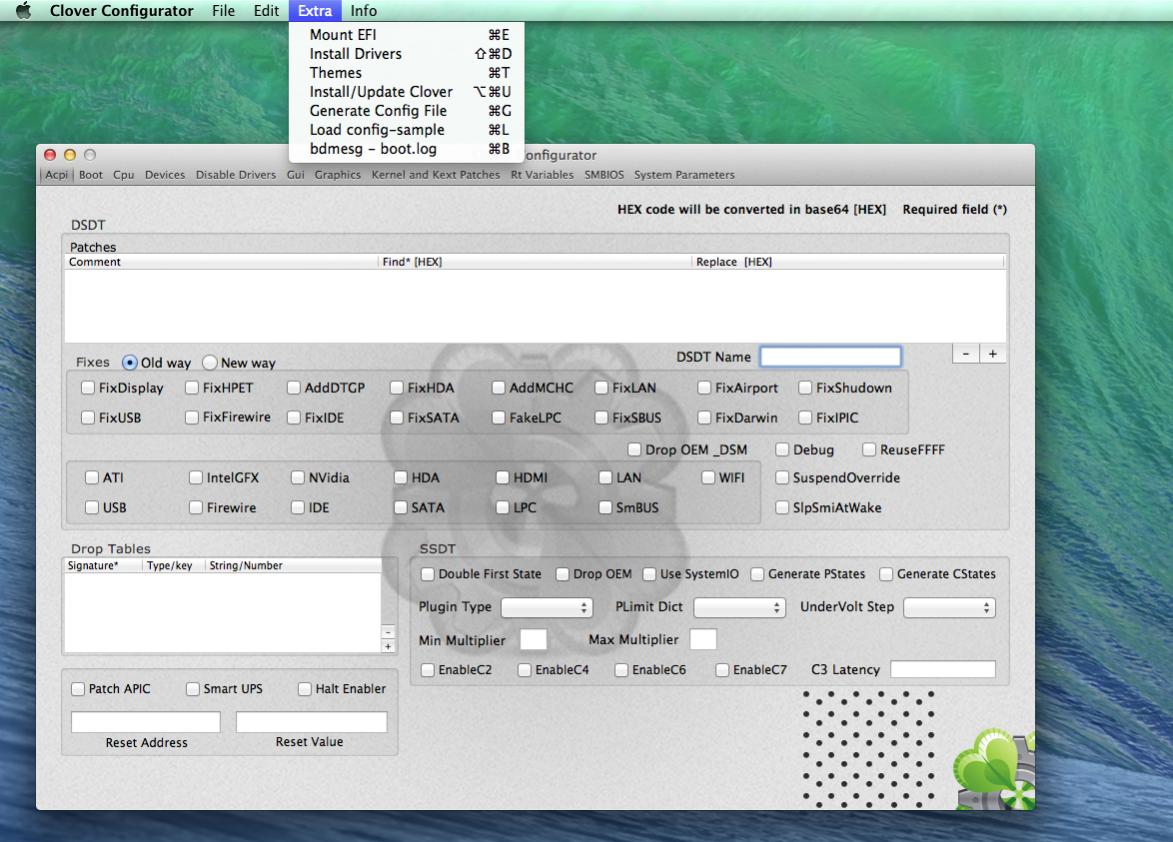
Then, use Command+O, navigate to the config.plist file and open it. Our configuration will be loaded to the program.
Navigate through all the menus in the app and you will see the configurations set up. We need to add a few more and we are done.
First, go to the SMBIOS menu. You'll see this:
With the wand icon you will be able to generate the serial number for your build. You can also fill up your RAM information as well, although they should be detected.
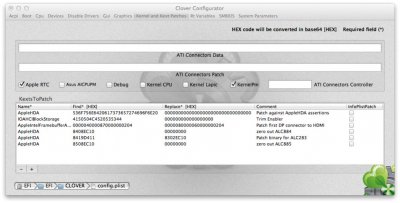
After this change, you could add more patches in the Kernel and Kext patches section if you need. There are patches already for the kernel, the framebuffer connectors, AppleHDA patches and TRIM Enabler patch.
Note: The actual kernel and kext files will not be patched. Clover will just patch the in-memory copy of the files specified in the section, so any patch you remove from this section will stop having effect at next boot.
Some of the sections in the config are empty (like Cpu), this configurations are generated at boot time automatically by Clover, we do not need to specify them. In the GUI section, you can specify a theme for Clover boot screen and manage other boot entries, in case you are doing a multi-boot setup.
We are done with the required things in the config.plist file, save and close it and boot up your system with Clover!
AppleHDA
Thanks to minihack (posts below) we have a way of patching AppleHDA on-the-fly. By using a injector kext, we will make AppleHDA to load only the layouts needed for our audio; Clover will patch the binary for us, so we will be ready to go!
Details on this procedure here (http://pikeralpha.wordpress.com/2013/12/17/new-style-of-applehda-kext-patching/)
Just grab the AppleHDAIDT kext prepared by minihack on this post attachments, install it to /System/Library/Extensions and it's done.
Clover Preference Pane
After you boot with Clover, you will have two means of configuring it:
1. config.plist file, as we just did.
2. Clover preference pane.
After it's installation, you'll find it here:
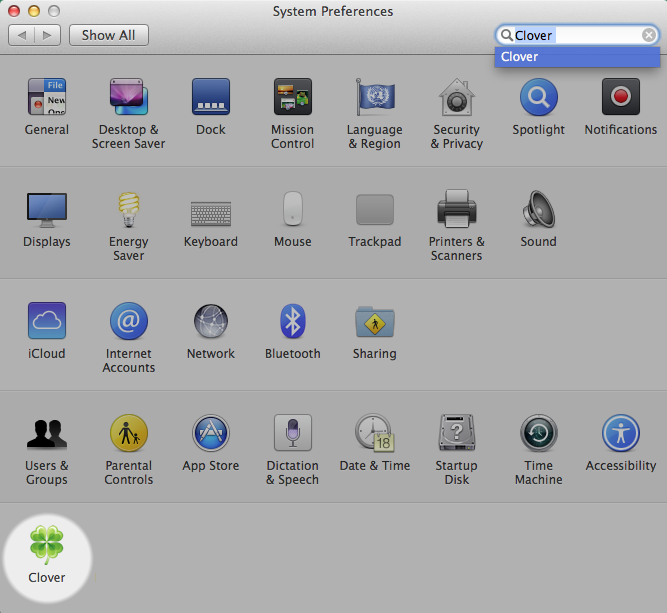
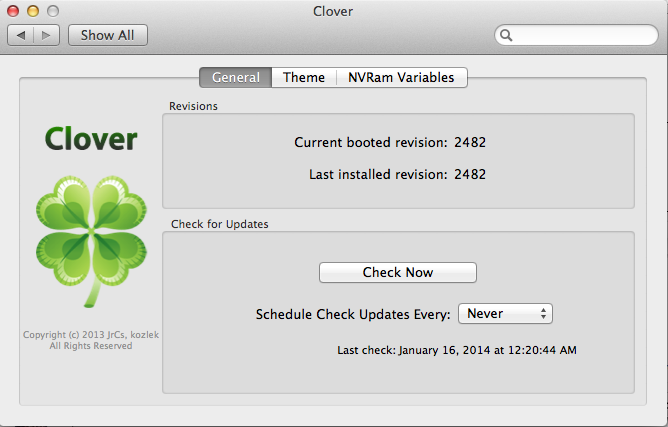
When you select it you will see the current revision you are booting from and you will be able to check for updates.
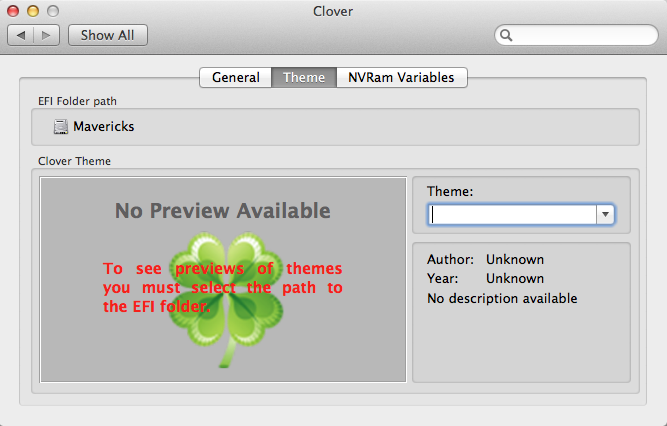
In here you can set up a theme:
And here you can set up preferences for logging and mounting the EFI partition.
Auto will mount the EFI partition of your boot device (e.g. EFI on the USB if you boot from the USB, EFI in the SSD if you boot from the SSD). You can set a fixed partition or no automount.
The difference between the PrefPane and the config.plist file is that the PrefPane options are saved to NVRAM, config.plist is read when Clover is loading. Based on my experimentation, Clover will give priority to the options you set in the PrefPane (NVRAM) and then in the config.plist.
Other Notes
mdworker errors
When you have your EFI partition mounted, Spotlight will try to index the drive, but fail, resulting in a flooding of the system log with mdworker errors. To prevent this, we should add the EFI partition to the Spotlight exclusions.
Go to the System Preferences and select Spotlight.
In there, go to the Privacy tab, and from a Finder window, drag and drop the EFI partition to the list:

This will stop the error messages from appearing.
Dual/Multi-booting with Clover
Clover makes easy the possibility to install other OS into the NUC alongside OS X, because we will be able to use all the advantages of GPT (GUID Partition Table).
Using pure GPT allows us flexibility to:
1. Install the OS we want in any order
2. Delete an existing OS with less possibility of breaking our system.
Do NOT format a partition on your HDD/SSD in Disk Utility as MS-DOS (FAT). By doing this, Disk Utility creates a Hybrid MBR in the GPT; we don't want that to happen!
I will give an example of installing Windows alongside an already installed OS X.
1. Create your installation media
I have copied my Windows 7 copy to a USB since we don't have an optical drive. (You can use this: http://www.microsoftstore.com/store/msusa/html/pbPage.Help_Win7_usbdvd_dwnTool)
If you have an USB optical drive or already have your installation on a USB, then go on ahead.
REMEMBER: Only 64-bit installations, 32-bit installations will not show up on our UEFI boot options!
2. Create a partition for Windows
In OS X, create a partition for Windows and format it as HFS+ Journaled (NOT MS-DOS)
3. Boot Windows Installer
You have two options: either boot directly to the Windows installation from the NUC boot options or let Clover pick up the entry and boot the Windows installer.
If you let Clover load the boot options, there will be more than one. Press the spacebar on every entry to see it's details, until you find one named "bootx64.efi" or "bootmgrfw.efi".
Windows should load up, you can continue the installation process normally. Remember to format the HFS+ partition to NTFS (you will catch this up, Windows won't let you install to the partition the first time)
After the first restart, you should already have the Windows entry read by Clover. Finish your Windows installation and you are done!
Easy, wasn't it?!
Other features of Clover
If you wish to learn more about Clover than what I have discussed in this guide, you can head here: http://clover-wiki.zetam.org/Home. This is a very detailed wiki on all the features and possible configurations of Clover. Feel free to ask as here as well")
Sleep: darwake Support (PowerNap)
As discussed in this post (http://www.tonymacx86.com/general-h...ake-0-flag-can-break-auto-sleep-10-8-1-a.html) darkwake boot-flag values affect how our system sleeps. Right now our config.plist file (at least the one in this post) is set to darkwake=8. If you have this setting and PowerNap is enabled in your NUC, it will wake up hourly to do PowerNap's intended job (check updates, etc).
It is supposed that PowerNap does not wakes up the screen and fans in the system. However, with darkwake=8 we are telling it to do a full wake every time PowerNap comes into action.
In order to have perfect funcionality, i.e. have PowerNap work without turning on the fan and the screen, we must set darkwake=10.
I have changed the config.plist on this post to darkwake=10, but bear in mind that if you use Clover Configurator it will erase this setting because the app does not have the option to set darkwake=10. I already made a request to have this setting available in the app; so until a next update of the Clover Configurator, remember to set this flag manually after you use the app or leave it in darkwake=8 for the time being.
If you do not specify one of these two darkwake flags sleep WONT WORK! It will wake up and crash.
If you also wish to disable PowerNap, just do it through System Preferences -> Energy Saver. If you disable it, the only difference between darkwake=8 and darkwake=10 will be that the first will wake up the screen instantly, the second will require a second input (KB, mouse) to wake up the screen.
Sleep: hibernatemode and sleepimage
We are defining our NUC as a MacBook Air, mainly becuase the latest Air model has our same CPU.
There is a setting in OS X power management configuration called hibernatemode. This defines where our system stores the current session when it sleeps (you can see an in-depth explanation of hibernatemode by executing "man pmset" in a Terminal window).
Our NUC, since it's recognized as a mobile device, it's using hibernatemode = 3, default for every Mac portable device.
This means that there is a file in the location /var/vm/sleepimage that is taking roughly the same amount of RAM we have in disk space (it could be less).
Since our system doesn't really have batteries, and we don't have any direct benefit of writing all or part of our current session to disk upon sleep (maybe a power outage; a UPS could be an option for that), we can disable this and reclaim extra disk space!
Here's what we need to do in a Terminal window:
1. Set our NUC hibernatemode to store everything to RAM (Desktop mode): sudo pmset -c hibernatemode 0.
2. Remove the sleepimage: sudo rm /var/vm/sleepimage
3. Prevent the sleepimage from being recreated at each boot: sudo ln -s /dev/null /var/vm/sleepimage
Enjoy the extra space!
Other Goodies
If you installed Windows on your NUC, or if you have NTFS drives in your array of devices, this guide will be useful for you: http://crosstown.coolestguidesontheplanet.com/os-x/44-how-to-write-to-a-ntfs-drive-from-os-x
It will allow you to read/write to NTFS drives with ntfs-3g.
Unsolved Issues
Two issues are still unsolved with this configuration (maybe present while using Chameleon as well):
1. RTC in Visual Bios goes forward by four hours after booting OS X. AppleRTC patch did not had any effect; however it should not pose a problem to use the NUC while it is fixed.
2. iMessage fails registration with customer support prompt.
These two last issues do not have to prevent you from having a working build. Hopefully as well they will be fixed soon enough!
Changes
1.0: Initial guide
1.1: Added detailed instructions on Clover Configurator and Clover Preference Pane.
1.1: Added AppleHDAIDT, config.plist with darkwake=10 and minihack kext patches for AppleHDA audio and shortened AppleIntelFramebufferAzul connector patch.
1.2: Added the zip file D54250WYB which you can put in EFI/CLOVER/OEM. It has the configurations necessary for the NUC and Clover will pick them up at boot, providing you a better installation and working system in case you need to boot from a USB. Thanks to minihack for preparing the package!
NOTE: The included DSDT and SSDT were generated with BIOS version 22. If you update or have a earlier version you will need to recompile the DSDT and SSDT. I will add soon the plaintext versions of both files in case anyone needs to recompile them.
For anyone that doesn't know, Clover aims to provide UEFI booting to UEFI capable boards and UEFI booting through emulation on older boards. Plus many other features..
Before starting, big credit to WonkeyDonkey for his NUC guide using Chameleon! It was very helpful for me to create my build and later this guide.
The files necessary for the installation (DSDT, SSDT) are on his post here: http://www.tonymacx86.com/mavericks...uide-intel-haswell-nuc-core-i5-d54250wyk.html
Clover Installation
First, you can get Clover installer from the sourceforge page here: http://sourceforge.net/projects/cloverefiboot/
Running the installer, whether you are installing Clover to a USB or to the SSD/HDD on the NUC, you should set the following options:
All the selections are required in order to boot OS X successfully!
UEFI only booting, since our board supports UEFI. This will install Clover to the EFI partition by default.
The CSMVideoDXE driver helps us to have correct resolutions while on Clover boot menu and while OS X is booting.
The EmuVariableUEFI driver allows OS X to use NVRAM variables.
The OSxAptioFix driver fixes memory issues in UEFI firmware.
Install RC scripts on target volume records an rc.shutdown script required by Clover to work. (Deselect this option if you are installing to a USB)
The Clover preference pane is a easy way to do Clover maintenance. (Also deselect this option if installing Clover to a USB).
Clover Configuration
Once Clover is installed, we must do a few steps to set it up nicely.
First, the DSDT and SSDT files must be placed in the location EFI/CLOVER/ACPI/Patched, in order for Clover to pick up their configurations at boot time.
Additionaly, a config.plist file must be defined. I have uploaded in this post a config.plist file with all the necessary configurations for the NUC; you have to copy that file to the location EFI/CLOVER/
We will be using the Clover Configurator app, which let's us easily modify our config.plist through a GUI.
Get the latest version from the developer page located here: http://mackie100.webwacemaster.altervista.org/
After we have the app, it's time to load our config file. If your EFI partition is not mount, use Command+E to mount it, like this:
Then, use Command+O, navigate to the config.plist file and open it. Our configuration will be loaded to the program.
Navigate through all the menus in the app and you will see the configurations set up. We need to add a few more and we are done.
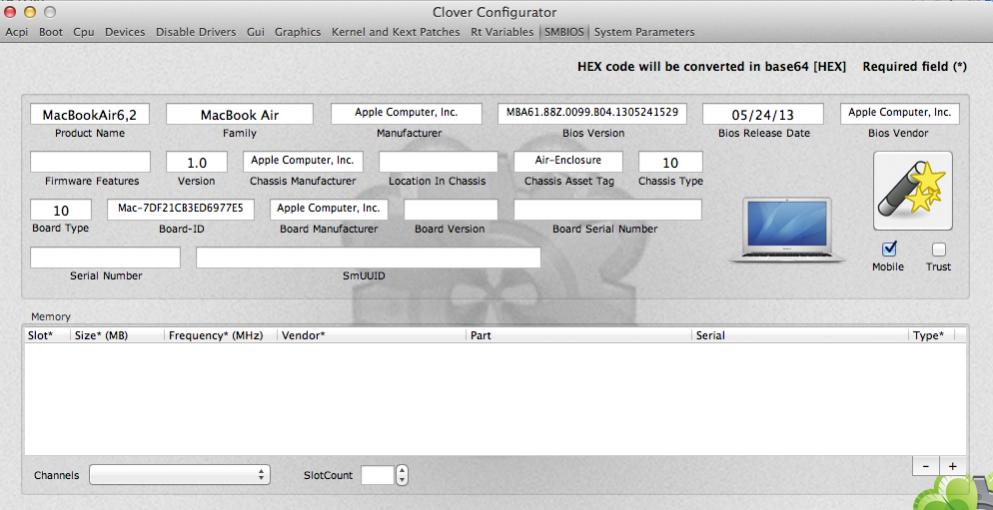
First, go to the SMBIOS menu. You'll see this:
With the wand icon you will be able to generate the serial number for your build. You can also fill up your RAM information as well, although they should be detected.
After this change, you could add more patches in the Kernel and Kext patches section if you need. There are patches already for the kernel, the framebuffer connectors, AppleHDA patches and TRIM Enabler patch.
Note: The actual kernel and kext files will not be patched. Clover will just patch the in-memory copy of the files specified in the section, so any patch you remove from this section will stop having effect at next boot.
Some of the sections in the config are empty (like Cpu), this configurations are generated at boot time automatically by Clover, we do not need to specify them. In the GUI section, you can specify a theme for Clover boot screen and manage other boot entries, in case you are doing a multi-boot setup.
We are done with the required things in the config.plist file, save and close it and boot up your system with Clover!
AppleHDA
Thanks to minihack (posts below) we have a way of patching AppleHDA on-the-fly. By using a injector kext, we will make AppleHDA to load only the layouts needed for our audio; Clover will patch the binary for us, so we will be ready to go!
Details on this procedure here (http://pikeralpha.wordpress.com/2013/12/17/new-style-of-applehda-kext-patching/)
Just grab the AppleHDAIDT kext prepared by minihack on this post attachments, install it to /System/Library/Extensions and it's done.
Clover Preference Pane
After you boot with Clover, you will have two means of configuring it:
1. config.plist file, as we just did.
2. Clover preference pane.
After it's installation, you'll find it here:
When you select it you will see the current revision you are booting from and you will be able to check for updates.
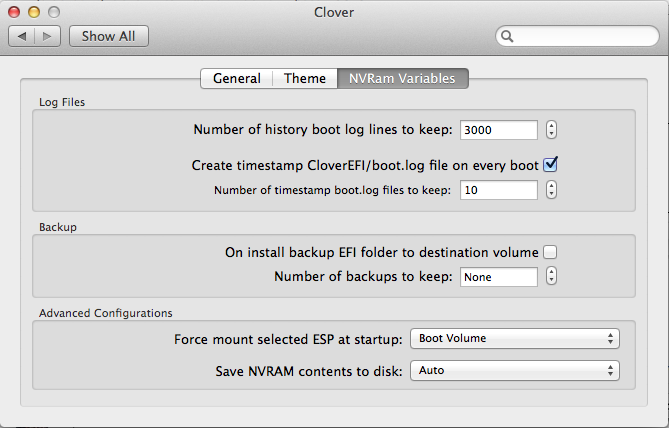
In here you can set up a theme:
And here you can set up preferences for logging and mounting the EFI partition.
Auto will mount the EFI partition of your boot device (e.g. EFI on the USB if you boot from the USB, EFI in the SSD if you boot from the SSD). You can set a fixed partition or no automount.
The difference between the PrefPane and the config.plist file is that the PrefPane options are saved to NVRAM, config.plist is read when Clover is loading. Based on my experimentation, Clover will give priority to the options you set in the PrefPane (NVRAM) and then in the config.plist.
Other Notes
mdworker errors
When you have your EFI partition mounted, Spotlight will try to index the drive, but fail, resulting in a flooding of the system log with mdworker errors. To prevent this, we should add the EFI partition to the Spotlight exclusions.
Go to the System Preferences and select Spotlight.
In there, go to the Privacy tab, and from a Finder window, drag and drop the EFI partition to the list:
This will stop the error messages from appearing.
Dual/Multi-booting with Clover
Clover makes easy the possibility to install other OS into the NUC alongside OS X, because we will be able to use all the advantages of GPT (GUID Partition Table).
Using pure GPT allows us flexibility to:
1. Install the OS we want in any order
2. Delete an existing OS with less possibility of breaking our system.
Do NOT format a partition on your HDD/SSD in Disk Utility as MS-DOS (FAT). By doing this, Disk Utility creates a Hybrid MBR in the GPT; we don't want that to happen!
I will give an example of installing Windows alongside an already installed OS X.
1. Create your installation media
I have copied my Windows 7 copy to a USB since we don't have an optical drive. (You can use this: http://www.microsoftstore.com/store/msusa/html/pbPage.Help_Win7_usbdvd_dwnTool)
If you have an USB optical drive or already have your installation on a USB, then go on ahead.
REMEMBER: Only 64-bit installations, 32-bit installations will not show up on our UEFI boot options!
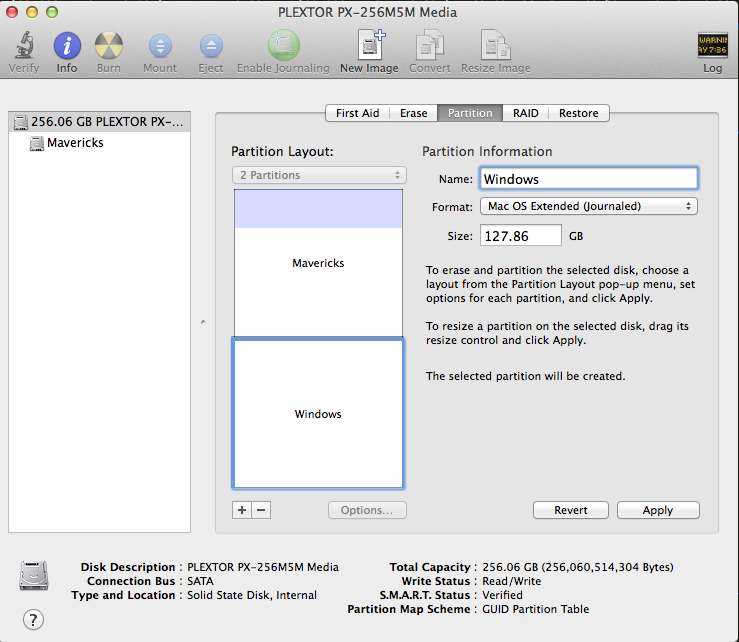
2. Create a partition for Windows
In OS X, create a partition for Windows and format it as HFS+ Journaled (NOT MS-DOS)
3. Boot Windows Installer
You have two options: either boot directly to the Windows installation from the NUC boot options or let Clover pick up the entry and boot the Windows installer.
If you let Clover load the boot options, there will be more than one. Press the spacebar on every entry to see it's details, until you find one named "bootx64.efi" or "bootmgrfw.efi".
Windows should load up, you can continue the installation process normally. Remember to format the HFS+ partition to NTFS (you will catch this up, Windows won't let you install to the partition the first time)
After the first restart, you should already have the Windows entry read by Clover. Finish your Windows installation and you are done!
Easy, wasn't it?!
Other features of Clover
If you wish to learn more about Clover than what I have discussed in this guide, you can head here: http://clover-wiki.zetam.org/Home. This is a very detailed wiki on all the features and possible configurations of Clover. Feel free to ask as here as well
Sleep: darwake Support (PowerNap)
As discussed in this post (http://www.tonymacx86.com/general-h...ake-0-flag-can-break-auto-sleep-10-8-1-a.html) darkwake boot-flag values affect how our system sleeps. Right now our config.plist file (at least the one in this post) is set to darkwake=8. If you have this setting and PowerNap is enabled in your NUC, it will wake up hourly to do PowerNap's intended job (check updates, etc).
It is supposed that PowerNap does not wakes up the screen and fans in the system. However, with darkwake=8 we are telling it to do a full wake every time PowerNap comes into action.
In order to have perfect funcionality, i.e. have PowerNap work without turning on the fan and the screen, we must set darkwake=10.
I have changed the config.plist on this post to darkwake=10, but bear in mind that if you use Clover Configurator it will erase this setting because the app does not have the option to set darkwake=10. I already made a request to have this setting available in the app; so until a next update of the Clover Configurator, remember to set this flag manually after you use the app or leave it in darkwake=8 for the time being.
If you do not specify one of these two darkwake flags sleep WONT WORK! It will wake up and crash.
If you also wish to disable PowerNap, just do it through System Preferences -> Energy Saver. If you disable it, the only difference between darkwake=8 and darkwake=10 will be that the first will wake up the screen instantly, the second will require a second input (KB, mouse) to wake up the screen.
Sleep: hibernatemode and sleepimage
We are defining our NUC as a MacBook Air, mainly becuase the latest Air model has our same CPU.
There is a setting in OS X power management configuration called hibernatemode. This defines where our system stores the current session when it sleeps (you can see an in-depth explanation of hibernatemode by executing "man pmset" in a Terminal window).
Our NUC, since it's recognized as a mobile device, it's using hibernatemode = 3, default for every Mac portable device.
This means that there is a file in the location /var/vm/sleepimage that is taking roughly the same amount of RAM we have in disk space (it could be less).
Since our system doesn't really have batteries, and we don't have any direct benefit of writing all or part of our current session to disk upon sleep (maybe a power outage; a UPS could be an option for that), we can disable this and reclaim extra disk space!
Here's what we need to do in a Terminal window:
1. Set our NUC hibernatemode to store everything to RAM (Desktop mode): sudo pmset -c hibernatemode 0.
2. Remove the sleepimage: sudo rm /var/vm/sleepimage
3. Prevent the sleepimage from being recreated at each boot: sudo ln -s /dev/null /var/vm/sleepimage
Enjoy the extra space!
Other Goodies
If you installed Windows on your NUC, or if you have NTFS drives in your array of devices, this guide will be useful for you: http://crosstown.coolestguidesontheplanet.com/os-x/44-how-to-write-to-a-ntfs-drive-from-os-x
It will allow you to read/write to NTFS drives with ntfs-3g.
Unsolved Issues
Two issues are still unsolved with this configuration (maybe present while using Chameleon as well):
1. RTC in Visual Bios goes forward by four hours after booting OS X. AppleRTC patch did not had any effect; however it should not pose a problem to use the NUC while it is fixed.
2. iMessage fails registration with customer support prompt.
These two last issues do not have to prevent you from having a working build. Hopefully as well they will be fixed soon enough!
Changes
1.0: Initial guide
1.1: Added detailed instructions on Clover Configurator and Clover Preference Pane.
1.1: Added AppleHDAIDT, config.plist with darkwake=10 and minihack kext patches for AppleHDA audio and shortened AppleIntelFramebufferAzul connector patch.
1.2: Added the zip file D54250WYB which you can put in EFI/CLOVER/OEM. It has the configurations necessary for the NUC and Clover will pick them up at boot, providing you a better installation and working system in case you need to boot from a USB. Thanks to minihack for preparing the package!
NOTE: The included DSDT and SSDT were generated with BIOS version 22. If you update or have a earlier version you will need to recompile the DSDT and SSDT. I will add soon the plaintext versions of both files in case anyone needs to recompile them.
Attachments
Last edited by a moderator: