- Joined
- Nov 17, 2009
- Messages
- 7,366
- Motherboard
- Z370N WIFI
- CPU
- i7 8700K
- Graphics
- HD 630
- Mac
- Classic Mac
- Mobile Phone
Here's a quick guide to create a macOS High Sierra 10.13 Public Beta Installation USB using Clover. Please note, this guide is not universal, and may not work for all systems.
STEP 1: Download macOS High Sierra Public Beta
1. Enroll in the Free Apple Beta Software Program
2. Open Mac App Store
3. Log in with your Apple ID
4. Redeem code
4. Download macOS High Sierra Public Beta
The Application Install macOS High Sierra Beta will appear in /Applications.
STEP 2: Prepare Bootable USB Drive
This step extracts the Installer contents, then installs Clover bootloader to the USB stick.
1. Insert the USB drive
2. Open /Applications/Utilities/Disk Utility
3. Highlight the USB drive in left column
4. Click on the Partition tab
5. Click Current and choose 1 Partition
6. Click Options...
7. Choose GUID Partition Table
8. Under Name: type USB (You can rename it later)
9. Under Format: choose Mac OS Extended (Journaled)
10. Click Apply then Partition
11. Open /Applications/Utilities/Terminal
12. Type the following, enter password and hit enter. This command completely erases the USB, then creates native installer media from the Install High Sierra Beta Application.
macOS High Sierra
macOS High Sierra (Public Beta)
Upon completion, the USB will be renamed Install macOS High Sierra Beta.
13. Download the latest version of Clover from sourceforge
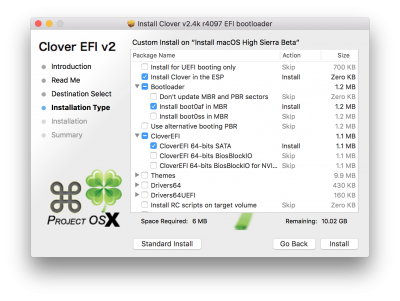
14. Open Clover package installer
15. Hit Continue, Continue, Change Install Location...
16. Choose the USB, now called Install macOS High Sierra Beta
17. Hit Customize and install Clover to the same USB using one of the following examples:
18. Navigate to /EFI/CLOVER/ and replace default config.plist with one of the attached config.plist examples.
19. Copy apfs.efi to /EFI/CLOVER/drivers64UEFI/.
20. Navigate to /EFI/CLOVER/kexts/Other/ and add FakeSMC.kext
21. (Optional) Navigate to /EFI/CLOVER/kexts/Other/ and add your ethernet kext
22. (Optional) Navigate to /EFI/CLOVER/kexts/Other/ and add NullCPUPowerManagement.kext
Your Clover Installation USB is now finished.
For post installation instructions and screenshots, please see
https://www.tonymacx86.com/threads/...ierra-on-any-supported-intel-based-pc.200564/
Clover Developers:
Slice, with help of Kabyl, usr-sse2, jadran, Blackosx, dmazar, STLVNUB, pcj, apianti, JrCs, pene, FrodoKenny, skoczy, ycr.ru, Oscar09, xsmile, SoThOr, rehabman, Download-Fritz, Zenit432, cecekpawon…
Source code credits:
Intel, Apple, Oracle, Chameleon, rEFIt and Xom.
Official Clover Links:
Sourceforge: Clover
Clover Wiki
Config.plist Examples
STEP 1: Download macOS High Sierra Public Beta
1. Enroll in the Free Apple Beta Software Program
2. Open Mac App Store
3. Log in with your Apple ID
4. Redeem code
4. Download macOS High Sierra Public Beta
The Application Install macOS High Sierra Beta will appear in /Applications.
STEP 2: Prepare Bootable USB Drive
This step extracts the Installer contents, then installs Clover bootloader to the USB stick.
1. Insert the USB drive
2. Open /Applications/Utilities/Disk Utility
3. Highlight the USB drive in left column
4. Click on the Partition tab
5. Click Current and choose 1 Partition
6. Click Options...
7. Choose GUID Partition Table
8. Under Name: type USB (You can rename it later)
9. Under Format: choose Mac OS Extended (Journaled)
10. Click Apply then Partition
11. Open /Applications/Utilities/Terminal
12. Type the following, enter password and hit enter. This command completely erases the USB, then creates native installer media from the Install High Sierra Beta Application.
macOS High Sierra
Code:
sudo /Applications/Install\ macOS\ High\ Sierra.app/Contents/Resources/createinstallmedia --volume /Volumes/USB --applicationpath /Applications/Install\ macOS\ High\ Sierra.app --nointeractionmacOS High Sierra (Public Beta)
Code:
sudo /Applications/Install\ macOS\ High\ Sierra\ Beta.app/Contents/Resources/createinstallmedia --volume /Volumes/USB --applicationpath /Applications/Install\ macOS\ High\ Sierra\ Beta.app --nointeractionUpon completion, the USB will be renamed Install macOS High Sierra Beta.
13. Download the latest version of Clover from sourceforge
14. Open Clover package installer
15. Hit Continue, Continue, Change Install Location...
16. Choose the USB, now called Install macOS High Sierra Beta
17. Hit Customize and install Clover to the same USB using one of the following examples:
18. Navigate to /EFI/CLOVER/ and replace default config.plist with one of the attached config.plist examples.
19. Copy apfs.efi to /EFI/CLOVER/drivers64UEFI/.
20. Navigate to /EFI/CLOVER/kexts/Other/ and add FakeSMC.kext
21. (Optional) Navigate to /EFI/CLOVER/kexts/Other/ and add your ethernet kext
22. (Optional) Navigate to /EFI/CLOVER/kexts/Other/ and add NullCPUPowerManagement.kext
Your Clover Installation USB is now finished.
For post installation instructions and screenshots, please see
https://www.tonymacx86.com/threads/...ierra-on-any-supported-intel-based-pc.200564/
Clover Developers:
Slice, with help of Kabyl, usr-sse2, jadran, Blackosx, dmazar, STLVNUB, pcj, apianti, JrCs, pene, FrodoKenny, skoczy, ycr.ru, Oscar09, xsmile, SoThOr, rehabman, Download-Fritz, Zenit432, cecekpawon…
Source code credits:
Intel, Apple, Oracle, Chameleon, rEFIt and Xom.
Official Clover Links:
Sourceforge: Clover
Clover Wiki
Config.plist Examples
Attachments
Last edited:


