- Joined
- Mar 11, 2018
- Messages
- 74
- Motherboard
- Z370 Aorus Ultra Gaming
- CPU
- i7 8700K
- Graphics
- EVGA GeForce GTX TITAN X 12GB
- Mac
- Classic Mac
- Mobile Phone
I have been editing for nearly 15 years on Macs and now have begun editing 360 footage on a 2012 iMac. For the first time, I had a Mac crash on me. I have been intrigued with making a Hackintosh since I first came across this website in 2013. I have been reading forums and was surprised at clearly the steps are laid out as long as the right gear is purchased. I was going to build a model based on the 200 series and then I saw the 300 series come out. Since I don't purchase computers on regular bases I figured I would max out the possibilities and build a screamer of an editing station. I know I jumped into this on a newer setup and understand there may be some challenges. I have an IT background as far as working on hardware and have done some Terminal work to get older Versions of AVID media composer to work on updated MAC OS.
My inspiration matches that of @JCMunsonII in his build based off of @Stork build.
The Stork Build that got me super excited: https://www.tonymacx86.com/threads/...og-maximus-viii-hero-i7-6700k-gtx-980.197284/
The JCMundonII build that inspired me to take on this challenge: https://www.tonymacx86.com/threads/...x-hero-i7-7700k-32gb-ram-intel-630-hd.222316/
I have followed the steps as described in https://www.tonymacx86.com/forums/high-sierra-desktop-guides.191/ up to Step 4 but that is when things stop working for me.
I have the following gear for my build in the Corsair Carbide Series Black 300R Mid-Tower Computer Case.
Core i7-8700K
3.7Ghz / 6 Cores / 12 Threads, Turbo / 12MB L3 Cache / 95W Max TDP
Cooled with the Corsair CW-9060025-WW Hydro Series, H100i v2
ASUS ROG MAXIMUS X HERO (WI-FI AC) ATX
Form: ATX
Audio: ALC1220
Video: HDMI, DP
Network: Intel I219-V
Ballistix Sport LT 64GB Kit (16GBx4) DDR4 2400 MT/s (PC4-19200) DIMM 288-Pin - BLS4K16G4D240FSE
EVGA GeForce GTX TITAN X 12GB SC
Powered by the
Corsair RMx Series, RM650x, 650W, Fully Modular Power Supply, 80+ Gold Certified
For the operating system, I am using:
Samsung 850 EVO 500GB 2.5-Inch SATA III Internal SSD
For storage, I built a RAID 5 by using 3 Seagate Barracuda ST5000DM000 5TB 3.5-Inch Internal Hard Drive, SATA, 5900 Rpm, 128 Mb Buffer

Already owned:
Apple Full-size USB Keyboard
What can I say, like JCMunsonII I use the number pad.
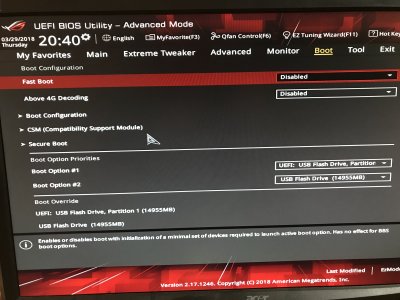
The BIOS Version originally was 0401. However, ASUS just released a new BIOS on 3/23/2018 to version 1101. I have updated to the latest BIOS. https://www.asus.com/us/Motherboards/ROG-MAXIMUS-X-HERO-WI-FI-AC/HelpDesk_BIOS/
In the BIOS, I set the following (while in Advanced Mode):
Exit


I have a 2.0 16GB thumb drive with the following on it.

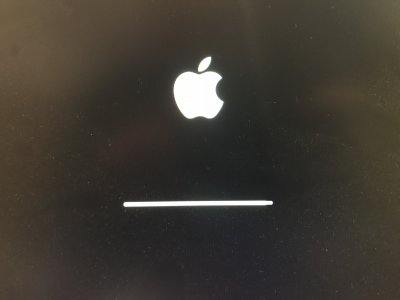
I am placing the thumb drive in the BIOS USB hub. I turn on the build and press F8 since it is an ASUS board and get the option to select the USB UEFI option. When I do I get routed back to the BIOS.

If I have missed something please point me in the right direction. I have been pouring over Forums to see if there are additional files that I needed or setting that I missed and I have not yet found the solution.
My inspiration matches that of @JCMunsonII in his build based off of @Stork build.
The Stork Build that got me super excited: https://www.tonymacx86.com/threads/...og-maximus-viii-hero-i7-6700k-gtx-980.197284/
The JCMundonII build that inspired me to take on this challenge: https://www.tonymacx86.com/threads/...x-hero-i7-7700k-32gb-ram-intel-630-hd.222316/
I have followed the steps as described in https://www.tonymacx86.com/forums/high-sierra-desktop-guides.191/ up to Step 4 but that is when things stop working for me.
I have the following gear for my build in the Corsair Carbide Series Black 300R Mid-Tower Computer Case.
Core i7-8700K
3.7Ghz / 6 Cores / 12 Threads, Turbo / 12MB L3 Cache / 95W Max TDP
Cooled with the Corsair CW-9060025-WW Hydro Series, H100i v2
ASUS ROG MAXIMUS X HERO (WI-FI AC) ATX
Form: ATX
Audio: ALC1220
Video: HDMI, DP
Network: Intel I219-V
Ballistix Sport LT 64GB Kit (16GBx4) DDR4 2400 MT/s (PC4-19200) DIMM 288-Pin - BLS4K16G4D240FSE
EVGA GeForce GTX TITAN X 12GB SC
Powered by the
Corsair RMx Series, RM650x, 650W, Fully Modular Power Supply, 80+ Gold Certified
For the operating system, I am using:
Samsung 850 EVO 500GB 2.5-Inch SATA III Internal SSD
For storage, I built a RAID 5 by using 3 Seagate Barracuda ST5000DM000 5TB 3.5-Inch Internal Hard Drive, SATA, 5900 Rpm, 128 Mb Buffer

Already owned:
Apple Full-size USB Keyboard
What can I say, like JCMunsonII I use the number pad.
The BIOS Version originally was 0401. However, ASUS just released a new BIOS on 3/23/2018 to version 1101. I have updated to the latest BIOS. https://www.asus.com/us/Motherboards/ROG-MAXIMUS-X-HERO-WI-FI-AC/HelpDesk_BIOS/
In the BIOS, I set the following (while in Advanced Mode):
Exit
- Load Optimized Defaults
- AI Overclocker Tuner > X.M.P.
- Extreme Tweeking > Enable
- System Agent (SA) Configuration > VT-d > Disable
- PCH Configuration > IOAPIC 24-119 > Disabled
- USB Configuration > Legacy USB Support > Auto
- USB Configuration > XHCI Hand Off > Enabled (this option is not in the new BIOS - see screen shots)
- APM Configuration > Power on by PCI - E/PCI > Disabled
- Fast Boot > Disabled
- Secure Boot > OS Type > Other OS
- Boot Option 1 > USB installer thumb drive (the UEFI choice)


I have a 2.0 16GB thumb drive with the following on it.

I am placing the thumb drive in the BIOS USB hub. I turn on the build and press F8 since it is an ASUS board and get the option to select the USB UEFI option. When I do I get routed back to the BIOS.

If I have missed something please point me in the right direction. I have been pouring over Forums to see if there are additional files that I needed or setting that I missed and I have not yet found the solution.
Last edited:


