Contribute
Register

Haswell-E + X99 Motherboard Temporary Guide - OS X 10.10

Haswell-E + X99 Motherboard Temporary Guide - OS X 10.10.0

nope cuz clover is better

Regardless of what you think of Clover (and I agree that it can be an alternate solution for some users), this reply is off-topic. Please stay on topic and refrain from contradicting the instructions as originally posted by Tonymac.

If you feel confident that your hybrid solution is an easier and more successful build, start a new thread. But do not tell users that they are "supposed" to do something other than the instructions provided here, implying that the OP instructions/process do/does not work. They do.
 
Haswell-E + X99 Motherboard Temporary Guide - OS X 10.10.0

You don't patch the install at this step. You open Terminal and copy the already patched kernel that's on your UniBeast key over to the proper location on your newly installed Yosemite using the terminal command at the beg. of this post - thereby replacing the kernel installed by Yosemite installer with the one on your USB.

Once you copy over patched kernel to your SSD, exit Terminal/Yosemite installer & reboot. Again, pressing F8 at POST and selecting your USB key for boot. But now, select your Yosemite install. Only flags you should need are -v (and maybe -x for safe mode) .... npci and kext-dev-mode should already be on your USB key's org.chameleon.boot. plist - entering them now has no effect.

Thanks for the input

That's what I meant and that is what I did. I used the following terminal command:

cp -R /Volumes/USB/System/Library/Kernels/kernel /Volumes/Yosemite/System/Library/Kernels/kernel

as described and then booted into Yosemite on the SSD via the Unibeast USB stick. If, for example, I were to leave out the -x flag it would halt at a system uptime notification and I would see two instances of some flags I had previously input so I figured they were already in the org.chameleon.Boot.plist.

You are right, at this point all I should have to enter manually is -x for safe mode to get into the install and maybe -v to see what is going on.

Its a little slow booting but it seems to work OK in safe mode and all 6 cores are seen (12 cores in CPU History)

I think I am good up to this point but I am willing to start over if I have to or if it makes it easier going forward.


Please see this post from me for UEFI/BIOS settings:
http://www.tonymacx86.com/yosemite-...orary-guide-os-x-10-10-0-a-34.html#post918063

Don't confuse deleting a kext with not selecting a kext in MultiBeast to install in the first place. Your MB settings should be pretty simple. For now, basically the VooDoo 6 core patch, USB3, network adapter, and system definition is all you should need. I'm attaching a MultiBeast file that works for my X99-Deluxe. Since you have SSD boot drive + 6-core CPU, this should work for you as well. **MAYBE** I'd open this file up & add NullCPUPowerManagement to help (for now) with power mgmt issues.

Also, once you finish installing MultiBeast, don't forget to go into your org.chameleon.boot.plist and make sure to add npci=0x2000 .... it goes on the same line as kext-dev-mode...just put a space after it & then type npci=0x2000.

I will defiantly review your UEFI/BIOS settings. Thank you for pointing them out by linking to them.

To be clear I wasn't confusing deleting a kext and not selecting one since I was referring to the installation of some options that may have been mandatory selections as part of a MultiBeast "EasyBeast" selection for example. However I really appreciate you uploading your Multbeast options file. I will definitely give it a try.

I'll report back as soon as possible.

Thanks agin!!!

Oct.
 
Haswell-E + X99 Motherboard Temporary Guide - OS X 10.10.0

:banghead::banghead::banghead::banghead:
plz help!

my system:
asus deluxe x99
cpu 5960
gpu 780ti
ram g.skill ripjaws4 32gb 2444mhz

unibeast usb created and patched with terminal comand provided at the beginning (just one), voodooTSCSYNC for 8core cpu copied, ncpi=0x2000 added to org.chameleon.Boot.plist.

stucked at pci configuration with:
-v -x -f npci=0x2000 cpus=1 kext-dev-mode=1
-v -x -f npci=0x2000 kext-dev-mode=1
-v -x npci=0x2000 kext-dev-mode=1

or kernel panic with
v -x -npci=0x2000 kext-dev-mode=1 nv_disable=1 and similar

any idea?
plz?
:beachball:
ya, you are supposed to use the 10.9.5 kexts.
 
Haswell-E + X99 Motherboard Temporary Guide - OS X 10.10.0

ya, you are supposed to use the 10.9.5 kexts.
That I can easily find and install ....(thanx for the advice by the way)
Where?
 
Haswell-E + X99 Motherboard Temporary Guide - OS X 10.10.0

That I can easily find and install ....(thanx for the advice by the way)
Where?

a bit better this way:
-v -x npci=0x3000 kext-dev-mode=1

but now stuck at "intel (r) gigabit ethernet network connection...using legacy interrupts. 1 rx queue(s), 1 tx queue(s)

any idea?

:beachball:

UPDATE!

-v -x -s -f npci=0x3000 kext-dev-mode=1 PCIRootUID=1

start pci configuration but hangs at the first task "usbf:......1600.150...AppleUSBXHCI......Bus 14 already taken"

thanx in advance for your time kindly helper
 
Haswell-E + X99 Motherboard Temporary Guide - OS X 10.10.0

Hello Everybody,

I think I have a success with my system. It's now running 10.10. without -x, but with the bootstick for now. I'm currently making a CCC-Copy on a MBR-USB stick and hope to workout booting without the stick, even though it doesn't bother me that much. Thanks a lot for this forum!!!! Its really super great for people like me that something like this exists. Thank you very much!!!!

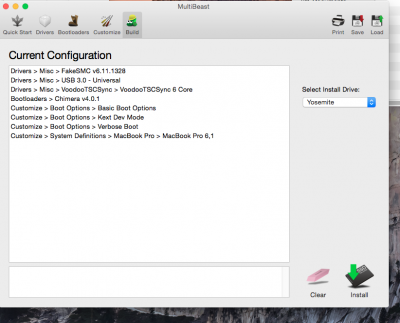
The final trick in my case was deleting the Bluetooth kexts (IOBluetooth....) in the S/L/E Folder. I had KPs because of that and I don't need Bluetooth anyway. Before that I used the unibeast methode described as here and selected only the basic stuff in Multibeast (see screenshot).

Screen Shot 2014-11-14 at 21.49.45.png

My system is:

Asus x99-a, i7 5820k, Asus R9 280x, 16 GB Crucial, Samsung 220 GB SSD

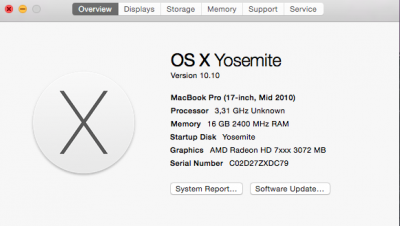
The hardware is recognized like this:

Screen Shot 2014-11-15 at 11.54.25.png

Next step is audio. I saw some different posts there, have to look into it. Otherwise everything looks great now. I'm really happy!

Thanks to everyone in this forum!

All the best

Janzwo
 
Haswell-E + X99 Motherboard Temporary Guide - OS X 10.10.0

sounds like a kernel patch issue/

Guide is based on the work of stinga11, jackie099, lokicat, and tony.

1. Download the latest beta bios here : http://forums.tweaktown.com/gigabyte/28441-gigabyte-latest-beta-bios.html
2. Settings in BIOS: optimized defaults, other OS, and enabled legacy support for some other stuff like XHCI or something.
3. Dload Unibeast Installer
4. Format USB with label "USB" MBR partition table and HFS+
5. Let wizard install the files (preferably on a USB 3.0 flash drive for speed) and make sure to use a USB 2.0 port on the motherboard.
6. Change boot flags to "-v -x -f npci=0x2000" in config plist in the USB/Extras folder (folder is hidden)
7. [Add VoodooTSCSync.kext to Extra/Extensions folder on the USB drive.
Edit the .kext for your cpu cores like in the OP first post if its not already edited] or use cpus=1 bootflag but the installer will be hella slow
8. Use the first kernel patch "sudo perl -pi -e 's|\x74\x11\x83\xF8\x3C|\x74\x11\x83\xF8\x3F|g' /Volumes/USB/System/Library/Kernels/kernel"
9. I also added the boot flag nv_disable=1 for my GTX 980, you may or may not need it.
This worked for me to get the installer running and install OS X onto the SSD.

With that said I don't even know if its worth going through all that trouble because I'm pretty sure you can install OS X using a different machine onto the drive (like using a usb 3.0 adapter)

10. But assuming you get this far and the install finishes you will need to boot into USB installer once again and then launch terminal to copy the patched kernel off the USB drive and onto the SSD. "cp -R /Volumes/USB/System/Library/Kernels/kernel /Volumes/Yosemite/System/Library/Kernels/"
11. Finally reboot once more and use chameleon to boot into the SSD.
12. Install Nvidia Web Drivers.
13. Change bootflags to "npci=0x2000 kext-dev-mode=1 nvda_drv=1"
14. Reboot


15. Load the latest version of clover (right now its 2976) and install with it with the following boxes checked:
-Install for UEFi...
-Install Clover in the ESP
-(whatever theme you like)
Drivers64UEFI
--OSXAptioFixDrv-64
--ParitionDXE-64
-Install RC scripts on target volume
-Panel

16. Copy the .kext from chameleon over to clover. I use AHCIPortInjector.kext from the OP, AppleGB.kext, AppleIntelE1000e, FakeSMC, NullCPUPowerManagmenet, GenericUSBXHCI.kext and VoodooTSCSync.
17. Use clover configurator to set the bootflags of "npci=0x2000 kext-dev-mode=1 nvda_drv=1" and the profile to Mac Pro 6,1.
18. [Optional] You can use clover to get iMessage working by messing around with SmMUUID, Serial Number and Board Serial Number in SMBIOS and Custom UUID, inject System ID in System parameters.

Audio works if you apply Voodoo fix but the quality is awful.

Still need to fix the about this mac cpu name page.

I saw these Hawell-e OC SSDT so you guys are free to mess around with them.

Hi Bomerr,
i checked exactly in clover what you did, but i'm stuck here :

FullSizeRender.jpg

an idea?
 
Haswell-E + X99 Motherboard Temporary Guide - OS X 10.10.0

ssdt is not injecting anything; installed improperly, incompatible or simply not working.
Remove installed ssdt and download ssdt-1 from Post #229.
Rename and install to EFI/CLOVER/ACPI/patched/SSDT.aml.
Reply with new Clover boot log, config.plist and IOReg.

I don't get it what am I doing wrong so my audio is not working.

Injection done via SSDT. Tested also with clover injection.

Patching of codec tested with both methods for clover.

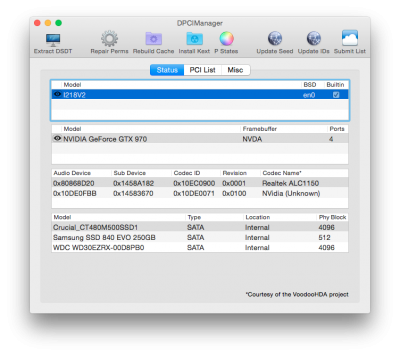
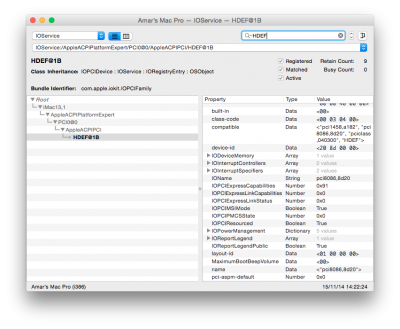
I get the devices, I can see codec id DPCIManager, can see that layout id is 1 and everything looks perfect, BUT when I try to play a sound it just hangs. Youtube video doesn't start playing, just hangs on 0:00, iTunes is doing the same, QuickTime Player same.

I know I can do it easy way with VoodooHDA_V286_MAV.pkg but it's a matter of principle, it's going to work, one way or another on Clover.

Here are debug.log from Clover, config.plist, ioreg file and screenshots from DPCIManager.

Screen Shot 2014-11-15 at 14.20.31.pngScreen Shot 2014-11-15 at 14.22.45.pngView attachment Archive.zip
 
Back
Top