
You are using an out of date browser. It may not display this or other websites correctly.
You should upgrade or use an alternative browser.
You should upgrade or use an alternative browser.
<< Solved >> Dell Optiplex 7020 - 4K monitors on Intel 4600 Integrated GPU
- Thread starter nicksoph
- Start date
- Status
- Not open for further replies.
- Joined
- Jun 13, 2017
- Messages
- 3,321
- Motherboard
- Gigabyte A520i AC
- CPU
- Ryzen 7 4700G
- Graphics
- Radeon Vega 8
- Mac
- Classic Mac
- Mobile Phone
@nicksoph, Got it!. I did this part of the process in Windows and Mac, fairly straight forward. Extacting the BIOS was done in windows, the following steps were done in Windows and Mac.
Extracted BIOS using the BIOS_Backup_TooKit and saved a copy. (Windows)
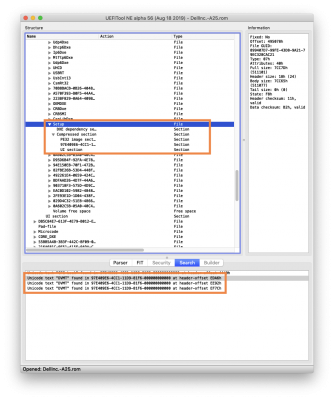
Opened UEFITool and opened the image file 'DellInc.-A25.rom', my BIOS file I saved using the BIOS_Backup_Tookit. (Windows/Mac)
Searched for CFG Lock first and extracted the 'Setup file', (Right click, 'Extract Body'). This saves an .fdb file that can be converted to text. (Windows/Mac)
Searched for DVMT, and extracted the 'Setup file', (Right click and 'Extract Body'). Saved the file, added DVMT before the format to avoid confusing the two .fbd files. (Windows/Mac).


Extracted BIOS using the BIOS_Backup_TooKit and saved a copy. (Windows)
Opened UEFITool and opened the image file 'DellInc.-A25.rom', my BIOS file I saved using the BIOS_Backup_Tookit. (Windows/Mac)
Searched for CFG Lock first and extracted the 'Setup file', (Right click, 'Extract Body'). This saves an .fdb file that can be converted to text. (Windows/Mac)
Searched for DVMT, and extracted the 'Setup file', (Right click and 'Extract Body'). Saved the file, added DVMT before the format to avoid confusing the two .fbd files. (Windows/Mac).
Attachments
Last edited:
- Joined
- Jan 21, 2012
- Messages
- 991
- Motherboard
- HP 8300 Elite
- CPU
- i5-3570
- Graphics
- GT 710
- Mobile Phone
Last edited:
- Joined
- Jun 13, 2017
- Messages
- 3,321
- Motherboard
- Gigabyte A520i AC
- CPU
- Ryzen 7 4700G
- Graphics
- Radeon Vega 8
- Mac
- Classic Mac
- Mobile Phone
Stop! At text stage you must search for
DVMT Pre-Allocated
Like so, searched for 'DVMT Pre-Allocated'.
Last edited:
- Joined
- Jun 13, 2017
- Messages
- 3,321
- Motherboard
- Gigabyte A520i AC
- CPU
- Ryzen 7 4700G
- Graphics
- Radeon Vega 8
- Mac
- Classic Mac
- Mobile Phone
Got it!. DMVT Pre-Allocated.

- Joined
- Jan 21, 2012
- Messages
- 991
- Motherboard
- HP 8300 Elite
- CPU
- i5-3570
- Graphics
- GT 710
- Mobile Phone
Windows Based Method to Find Offsets To Be Written To
Only needed if using a BIOS that is not listed as already done on post 1
Process
The bios offsets are different between BIOS versions and between 7020/9020 and should not be presumed.
We currently know;
Dell 9020 - Bios A25
CFG Lock - Offset - 0xDA2, normal value – 0x2 - new value 0x0
DVMT Pre-Allocated - Offset - 0x263, normal value – 0x2 - new value 0x3
Dell 7020 - Bios A18
CFG Lock - Offset - 0xDA2, normal value – 0x2 - new value 0x0
DVMT Pre-Allocated - Offset - 0x263, normal value – 0x2 - new value 0x3
Preparation
You will need to know the search words that will find you the right settings;
Here our final search will be for “CFG LOCK” and “DVMT Pre-Allocation” but there is a two stage search process and the searches may not be the same at those two stages. You will need to know if that is the case.
We use two different search terms for DVMT Pre-Allocation, when the we first search within UEFI tool for just “DVMT” but use “DVMT Pre-Allocation” when we search the text file that UEFI tool exports for the information we need.
Make a directory and put in; (files attached below as BiosProgs.zip)

Dump BIOS from Machine
Right click and Run Bios Backup Toolkit 'as Administrator' and backup the bios to this same folder
Extract Section of Interest from Bios using UEFI tool
For this method, each change we want to make to the UEFI settings creates two files -
To get 4k working on our Dells we will make 2 changes;
In UEFI tool, Under the File menu - Open image file - and select the Bios backup file made by BIOS Backup Toolkit.
In the Action menu select Search, then set 'Text' and 'Body Only' options and search for "CFG Lock".

If it finds any of that search term it will display them at the bottom of the window under the search tab.

Double Clicking on the item shown in the bottom window search tab will expand the tree to show where the search term was found

This shows the line where it was found but we want to export the branch it is part of not just that line - here that is everything that is in that part of the tree up to “Setup” (five lines above).
So we select Setup and then right click on that line and select Extract body to save the section our line is in with Setup as the root of that branch, to a file.

Keep the .fbd extension and name the file to show it is for CFG Lock.
If the file dialogue automatically shows the .fbd extension - that's a sort of sign we have properly selected a branch to be exported, if it does NOT there is a problem for sure.
If you do have more than uefi edit to make in a single BIOS this process makes a file for each one of the changes – note the name of the files and what they refer to.
The next image shows the naming of two Extracted bodies from the same bios file.

DVMT
Here we repeat the process, searching for “DVMT” which in this case gives us 3 results but they all refer to the same line. Double clicking on any of them will take us to the same line.

And again we want to extract the tree the line is on and up to “Setup” just above,
so we select the line with Setup on and right click it and extract.
Keeping the .fbd extension and naming the file to show it is for DVMT.
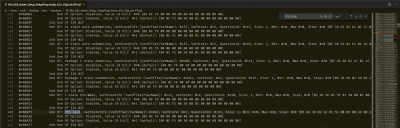
Convert Section of Interest Into Text Using Universal IFR Extractor
(I’m abbreviating to UIFRE).
Open UIFRE and click the three dots that open the file menu and select the .fbd file to be converted to text.

UIFRE should then show UEFI in green as the protocol, if it is not green or it does not say UEFI, there is a problem with the file Extracted using Uefi Tools.

Click Extract and save the file as text

Doing this for each .bdf file created and making sure you note or create filenames which relate to particular settings.
Read Settings
Open the text files in a text editor and search for the term needed for that particular file –
Two sets of settings will be shown here CFG Lock and DVMT Pre-Allocation.
In the Cfg Lock text file we Search for "CFG Lock"

And the bit we are interested in is

Which shows CFG Lock details of;
Just beneath the values is a list of what those values mean –
(In this particular case the currently stored value (0x2), is not included as an option so I suspect that here either anything other than zero counts as 1, or if an option number that does not exist is set, it just uses whatever is marked as the default.)
We want to disable CFG Lock and the text file shows that option as an 8 bit value of 0.
CFG Lock, 0xDA2, Currently 2, Disabled 0.
Doing the same with the DVMT text file and searching for “DVMT Pre-Allocated” we find

And the bits of interest to us show the DVMT Pre-Allocation Offset and value as 0x263 and 0x2 respectively.

So if we look lower down we can see the current value 0x2 signifies 64M (which here means 64MB of RAM) and we want 96MB of DVMT Pre-Allocated RAM or option 0x3.
So we have all the info about what we want to change
Dell 9020 - Bios A25
CFG Lock
Offset - 0xDA2, current value – 0x2 - Enabled to Disabled - 0x0
DVMT Pre-Allocated
Offset - 0x263, current value – 0x2 - 64M to 96M - 0x3
Write Setting
To alter the values we make a bootable USB which has only one UEFI based program on it - Grub Shell - and run commands using grub shell to alter the values of the offsets we just found.
Instructions on making the USB on a Mac or Linux is covered by @iLikeHackintosh in the section;
"How to create bootable USB for GRUB shell "
in this post.
Booting from the USB should go to a command prompt.
To help confirm we will be writing to the right locations, we will first read the values and only then write the new ones.
To read the Cfg Lock setting - the command
should return 2
and if it does we can change it to 0 using the command
and likewise for DVMT PreAllocation
should return 2, and we can set it to 3 with
Removing the USB and booting normally will show us if we have broken anything and rebooting with the boot USB to read the settings will show us if the settings keep between boots. (they generally do – but BIOS updates may revert these changes and Im minded to revert the changes back to their original state before doing a bios update?)
We also need to make an entry in Clover - covered in post 1 of this thread.
Only needed if using a BIOS that is not listed as already done on post 1
Process
- Dump BIOS from Machine
- Extract Section of Interest
- Convert Section of Interest into text
- Read Settings
- Write Setting - covered in detail on post 1
The bios offsets are different between BIOS versions and between 7020/9020 and should not be presumed.
We currently know;
Dell 9020 - Bios A25
CFG Lock - Offset - 0xDA2, normal value – 0x2 - new value 0x0
DVMT Pre-Allocated - Offset - 0x263, normal value – 0x2 - new value 0x3
Dell 7020 - Bios A18
CFG Lock - Offset - 0xDA2, normal value – 0x2 - new value 0x0
DVMT Pre-Allocated - Offset - 0x263, normal value – 0x2 - new value 0x3
Preparation
You will need to know the search words that will find you the right settings;
Here our final search will be for “CFG LOCK” and “DVMT Pre-Allocation” but there is a two stage search process and the searches may not be the same at those two stages. You will need to know if that is the case.
We use two different search terms for DVMT Pre-Allocation, when the we first search within UEFI tool for just “DVMT” but use “DVMT Pre-Allocation” when we search the text file that UEFI tool exports for the information we need.
Make a directory and put in; (files attached below as BiosProgs.zip)
- BIOS Backup Toolkit – used to extract the bios from the pc to a file
- UefiTool – used to extract section of interest from BIOS file
- Universal IFR Extractor – Used to convert section of interest into text
Dump BIOS from Machine
Right click and Run Bios Backup Toolkit 'as Administrator' and backup the bios to this same folder
Extract Section of Interest from Bios using UEFI tool
For this method, each change we want to make to the UEFI settings creates two files -
1. a ".fbd" which contains the section of info we need to make a change,
it is created in UEFI Tool from the bios image file but is not easily human readable,
and later
2. a ".txt" file created by Universal IFR Extractor which makes a readable plain text file from the .fdb
To get 4k working on our Dells we will make 2 changes;
- Disable Cfg Lock,
- Set DVMT memory size to 96MB
In UEFI tool, Under the File menu - Open image file - and select the Bios backup file made by BIOS Backup Toolkit.
In the Action menu select Search, then set 'Text' and 'Body Only' options and search for "CFG Lock".
If it finds any of that search term it will display them at the bottom of the window under the search tab.
Double Clicking on the item shown in the bottom window search tab will expand the tree to show where the search term was found
This shows the line where it was found but we want to export the branch it is part of not just that line - here that is everything that is in that part of the tree up to “Setup” (five lines above).
So we select Setup and then right click on that line and select Extract body to save the section our line is in with Setup as the root of that branch, to a file.
Keep the .fbd extension and name the file to show it is for CFG Lock.
If the file dialogue automatically shows the .fbd extension - that's a sort of sign we have properly selected a branch to be exported, if it does NOT there is a problem for sure.
If you do have more than uefi edit to make in a single BIOS this process makes a file for each one of the changes – note the name of the files and what they refer to.
The next image shows the naming of two Extracted bodies from the same bios file.
DVMT
Here we repeat the process, searching for “DVMT” which in this case gives us 3 results but they all refer to the same line. Double clicking on any of them will take us to the same line.
And again we want to extract the tree the line is on and up to “Setup” just above,
so we select the line with Setup on and right click it and extract.
Keeping the .fbd extension and naming the file to show it is for DVMT.
Convert Section of Interest Into Text Using Universal IFR Extractor
(I’m abbreviating to UIFRE).
Open UIFRE and click the three dots that open the file menu and select the .fbd file to be converted to text.
UIFRE should then show UEFI in green as the protocol, if it is not green or it does not say UEFI, there is a problem with the file Extracted using Uefi Tools.
Click Extract and save the file as text
Doing this for each .bdf file created and making sure you note or create filenames which relate to particular settings.
Read Settings
Open the text files in a text editor and search for the term needed for that particular file –
Two sets of settings will be shown here CFG Lock and DVMT Pre-Allocation.
In the Cfg Lock text file we Search for "CFG Lock"
And the bit we are interested in is
Which shows CFG Lock details of;
Its Offset - VarOffset/VarName which is 0xDA2, and
Its current value – VarStore which is 0x2
Just beneath the values is a list of what those values mean –
(In this particular case the currently stored value (0x2), is not included as an option so I suspect that here either anything other than zero counts as 1, or if an option number that does not exist is set, it just uses whatever is marked as the default.)
We want to disable CFG Lock and the text file shows that option as an 8 bit value of 0.
CFG Lock, 0xDA2, Currently 2, Disabled 0.
Doing the same with the DVMT text file and searching for “DVMT Pre-Allocated” we find
And the bits of interest to us show the DVMT Pre-Allocation Offset and value as 0x263 and 0x2 respectively.
So if we look lower down we can see the current value 0x2 signifies 64M (which here means 64MB of RAM) and we want 96MB of DVMT Pre-Allocated RAM or option 0x3.
So we have all the info about what we want to change
Dell 9020 - Bios A25
CFG Lock
Offset - 0xDA2, current value – 0x2 - Enabled to Disabled - 0x0
DVMT Pre-Allocated
Offset - 0x263, current value – 0x2 - 64M to 96M - 0x3
Write Setting
To alter the values we make a bootable USB which has only one UEFI based program on it - Grub Shell - and run commands using grub shell to alter the values of the offsets we just found.
Instructions on making the USB on a Mac or Linux is covered by @iLikeHackintosh in the section;
"How to create bootable USB for GRUB shell "
in this post.
Booting from the USB should go to a command prompt.
To help confirm we will be writing to the right locations, we will first read the values and only then write the new ones.
To read the Cfg Lock setting - the command
setup_var 0xDA2should return 2
and if it does we can change it to 0 using the command
setup_var 0xDA2 0x0and likewise for DVMT PreAllocation
setup_var 0x263should return 2, and we can set it to 3 with
setup_var 0x263 0x3Removing the USB and booting normally will show us if we have broken anything and rebooting with the boot USB to read the settings will show us if the settings keep between boots. (they generally do – but BIOS updates may revert these changes and Im minded to revert the changes back to their original state before doing a bios update?)
We also need to make an entry in Clover - covered in post 1 of this thread.
Attachments
Last edited:
- Joined
- Jun 13, 2017
- Messages
- 3,321
- Motherboard
- Gigabyte A520i AC
- CPU
- Ryzen 7 4700G
- Graphics
- Radeon Vega 8
- Mac
- Classic Mac
- Mobile Phone
- Joined
- Jan 21, 2012
- Messages
- 991
- Motherboard
- HP 8300 Elite
- CPU
- i5-3570
- Graphics
- GT 710
- Mobile Phone
Yes to checking - About this mac - displays.
This is the text that goes in Clover, if you want to just paste it in - beneath is a screenshot of clover configurator to show how i did changes
Attached a copy of my config.plist, with serial numbers randomised - you can see if there are any differences if it dont work for you.
<key>KextsToPatch</key>
<array>
<dict>
<key>Disabled</key>
<false/>
<key>Find</key>
<data>
AwAiDQADAwMAAAACAAAwAQ==
</data>
<key>InfoPlistPatch</key>
<false/>
<key>Name</key>
<string>AppleIntelFramebufferAzul</string>
<key>Replace</key>
<data>
AwAiDQADAwMAAAAEAAAAAw==
</data>
</dict>
</array>

You click the plus button (near the bottom - to the left of 'List of Patches"
Then the double click on the Name field of the line will be highlighted (it may say 'kext name')
The name and data must be correct - these were pasted directly from my config.plist;
name =
AppleIntelFramebufferAzul
Find =
0300220D 00030303 00000002 00003001
Replace =
0300220D 00030303 00000004 00000003
This is the text that goes in Clover, if you want to just paste it in - beneath is a screenshot of clover configurator to show how i did changes
Attached a copy of my config.plist, with serial numbers randomised - you can see if there are any differences if it dont work for you.
<key>KextsToPatch</key>
<array>
<dict>
<key>Disabled</key>
<false/>
<key>Find</key>
<data>
AwAiDQADAwMAAAACAAAwAQ==
</data>
<key>InfoPlistPatch</key>
<false/>
<key>Name</key>
<string>AppleIntelFramebufferAzul</string>
<key>Replace</key>
<data>
AwAiDQADAwMAAAAEAAAAAw==
</data>
</dict>
</array>
You click the plus button (near the bottom - to the left of 'List of Patches"
Then the double click on the Name field of the line will be highlighted (it may say 'kext name')
The name and data must be correct - these were pasted directly from my config.plist;
name =
AppleIntelFramebufferAzul
Find =
0300220D 00030303 00000002 00003001
Replace =
0300220D 00030303 00000004 00000003
Attachments
Last edited:
- Joined
- Jun 13, 2017
- Messages
- 3,321
- Motherboard
- Gigabyte A520i AC
- CPU
- Ryzen 7 4700G
- Graphics
- Radeon Vega 8
- Mac
- Classic Mac
- Mobile Phone
- Status
- Not open for further replies.
Copyright © 2010 - 2024 tonymacx86 LLC