
- Joined
- Sep 30, 2012
- Messages
- 367
- Motherboard
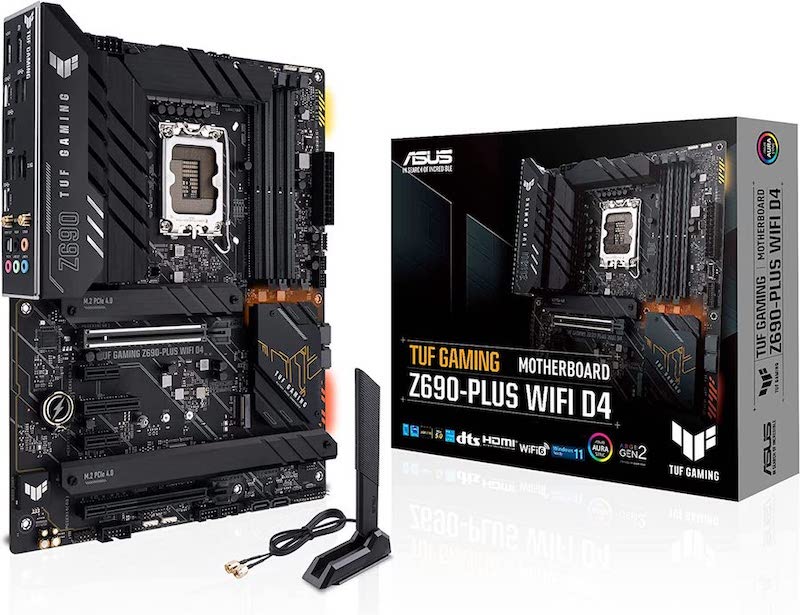
- Asus TUF Gaming Z690-PLUS WiFi D4
- CPU
- i7-12700K
- Graphics
- RX 580
- Mac
- Mobile Phone
Hardware
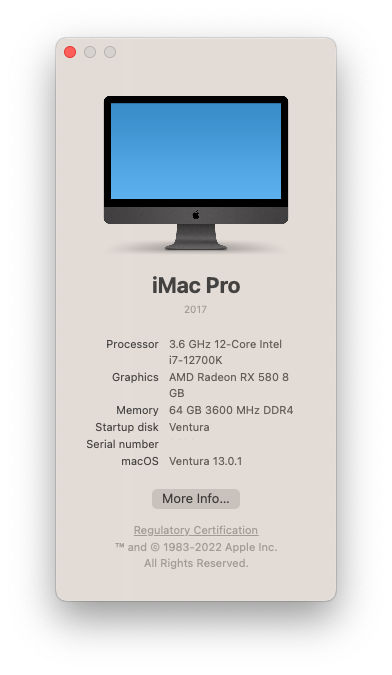
- Motherboard: ASUS TUF Gaming Z690-Plus WiFi D4
- CPU: Intel i7-12700K
- dGPU: XFX Radeon RX580 GTS Black Edition 8GB
- RAM: G.Skill Trident Z RGB Series 64GB (2x32GB) DDR4 3600
- NVMe (Main): SK hynix Platinum P41 2TB Gen4 NVMe M.2
- NVMe (Storage): WD_Black SN750 1TB Gen3 NVMe M.2
- WiFi/Bluetooth: Apple OEM Airport BCM94360CD
- Cooler: Noctua NH-D15 Premium CPU Cooler
- Power Supply: EVGA Supernova 850 T2, 80+ Titanium 850W
- Others: Apple Magic Keyboard & Magic Mouse
Steps
- Update FW to 2103 (see notes in the BIOS Settings section)
- Download macOS Ventura from the App Store
- Download OpenCore 0.8.6
- Using OpenCore Configurator, PlistEditor, or ProperTree, modify the config.plist file accordingly (see Notes section)
- Create the USB install media (make sure the EFI folder is copied onto the UEFI partition)
- Configure BIOS settings (see BIOS Settings section)
- Press F8 to boot from the USB drive and follow the onscreen instructions to install macOS Ventura
- Once everything is working properly, copy the EFI folder from the USB drive to your NVMe/SSD
Ethernet / WiFi / Bluetooth
To use the built-in Intel i225-V 2.5Gb Ethernet, AppleVTD must be enabled. No additional kext is required since it is supported natively in macOS Ventura. To enable AppleVTD, set the following:
• config.plist → Kernel → Quirks → DisableIoMapper = False
• config.plist → ACPI → Add → SSDT-DMAR.aml → set Enabled = True
• config.plist → ACPI → Delete → DMAR → set Enabled = True
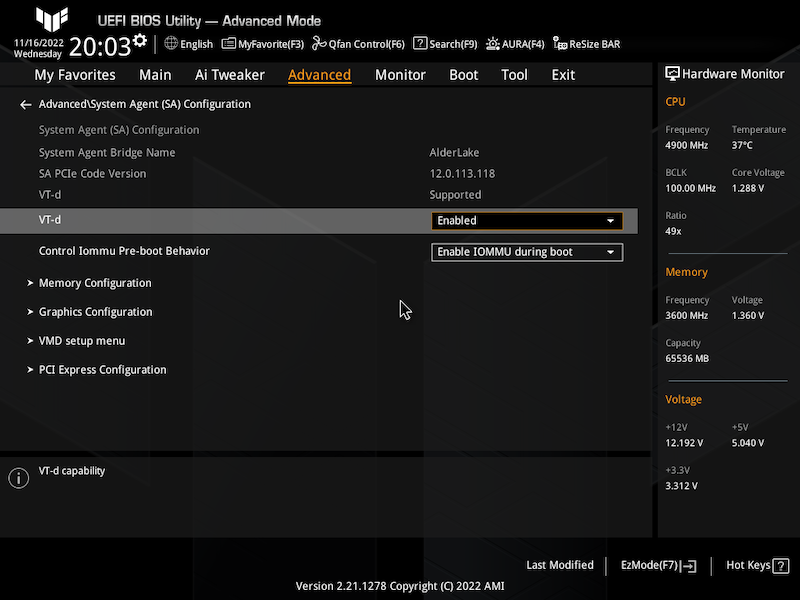
• BIOS → Advanced → System Agent (SA) Configuration → VT-d = Enabled
I am using an Apple OEM Airport Broadcom BCM94360CD 802.11ac/Bluetooth module that I made over 9 years ago and it works perfectly OOB. This is identical to the Fenvi t919 PCIe card. Since I won't be using the built-in Intel WiFi6 and Bluetooth, I have them disabled in BIOS (see BIOS Settings section). If you want to use the built-in Intel WiFi6/Bluetooth model, enable them in BIOS first then read this post.
USB Port Mapping
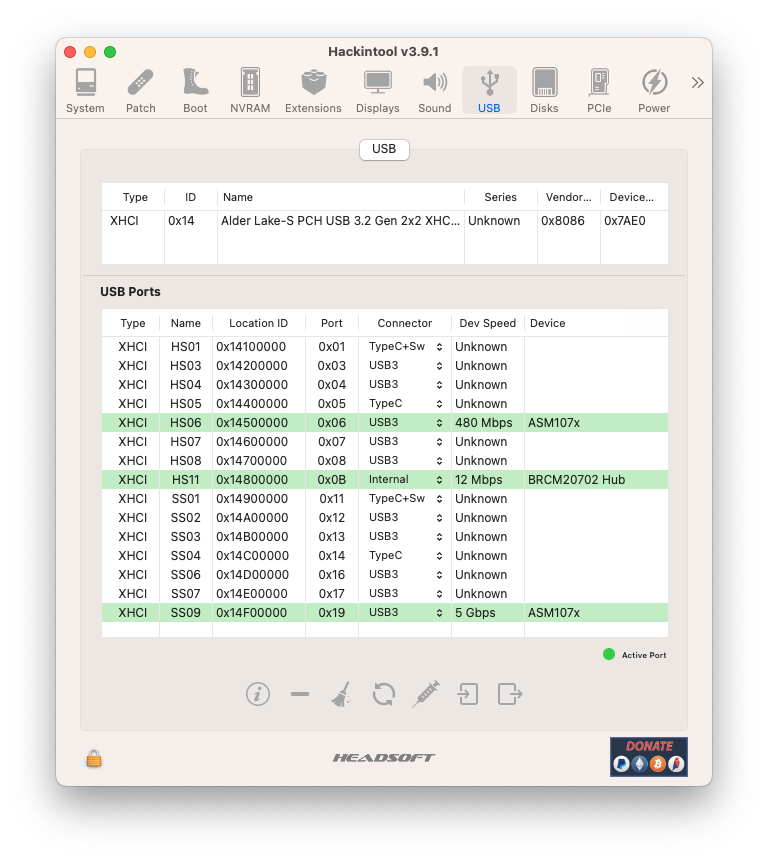
A total of 15 USB ports is mapped using Hackintool.
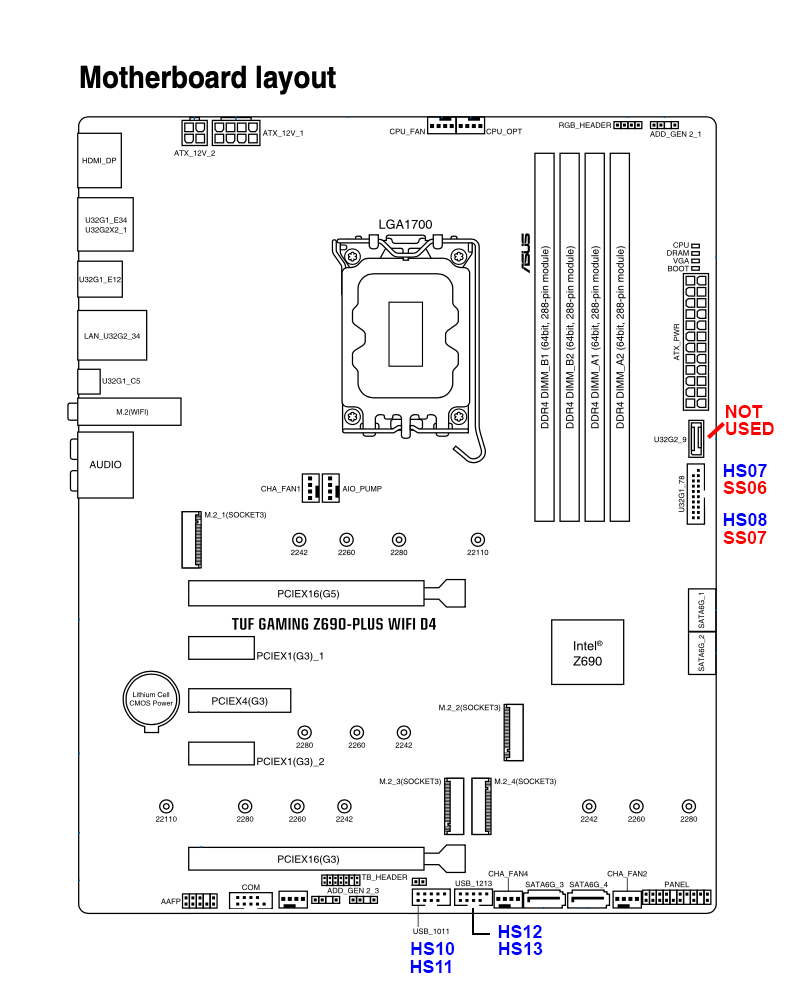
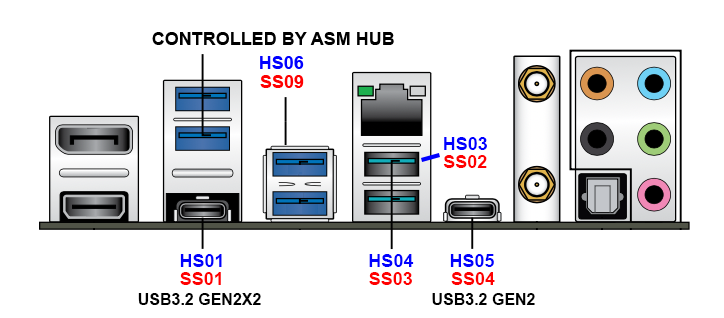
• The four (4) blue USB3.2 Gen1 Type-A ports (U32G1_E34 and U32G1_E12) on the back panel are controlled by the ASMedia ASM107X hub and automatically mapped to ports HS06/SS09
• HS02 is the AURA LED Controller and since we cannot use it in macOS, it is disabled
• HS11 is the one of the four (4) onboard USB2.0 headers (USB_1011 and USB_1213) used by Apple OEM Airport BCM94360CD Bluetooth (shows up as BRCM20702 Hub) and should be defined as Internal (255). If you are using a Fenvi t919 card or a compatible Broadcom adapter, enable the appropriate USB2.0 port where your Bluetooth power cable is plugged into (e.g.: HS10/HS11 or HS12/HS13)
BIOS Settings
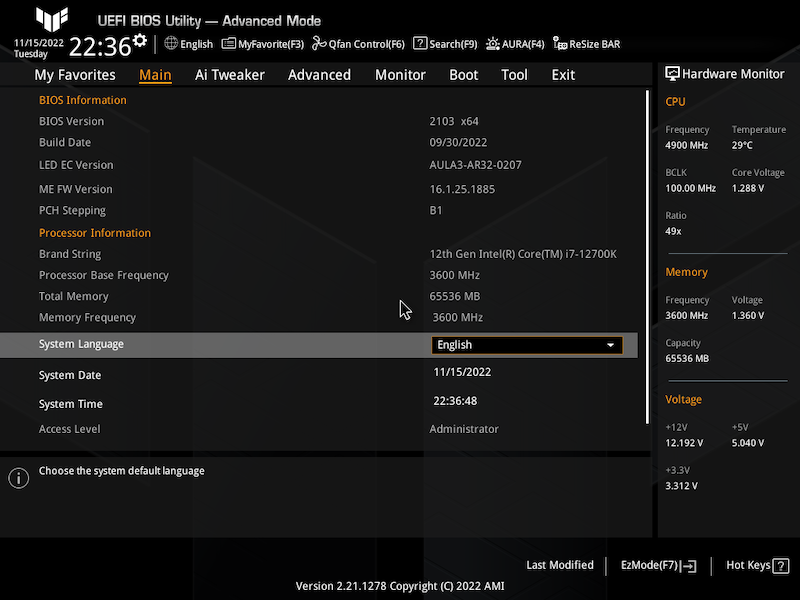
BIOS FW is 2103 (released 10/19/2022), which is the latest FW at the time of this post (Note: Need to update Intel ME to version 16.1.25.1885 prior to updating the BIOS FW, as stated in the BIOS FW instructions, and this can be only done in Windows). I believe FW 2004 (released 09/16/2022) includes Intel ME 16.1.25.1885 so if you don't have Windows, you can upgrade to FW 2004 and then FW 2103.
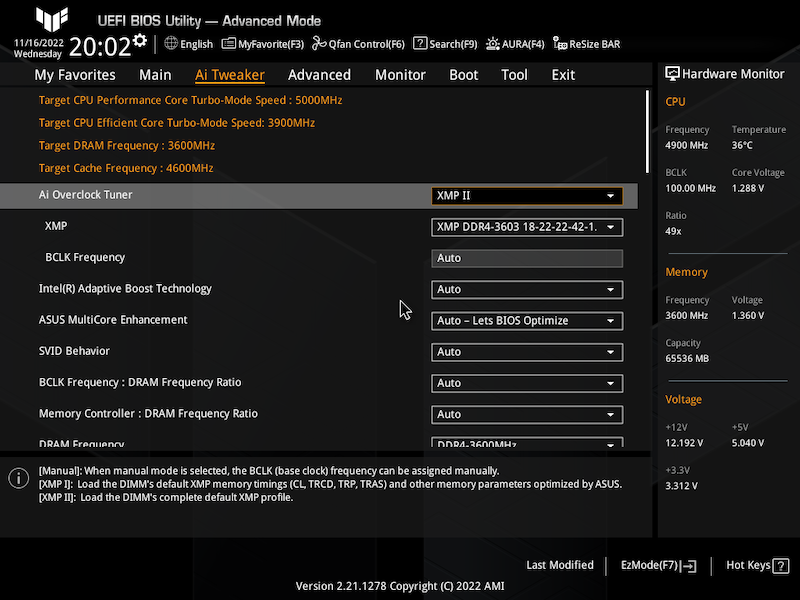
• Ai Tweaker → Ai Overclock Tuner → Choose XMP I (or XMP II if your RAM allows it)
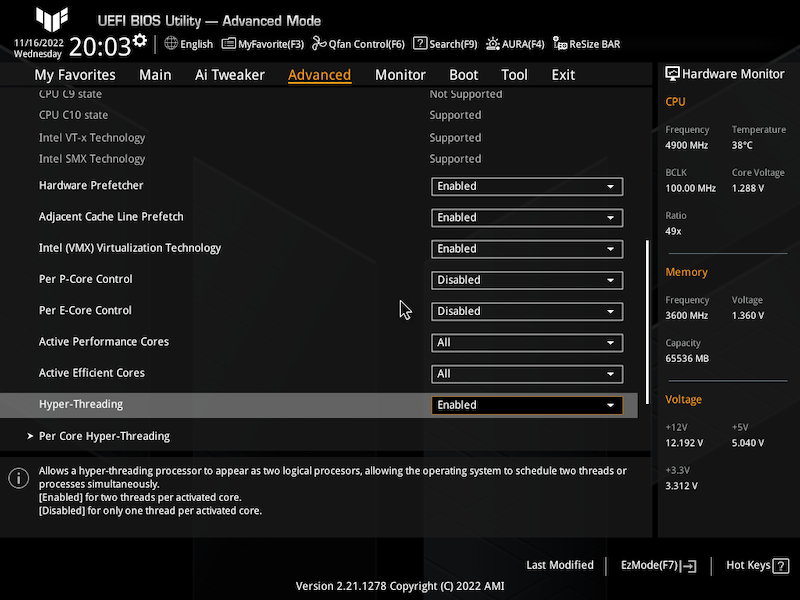
• Advanced → CPU Configuration → Active Performance Cores = All
• Advanced → CPU Configuration → Active Efficient Cores = All
• Advanced → CPU Configuration → Hyper-Threading = Enabled
• Advanced → System Agent (SA) Configuration → VT-d = Enabled
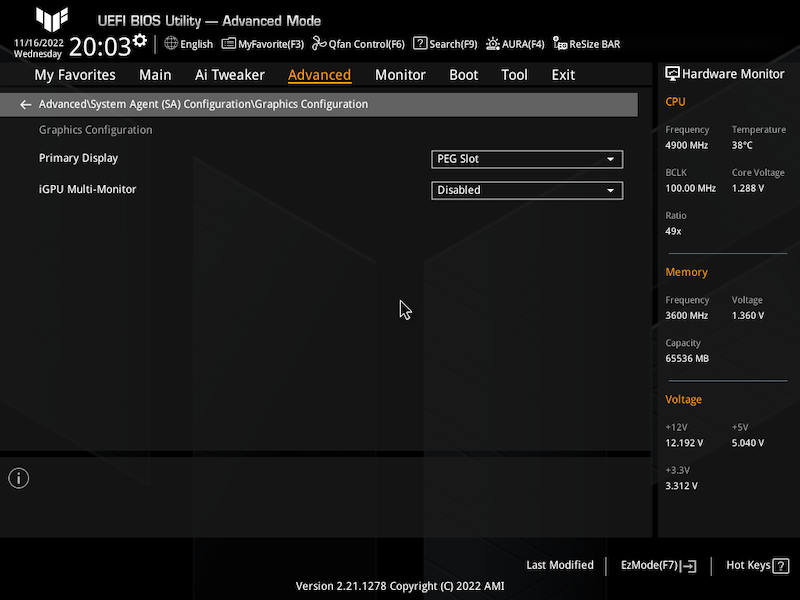
• Advanced → System Agent (SA) Configuration → Graphics Configuration → Primary Display = PEG Slot
• Advanced → System Agent (SA) Configuration → Graphics Configuration → IGPU Multi-Monitor = Disabled
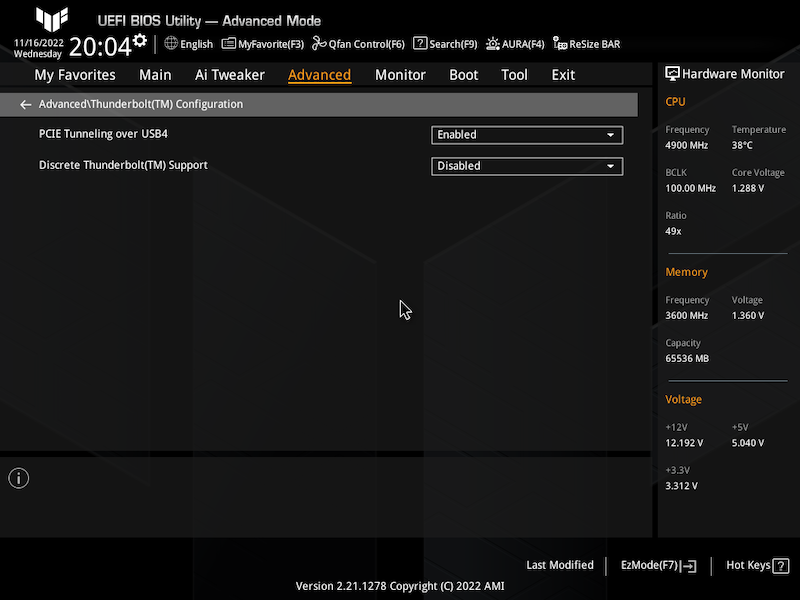
• Advanced → Thunderbolt(TM) Configuration → Discrete Thunderbolt Support = Disabled
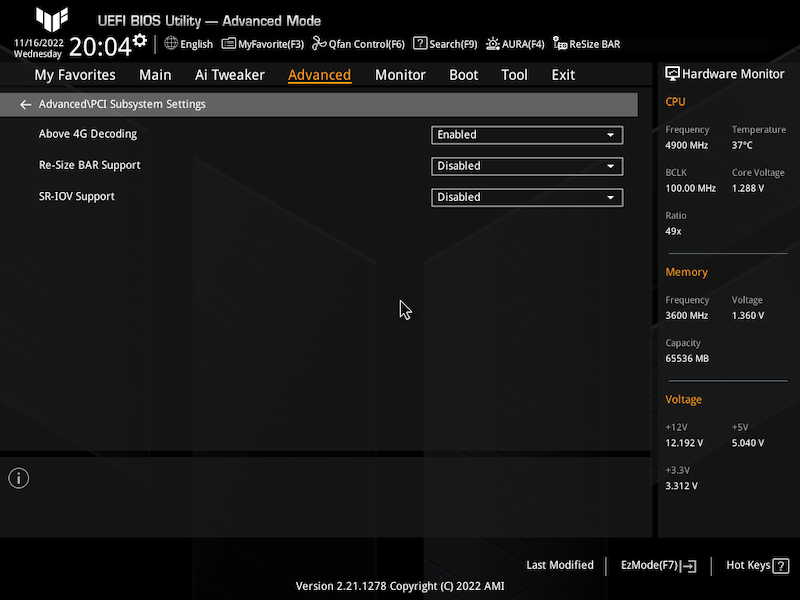
• Advanced → PCI Subsystem Settings → Above 4G Decoding = Enabled
• Advanced → PCI Subsystem Settings → Re-Size BAR Support = Disabled
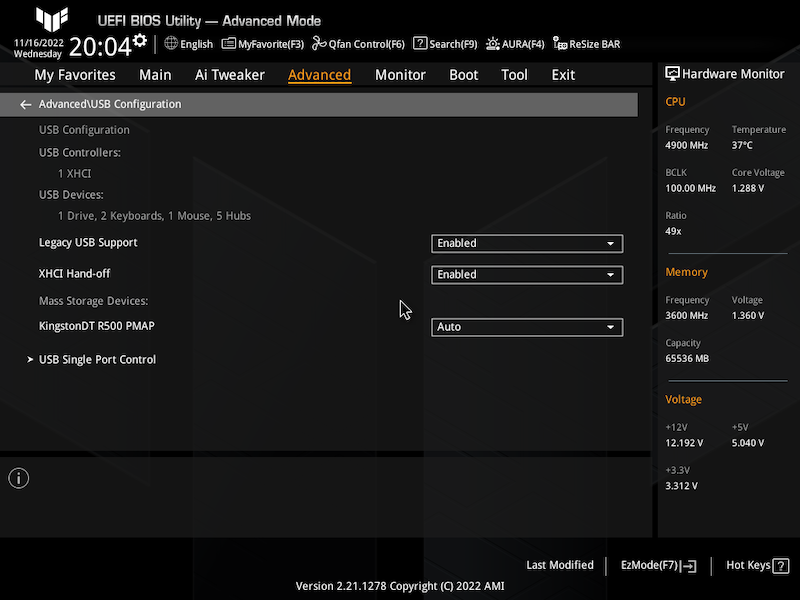
• Advanced → USB Configuration → XHCI Hand-off = Enabled
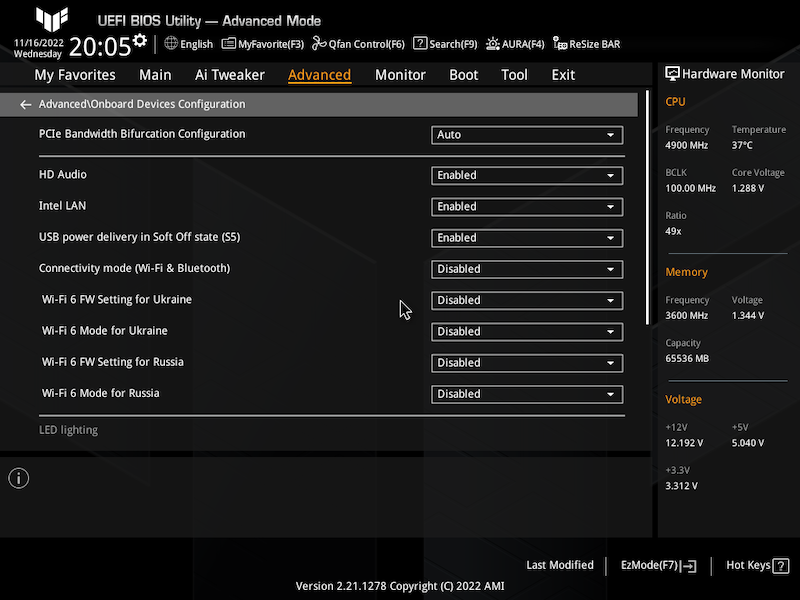
• Advanced → Onboard Devices Configuration → USB power delivery in Soft Off state (S5) = Enabled
• Advanced → Onboard Devices Configuration → Connectivity mode (Wi-Fi & Bluetooth) = Disabled
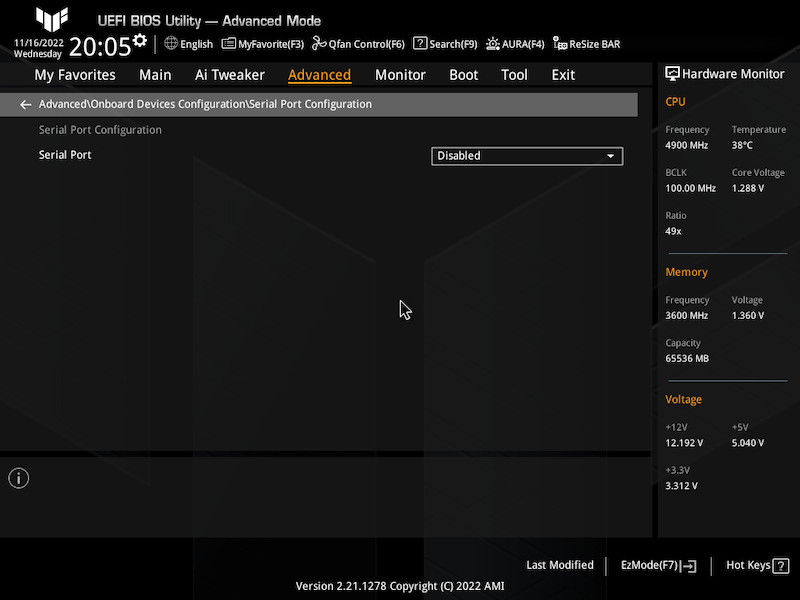
• Advanced → Onboard Devices Configuration → Serial Port Configuration → Serial Port = Disabled
• Boot → CSM (Compatibility Support Module) → Launch CSM = Disabled
• Boot → Secure Boot → OS Type = Windows UEFI mode (or Other OS)
• Boot → Secure Boot → Secure Boot Mode = Custom
• Boot → Secure Boot → Key Management → Clear Secure Boot Keys
• Boot → Boot Configuration → Fast Boot = Disabled
What Works?
• Shutdown, restart
• Sleep, wake
• AppleTV, Music, App Store, iCloud
• FaceTime, Messages
• Handoff, Continuity (Clipboard, Camera) , AirDrop, Universal Control, SMS, Phone
• Unlock with Apple Watch
• WiFi (802.11ac) + Bluetooth
• Intel i225-V 2.5Gb Ethernet
What Does Not Work?
• Sidecar
Notes 1
• Depending on which M.2 slot and what type of NVMe SSD you are planning to use, if you want them to show up under the PCI section on System Information screen, they should be mapped in config.plist → DeviceProperties → Add section:
• For slot M.2_1 change PciRoot(0x0)/Pci(0x6,0x0)/Pci(0x0,0x0) → model → <name_of_your_NVMe_SSD>
• For slot M.2_3 change PciRoot(0x0)/Pci(0x1A,0x0)/Pci(0x0,0x0) → model → <name_of_your_NVMe_SSD>
For any other M.2 slots (M.2_2 and M.2_4), install the drive(s) first, then go to the PCIe section in Hackintool to find out their Device Path and update the DeviceProperties → Add section in the config.plist file accordingly.
Notes 2
The system wakes (from sleep) when pressing any key on the corded or Bluetooth keyboard (or clicking on the mouse). If you want the system to wake up only by pressing the Power button, make the following changes:
• config.plist → ACPI → Add → SSDT-GPRW.aml → set Enabled = True
• config.plist → ACPI → Add → SSDT-USBW.aml → set Enabled = False
• config.plist → ACPI → Patch → find "change Method(GPRW,2,N) to XPRW..." patch → set Enabled = True
• config.plist → Kernel → Add → find "USBWakeFixup.kext" → set Enabled = False
Notes 3
As of 15 Jan 2023, the BIOS for the motherboard is patched to disable CFG-Lock due to the fact that ASUS motherboards are factory CFG locked. As a result, beginning with OpenCore 0.8.9, all future EFI folders will reflect as such. The instructions to patch the CFG-Lock can be found here.
If you do not want to patch the BIOS (and future BIOS releases), make sure that these 2 settings in the config.plist are as follows:
• config.plist → Kernel → Quirks → AppleCpuPmCfgLock = False
• config.plist → Kernel → Quirks → AppleXcpmCfgLock = True
Notes 4
i think I have finally fixed the issues with Bluetooth for the latest macOS Ventura 13.5 up to 13.6. Bluetooth now should work properly upon sleep/wakeup (even in macOS Sonoma 14.0). Note that I am using the BCM4360CD WiFi/Bluetooth adapter (same as the Fenvi t919) so if you are *not* using the same adapter you might not experience any Bluetooth issues to begin with.
What I did was remove the SSDT-USBW.aml and USBWakeFixup.kext, then regenerate some of the ACPI files using the SSDTTime app. For this configuration, Bluetooth works natively without any SSDT or kext.
The latest EFI (EFI_OC_095_2) contains all the latest changes.
Notes 5
As per CaseySJ's recommendation, instead of enabling AppleVTD (VT-d), we can just use this new kext and modify the config.plist as specified below. This will ensure that the Intei I225-V Ethernet adapter will work in the latest Ventura 13.1+ and Sonoma. You can read his post here.
• Download AppleIGC.kext and move it to EFI/OC/Kexts folder
• Insert an entry in config.plist → Kernel → Add section to reflect this new kext
• In config.plist → DeviceProperties, remove (or disable) the entry related to the Intel i225-V Ethernet controller
• Add e1000=0 to boot-args in config.plist
Notes 6
If you are going to update to the latest BIOS (2602 and later), make sure to modify the config.plist file as follows. Otherwise, the system will not boot properly and you'll end up with a black screen with the Apple icon.
• config.plist → Booter → Quirks → SetupVirtualMap = True
Credits:
• @CaseySJ, @Middleman, @etorix, @bootmacos and the Hackintosh community
Updates
• 16 Nov 2022: First release
• 06 Dec 2022: Updated to OpenCore 0.8.7
• 08 Jan 2023: Updated to OpenCore 0.8.8
• 15 Jan 2023: Added Notes 3 with regards to CFG-Lock
• 15 Feb 2023: Updated to OpenCore 0.8.9
• 06 Mar 2023: Updated to OpenCore 0.9.0
• 05 Apr 2023: Updated to OpenCore 0.9.1
• 09 May 2023: Updated to OpenCore 0.9.2
• 12 Jun 2023: Updated to OpenCore 0.9.3
• 13 Aug 2023: Updated to OpenCore 0.9.4
• 11 Sep 2023: Updated to OpenCore 0.9.5
• 26 Sep 2023: Added Notes 4 and updated EFI with Bluetooth issues fixed (OpenCore 0.9.5)
• 06 Oct 2023: Added Notes 5 regarding AppleIGC.kext for Intel I225-V Ethernet adapter
• 22 Oct 2023: Added Notes 6 regarding the booting issue with latest BIOS
Attachments
-
EFI_OC_0.8.6.zip5.4 MB · Views: 260
-
EFI_OC_087.zip5.4 MB · Views: 264
-
EFI_OC_088.zip5.4 MB · Views: 239
-
EFI_OC_089.zip5.5 MB · Views: 117
-
EFI_OC_090.zip5.5 MB · Views: 121
-
EFI_OC_091.zip5.5 MB · Views: 177
-
EFI_OC_092.zip5.5 MB · Views: 145
-
EFI_OC_093.zip5.5 MB · Views: 237
-
EFI_OC_094.zip5.6 MB · Views: 129
-
EFI_OC_095.zip5.6 MB · Views: 85
-
EFI_OC_095_2.zip5.5 MB · Views: 351
Last edited: