
- Joined
- Jul 16, 2011
- Messages
- 18
- Motherboard
- HP Pavillion dv 6 6116tx laptop
- CPU
- Intel i3 2310m
- Graphics
- AMD Radeon 6490M / Intel HD 3000
- Mac
- Classic Mac
- Mobile Phone
[Guide] HP DV6 6116TX Mountaion Lion Applehda audio + HDMI audio for DV 6 Series (IDT111d7605 differs from Mickey1979 system)
Hi guys,
Here is a guide for HP Dv6 6116tx entertainment notebook/ DV6 series in general.
Edit 1 : Attached @RacerRehabman 's VoodooPS2 here .... works perfectly.
Edit 2: No need for Lapic patcher from now on. Just download Chameleon Wizard. It works with Chimera 2.2. Go to "Modules" tab and select the "Kernel patcher" module. It will do it on its own.
Edit 3: No more use of GraphicsEnabler=Yes in boot.plist. Got rid off it as it gave artifacts owing to the problem that I cannot switch of AMD6490m in my BIOS.
Edit 4: Am now using Resolution patcher module from Chameleon wizard on Chimera 2.2.
Edit 5: Am working on a way to boot using clover and maybe even install Mountain Lion (successful) and future versions of OSX (?) using Clover efi on our legacy BIOS board.
Credits:
@RacerRehabman, @bcc9, @Mirone (thanks a lot for Applehda), @toleda, @the hackintosh community in general and @overclockthesun (me) 8).
My specs:
Intel i3 2310m cpu,
4Gb Ram,
AMD 6490M Switchable Graphics,
4 USB 2.o ports, 1x HMDI, 1xVGA port.
Realtek 8158 ehternet port, intel centrino 1300n wireless network and bluetooth,
128 GB OCZ Agility 3 SSD, HP DVD Drive.
*I suggest moving onto an SSD asap as it helps with installation and troubleshooting owing to its higher speeds*


+Working: Everything")
- Not Working:
1)Wifi: The whitelist for this card does not support AR 9285, but I would like someone to confirm it first. I do not have an AR 9285 to confirm it.
2) AMD 6490M. Useless card. HP has locked its bios down so tight even pheonix tool won't dump its bios. Will not work.
Getting Started:
First and foremost, you need at least a working Mac/hack/ vmware installation of OSX in windows to prepare the unibeast installation disk.
Follow this link to prepare your unibeast drive. http://www.tonymacx86.com/61-unibeast-install-os-x-mountain-lion-any-supported-intel-based-pc.html
Go on and complete step 2 of the above guide. You now have your Unibeast drive ready to install.
Go ahead and boot into your computer. Press F9 once the motherboard POSTS (shows the "Press Delete to enter setup or F10 for BIOS Options" screen) and select the Unibeast drive, then wait for the boot selection screen. Highlight the unibeast drive.
Now type " cpus=1 busratio=21 -f -v". Make sure you have no other usb drives attached except for the Unibeast one.
This should take you straight to welcome screen of the installation utility.
Now comes the part of partitioning your HDD/SSD.
I dual boot Windows 8 pro and Mountain lion on my disk. As such Rehabman's guide for this purpose is perfect.
Check it out here: http://racerrehabman.wordpress.com/
If like me you make 2 partitions, follow the guide and install Windows 8 to the first partition and then select the second partition for our install. Go ahead and install Mountain lion on your disk. When it completes restart your computer.
Now hit F9 again select the Unibeast drive and boot into Mountain Lion using the same flags above with one exception i.e. "cpus=1 busratio=21 -f -v USBBusFix" without quotes. Without the last one you will not see any usb drives. This flag is temporary and we will not need it after installing all our kexts especially FakeSMC.kext.
You will now reach the registration process. Complete it and go ahead and login. If you have an apple id complete that step too. Do not copy any data from another time machine backup if you have. Just complete the process and you should have the desktop in sight!
Hurray! You are in the matrix now.
Now for Post Installation instructions.
First things first. I advise you to just close your eyes and update to 10.8.4. You can download it from here
http://support.apple.com/kb/dl1659.
Next go ahead restart your pc into the Unibeast drive but wait at the selection screen. Now you should see your Mountain Lion system in the list too. Select it, type in "cpus=1 busratio=21 -f -v USBBusFix" without quotes and boot into your system.
Once at the desktop, the first thing you are going to do is install the necessary kexts to run your system. This will be done via 2 steps: 1) Using Multibeast and 2) By installing all the attached kexts with Kext Utility. This is because we have to go a step further than Multibeast to get our DV6 in tip-top condition.
Step 1)
Using Multibeast:
Download multibeast from http://www.tonymacx86.com/downloads.php?do=file&id=186 and open it.
Click next until you arrive at the options screen. Select what I have chosen here.


As you can see, I have not selected "User/DSDT Free installation". We are about to do that in a while.
1 - A)
Once you finish installing Mulitbeast, the next step is to open the HP Probook installer. You can get that from here http://www.tonymacx86.com/hp-probook/87816-hp-probook-installer-6-1-4x30s-4x40s-support.html
I suggest using version 6 as it still has the SSDT we require. Alternatively you can copy the SSDT I have attached to your /Extra folder. Remember, the SSDT I have provided is only for Intel i3 2310m processor. I will include screenshots of both the version 6 and the latest at the time of writing this guide - version 6.1.2 beta in this respective order.
Load it up and select the following.

Or

The reason we have not selected any kexts or DSDT is because we have selected our kexts from Multibeast and we are about to install the rest from the attachments below.
We still have not restarted as yet. If you feel like it, you can do it now using Unibeast or you can do the next vital but optional (optional till the next reboot) steps right now.
As we know, HP notebook require a patched mach_kernel. But before we do that we must setup our iCloud, iTunes and messages account. Go ahead right now and login to iCloud, iTunes and iMessages accounts. If your iMessages account doesn't work, just login to iTunes and go to edit information-> enter your credit card details. It will work after that. Make sure that your iCloud, iTunes and iMessages are working before moving on. Don't worry its not like its irreversible. Its just that after patching the kernel you will need to boot in with mach_kernel.bak (remember the .bak) if you need to change these items.
Now onto Patching the kernel.
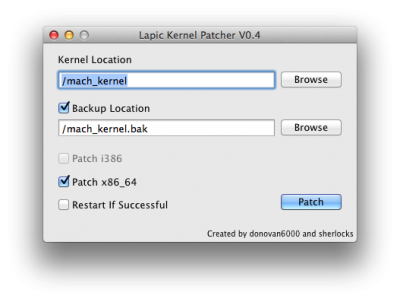
First search and download "Lapic kernel patcher" using your favourite search engine (which should be google) or download from the attachments below. http://www.tonymacx86.com/attachment.php?attachmentid=65191&d=1377368635
You will be presented with this screen.

It should automatically select the file for you. In case it does not, browse to the root of your Mountain Lion volume ... in my case /lion and select "mach_kernel". The destination should be the same as the source. Select "create backup of mach_kernel" and deselect "Restart if successful" option.
Now you have a patched mach_kernel. This means that you no longer need to boot with "cpus=1 busratio=21" option
However, this patch must be repeated on every system update ...say for example when we update from 10.8.4 to 10.8.5.
Next we can move to other fun stuff.
Step 2):
What we have left to get working now is simple (well not exactly simple),
1) Audio - using Applehda kext ..... we will need DSDT for this purpose.
2) QE/CI for HD 3000 graphics. (IntelHD3000graphics.kext)
3) HD out to say an HDTV etc ....also this includes getting automatic Display Mirroring started. (AppleIntelSNBGraphics.kext)
4) HDMI Audio - related to Applehda audio. (Applehda.kext)
5) Battery recognition. (Voodoobatterymanager.kext)
6) Getting the system to properly recognise AC Adapter power when we remove our battery and use just the AC adapter. (Applesmartbatterymanager.kext)
7) Trackpad and custom Fn key shortcuts + gestures (last minute addition to the guide) (Rehabman zip folder - VoodooPS2Controller)
8) Kozlek's FakeSMC.kext for voodoops2 to work properly.
9) AppleACPIPlatform.kext to prevent kernel panic.
10) AppleIntelCPupowermanagement.kext so you don't need to use Nullcpupowermanagement kext.
In simple terms, just drag and drop all the above mentioned kexts except "7" into kext utility and install them. I will explain how each one works in the next sentence. You should have everything working now.
* Audio and HDMI audio needed patching because even though it is the same IDT 111d7605 as @Mickey1979's, there is a small difference. That has been taken care of thanks to @Mirone.
** Getting HDMI audio was a pain, but it was solved thanks to @toleda 's guide. All I had to do was change the value in the string 0205 from 0400 to 0800. Viola!

*** Getting proper sound and Display mirroring requires a simple patch. Both the Appleintelhd3000Graphics and AppleIntelSNBGraphics have to be patched in this way.
As you can see above, you have to find the key and add or edit 0x01168086 to 01168086. Just remove the leading "0x". Thats it. If not, you won't get automatic mirroring or even mirroring at all. Also there are more than one IOPCIPrimaryMatch keys in SNBGraphics.kext. Add it in all places.
**** Now in case of "7)" - VoodooPS2controller, unzip the rehabman folder and first install the kext using kext utility. Then enter these commands in terminal after changing directory to the place when you just unzipped the files.
If it returns an error don't worry, it means that these kexts are not installed which is good news.
Next do this,
This should install the PS2 driver for our keyboard and trackpad. You can customise the Brightness keys in system preferences -> Keyboard-> ...... after a restart.

As you can see I have setup mine to use Fn+F2 and Fn+F3. Without this kext, you will have to use Fn+Right Shift(pause) for Increasing brightness and you will have no controls to reduce brightness at all.
Now we have just a few steps left before we can restart.
Next copy the DSDT.aml I have attached if are using the same as mine to your /Extra folder. After that, comes the part where you copy the custom EDID to /System/Library/Display/DisplayOverrides/ if you once again have the same system as me.
Do not copy these 2 files unless you have the same system as mine. You will need to generate your own DSDT using MacIASL.
Next, if you have an SSD like me, this where those "Extra Tools" from the Probook installer will come in handy. Open up "TRIM Enabler" and set it to the "On" position. This should start TRIM on your system on the next boot.

Finally, we will use Chameleon Wizard to select boot flags. Yes this does save to Chimera Bootloader! This way you don't have to manually edit the org.boot.plist file everytime you want to change something. Unless its something like the EDID like the codes I have posted below.
For my system, the following screenshot has all the needed boot flags.

Also in case you have the exact same system as mine, go ahead and open up the boot.plist file in Plist editor. You can now copy these keys to your own boot.plist if you want to generate one.
Remember don't copy anything other than The SMBoardproduct details if you don't use a similar system as mine. That is the EDID data. SMBoardproduct data must be copied for every HD3000 system if you want HDMI to work.
In case you still have RTC/CMOS reset issues do this after installation is completed. (Only in case you get cmos reset after using multibeast like I did).
First search for "RTC" in DSDT by opening it in MacIASL. Then make changes to it so it looks exactly like this.
Then open up Terminal and run these 2 commands
Thats it! Go ahead and restart your system. Everything should be working absolutely fine now Everything should be just like a Macbookpro.
Enjoy your HackBookPro!!!!arty:
Benchmarks coming up soon.
Hi guys,
Here is a guide for HP Dv6 6116tx entertainment notebook/ DV6 series in general.
Edit 1 : Attached @RacerRehabman 's VoodooPS2 here .... works perfectly.
Edit 2: No need for Lapic patcher from now on. Just download Chameleon Wizard. It works with Chimera 2.2. Go to "Modules" tab and select the "Kernel patcher" module. It will do it on its own.
Edit 3: No more use of GraphicsEnabler=Yes in boot.plist. Got rid off it as it gave artifacts owing to the problem that I cannot switch of AMD6490m in my BIOS.
Edit 4: Am now using Resolution patcher module from Chameleon wizard on Chimera 2.2.
Edit 5: Am working on a way to boot using clover and maybe even install Mountain Lion (successful) and future versions of OSX (?) using Clover efi on our legacy BIOS board.
Credits:
@RacerRehabman, @bcc9, @Mirone (thanks a lot for Applehda), @toleda, @the hackintosh community in general and @overclockthesun (me) 8).
My specs:
Intel i3 2310m cpu,
4Gb Ram,
AMD 6490M Switchable Graphics,
4 USB 2.o ports, 1x HMDI, 1xVGA port.
Realtek 8158 ehternet port, intel centrino 1300n wireless network and bluetooth,
128 GB OCZ Agility 3 SSD, HP DVD Drive.
*I suggest moving onto an SSD asap as it helps with installation and troubleshooting owing to its higher speeds*
+Working: Everything
- Not Working:
1)Wifi: The whitelist for this card does not support AR 9285, but I would like someone to confirm it first. I do not have an AR 9285 to confirm it.
2) AMD 6490M. Useless card. HP has locked its bios down so tight even pheonix tool won't dump its bios. Will not work.
Getting Started:
First and foremost, you need at least a working Mac/hack/ vmware installation of OSX in windows to prepare the unibeast installation disk.
Follow this link to prepare your unibeast drive. http://www.tonymacx86.com/61-unibeast-install-os-x-mountain-lion-any-supported-intel-based-pc.html
Go on and complete step 2 of the above guide. You now have your Unibeast drive ready to install.
Go ahead and boot into your computer. Press F9 once the motherboard POSTS (shows the "Press Delete to enter setup or F10 for BIOS Options" screen) and select the Unibeast drive, then wait for the boot selection screen. Highlight the unibeast drive.
Now type " cpus=1 busratio=21 -f -v". Make sure you have no other usb drives attached except for the Unibeast one.
This should take you straight to welcome screen of the installation utility.
Now comes the part of partitioning your HDD/SSD.
I dual boot Windows 8 pro and Mountain lion on my disk. As such Rehabman's guide for this purpose is perfect.
Check it out here: http://racerrehabman.wordpress.com/
If like me you make 2 partitions, follow the guide and install Windows 8 to the first partition and then select the second partition for our install. Go ahead and install Mountain lion on your disk. When it completes restart your computer.
Now hit F9 again select the Unibeast drive and boot into Mountain Lion using the same flags above with one exception i.e. "cpus=1 busratio=21 -f -v USBBusFix" without quotes. Without the last one you will not see any usb drives. This flag is temporary and we will not need it after installing all our kexts especially FakeSMC.kext.
You will now reach the registration process. Complete it and go ahead and login. If you have an apple id complete that step too. Do not copy any data from another time machine backup if you have. Just complete the process and you should have the desktop in sight!
Hurray! You are in the matrix now.
Now for Post Installation instructions.
First things first. I advise you to just close your eyes and update to 10.8.4. You can download it from here
http://support.apple.com/kb/dl1659.
Next go ahead restart your pc into the Unibeast drive but wait at the selection screen. Now you should see your Mountain Lion system in the list too. Select it, type in "cpus=1 busratio=21 -f -v USBBusFix" without quotes and boot into your system.
Once at the desktop, the first thing you are going to do is install the necessary kexts to run your system. This will be done via 2 steps: 1) Using Multibeast and 2) By installing all the attached kexts with Kext Utility. This is because we have to go a step further than Multibeast to get our DV6 in tip-top condition.
Step 1)
Using Multibeast:
Download multibeast from http://www.tonymacx86.com/downloads.php?do=file&id=186 and open it.
Click next until you arrive at the options screen. Select what I have chosen here.
As you can see, I have not selected "User/DSDT Free installation". We are about to do that in a while.
1 - A)
Once you finish installing Mulitbeast, the next step is to open the HP Probook installer. You can get that from here http://www.tonymacx86.com/hp-probook/87816-hp-probook-installer-6-1-4x30s-4x40s-support.html
I suggest using version 6 as it still has the SSDT we require. Alternatively you can copy the SSDT I have attached to your /Extra folder. Remember, the SSDT I have provided is only for Intel i3 2310m processor. I will include screenshots of both the version 6 and the latest at the time of writing this guide - version 6.1.2 beta in this respective order.
Load it up and select the following.
Or
The reason we have not selected any kexts or DSDT is because we have selected our kexts from Multibeast and we are about to install the rest from the attachments below.
We still have not restarted as yet. If you feel like it, you can do it now using Unibeast or you can do the next vital but optional (optional till the next reboot) steps right now.
As we know, HP notebook require a patched mach_kernel. But before we do that we must setup our iCloud, iTunes and messages account. Go ahead right now and login to iCloud, iTunes and iMessages accounts. If your iMessages account doesn't work, just login to iTunes and go to edit information-> enter your credit card details. It will work after that. Make sure that your iCloud, iTunes and iMessages are working before moving on. Don't worry its not like its irreversible. Its just that after patching the kernel you will need to boot in with mach_kernel.bak (remember the .bak) if you need to change these items.
Now onto Patching the kernel.
First search and download "Lapic kernel patcher" using your favourite search engine (which should be google)
or download from the attachments below. http://www.tonymacx86.com/attachment.php?attachmentid=65191&d=1377368635You will be presented with this screen.
It should automatically select the file for you. In case it does not, browse to the root of your Mountain Lion volume ... in my case /lion and select "mach_kernel". The destination should be the same as the source. Select "create backup of mach_kernel" and deselect "Restart if successful" option.
Now you have a patched mach_kernel. This means that you no longer need to boot with "cpus=1 busratio=21" option
However, this patch must be repeated on every system update ...say for example when we update from 10.8.4 to 10.8.5.
Next we can move to other fun stuff.
Step 2):
What we have left to get working now is simple (well not exactly simple),
1) Audio - using Applehda kext ..... we will need DSDT for this purpose.
2) QE/CI for HD 3000 graphics. (IntelHD3000graphics.kext)
3) HD out to say an HDTV etc ....also this includes getting automatic Display Mirroring started. (AppleIntelSNBGraphics.kext)
4) HDMI Audio - related to Applehda audio. (Applehda.kext)
5) Battery recognition. (Voodoobatterymanager.kext)
6) Getting the system to properly recognise AC Adapter power when we remove our battery and use just the AC adapter. (Applesmartbatterymanager.kext)
7) Trackpad and custom Fn key shortcuts + gestures (last minute addition to the guide)
(Rehabman zip folder - VoodooPS2Controller)8) Kozlek's FakeSMC.kext for voodoops2 to work properly.
9) AppleACPIPlatform.kext to prevent kernel panic.
10) AppleIntelCPupowermanagement.kext so you don't need to use Nullcpupowermanagement kext.
In simple terms, just drag and drop all the above mentioned kexts except "7" into kext utility and install them. I will explain how each one works in the next sentence. You should have everything working now.
* Audio and HDMI audio needed patching because even though it is the same IDT 111d7605 as @Mickey1979's, there is a small difference. That has been taken care of thanks to @Mirone.
** Getting HDMI audio was a pain, but it was solved thanks to @toleda 's guide. All I had to do was change the value in the string 0205 from 0400 to 0800. Viola!
*** Getting proper sound and Display mirroring requires a simple patch. Both the Appleintelhd3000Graphics and AppleIntelSNBGraphics have to be patched in this way.
Code:
<key>IOPCIPrimaryMatch</key>
<string>[b] 01168086[/b]</string>
As you can see above, you have to find the key and add or edit 0x01168086 to 01168086. Just remove the leading "0x". Thats it. If not, you won't get automatic mirroring or even mirroring at all. Also there are more than one IOPCIPrimaryMatch keys in SNBGraphics.kext. Add it in all places.
**** Now in case of "7)" - VoodooPS2controller, unzip the rehabman folder and first install the kext using kext utility. Then enter these commands in terminal after changing directory to the place when you just unzipped the files.
Code:
sudo rm -rf /System/Library/Extensions/AppleACPIPS2Nub.kext
Code:
sudo rm -rf /System/Library/Extensions/ApplePS2Controller.kextIf it returns an error don't worry, it means that these kexts are not installed which is good news.
Next do this,
Code:
sudo cp org.rehabman.voodoo.driver.Daemon.plist /Library/LaunchDaemons
Code:
sudo cp VoodooPS2Daemon /usr/binThis should install the PS2 driver for our keyboard and trackpad. You can customise the Brightness keys in system preferences -> Keyboard-> ...... after a restart.
As you can see I have setup mine to use Fn+F2 and Fn+F3. Without this kext, you will have to use Fn+Right Shift(pause) for Increasing brightness and you will have no controls to reduce brightness at all.
Now we have just a few steps left before we can restart.
Next copy the DSDT.aml I have attached if are using the same as mine to your /Extra folder. After that, comes the part where you copy the custom EDID to /System/Library/Display/DisplayOverrides/ if you once again have the same system as me.
Do not copy these 2 files unless you have the same system as mine. You will need to generate your own DSDT using MacIASL.
Next, if you have an SSD like me, this where those "Extra Tools" from the Probook installer will come in handy. Open up "TRIM Enabler" and set it to the "On" position. This should start TRIM on your system on the next boot.
Finally, we will use Chameleon Wizard to select boot flags. Yes this does save to Chimera Bootloader! This way you don't have to manually edit the org.boot.plist file everytime you want to change something. Unless its something like the EDID like the codes I have posted below.
For my system, the following screenshot has all the needed boot flags.
Also in case you have the exact same system as mine, go ahead and open up the boot.plist file in Plist editor. You can now copy these keys to your own boot.plist if you want to generate one.
Code:
        <key>SMboardproduct</key>
	<string>Mac-94245B3640C91C81</string><key>DisplayProductID</key>
	<integer>41493</integer>
	<key>DisplayProductName</key>
	<string>HP DV6 6116TX Entertainment Notebook PC</string>
	<key>DisplayVendorID</key>
	<integer>21162</integer>
        <key>IODisplayEDID</key>
	<data>
	AP///////wANr6IVAAAAADUTAQOAIxN4Cgf1mldOhyYeUFQAAAABAQEBAQEBAQEBAQEB
	AQEBEhtWZFAAFDAQIiYAWMEQAAAYAAAA/gBOMTU2QjYtTDBCCiAgAAAA/gBDTU8KICAg
	ICAgICAgAAAA/gBOMTU2QjYtTDBCCiAgABA=
	</data>
Remember don't copy anything other than The SMBoardproduct details if you don't use a similar system as mine. That is the EDID data. SMBoardproduct data must be copied for every HD3000 system if you want HDMI to work.
In case you still have RTC/CMOS reset issues do this after installation is completed. (Only in case you get cmos reset after using multibeast like I did).
First search for "RTC" in DSDT by opening it in MacIASL. Then make changes to it so it looks exactly like this.
Code:
Device (RTC)
                {
                    Name (_HID, EisaId ("PNP0B00"))  // _HID: Hardware ID
                    Name (_CRS, ResourceTemplate ()  // _CRS: Current Resource Settings
                    {
                        IO (Decode16,
                            0x0070,             // Range Minimum
                            0x0070,             // Range Maximum
                            0x00,               // Alignment
                            0x02,               // Length
                            )
                    })
                }
Then open up Terminal and run these 2 commands
Code:
sudo perl -pi -e 's|\x75\x30\x89\xd8|\xeb\x30\x89\xd8|' /System/Library/Extensions/AppleRTC.kext/Contents/MacOS/AppleRTC

sudo touch /System/Library/Extensions
Thats it! Go ahead and restart your system. Everything should be working absolutely fine now
Everything should be just like a Macbookpro.Enjoy your HackBookPro!!!!
arty:Benchmarks coming up soon.
Attachments
-
 Screen Shot 2013-08-24 at 1.01.55 AM.jpg189.9 KB · Views: 3,137
 -
 Screen Shot 2013-08-24 at 1.02.02 AM.jpg188.7 KB · Views: 3,022
 -
 Screen Shot 2013-08-24 at 11.25.31 PM.jpg189.4 KB · Views: 3,006
 -
 Screen Shot 2013-08-24 at 11.30.54 PM.jpg189.7 KB · Views: 3,032
 -
Lapic Kernel Patcher.zip156.8 KB · Views: 314
-
 Screen Shot 2013-08-24 at 11.54.48 PM.png49.4 KB · Views: 2,952
 -
 Screen Shot 2013-08-25 at 12.28.48 AM.png184.7 KB · Views: 2,924
 -
DSDT.aml.zip20.9 KB · Views: 239
-
ssdt.aml721 bytes · Views: 277
-
SMBios.plist593 bytes · Views: 382
-
org.chameleon.Boot.plist1.3 KB · Views: 394
-
Kexts.zip1.7 MB · Views: 390
-
 Screen Shot 2013-08-25 at 1.12.30 AM.png116.3 KB · Views: 3,128
 -
 Screen Shot 2013-08-25 at 1.12.59 AM.png70 KB · Views: 2,988
 -
 Screen Shot 2013-08-25 at 1.24.58 AM.png37.6 KB · Views: 2,963
 -
 Screen Shot 2013-08-20 at 2.58.44 PM.png77.9 KB · Views: 3,030
 -
 Screen Shot 2013-08-25 at 4.54.19 PM.png72.1 KB · Views: 2,980
 -
 Screen Shot 2013-08-25 at 5.43.06 PM.png29.6 KB · Views: 2,882
 -
RehabMan-Voodoo-2013-0815.zip221.1 KB · Views: 308
Last edited by a moderator: