Contribute
Register

Installation Guide For Using Clover on the Intel Haswell NUC

Status
Not open for further replies.
Thank you for your reply.

I tested many method and already tried SSDT/DSDT compiled.
But I failed HD4400 with HDMI sound.
I use Wifi(Intel 7260AC for WiDi and Bluetooth) and this is also failed but I know already (This is for Windows 8.1 I use dual booting using Clover.)

This week I tested several way and Failed all, (DSDT/SSDT Compiled , Framebuffer change and Also change bootloader,ETC)

Now I make new Clover Bootloader via USB with Maverick 10.9.2 Clean dmg.

I'll test it this weekend. If I failed I'll change NUC 34010 to 54250. lol


Haha, that would be the easier way to get a working NUC lol. Intel HD4400 is not natively supported by OS X so it will be hard, although I have read users who got the graphics working, so it shouldn't be impossible. I don't know if it would be fully functional however, I would need to research on that a bit.
 
Hey I am a noob to Hackintosh, clover and all the MAC stuff. I have read a bunch of the "I'm new to everything...", but I am really confused.

I purchased the NUC D54250WYK and saw these instructions and assumed I should be able to do this but where do I start. It looks like the post assumes that OSX is already installed? I created the USB with unibeast but it fails to boot. It acts like it is about to boot, but I get some error about USBF... unable to enumerate and then repeat messages about "Still waiting for root device".

I noticed there is a similar guide using Chameleon and that one gives a summary of the steps which I think would help a lot in this guide. I have been working on this all day and have reached my limit of frustration. :banghead:

I really appreciate the efforts that have been put into this and I hope I can get it to work.

Chris

Yes, my guide just complements the one with Chimera from WonkeyDonkey. Since you are having problems with that maybe I must do it as standalone, I don't know who else may be facing issues.

If you want to use this guide you must install Clover to your USB, if not then you can follow the entire guide by WonkeyDonkey as there are many steps you don't have to do with this one since Clover takes care of the work.

First decide which one you want, if you want Clover then install it to your USB through a real Mac or another Hackintosh (whichever you have). This will create the Clover folder structure in your USB inside the EFI partition. After you have this, grab the D54250WYB zip file from the first post and put it inside EFI\CLOVER\OEM.

When you next boot with the USB it should pick up the configurations.

If you wish to stick with Chimera, then my best recommendation is that you follow WonkeyDonkey's guide from the beginning. It goes to the detail in everything you need to modify to get it working.
 
…Or try the hybrid install steps I outlined in post 11 of this thread. Again, it is not a full detail by detail guide, but I did confirm the method works from scratch to be able to install without needing Chimera/Chameleon to do it.
However you do it though I definitely recommend reading through the first few pages of the thread from Wonkey Donkey as it was in the production of that thread that we worked through the important issues involved in getting the NUC up and running.
I see the biggest advantages of Clover as being post install. I.e, in being able to customise the NUC boot loader settings so that it is much more robust and likely to survive OS X updates without major issue or needing to constantly manually patch the Mach_Kernel or kext files.
 
Had been wanting to build a hackintosh for a long time. Recently purchased a few Intel NUC D54250WYK for a project at work and also wanted to put OS X Mavericks on one to compare with the performance on the actual macs that we use in marketing, as many of them use old Mac Pros and don't have many actual mac/hardware requirements to justify crazy expensive upgrades.

I read through the install guides for Clover and Chameleon (again, noob/never done this) to get an idea of what I was up against. I decided on Clover and actually had really great success with this for my first time, however, now I've got a problem and don't know enough yet to know where to start....

Here's my procedure list based on all my research:

Download MultiBeast - Mavericks 6.2.1
Download UniBeast 3.0.1
Download Haswell NUC Install Pack V3.8


Current/working MAC: OSX Mavericks (Mac Mini/HF-MAC08) --> Insert 16GB USB


Open /Applications/Utilities/Disk Utility
- Select USB --> Partition tab
- Change Current --> 1 Partition
- Click Options Button --> Choose GUID Partition Table
- Change Name to USB
- Change Format to Mac OS Extended (Journaled)
- Apply Changes/Format USB


Run UniBeast
- Choose USB as the Destination and then click on Customize button
- Select Mac App Store Mavericks - 10.9 --> Install
- Drag MultiBeast - Mavericks Edition to the completed USB drive


Download Clover v2k r2652
- Install Clover to USB
- Select the following:
- Install for UEFI booting only
- Themes
- Drivers64UEFI
- CsmVideoDxe-64
- EmuVariableUefi-64
- OsxAptioFixDrv-64


Download D54250WYB.zip from Port #13 on 122157 Guide
- Copy extracted contents to EFI/CLOVER/OEM


Download AppleHDAIDT.kext.zip and copy extracted file to USB drive
Copy extracted Multibeast-Config-NUC.mb from Haswell NUC Install Pack V3.8 to USB drive
Download KextBeast.pkg to USB drive


Install OSX Mavericks 10.9.2
- Boot to UEFI:USB --> Boot to Mac OS X (no option for "with Kexts", just shows "without Kexts")
- Utilities --> Disk Utility --> Partition tab --> SSD
- Change to 1 Partition --> Mac OS Extended (Journaled) --> Options/GUID Partition Table --> Name it HF-MAC09
- Standard OSX Setup/IT Account
- On restart, choose UEFI:SSD
- After successful install, run MultiBeast
- Load Multibeast-Config-NUC.mb
- Also add Drivers --> Disk --> Trim Enabler --> 10.9.X TRIM Patch
- Also add Drivers --> Network --> Intel - hnak's AppleIntelE1000e v2.4.14
- Build --> Install


Install Clover to SSD:
- Select the following:
- Install for UEFI booting only
- Themes
- Drivers64UEFI
- CsmVideoDxe-64
- EmuVariableUefi-64
- OsxAptioFixDrv-64
- Install RC scripts on target volume
- Install Clover Preference Pane


Copy AppleHDAIDT.kext to desktop
Run KextBeast.pkg to install AppleHDAIDT.kext to /S/L/E

Finished all of this and everything looked to be working great.....til I restarted after completing everything. NUC boots to the Clover list of options, defaulting to Boot to Mac OSX and then just sits there (I'd like it to auto boot to it when I'm all done). When I hit Enter, it changes to the Apple splash screen for about 15 seconds, then gives me the spinning wheel and never goes anywhere.

Here's my issue, I don't know how to get it to boot again to a sign-in/desktop. I may wipe it and start the install again to make sure that everything above is followed exactly, but I'd like to know if I just made a simple mistake or if my procedure is flawed and needs to be adjusted. Please help.

Thanks
Derrick Hughes
 
Yes, my guide just complements the one with Chimera from WonkeyDonkey. Since you are having problems with that maybe I must do it as standalone, I don't know who else may be facing issues.

I would definitely like to see an up-to-date standalone and I would be willing to assist in any way! As it is there is too much information in too many different locations for a noob (like me) to correctly put it all together.

Based on what I am reading it appears that Clover is the best way to go, so I plan on sticking with it.

I put this together based on my latest experience.

These are the basic steps that I am using now:
1. From an already installed MAC download Maverick from the App Store

2. Format USB stick using disk utility as Mac OS Extended (Journaled) Min 8GB
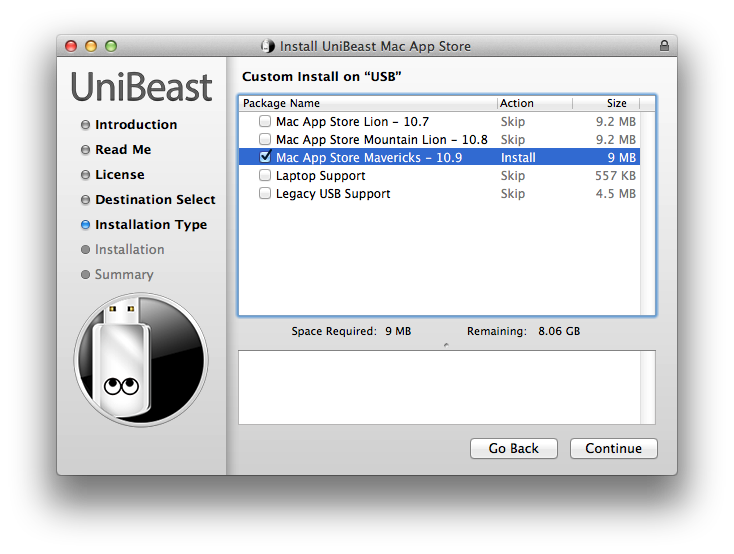
3. Using Unibeast install it to the USB. Only select Maverick in the options(see this image). Says it will take less than a minute, but expect 20min.

4. Download and install Clover to USB use this image to make your selections
Select these options in the customize window:
UEFI only booting, since our board supports UEFI. This will install Clover to the EFI partition by default.
Theme -> Bootcamp(or choose the options in the image)
Question: Does the theme you choose make a difference? I have tried a few and it appears that it does not. Bootcamp is the one I use the most.
Under Drivers64UEFI:
The CSMVideoDXE-64 driver helps us to have correct resolutions while on Clover boot menu and while OS X is booting.

The EmuVariableUEFI-64 driver allows OS X to use NVRAM variables.
The OSxAptioFixDRV-64 driver fixes memory issues in UEFI firmware.
Install RC scripts on target volume records an rc.shutdown script required by Clover to work. (Deselect this option if you are installing to a USB)
The Clover preference pane is a easy way to do Clover maintenance. (Also deselect this option if installing Clover to a USB).
Question: The instructions from Installation Guide For Using Clover on the Intel Haswell NUC state that the last two options should be unchecked if installing to a USB, but the instructions from Using Unibeast to create a Clover Installer say to check them. Which is best?


5. While the EFI on the USB is still mounted copy the following files to the appropriate folders:
D54250WYB folder into EFI\CLOVER\OEM.
Question: Why is this D54250WYB and not D54250WYK? It that the correct folder to use for a WYK NUC?
config.plist file into EFI/CLOVER/
Question: There is one already in that folder, I assume I replace it?
DSDT and SSDT (Found in Haswell NUC Install Pack V3.8.zip files must be placed in the location EFI/CLOVER/ACPI/Patched
Question: The files are provided but later in WonkeyDonkeys post it tell you to "roll your own" after the install. So just to clarify, the first set are just to properly boot the system to allow Maverick to install? But then you roll your own to ensure they are consistent with your system (bios)?

Question: Should I add other tools to the USB for use after the install? MultiBeast?

6. Unmount the USB and insert into the box to be installed.

7. Boot to UEFI USB and select the Boot MAC OS from USB??? It took about 5 min to boot into the installer.


This is as far as I have gotten because after I boot I get stuck at the spinning flower and Apple.
 
I literally posted the same basic info (and I have the same questions too) as you did less than 15 mins before....I'm very interested in the next responses....
 
@Derrick Are you in AZ by chance?
It looks like we are doing the exact same thing...

I also have the NUC D54250WYK and the setup was more of less the same and I got the same results. :beachball:

Hopefully one of us will get this resolved soon.

Chris Null
AKA Creol
 
Had been wanting to build a hackintosh for a long time. Recently purchased a few Intel NUC D54250WYK for a project at work and also wanted to put OS X Mavericks on one to compare with the performance on the actual macs that we use in marketing, as many of them use old Mac Pros and don't have many actual mac/hardware requirements to justify crazy expensive upgrades.

I read through the install guides for Clover and Chameleon (again, noob/never done this) to get an idea of what I was up against. I decided on Clover and actually had really great success with this for my first time, however, now I've got a problem and don't know enough yet to know where to start....

Here's my procedure list based on all my research:

Download MultiBeast - Mavericks 6.2.1
Download UniBeast 3.0.1
Download Haswell NUC Install Pack V3.8


Current/working MAC: OSX Mavericks (Mac Mini/HF-MAC08) --> Insert 16GB USB


Open /Applications/Utilities/Disk Utility
- Select USB --> Partition tab
- Change Current --> 1 Partition
- Click Options Button --> Choose GUID Partition Table
- Change Name to USB
- Change Format to Mac OS Extended (Journaled)
- Apply Changes/Format USB


Run UniBeast
- Choose USB as the Destination and then click on Customize button
- Select Mac App Store Mavericks - 10.9 --> Install
- Drag MultiBeast - Mavericks Edition to the completed USB drive


Download Clover v2k r2652
- Install Clover to USB
- Select the following:
- Install for UEFI booting only
- Themes
- Drivers64UEFI
- CsmVideoDxe-64
- EmuVariableUefi-64
- OsxAptioFixDrv-64


Download D54250WYB.zip from Port #13 on 122157 Guide
- Copy extracted contents to EFI/CLOVER/OEM


Download AppleHDAIDT.kext.zip and copy extracted file to USB drive
Copy extracted Multibeast-Config-NUC.mb from Haswell NUC Install Pack V3.8 to USB drive
Download KextBeast.pkg to USB drive


Install OSX Mavericks 10.9.2
- Boot to UEFI:USB --> Boot to Mac OS X (no option for "with Kexts", just shows "without Kexts")
- Utilities --> Disk Utility --> Partition tab --> SSD
- Change to 1 Partition --> Mac OS Extended (Journaled) --> Options/GUID Partition Table --> Name it HF-MAC09
- Standard OSX Setup/IT Account
- On restart, choose UEFI:SSD
- After successful install, run MultiBeast
- Load Multibeast-Config-NUC.mb
- Also add Drivers --> Disk --> Trim Enabler --> 10.9.X TRIM Patch
- Also add Drivers --> Network --> Intel - hnak's AppleIntelE1000e v2.4.14
- Build --> Install


Install Clover to SSD:
- Select the following:
- Install for UEFI booting only
- Themes
- Drivers64UEFI
- CsmVideoDxe-64
- EmuVariableUefi-64
- OsxAptioFixDrv-64
- Install RC scripts on target volume
- Install Clover Preference Pane


Copy AppleHDAIDT.kext to desktop
Run KextBeast.pkg to install AppleHDAIDT.kext to /S/L/E

Finished all of this and everything looked to be working great.....til I restarted after completing everything. NUC boots to the Clover list of options, defaulting to Boot to Mac OSX and then just sits there (I'd like it to auto boot to it when I'm all done). When I hit Enter, it changes to the Apple splash screen for about 15 seconds, then gives me the spinning wheel and never goes anywhere.

Here's my issue, I don't know how to get it to boot again to a sign-in/desktop. I may wipe it and start the install again to make sure that everything above is followed exactly, but I'd like to know if I just made a simple mistake or if my procedure is flawed and needs to be adjusted. Please help.

Thanks
Derrick Hughes

Okay, so I am sitting at my install and checking my EFI folder to see if there are any differences in my selected options.

Firstly, it is very possible that you may only need the drivers you listed in the "drivers64UEFI" folder, but I actually have all of these in there:CsmVideoDxe-64; EmuVariableUefi-64; OsxAptioFixDrv-64; FS-inject-64; OsxAptioFixDrv-64; OsxFatBinaryDrv-64 and VBoxHfs-64. So that seems the only difference in my drivers from yours.

Now, it is very possible that if you are on a different bios version from me (ver 22) that you should NOT use my DSDT so I recommend you get rid of that and when you get to the Clover boot screen you boot with the option for Safe Mode (flag -x) and with luck that will get you to the desktop and you can from there extract your DSDT (using the steps outlined by WOnkeyDonkey in his thread) and then patch it.

For your information the only boot flag I use in my working install is Darkwake=10 and once you have your DSDT sorted correctly you should be able to use just that yourself, but to get started use Safe Mode.

In the KernelAndKextPatches section you need to have KernelLapic set to Yes and KernelPM also set to Yes.

If for some reason your system is not recognised by Clover in the same way (i.e. by the same name as it recognises mine) as D54250WYB then instead of using my folder name just remove that folder and instead make sure the config.plist in the main "CLOVER" folder is the same as mine, and that the Drivers and Kexts folder in the main Clover folder are correct. What I mean here is that the folder inside OEM is ONLY used if Clover has identified your system as having the name D54250WYB, if it thinks your system is not called that then it uses the default values in the CLOVER folder. This is a nice feature of Clover in that you can set a boot loader up for general and specific systems at the same time……..

Other things to check are bios settings. Ones I select on my bios version of 22 were: make sure under Devices/SATA AHCI is selected; under Devices/Video I have IGD minimum memory at 32GB (prob not important?);under Security/Security Features make sure Vt-d is UNCHECKED; and under Boot/Boot Priority I found I needed BOTH UEFI boot Priority and Legacy boot priority boxes checked.

I hope something here helps!!!
 
I've managed to create the installer, install mavericks' I then installed clover onto my mavericks disk following the same procedure as I did to create the USB stick.

if I boot to the USB stick and then select my mavericks disk it boots fine and everything runs as I'd expect.

if I remove the USB stick it boots ok, I select mavericks I get the grey screen with the apple logo and the spinning icon below it, (not the spinning beach ball) it just stays on that screen with the spinning icon below it,

what have I missed?

thanks in advance
 
Status
Not open for further replies.
Back
Top