
Going Bald
Moderator
- Joined
- Aug 14, 2010
- Messages
- 22,390
- Motherboard
- GA-X58A-UD7-F7
- CPU
- W3670
- Graphics
- RX 580
- Mac
- Classic Mac
- Mobile Phone
Multi Booting with Sierra, Windows 10 and Linux Ubuntu on Legacy BIOS hardware is as easy as doing it on UEFI hardware.
What you need to start:

Note that the Sierra USB installer must have Clover installed Legacy mode. This is easily accomplished with UniBeast:

You can install the operating systems in any order. Say you want to install Sierra, then Win10 and add Ubuntu later.
Procedure goes like this:
For Sierra:
1. Connect Sierra drive-to-be, boot with UniBeast USB and install Sierra.
2. Run MultiBeast post install and select Quick Start - Legacy, your networking and audio kexts, build and install.
3. Edit config.plist for your hardware.
4. Shutdown, disconnect drive
For Windows:
1. Connect Windows drive-to-be, boot with the Windows installer.
2. At the install screen, if using an old drive with files/operating system, etc. on it, starting at the bottom of the partition list, delete all partitions on the drive until you get to this:
 Clicking on new gets you this:
 You can select how much room on the drive is to be for your Win10 installation - default is the entire drive. Clicking on Apply will get you a screen announcing the Windows installer will create partitions as needed and clicking on OK will get you this:
 At this point you can click on Next and the installer will give you a clean Legacy boot installation with the boot files in the System Reserved partition, which you will probably want to hide with Clover, so why bother to allow it to create it in the first place? If you select the Partition 2 and click Delete
 you wind up with this:
 and now you can select the System Reserved partition and click Extend and it gives you a screen to select how much of the free space to include in the System reserved partition. Selecting the default of the entire rest of the drive gets you this:
 so now click on Next and the installation will begin.
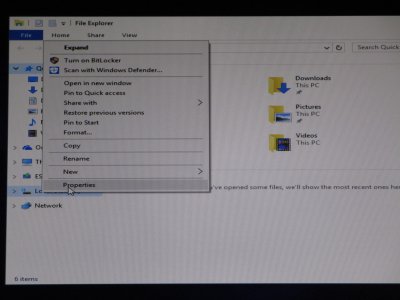
Once you have installed and are at the desktop there is one thing left to do: rename the drive so it shows as Win10 on the Sierra desktop rather than Untitled, so open Windows Explorer, right click on the C drive and select Properties:
 Then type the name you want to show on the desktop of Sierra in the empty box next to the hard drive icon in the upper left of the general tab:
 Click Apply and OK
You can now finish your Win10 installation by installing whatever Security Suite suites your fancy (personally, I use the AV that come with Win10 and a paid-for license from Malwarebytes) and all of your 3rd party apps if you have any.
When you get done, you can shutdown, reconnect the Sierra drive, boot to BIOS and make the Sierra drive first in drive boot order, save&exit and continue boot.


What you need to start:
Note that the Sierra USB installer must have Clover installed Legacy mode. This is easily accomplished with UniBeast:
You can install the operating systems in any order. Say you want to install Sierra, then Win10 and add Ubuntu later.
Procedure goes like this:
For Sierra:
1. Connect Sierra drive-to-be, boot with UniBeast USB and install Sierra.
2. Run MultiBeast post install and select Quick Start - Legacy, your networking and audio kexts, build and install.
3. Edit config.plist for your hardware.
4. Shutdown, disconnect drive
For Windows:
1. Connect Windows drive-to-be, boot with the Windows installer.
2. At the install screen, if using an old drive with files/operating system, etc. on it, starting at the bottom of the partition list, delete all partitions on the drive until you get to this:
Clicking on new gets you this: You can select how much room on the drive is to be for your Win10 installation - default is the entire drive. Clicking on Apply will get you a screen announcing the Windows installer will create partitions as needed and clicking on OK will get you this: At this point you can click on Next and the installer will give you a clean Legacy boot installation with the boot files in the System Reserved partition, which you will probably want to hide with Clover, so why bother to allow it to create it in the first place? If you select the Partition 2 and click Delete you wind up with this: and now you can select the System Reserved partition and click Extend and it gives you a screen to select how much of the free space to include in the System reserved partition. Selecting the default of the entire rest of the drive gets you this: so now click on Next and the installation will begin.Once you have installed and are at the desktop there is one thing left to do: rename the drive so it shows as Win10 on the Sierra desktop rather than Untitled, so open Windows Explorer, right click on the C drive and select Properties:
Then type the name you want to show on the desktop of Sierra in the empty box next to the hard drive icon in the upper left of the general tab: Click Apply and OKYou can now finish your Win10 installation by installing whatever Security Suite suites your fancy (personally, I use the AV that come with Win10 and a paid-for license from Malwarebytes) and all of your 3rd party apps if you have any.
When you get done, you can shutdown, reconnect the Sierra drive, boot to BIOS and make the Sierra drive first in drive boot order, save&exit and continue boot.
Attachments

Last edited:


