- Joined
- Feb 15, 2019
- Messages
- 31
- Motherboard
- Gigabyte GA-Z170mx-Gaming 5
- CPU
- i7-6700K
- Graphics
- RX 580
- Mac
- Mobile Phone
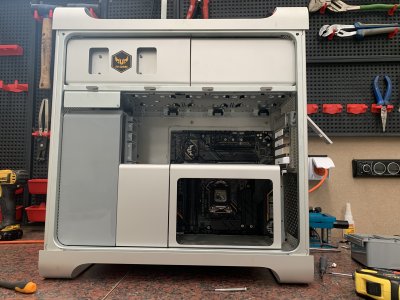
I already had a Hackintosh when I decided to put my pc in one of these amazing cases, this is my first mod (not already finished) and I didn't think that it would take me so many time. The most time I spent on this was thinking about how to do it, reading posts here and figuring out how I would put all my components in it. Also I'm a student with not many money so I didn't want to spent much on things to adapt the case.
My actual PC has an ATX Mobo and ATX psu, I first wanted to put all this in the case but I changed my mind when I saw how difficult it would be and all the concessions I would have to make (cuttings, the case would not be stock) so I decided to buy a second hand micro ATX Mobo with a new CPU and ram. It was the occasion to upgrade my config and get a mobo on which doing a Hackintosh was easier (mine was a msg Z87 G45 gaming).
But I still will get my PSU and put it in the Apple cage.
The futur setup will be :
Shopping list
I'm listing here just the required things to adapt the case, everything else are pc components that can be chosen depending on your preferences
Standoff adaptation
After emptying this old beast I first removed the standoff with a flat pliers and attached them on an old mATX mobo that I had. I put epoxy on each standoff and softly put the mobo in place in the case. I also used an old gpu to make sure that the board would be exactly at the right place.

Cuttings
This was the most delicate step. At the rear of the case I decided to only cut the rectangle where the ports was.
I used a Dremel with 540 discs.

This is just after I did it, I did my best and still have to clean it (grey marks on the side is just paste from the adhesive tape I used to protect it) and file it properly. I plan them to 3D-print a piece of plastic adapted for the ports of my mobo.
I did some cuttings on the ram risers cage so that it can be fitted in the case and hold the rear fan.
But it's not finished, the right side on the pic fell right on the ram slots of my mobo so I need to cut this part also.

I also had to cut the Apple PSU cage so I can gut mine in it. I don't have pics but you can find ones on NuclearLemons's thread as I have the same PSU and did the same thing
Front Panel
I just soldered the button pins to home-made cables that will be connected to the mobo
Left : LED+
Middle : Ground (connected to Power- on mobo)
Right : Power+

I won't use the original Apple front panel PCB, I want USB 3, so I will either make my own pcb or buy already made cables on Aliexpress and 3d-print something to attach them.
PSU
This was probably the most painful part.
Mine is an Evga Supernova G3 850W. Great PSU, but not simple to adapt for the Mac Pro.

First I teared it down and hopefully I knew what I was doing. If the capacitors are charged you can be injured so be careful if you plan to do the same.
I had to unplug the Evga fan (which was very noisy) and cut the power cables. I wanted to use the Delta EMI filter from the Apple PSU so I didn't had to do any cut behind the case. (and now I also use the Apple power cable ! )
)
I used the same standoff as for the motherboard, but if you can use smaller ones.
I was very lucky that the PSU board fitted perfectly in the cage with the EMI filter, I suggest you to look how your PSU board is before planning to put it in the cage.

Leaving a cable for a fan.
Now the worst part was to put back the cage in the case. The space where the cables are plugged is very tight and I had to hook them where they left with the Apple PSU.
I put the fan where the old one were (120mm).
All of this took some time to study my PSU, find a compatible fan and being very careful during handling. If you don't want it to be simple I suggest you to take a sfx psu.
Nether the less the result is here, a full modular 850W PSU in the Apple PSU cage with the original connector and with the best airflow possible.
Fans
I simply used 120mm fans that fit on the original Apple parts

I have another one (pmw) for PSU but I still don't know if I will keep it.
Storage
There are three solutions to keep using the Apple HDD spots :
They fit almost perfectly using the Apple screws.

I also bought an adapter for the Apple 5,25 Bay to put 3 HDD/SSD in it.
What's left to do

My actual PC has an ATX Mobo and ATX psu, I first wanted to put all this in the case but I changed my mind when I saw how difficult it would be and all the concessions I would have to make (cuttings, the case would not be stock) so I decided to buy a second hand micro ATX Mobo with a new CPU and ram. It was the occasion to upgrade my config and get a mobo on which doing a Hackintosh was easier (mine was a msg Z87 G45 gaming).
But I still will get my PSU and put it in the Apple cage.
The futur setup will be :
- i7 6700k
- Gigabyte Z170mx Gaming 5
- 16 Go DDR4 3200MHz
- Noctua NH-U9S
- R9 290 tri-x (will maybe change that, it's not optimized for dual screen on Mac)
- Samsung 860 Evo 500Go SSD for macOs
- Kingston HyperX 120Go for Windows
- A few HDDs
Shopping list
I'm listing here just the required things to adapt the case, everything else are pc components that can be chosen depending on your preferences
- Mac Pro 3.1 : Free (I got it at the dump)
- Epoxy glue : 6€
- Corsair Hot Swap Adapters : 30€ (with shipping)
- SilverStone 5,25 bay adapter for HDD : 12€
- Dremel discs 540 : 4€
- 24pins PSU extension cable : 8.5$
- 8pins PSU extension cable : 5$
Standoff adaptation
After emptying this old beast I first removed the standoff with a flat pliers and attached them on an old mATX mobo that I had. I put epoxy on each standoff and softly put the mobo in place in the case. I also used an old gpu to make sure that the board would be exactly at the right place.
Cuttings
This was the most delicate step. At the rear of the case I decided to only cut the rectangle where the ports was.
I used a Dremel with 540 discs.
This is just after I did it, I did my best and still have to clean it (grey marks on the side is just paste from the adhesive tape I used to protect it) and file it properly. I plan them to 3D-print a piece of plastic adapted for the ports of my mobo.
I did some cuttings on the ram risers cage so that it can be fitted in the case and hold the rear fan.
But it's not finished, the right side on the pic fell right on the ram slots of my mobo so I need to cut this part also.
I also had to cut the Apple PSU cage so I can gut mine in it. I don't have pics but you can find ones on NuclearLemons's thread as I have the same PSU and did the same thing
Front Panel
I just soldered the button pins to home-made cables that will be connected to the mobo
Left : LED+
Middle : Ground (connected to Power- on mobo)
Right : Power+
I won't use the original Apple front panel PCB, I want USB 3, so I will either make my own pcb or buy already made cables on Aliexpress and 3d-print something to attach them.
PSU
This was probably the most painful part.
Mine is an Evga Supernova G3 850W. Great PSU, but not simple to adapt for the Mac Pro.
First I teared it down and hopefully I knew what I was doing. If the capacitors are charged you can be injured so be careful if you plan to do the same.
I had to unplug the Evga fan (which was very noisy) and cut the power cables. I wanted to use the Delta EMI filter from the Apple PSU so I didn't had to do any cut behind the case. (and now I also use the Apple power cable !
)I used the same standoff as for the motherboard, but if you can use smaller ones.
I was very lucky that the PSU board fitted perfectly in the cage with the EMI filter, I suggest you to look how your PSU board is before planning to put it in the cage.
Leaving a cable for a fan.
Now the worst part was to put back the cage in the case. The space where the cables are plugged is very tight and I had to hook them where they left with the Apple PSU.
I put the fan where the old one were (120mm).
All of this took some time to study my PSU, find a compatible fan and being very careful during handling. If you don't want it to be simple I suggest you to take a sfx psu.
Nether the less the result is here, a full modular 850W PSU in the Apple PSU cage with the original connector and with the best airflow possible.
Fans
I simply used 120mm fans that fit on the original Apple parts
I have another one (pmw) for PSU but I still don't know if I will keep it.
Storage
There are three solutions to keep using the Apple HDD spots :
- Buy the SAS to Sata adapter (60$ without shipping)
- Corsair 540 Hot Swap connectors (30$ for 4 with shipping)
- Using nothing, just connect HDD to mobo
They fit almost perfectly using the Apple screws.
I also bought an adapter for the Apple 5,25 Bay to put 3 HDD/SSD in it.
What's left to do
- Make the 3D parts for the front panel and the backplate
- Enjoy
Last edited: